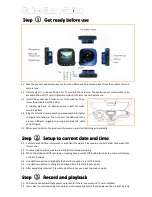
background image

User Guide

Axiocam 503 color/mono

Microscope Camera

Summary of Contents for Axiocam 503 color

Page 1: ...User Guide Axiocam 503 color mono Microscope Camera ...

Page 2: ...e prosecuted The use of general descriptive names registered names trademarks etc in this document does not imply even in the absence of a specific statement that such names are exempt from the relevant protective laws and regulations and therefore free for general use Software programs will fully remain the property of ZEISS No program documentation or subsequent upgrade thereof may be disclosed ...

Page 3: ... 15 5 Connecting the Camera 16 5 1 Camera Overview 16 5 2 Building in the interface card 17 5 3 Mounting the camera on the microsope 18 5 4 Connecting the camera to the PC 18 5 5 Connecting the trigger cable 19 5 6 Function indicator 21 6 Installing Software and drivers 22 6 1 Installing software and drivers 22 7 Trouble shooting 23 7 1 Software 23 7 1 1 The camera does not appear in the menu of s...

Page 4: ...Content 4 User Guide Axiocam 503 color mono V 3 0 en 06 2016 8 Maintenance 25 8 1 Optical System 25 8 2 Cleaning the infrared filter or protective glass 25 9 Disposal and Recycling 26 ...

Page 5: ... manual Introduction and overview about this manual Safety Important information on a safe handling with the Axiocam 503 Read this chapter before unpacking the camera and putting it into operation Shipment The contents of delivery and optional attachments will be described here Technical data Here you will find all technical data to your camera Connecting the camera In this chapter you will find d...

Page 6: ...O Indicates useful additional information It helps you to make your daily work easier but it is optional There is no risk for personal injury or property damage involved 1 3 Text formats and conventions 1 3 Text formats and conventions Bold texts Bold is used for texts within the software like names of GUI elements e g buttons sections tools menus buttons on a device and product names e g MTB 2011...

Page 7: ... instructive sequences Prerequisites stands for a condition which must be fulfilled before starting with the action Procedure 1 stands for a single step the user is asked to perform Web Links Web links appear in blue text To open the linked website simply click on the link Please make sure you have an internet connection established before opening the web link ...

Page 8: ...The manufacturer shall be exempt from statutory liability for accidents should the operator fail to observe the safety regulations CAUTION Personal Injury To avoid personal injury read and adhere to the safety notes below u To avoid the risk of fire or explosion do not use the camera near inflammable liquids or gases u Setup expansions re adjustments alterations and repairs must be carried out onl...

Page 9: ...our local ZEISS service organization if a repair is necessary u Save all your data such as images measurement data archives reports forms and documents at regular intervals on an external storage medium Otherwise it cannot be avoided that access to this data may be lost as a result of operational errors or hardware defects ZEISS accepts no liability for consequential damage resulting from insuffic...

Page 10: ...r Format Spectral Sensitivity Axiocam 503 color app 400 nm 720 nm coated Hoya C5000 IR Cut Filter RGB Bayer color filter mask Axiocam 503 mono app 400 nm 1000 nm coated BK 7 protective glass Max Full Well Capacity typical 15 000 e per pixel Signal Amplification Adjustable analog amplification 1x 2x 3x Digitization 14 Bit Pixel Read Out Speed Switchable readout clock speed 39 MHz 13 Mhz Readout Noi...

Page 11: ...t time lapse imaging Switchable Sensor Output Amplifier Single Port Readout mode for long exposure times for maximum signal quality Dual Port and Quad Port Readout Mode for improved readout speed at full resolution Automatic port activation mode or full manual mode Region of Interest ROI User defined imaging sub area for improvement of readout speed and reduction of amount of data Hardware Trigger...

Page 12: ...cm x 7 8 cm x 4 3 cm 500 g Housing Blue anodized aluminum thread for camera equipment Zero Vibration by convection cooling optimized cooling finns Teflon coated C mount thread Certificates CE Power Supply Max 7W power consumption power by USB2 0 and USB3 0 Bus from PC For maximum performance connection to USB 3 0 and USB 2 0 required dual connection cabling provided with camera Ambient Conditions ...

Page 13: ... at optimum settings Hardware and color enhancement off Max Frame Rate Binning Factor Mode Pixel Count 38 frames s 1 slow 1936 x 1460 75 frames s 3 medium 640 x 484 93 frames s 5 fast 384 x 292 Axiocam 503 mono Max Ratings at optimum settings Max Frame Rate Binning Factor Mode Pixel Count 38 Bilder s 1 slow 1936 x 1460 61 Bilder s 2 medium 968 x 728 76 Bilder s 3 fast 640 x 484 INFO Computer hardw...

Page 14: ...03 color mono 14 User Guide Axiocam 503 color mono V 3 0 en 06 2016 3 1 3 Spectral Sensitivity Axiocam 503 color Fig 3 1 Axiocam 503 color incl Hoya C5000 IR Cut Filter Axiocam 503 mono Fig 3 2 Spectral Sensitivity Axiocam 503 mono ...

Page 15: ...426559 0000 000 1 x USB cable 2 in one for power supply USB 2 0 black cable and data transfer USB 3 0 blue cable 1 x PCI express interface card 4 x USB 3 0 1 x 15 Pin SATA power connector cable 1 x DVD with device driver for ZEISS software as well as this guide as a PDF file Accessory optional Fig 4 1 Axiocam trigger cable Content Order Number Trigger cable 426557 0001 000 ...

Page 16: ...2016 5 Connecting the Camera 5 1 Camera Overview 5 1 Camera Overview Camera connections Fig 5 1 Camera back Number Description 1 Trigger connection 2 USB 2 0 connection for power supply and cooling 3 USB 3 0 connection for image controller data and power supply 4 photo thread tripod connection ...

Page 17: ...f your computer before you build in the interface card Procedure 1 Switch off your PC and all connected peripherals 2 Disconnect the PC and the peripherals from the mains and open the computer case 3 Examine your PC s power supply to see if it has Molex type connectors or SATA type connectors Choose the appropriate power connector cable for the following steps If your PC s power supply has both co...

Page 18: ... with an integrated BK7 protective glas This will protect the camera against dust and reduces optical interferences u The IR filter is situated approx 5 mm behind the outer edge of the C mount opening in the camera u Due to this pre mounted IR barrier filter C mount adapters that screw more than 5 mm into the thread cannot be screwed into the camera u Do not remove the filter or the protective gla...

Page 19: ...ED status light in the chapter Function indicator 5 5 Connecting the trigger cable 5 5 Connecting the trigger cable In this chapter you will learn how to connect the trigger cable optional to the camera and the SVB signal distribution box Fig 5 2 Trigger cable Number Description 1 Trigger Trigger In 2 GPO 0 Trigger Out for exposure time incl predelay coresponding to shutter control 3 GPO 1 Trigger...

Page 20: ...e Camera Overview 16 2 Plug the connector Trigger 1 in the socket Trigger Out of the SVB Signal distribution box Fig 5 3 Signal distribution box SVB backside 3 Plug the connector GPO 0 2 in the socket Trigger In 1 of the SVB Signal distribution box 4 Plug the connector GPO 1 3 in the socket Trigger In 2 of the SVB 5 Connect the connectors GPOPWR 5 and AUXPWR 6 of the trigger cable together GPO 2 4...

Page 21: ...ion for best camera performance Green USB 3 0 connection Camera connected with USB 2 0 connection PC Power supply USB 2 0 cable attached Violet USB 3 0 connection Camera connected with USB 3 0 connection PC Power supply USB 2 0 cable not attached Yellow USB 3 0 connection Camera connected with USB 2 0 connection PC Power supply USB 2 0 cable not attached Red Power supply attached no driver loaded ...

Page 22: ... software Before starting the installation of the software and drivers the camera must be connected to the PC see chapter Connecting the camera to a PC Procedure 1 Install the software according to the installation guide delivered with the software 2 During the installation you will be asked to install the camera drivers Follow the procedure by confirming the upcoming messages 3 Restart your PC af...

Page 23: ...our screen Check the light path setting of the microscope Is the status LED on the camera on If not check the cable connections between camera and computer Execute a reset of the camera Execute an automatic exposure measurement Check the display adjustments for the live image Check the aperture diaphragm of the microscope Check the position of the beam splitter between the ocular and the TV port 7...

Page 24: ... the color is different to the visual impression in the eyepiece select a different overlay color 7 2 Hardware 7 2 Hardware 7 2 1 Vibrations Sudden jolt vibration or moving objects during the acquisition can detract the image quality The intensity of light during exposure time can change as well To avoid jolt use damping systems on your microscope Repeat the shot and take care to ensure the condit...

Page 25: ...tive cap onto the camera s C Mount thread 8 2 Cleaning the infrared filter or protective glass 8 2 Cleaning the infrared filter or protective glass Contamination of the IR filter for color cameras only or the protective glass has an adverse effect on the quality of the resulting image dark points cloudy structures in the image If there is dry dust on the front side of the infrared filter or protec...

Page 26: ...oHS and 2002 96 EC WEEE insofar as these apply to this product ZEISS has implemented a take back and recycling process that ensures that proper recycling is carried out in accordance with the aforementioned EU directives Please contact your ZEISS sales service organization for details relating to disposal and recycling This product must not be disposed of with domestic waste or using municipal was...

Page 27: ...a Germany microscopy zeiss com www zeiss com microscopy Carl Zeiss Microscopy GmbH Königsallee 9 21 37081 Göttingen Germany ZEISS reserves the right to make modifications to this document without notice Jena 2016 by Carl Zeiss Microscopy GmbH all rights reserved ...

Reviews: