background image

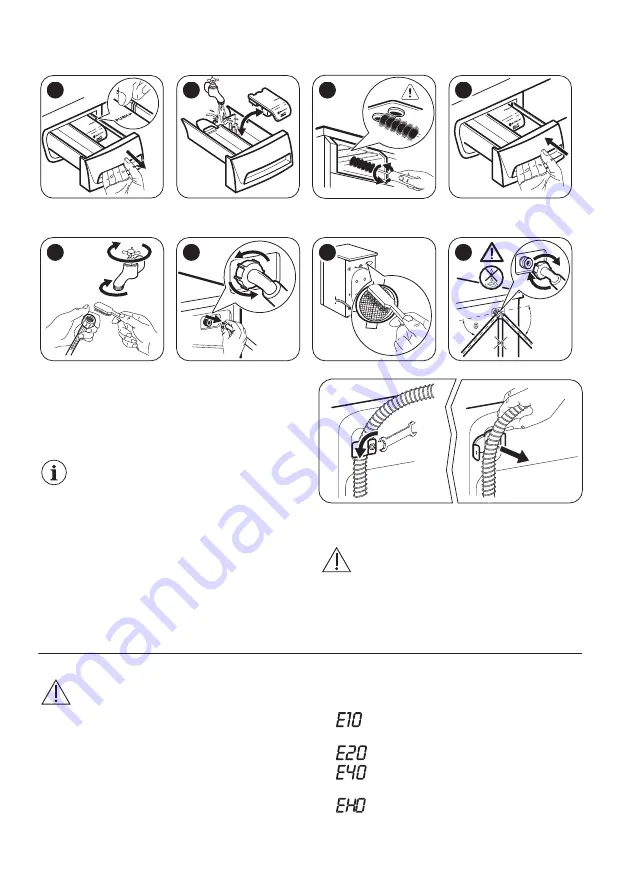
CLEANING THE DETERGENT DISPENSER

1

2

3

4

CLEANING THE INLET HOSE AND THE VALVE FILTER

1

2

3

1

2

3

45°

20°

4

FROST PRECAUTIONS
If the appliance is installed in an area where the

temperature can be less than 0 °C, remove the

remaining water from the inlet hose and the drain

pump.

Do this procedure also when you want

to do the emergency drain.

1. Disconnect the mains plug from the mains

socket.

2. Remove the water inlet hose.

3. Remove the drain hose from the rear support

and unhook it from sink or spigot.

4. Put the ends of the drain and inlet hose in a

container. Let the water flow out of the hoses.

5. When no more water flows, install the inlet

hose and the drain hose again.

WARNING! Make sure that the

temperature is more than 0 °C before

you use the appliance again. The

manufacturer is not responsible for

damages caused by low temperatures.

TROUBLESHOOTING

WARNING! Refer to Safety chapters.

INTRODUCTION
The appliance does not start or it stops during

operation.
First try to find a solution to the problem (refer to

the table). If the problem persists, contact the

Authorised Service Centre.

With some problems, the acoustic signals

operate and the display shows an alarm

code:

 - The appliance does not fill with water

properly.

 - The appliance does not drain the water.

 - The appliance door is open or not

closed correctly. Please check the door!

 - The mains supply is unstable. Wait until

the mains supply is stable.

16

Summary of Contents for ZWF 71453BW

Page 1: ...GETTING STARTED EASY User Manual ZWF 71453BW EN User Manual Washing Machine ...

Page 2: ...Do not let children play with the appliance Children aged 3 years and under must be kept away from this appliance when it is in operation at all times Keep all packaging away from children and dispose of it appropriately Keep detergents away from children Keep children and pets away from the appliance when the door is open If the appliance has a child safety device this should be activated Childre...

Page 3: ... heat resistant and clean Make sure that there is air circulation between the appliance and the floor Do not install the appliance directly over the floor drain Adjust the feet to have the necessary space between the appliance and the flooring Do not install the appliance where the appliance door cannot be fully opened Do not put a container to collect possible water leakage under the appliance Co...

Page 4: ...ubstances It can damage rubber parts of the washing machine Prewash such fabrics by hand before loading them into the washing machine Do not touch the glass door while a programme is in operation The glass can get hot SERVICE To repair the appliance contact an Authorised Service Centre Use original spare parts only DISPOSAL WARNING Risk of injury or suffocation Disconnect the appliance from the ma...

Page 5: ...o close the door turn the device anti clockwise until the groove is vertical FIXING PLATE KIT 4055171146 Available from your authorised dealer If you install the appliance on a plinth secure the appliance in the fixing plates Read carefully the instructions supplied with the accessory 5 ...

Page 6: ...Couleurs foncées 3 4 6 5 7 8 9 10 1 2 1 Programme knob 2 Display 3 Delay Start button Startuitstel Départ différé 4 Door locked indicator 5 Start Pause button Start Pauze Départ Pause 6 Extra Rinse button Extra spoelen Rinçage plus 7 Super Quick button Snel Rapide 8 Rinse Hold button Spoelstop Anti froissage 9 Spin reduction button Centrif Essorage 10 Temperature button Temp DISPLAY A C B The disp...

Page 7: ...equiring a mild washing Normal soil Wol Laine Hand was Lavage à la main 40 C Cold 1 5 kg 900 rpm Machine washable wool hand washable wool and other fabrics with hand washing care symbol2 Donkere kleding Couleurs foncées 40 C 3 kg 1400 rpm Cotton items or mixed fabric items in dark colours Normal soil Mix Mixtes 20 20 C 2 kg 900 rpm Special programme for cotton synthetic and mixed fabrics lightly s...

Page 8: ...ter consumption for washing normally soiled cotton laundry The water temperature of the washing phase may differ from the temperature declared for the selected programme 2 During this cycle the drum rotates slowly to ensure a gentle wash It can seem that the drum doesn t rotate or doesn t rotate properly but this is normal for this programme 3 The appliance performs the short heating phase if the ...

Page 9: ...crease the quantity of the laundry It is possible to keep the full load but the washing results can be unsatisfactory Recommended load cotton 3 5 kg synthetics and delicates 1 5 kg CONSUMPTION VALUES Stated values are obtained in laboratory conditions with relevant standards Different cau ses can change the data the quantity and type of laundry and ambient temperature Wa ter pressure the supply vo...

Page 10: ... Load kg Energy con sumption kWh Water con sumption li tre Approximate programme duration mi nutes Remaining moisture 1 Katoen Coton 60 C 7 1 34 68 157 52 Katoen Coton 40 C 7 0 78 61 157 52 Synthetica Synthé tiques 40 C 3 0 60 56 103 35 Fijne was Délicats 40 C 3 0 55 59 81 35 Wol Laine Hand was Lavage à la main 30 C 2 1 5 0 30 53 57 30 Standard cotton programmes Standard 60 C cot ton 7 0 92 45 250...

Page 11: ...n be opened SETTINGS CHILD LOCK With this option you can prevent that the children play with the control panel To activate deactivate this option press Temp and Centrif Essorage at the same time until the indicator comes on goes off You can activate this option After you press Start Pauze Départ Pause the options and the programme knob are locked Before you press Start Pauze Départ Pause the appli...

Page 12: ...t the de tergent and the fabric conditioner 2 Put the detergent and the fabric condi tioner into the com partments 3 Carefully close the detergent drawer DETERGENT COMPARTMENTS Detergent compartment for washing phase If you use liquid detergent put it immediately before you start the programme Compartment for liquid additives fabric conditioner starch CAUTION Do not exceed the MAX level Flap for p...

Page 13: ...atically You can cancel or change the set of the Startuitstel Départ différé option before you press the button Start Pauze Départ Pause After pressing the button Start Pauze Départ Pause you can only cancel the Startuitstel Départ différé option To cancel the Startuitstel Départ différé option a Press the button Start Pauze Départ Pause to set the appliance to pause The indicator of button Start ...

Page 14: ...to the position to deactivate the appliance STAND BY Some minutes after the end of the washing programme if you do not deactivate the appliance the energy saving status activates The energy saving status decreases the energy consumption when the appliance is on the standby All indicators and the display go off The indicator of button Start flashes slowly Press one of the buttons to deactivate the ...

Page 15: ... area is high or moderate we recommend that you use a water softener for washing machines In areas where the water hardness is soft it is not necessary to use a water softener To know the water hardness in your area contact your local water authority Use the correct quantity of the water softener Obey the instructions that you find on the packaging of the product CARE AND CLEANING WARNING Refer to...

Page 16: ...hen no more water flows install the inlet hose and the drain hose again WARNING Make sure that the temperature is more than 0 C before you use the appliance again The manufacturer is not responsible for damages caused by low temperatures TROUBLESHOOTING WARNING Refer to Safety chapters INTRODUCTION The appliance does not start or it stops during operation First try to find a solution to the proble...

Page 17: ...be too low The appliance does not drain the water Make sure that the sink spigot is not clogged Make sure that the drain hose has no kinks or bends Make sure that the connection of the drain hose is correct Set the drain programme if you set a programme without drain phase Set the drain programme if you set an option which ends with water in the drum If above mentioned solutions do not help contac...

Page 18: ...d button s After the check activate the appliance The programme continues from the point of interruption If the problem occurs again contact the Authorised Service Centre If the display shows other alarm codes Deactivate and activate the appliance If the problem continues contact the Service SERVICE We recommend the use of original spare parts When contacting the Authorised Service Centre make sur...

Page 19: ...tainers to recycle it Help protect the environment and human health by recycling waste of electrical and electronic appliances Do not dispose of appliances marked with the symbol with the household waste Return the product to your local recycling facility or contact your municipal office 19 ...

Page 20: ...WWW ZANUSSI COM SHOP 192942120 A 232017 ...

Reviews: