Electronic gas hobTable de cuisson électronique à gaz
ZGG 743 EX
Instruction bookletNotice d’utilisation
BE
Page 1: ...Electronic gas hob Table de cuisson électronique à gaz ZGG 743 EX Instruction booklet Noticed utilisation BE ...
Page 2: ...ith a finger z Electronic Timer to programme your cooking z Automatic reignition of the burners if the flame is accidentally extinguished z Residual heat indicator to advise that the pan supports and the burners are still hot z Children safety device to prevent the controls from being accidentally operated z General shutdown to turn off all the burners at once for an emergency z Safety device in c...
Page 3: ...nction 12 Hob Safety Cut off Function 12 Protection against overheating 13 Child Safety Function 13 The Electronic Timer 14 How to programme the burner to switch off 15 How to set the Minute Minder Function 17 Safety and energy saving advice 18 Cooking table 19 Cleaning and maintenance 20 Periodical maintenance 22 Something not working 23 Assistance and spare parts 24 Guarantee 24 For the installe...
Page 4: ...the ventilation should be improved by opening a window or increasing the extractor speed z After unpacking the appliance make sure the product is not damaged and that the power cable is in perfect condition Otherwise contact the dealer before installing the appliance z The manufacturer declines any liability should these safety measures not be observed Child Safety z This hob is designed to be ope...
Page 5: ...m your local Council z When disposing of an old appliance make it unusable by cutting off the cable The symbol on the product or on its packaging indicates that this product may not be treated as household waste Instead it shall be handed over to the applicable collection point for the recycling of electrical and electronic equipment By ensuring this product is disposed of correctly you will help ...
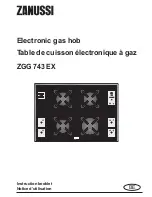
Page 6: ...ty Control Main ON OFF switch Rear right burner control zone Timer control zone Front right burner control zone Front left burner control zone Rear left burner control zone Auxiliary burner Rapid burner Semirapid burner Semirapid burner ...
Page 7: ...Controls To operate your hob simply touch the required control with a fingertip Ensure to only touch one control at a time during use Here follow the symbols for the main Touch Controls and the relevant indicators Main ON OFF Touch Control Burner Ignition Touch Control Flame level indicators Increasing Touch Control for the flame level Decreasing Touch Control for the flame level Residual heat ind...
Page 8: ...the hob is ready to use 2 Touch the Burner Ignition Touch Control of the required burner The flame level indicators located right above the symbols and illuminate 3 Within about 3 seconds touch the Increasing or Decreasing Touch Control to light the burner If touch control is selected the burner automatically lights at maximum flame level all the flame level indicators illuminate ...
Page 9: ...indicators illuminate 4 To adjust the burner flame level use the Increasing or Decreasing Touch Control The residual heat indicator lights up immediately after the burner is lit This means that the cooking zone is getting hot the indicator remains on until the pan support and the burner have cooled down ...
Page 10: ...attempts a safety device is set on the burner The flame level indicators flash Caution When the safety device is set on a burner the burner controls cannot be operated for about 60 seconds After 60 seconds you can remove the safety device on the burner by touching both the Increasing Controls and the Decreasing Control at the same time Then follow the instructions given in the paragraph How to lig...
Page 11: ...lly adjusted to the level set before it was accidentally extinguished If three consecutive reignition attempts fail a safety device is set on the burner The flame level indicators and the residual heat indicator flash Caution When the safety device is set on a burner the burner controls cannot be operated for about 60 seconds After 60 seconds you can remove the safety device on the burner by touch...
Page 12: ...ution When the safety device is set on a burner the burner controls cannot be operated for about 60 seconds If you select the burner that doesn t work with the Timer Control code number 10 flashes in the cooking time display After 60 seconds you can remove the safety device on the burner by touching both the Increasing Control and the Decreasing Control at the same time Then follow the instruction...
Page 13: ...d automatically adjusts all the lit burners to minimum If the hob temperature keeps rising although the flame level has been reduced all the lit burners are automatically turned off and a safety device is set on all the four burners Caution When the safety device is set on all the burners their controls cannot be operated for about 60 seconds If you select all the burners with the Timer Control on...
Page 14: ...ocked when the power is restored Timer control zone The Electronic Timer Your hob is supplied with an electronic timer enabling you to programme the cooking duration The timer can also be used as a minute minder when the hob is not in use The hob can even be used manually i e without any programming The timer only operates when the hob is switched on by means of the main ON OFF Control Here follow...
Page 15: ...to light a burner 3 Activate the Timer by touching the Timer Control and select the required burner by repeatedly touching the Timer Control 4 Set the required cooking time touching the Increasing and Decreasing Controls max time 99 minutes Once the cooking time has been set the burner selection can no longer be changed If you want to change burner you must set the cooking time to zero by means of...
Page 16: ...r Decreasing Control or at any time to adjust the time setting To cancel the time setting 1 Touch the Decreasing Control to set the cooking time to zero It is possible to programme the switch off of ONLY one burner at a time You can set the cooking time as well when the burner is already lit For example you can bring a pot of water to the boil then put some vegetables meat or pasta and programme t...
Page 17: ...ing or Decreasing controls to set the required time max time 99 minutes 4 The timer begins the countdown a few seconds after the time has been set 5 During the last ten seconds the timer starts beeping to advise that the timed period is about to end 6 An acoustic signal sounds at the end of the timed period To stop the acoustic signal touch the Timer Control To adjust the time setting 1 Touch the ...
Page 18: ...as the overheated splashes could easily ignite For an easier ignition of the burner light it before placing the pan on the pan support Unstable or misshapen pans should not be used on the hob as unstable pans can cause an accident by tipping or spillage It is advisable to cook with lids on By using a pressure cooker you will obtain further energy saving and shorter cooking times As soon as a liqui...
Page 19: ...ndives x Vegetables Peas in sauce 25 30 minutes x x Provencetomatoes 15 20minutes x x Fried potatoes x x Pasta x Meat Steak in pot x Fried escalope 10 12 minutes x Frying Chips 18 22 minutes x Fritters x Ricepudding 35 minutes x Stewedfruit x x Desserts Pancakes 3 4 minutes x Chocolate 5 6 minutes x Custard 20 25 minutes x Recommended cooking time Whereno recommendation is given times should be se...
Page 20: ... liquid has been added Avoid the use of the following householddetergentandbleaches impregnatedpadsunsuitablefornon stick saucepans steel wool pads bath sink stain removers Shouldthehobtopbecomeheavilysoiled it isrecommendedthatpropercleaningproduct is used If scratches or cracks are noticed on the glass top immediately disconnect the appliance from the electrical supply to avoid the risk of elect...
Page 21: ...ly cleaning reassemble the two parts and refit the cap in its correct position on the burner Frequentlywashtheburnercapsandcrowns using hot soapy water and remove marks with a mild paste cleaner A well moistened soap impregnated steel wool pad can be usedwithcaution ifthemarksareparticularly difficulttoremove For stubborn stains use normal non abrasive cleaners or specific products available on th...
Page 22: ...hat the condition and efficiency of the gas pipe and any pressure regulator are periodically checked If any anomalies are detected do not ask for repairing but always have the part replaced Periodical maintenance ...
Page 23: ... assistance centre fSee the section How to light a burner PROBLEM THE HOB DOESN T WORK A BURNER DOESN T WORK ITTAKESTOOLONG TOFINISHTHE DISHES THEY ARE COOKED TOO FAST CAUSE z There are blown fuses in the domestic electrical system Switches are turned off or there is no power at the power outlet z The hob is not activated z The main gas supply tap is closed z The gas bottle is empty z The hob has ...
Page 24: ...tory this appliance was tested and verified by specialized personnel in order to ensure best performance Any repairs or intervention which may become necessary must be carried out with utmost care and attention For this reason this hob should only be repairedorservicedbyanauthorisedService Engineer and only genuine approved spare parts should be used ForAssistance please contact your dealer or an ...
Page 25: ...uxiliary burner small 1 0 kW Appliance category II2E 3 Appliance gas supply setting Natural Gas G20 G25 20 25 mbar Gas supply connection G 1 2 Power supply voltage 230 V 50 Hz Overall dimensions Width 730 mm Depth 510 mm Cut out dimensions Width 710 mm Depth 470 mm Appliance class 3 Instructions for the Installer ...
Page 26: ...o the appliance is required to carry out the work ensureallthenecessaryprecautions are followed Gas connection It is indispensible that the connection to the gas mains are carried out by means of an AGB tap Choose fixed connections or use a flexible pipe in AGB stainless steel If using flexible metallic pipes be careful they do not come in contact with mobile parts or they are not squeezed Use the...
Page 27: ...o give you the best results Connection Carry out connection to the gas supply using a rigid metal pipe with connections conforming to the rules in force or with a flexible s steel tube conforming to the relevant rules in force limited to those whose max length is 2 m If flexible metal tubes are used make sure they do not come into contact with mobile parts or are crushed Pay the same attention als...
Page 28: ...fitted in a proper socket If connecting the appliance directly to the electric system it is necessary that you install a double pole switch between the appliance and the electricity supply with a minimum gap of 3 mm between the switch contacts and of a type suitable for the requiredloadincompliancewiththecurrent rules The connection cable has to be placed in order that in each part it cannot reach...
Page 29: ...le the parts following the same procedure backwards 5 Replace the Gas Type Label located near the gas supply connection with the one corresponding to the new type of gas The label is supplied in the accessories plastic bag Should the feeding gas pressure be different or variable compared with the required pressure an appropriate pressure regulator must be fitted on the gas supply pipe in complianc...
Page 30: ...RAL GAS L P G 28 30 37 mbar kW kW Inj m3 h Inj g h 1 100 G20 G25 1 100 G30 G31 mm 20mbar 25mbar Auxiliary 1 0 0 33 70 0 095 0 111 50 73 71 Semi rapid 1 9 0 45 96 0 181 0 210 71 138 136 Rapid Naturalgas 2 9 0 65 119 0 276 0 321 86 196 193 But Prop 2 7 Burner characteristics ...
Page 31: ...easing Control and hold the finger on it until the value 99 appears on the time display Then touch the Decrasing Control and hold the finger on it until the value 80 is displayed 4 Then touch the Increasing Control until 83 is displayed At this point the hob is set to the Gas Change mode and the current gas setting appears on the display n0stands for gas G20 G25 20 25 mbar n1 for gas G30 G31 28 30...
Page 32: ...the setting of the hob for the new gas type is completed If the flame stability is not satisfactory carry out an additional adjustment as described in the following paragraph Minimumflameadjustment If the flame stability and the flame aspect are not satisfactory proceed as follows 1 Carry out the steps described in the paragraph Setting the hob for the new gas type points 1 2 3 and 4 2 Light the b...
Page 33: ...he flame is on touch the Increasing or Decreasing Controls to carry out a fine adjustment until a small and regular flame is obtained on the whole burner crown 5 Switch off the hob touching the main ON OFF Control ...
Page 34: ...han 50 mm it is possible to install the hob on modular units of any width Any unit furniture unit household appliance etc placed near the unit which the hob is built in shall not exceed the worktop height A minimum clearance of 100 mm between the cut out in the worktop and any side wall exceeding the worktop height must be observed The hob dimensions and the cut out dimensions are given in fig 1 a...
Page 35: ...o the cabinet below Proceed as follows 1 Remove the pan supports the burner caps and crowns and turn the hob upside down taking care that the spark plugs and the thermocouples are not damaged in this operation 2 Place the sealing gasket all around the glass top edge as shown in Fig 3 3 Fit the hob in the cut out and push it down until the glass top and the worktop make contact as shown in Fig 4 Th...
Page 36: ...hind the kitchen unit b can be used for connections Dimensions are in mm Building over a unit with an oven The recesses for the hob and the oven must comply the indication given in Figs 6 and must be provided with openings to allow a continuous supply of air Two possible solutions to avoid excessive overheating are described in Fig 7 and 8 The electrical connection for the hob and the oven must be...
Page 37: ... the hob Fig 6 The electronic gas hob can only be installed over a built in oven equipped with cooling fan If the hob is installed over a built in oven equipped with pyrolytic cleaning function the hob must not be in use while the pyrolytic cleaning cycle of the oven is running 360 cm2 50 cm2 120 cm2 180 cm2 ...
Page 38: ...equivalent purposes 2 Performing the guarantee means that the appliance is returned to the condition it was in before the defect occurred Defective parts are replaced or repaired Parts replaced free of charge become our property 3 So as to avoid more severe damage the defect must be brought to our attention immediately 4 Applying the guarantee is subject to the consumer providing proof of purchase...
Page 39: ...mean that the normal guarantee period will be extended nor that a new guarantee period begins 14 We give a twelve month guarantee for repairs limited to the same defect 15 Except in the event where liability is legally imposed this declaration of guarantee terms excludes any compensation for damage outside the appliance for which the consumer wishes to assert his rights In the event of legally adm...