background image

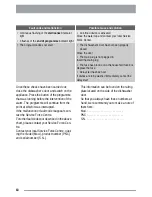
Cleaning the spray arms

NEVER try to remove the spray arms.

If residues of soil have clogged the holes in the
spray arms, remove them with a cocktail stick.

External cleaning

Clean the external surfaces of the machine and
control panel with a damp soft cloth. If
necessary use only neutral detergents. Never
use abrasive products, scouring pads or sol-
vent (acetone, trichloroethylene etc....).

Internal cleaning

Ensure that the seals around the door, the de-
tergent and rinse aid dispensers are cleaned
regularly with a damp cloth.
We recommend every 3 months to run the wash
programme for heavy soiled dishes using de-
tergent but without dishes.

Prolonged periods of non-
operation

If you are not using the machine for any pro-
longed period of time you are advised to:

1. Unplug the appliance and then turn off the

water.

2. Leave the door ajar to prevent the forma-

tion of any unpleasant smells.

3. Leave the inside of the machine clean.

Frost precautions

Avoid placing the machine in a location where
the temperature is below 0°C. If this is
unavoidable, empty the machine, close the ap-
pliance door, disconnect the water inlet pipe
and empty it.

Moving the machine

If you have to move the machine (moving house
etc....):
1. Unplug it.
2. Turn the water tap off.
3. Remove the water inlet and discharge ho-

ses.

4. Pull the machine out together with the ho-

ses.

Avoid over tilting the machine during transpor-
tation.

Environmental concerns

Packaging material

The packaging materials are environmentally
friendly and can be recycled. The plastic com-
ponents are identified by markings, e.g. >PE<,
>PS<, etc. Please dispose of the packaging
materials in the appropriate container at the
community waste disposal facilities.

16


Summary of Contents for ZDI 122

Page 1: ...User manual Dishwasher ZDI 122 ...

Page 2: ...se _ _ _ _ _ _ _ _ _ _ _ _ _ _ _ _ _ _ 6 Set the water softener _ _ _ _ _ _ _ _ _ _ _ 7 Filling with dishwasher salt _ _ _ _ _ _ _ _ 9 Filling with rinse aid _ _ _ _ _ _ _ _ _ _ _ 10 Adjusting the dosage of rinse aid _ _ _ _ 11 Loading cutlery and dishes _ _ _ _ _ _ _ 11 Use of detergent _ _ _ _ _ _ _ _ _ _ _ _ _ 13 Unloading the dishwasher _ _ _ _ _ _ _ _ 14 Care and cleaning _ _ _ _ _ _ _ _ _ _ ...

Page 3: ...e dishwashing cycle After use isolate the appliance from the power supply and turn off the water supply This product should be serviced only by an authorised service engineer and only genu ine spare parts should be used Under no circumstances should you attempt to repair the machine yourself Repairs car ried out by inexperienced persons will cause injury or serious malfunctioning Contact your loca...

Page 4: ...er use the dishwasher if the electrical supply cable and water hoses are damaged or if the control panel work top or plinth area are damaged such that the inside of the ap pliance is freely accessible Contact your local Service Force centre in order to avoid hazard All sides of the dishwasher must never be drilled to prevent damage to hydraulic and electric components WARNING For electrical and wa...

Page 5: ...l the corresponding light turns off 2 Release the Start Cancel button 3 Turn the programme selector dial to the Off po sition or select a new washing programme check that there is detergent in the detergent dispenser Programme selector indicator light Illuminates when the washing programme is selected Indicator lights Wash indicator light Illuminates when the washing and rinsing phases are running...

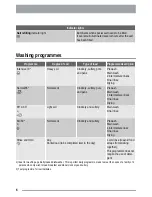
Page 6: ...Main wash 1 intermediate rinses Final rinse Drying 65 A 30 1 Light soil Crockery and cutlery Main wash Final rinse Bio 50 2 Normal soil Crockery and cutlery Prewash Main wash 1 intermediate rinse Final rinse Drying Rinse and Hold Any Partial load to be completed later in the day 1 cold rinse to avoid food scraps from sticking together This programme does not require the use of deter gent 1 Ideal f...

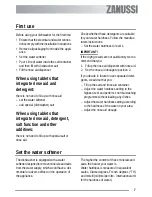
Page 7: ...s to level 1 IMPORTANT If the drying results are not satisfactory we rec ommend that you 1 Filluptherinseaiddispenserwithrinseaid 2 Set the rinse aid dosage to position 2 If you decide in future to use separated deter gents we advise that you Fill up the salt and rinse aid container Adjust the water hardness setting to the highest level and perform 1 normal washing programme without loading any di...

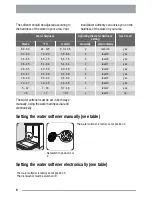
Page 8: ...45 51 64 5 1 6 4 2 level 7 yes 28 35 40 50 4 0 5 0 2 level 6 yes 23 27 33 39 3 3 3 9 2 level 5 yes 18 22 26 32 2 6 3 2 1 level 4 yes 13 17 19 25 1 9 2 5 1 level 3 yes 5 12 7 18 0 7 1 8 1 level 2 yes 5 7 0 7 1 level 1 no The water softener must be set in both ways manually using the water hardness dial and electronically Setting the water softener manually see table Set switch to position 1 or 2 Th...

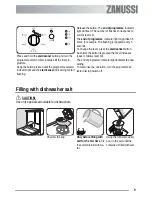
Page 9: ...lash 5 times for example The flashing is repeated every 5 seconds To change the level press the start cancel button Each time the button is pressed the level increases Level 1 follows level 10 The end of programme indicator light indicates the new setting To memorise the operation turn the programme se lector dial to position off Filling with dishwasher salt CAUTION Use only special salt suitable ...

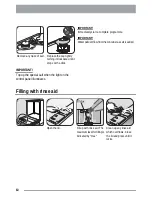
Page 10: ...programme IMPORTANT Waterwilloverflowfromthecontainerassaltisadded IMPORTANT Top up the special salt when the light on the control panel illuminates Filling with rinse aid Open the lid Fill up with rinse aid The maximum level for filling is indicated by max Clean up any rinse aid which overflows Close the lid and press until it locks 10 ...

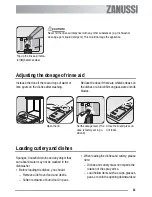
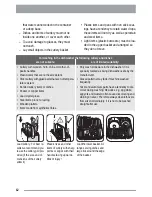
Page 11: ...r a bluish film on glassware or knife blades Open the lid Set the dosage level The dose is factory set in po sition 4 Closethelidandpressun til it locks Loading cutlery and dishes Sponges household cloths and any object that can absorb water may not be washed in the dishwasher Before loading the dishes you should Remove all left over food and debris Soften remnants of burnt food in pans When loadi...

Page 12: ...e resistant Bonded cutlery items or dishes Pewter or copper items Lead crystal glass Steel items prone to rusting Wooden platters Items made from synthetics fibres Only wash stoneware in the dishwasher if it is specially marked as being dishwasher safe by the manufacturer Glazed patterns may fade if machine washed frequently Silver and aluminium parts have a tendency to dis colour during washing R...

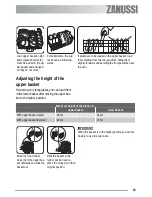
Page 13: ...height of the upper basket If washing very large plates you can load them in the lower basket after moving the upper bas ket to the higher position Maximum height of the dishes in upper basket lower basket With upper basket raised 20 cm 31 cm With upper basket lowered 24 cm 27 cm Move the front runner stops A of the upper bas ket outwards and slide the basket out Refit the basket in the higher pos...

Page 14: ...etergent tablets from different manufacturers dissolve at different rates For this reason some detergent tablets do not attain their full cleaning power during short washing pro grammes Therefore please use long washing programmes when using detergent tablets to ensure the complete removal of detergent residuals Unloading the dishwasher Hot dishes are sensitive to knocks The dishes should therefor...

Page 15: ...NEVER use the dishwasher without filters In correct repositioning and fitting of the filters will produce poor washing results Clean filters A B and C thoroughly under running water Turn the handle about 1 4 turn anticlockwise and re move filters B and C Remove filter A from the base of the washing com partment Put the flat filter A back in the base of the washing compartment and ensure that it fi...

Page 16: ...u are advised to 1 Unplug the appliance and then turn off the water 2 Leave the door ajar to prevent the forma tion of any unpleasant smells 3 Leave the inside of the machine clean Frost precautions Avoid placing the machine in a location where the temperature is below 0 C If this is unavoidable empty the machine close the ap pliance door disconnect the water inlet pipe and empty it Moving the mac...

Page 17: ...eration Certain problems are due to the lack of simple maintenance or oversights which can be solvedwiththehelpoftheindicationsdescribed in the chart without calling out an engineer Switch off the dishwasher open the door and carry out the following suggested corrective ac tions Fault code and malfunction Possible cause and solution continuous flashing of the start cancel indicator light 1 flash o...

Page 18: ...l the delay start Once these checks have been carried out close the dishwasher s door and switch on the appliance Press the button of the programme that was running before the intervention of the alarm The programme will continue from the point at which it was interrupted If the malfunction or fault code reappears con tact the Service Force Centre Forotherfaultcodesnotdescribedintheabove chart ple...

Page 19: ...t The salt container cap is not properly closed The dishes are wet and dull Rinse aid was not used The rinse aid dispenser is empty There are streaks milky spots or a bluish coating on glasses and dishes Decrease rinse aid dosing Water drops have dries onto glasses and dishes Increase rinse aid dosing The detergent may be the cause Contact the de tergent manufacturer s consumer care line If after ...

Page 20: ...A30 30 0 9 9 BIO 50 Test pro gramme for Test Insti tutes 140 1 05 16 Rinse and Hold 12 0 1 5 Hints for test institutes Testing in accordance with EN 60704 must be carried out with appliance fully loaded and us ing the test programme see Consumption values Test in accordance with EN 50242 must be carried out when the salt container and rinse aid dispenser have been filled with salt and rinse aid re...

Page 21: ...person Water connection WARNING The dishwashermustnot beconnectedto open water appliances or instantaneous water heat ers This dishwasher must be fed with cold water WARNING Only use for connection to the water mains newhose set oldhose setmustnotbereused CAUTION If the machine is connected to new pipes or pipes which have notbeen used for a long time you should run the water for a few minutes be ...

Page 22: ...shwasher Ensure that the hoses are not kinked crushed or en tangled When connecting the drain hose to an under sinktrapspigot theentire plastic membrane A must be removed Fail uretoremoveallthemem brane will result in food particles building up over time eventually blocking thedishwasherdrainhose spigot If you use a drain hose extension the total length should not be longer than 4 metres Likewise ...

Page 23: ...onsontheenclosed template for building in the dishwasher and fit ting the furniture panel WARNING Thedishwashermustbesecuredagainsttilting Therefore make sure that the counter it is fixed under is suitably secured to a fixed structure adjacent kitchen units cabinets wall This dishwasher is designed to be fitted under a kitchen counter or work surface No further openings for the venting of the dish...

Page 24: ...www electrolux com 156991170 00 12122007 ...

Reviews: