background image

29

IMPORTANT

This new appliance is easy to use, however, to
obtain the best results, it is important to read this
booklet and to follow all the instructions before
using it for the first time.
The booklet contains the necessary information
regarding installation, use and maintenance, as
well as giving useful advice.

THE GUARANTEE

Your new cooker is covered by guarantee.
You will find the guarantee certificate enclosed. If you
are missing anything contact your retailer, giving the
date of purchase, model, and the registration number
which is printed on the identification plate.
We ask you to bear in mind that for the guarantee to
be operated, it is necessary to fill in and send the larger
part of the guarantee to Zanussi Technical Assistance
& Service within 8 days of purchase, so that we can
provide registration.
We advise you that the smaller part of the certificate,
as well as your receipt and proof of purchase, should
be shown when required to personnel of Zanussi
Technical Assistance & Service.
Without following this procedure, the repair personnel
will have to charge you more for the repair.

These instructions are only valid for those countries whose identication symbols are shown

on the cover of the instruction brochure and on the appliance itself.

This appliance complies with the following E.E.C. Directives:
• 73/23 - 90/683 (Low Voltage Directive);
• 89/336 (Electromagnetical Compatibility Directive);
• 90/396 (Gas Appliance Directive);
• 93/68  (General Directives);
and subsequent modifications.

MANUFACTURER:

ELECTROLUX ZANUSSI ELETTRODOMESTICI S.p.A.
Viale Bologna 298
47100 FORLÌ (Italy)

Appliance      Class 1 and      Class 2      Sub-Class 1

Category:

II

 2H3+

Voltage tension:

230 V ~ 50 Hz

Summary of Contents for Gas cooker

Page 1: ...Assistance Service within 8 days of purchase so that we can provide registration We advise you that the smaller part of the certificate as well as your receipt and proof of purchase should be shown when required to personnel of Zanussi Technical Assistance Service Without following this procedure the repair personnel will have to charge you more for the repair These instructions are only valid for...

Page 2: ... cleaning panels they should only be cleaned with soap and water see cleaning instructions Only heat resistant plates may be placed in the drawer situated under the oven Do not put combustible materials there In case of repairs do not attempt to correct yourself Repairs carried out by unqualified persons can cause damage This appliance has been designed for use by adults Take care therefore that c...

Page 3: ...ecial kit which can be easily applied to the appliance is available You can buy the kit in our CUSTOMER SERVICE CENTRES it can be requested stating the number of PRODUCT NO shown on the working platelet Instructions for the installationn are enclosed in the packaging Warning Pag 30 Instructions for the user Pag 33 Installation Pag 33 Use Pag 33 Gas oven Pag 35 Turnspit Pag 36 Electric oven Pag 37 ...

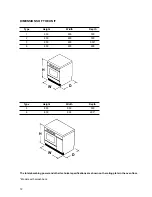
Page 4: ... 500 3 850 600 550 6 850 600 600 DIMENSIONS OF THE UNIT The total absorbing power and other technical specifications are shown on the rating plate in the oven floor Models with splash back Type Height Width Depth 5 850 900 550 6 850 900 600 H W D H W D ...

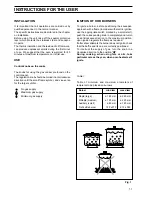
Page 5: ...e larger symbol No gas supply Maximum gas supply Minimum gas supply IGNITION OF HOB BURNERS To ignite a burner before positioning the saucepan approach with a flame in models with electric ignition use the appropriate switch marked by a small start push the corresponding knob in completely and turn in an anticlockwise direction to the maximum position upon ignition regulate the flame as required I...

Page 6: ...ng spilt onto the plates Never leave the plates on without a pan on them or with an empty pan on them To obtain the best results regarding kitchens equipped with hotplates and central grill remember to remove the grill situated above the hotplate sothat damagings and overheatings will be avoided In models supplied with a cover if the cover is in glass it should not be closed when the burners are s...

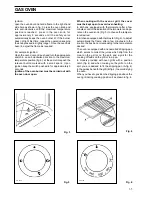
Page 7: ...ping pan A fig 4 in the guides beneath the grill B fig 4 to avoid dirtying the oven When you have to position the dripping pan above the oven grill during cooking position it as shown in fig 4 Ignition open the oven door and hold a flame to the right hand side hole as shown in fig 3 press the oven knob and turn anti clockwise until the maximum temperature position is reached press in the oven knob...

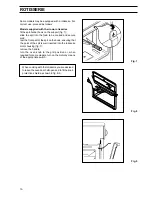
Page 8: ...l rest the front part of the spit on the hook ensuring that the point of the spit is well inserted into the rotisserie motor housing fig 7 remove the handle turn the oven knob to the grill position or when required for some models turn on the motor by means of the appropriate switch When cooking with the rotisserie you are advised to leave the oven door half open and to fit the knob protection shi...

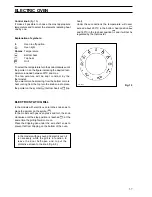
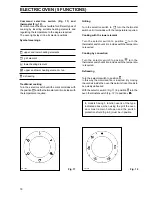
Page 9: ...he pointer on the symbol bottom heat or top heat Under these conditions the temperature will never exceed about 200 C in the bottom heat position and 180 C in the top heat position and it will not he regulated by the thermostat Fig 10 FO 1095 ELECTRIC STATIC GRILL In the models with electric oven turn the knob so as to place the pointer on the symbol In the models with gas oven press and turn the ...

Page 10: ...hermostat switch until it coincides with the temperature required Cooking with the lower element Turn the selector switch to position turn the thermostat switch until it coincides with the temperatu re required Cooking by convection Turn the selector switch to position turn the thermostat switch until it coincides with the temperatu re required Defreezing Turn the selector switch to position In th...

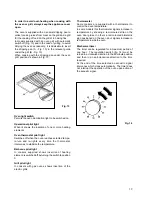
Page 11: ...tallic sign positioned on the oven door signals increase in temperature inside the oven Mechanical timer The timer can be regulated for a maximum period of one hour The regulation switch fig 14 must be turned in a clockwise direction to the 60 minute position and then in an anti clockwise direction to the time required At the end of the time selected an acoustic signal intervenes which stops autom...

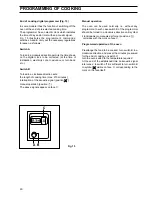
Page 12: ...me max 210 minutes interruption of the acoustic signal position manual operation position The above signals appear on face C Fig 15 PROGRAMMING OF COOKING Manual operation The oven can be used normally i e without any programme In such case switch B of the programmer should be turned in a clockwise direction until symbol il funzionamento manuale del forno posizione coincides with the mark on face ...

Page 13: ...g better Furthermore this oven is especially convenient for quick defreezing sterilizing preserves homemade fruit in syrup and finally to dry mushrooms or fruit Cooking with the multi function oven With this type of oven it is possible to carry out cooking traditionally by convection by jets of heat and by grill it therefore allows cooking to be optimized ADVICE FOR USE OF THE TRADITIONAL OVEN GAS...

Page 14: ...on the grill meat should be salted upon completion of cooking whereas fish should be salted on the inside before cooking The grill should be positioned in the guides nearest or furthest from the grill element according to the thickness of the meat in order to avoid burning the surface and cooking the inside insufficiently The formation of smoke caused by drops of juice and fat can be avoided by po...

Page 15: ...oke caused by drops of juice and fat can be avoided by pouring l or 2 glasses of water into the dripping pan Traditional cooking Heat is conveyed both from the top and bottom of the oven thus it is advisable to put the pot in the central shelves position When a higher heat is required either from the top or bottom put the pot in an upper or lower position Suggestions for traditional baking How to ...

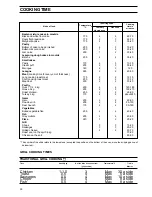
Page 16: ...0 2 2 30 40 Poultry Duck 1 1 2 2 kg 200 2 2 120 180 Goose 3 kg 200 2 2 150 210 Roast chicken 200 2 2 60 90 Turkey 5 kg 175 2 2 about 240 Game Hare 200 2 2 60 90 Roe deer rib 200 2 2 90 150 Deer haunch 175 2 2 90 180 Vegetables Boiled vegetable flan 200 2 2 40 45 Fish Grey mullets 200 2 2 40 50 Pizza 240 1 2 20 25 Grill Chops 3 3 15 20 Sausages 3 3 20 25 Grilled chicken 2 2 60 70 Roast veal on the ...

Page 17: ...wet filling 1 5 1 3 2 175 200 70 Shortpastry with dry filling 1 1 3 2 175 200 45 With naturally raised mixture 1 1 3 1 175 200 50 Little cakes 0 5 1 3 3 160 175 30 Meat Veal 1 2 2 180 200 60 Beef 1 2 2 180 200 70 English roastbeef 1 2 2 220 220 50 Pork 1 2 2 180 200 70 Chicken 1 1 5 2 2 200 200 70 Casseroles Beef casserole 1 1 2 175 200 120 Veal casserole 1 1 2 175 200 110 Fish Filets of cod hake ...

Page 18: ... instructions Clean the oven acces sories grate grid plate etc with warm water and detergent Remove possible incrustations with a slightly abrasive powder Never line any part of the oven with aluminium foil It would result in an accumulation of heat which might damage the cooking results and also damage the enamel Controls Sundries Periodically check the condition of the flexible pipe of gas conne...

Page 19: ...s in force UNI CIG 7129 7131 The air flow into the room must come directly through openings of external walls See fig 19 20 These openings must have a free passage of at least 200 cm2 one or more openings can be made Fig 21 Fig 22 These openings or opening should be realized in such a way not to be occluded both from inside and outside and preferably positioned near the floor opposite the combusti...

Page 20: ...just the closure of the lid The necessary force for opening closing the lid can be increased by turning the adjusting screw 2 or 3 times as shown in Fig 24 GAS CONNECTION Gas connection must be carried out according to the rules UNI CIG 7129 7131 The manufacturing company release the unit once tested adjusted for the kind of gas stated on the rating plate located on the back of the range next to c...

Page 21: ...ed as shown in Fig 25 it is no longer than 1500 mm it shows no throttles it is not subject to traction or torsion it doesn t get in touch with cutting edges or corners it can be easily inspected in order to check its condition The control of preservation of the flexible pipe consists in checking that it doesn t show cracks cuts marks of burnings both on the end parts and on its full extent the mat...

Page 22: ... baffles of the burners using a socket spanner 7 unscrew and remove fig 28 the nozzles replacing them with those ones required for the kind of gas in use see table 2 Reassemble the parts following the same procedure backwards Replacement of the fish kettle burner nozzle For models supplied remove the plate or glass cover by lifting it from the relevant brackets remove the grills unthread the caps ...

Page 23: ...ozzle situated in the bottom of the oven replacing it with the proper one see Table 2 reassemble the burner following the same procedure backwards Fig 31 Minimum level adjustment of oven burner In ranges with thermostat after setting the oven on maximum temperature with closed door for about 10 minutes turn the knob of the thermostat on 140 remove the knob and in case of conversion from natural ga...

Page 24: ... 2 0 0 45 144 Auxiliary 50 1 0 0 33 72 Fish kettle burner 88 3 2 0 85 230 28 30 37 Oven with thermostat 82 3 0 1 0 216 Oven with tap 73 2 4 1 1 173 NATURAL GAS Methane SPECIFICATIONS OF THE BURNER AND OF THE INJECTORS Plate and oven burners don t need regulation of primary air WARNING If the pressure of gas used is different or variable from that foreseen an appropriate pressure regulator must be ...

Page 25: ...e mains complying with the existing regulations The brown live wire originating from the clamp of the cooker junction box must always be connected to the phase of the mains supply In any case the supply cord must be positioned in such a way as it doesn t reach in any point a temperature higher by 50 C than the room temperature Should the supply cord need to be replaced it is necessary that the yel...

Page 26: ...ll your nearest Service Centre givin them all the necessary information such as model and serial number of the appliance MAINTENANCE TECHNICAL ASSISTANCE ORIGINAL SPARE PARTS This machine before leaving the factory has been tested and studied by many experts and specialists in order to give you the best results Any repair work which needs to be carried out should be done with the utmost care and a...

Page 27: ...55 ...

Reviews: