background image


DOC-USR-0109-03


___________________________________________________________________________________________


Z3 Technology, LLC 

 100 N 8

th

 ST, STE 250 

 Lincoln, NE 68508-1369 USA 

 +1.402.323.0702


40


9.4


Using the Password Feature


The Z3-MVE-250 supports the assignment of a password to restrict access to the user interface. Please note, 
once a password has been set, this cannot be undone.


(19)


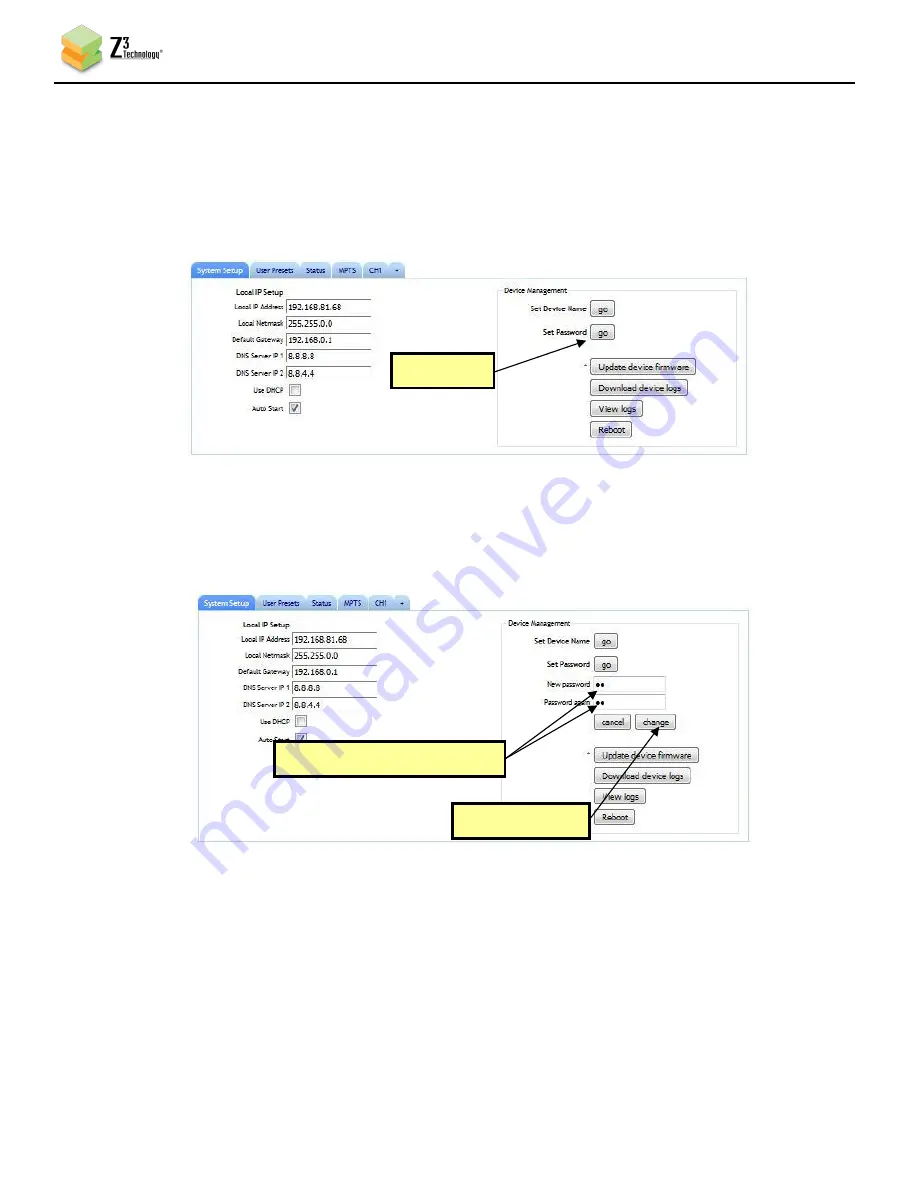
In the System Setup tab, click on “go” next to “Set Password”:


(20)


Once you click on “go”, the change password options appear. Enter the new password twice and 

click “change.”


(21)


Wait for the password options to disappear. This indicates that the password has changed.


Click here


Enter new password twice


Click “change”


Figure 41  Selecting “Set Password”


Figure 42  Changing the Password


Summary of Contents for Z3-MVE-250

Page 1: ...of Z3 Technology LLC Z3 This document may not be used reproduced disclosed or disseminated to anyone without the prior written approval of an authorized representative of Z3 Z3 reserves the right to change this product at any time and without notice All product names trademarks trade names service marks or service names mentioned in this document are the property of their respective owners Z3 Tech...

Page 2: ...logy LLC 100 N 8th ST STE 250 Lincoln NE 68508 1369 USA 1 402 323 0702 2 Revision History Version Date Change Note Author 2 35 2 10 24 2016 Initial Document TA 2 35 2a 10 25 2016 Updated Product Photos TA 2 68 06 26 2019 Updated 3G SDI input output to 3G SDI ASI input output Added RTSP and RTMPS to features section SI ...

Page 3: ...urce 12 6 2 Connect and Power up the Z3 MVE 250 12 6 3 Find the Encoder Using ZFinder 13 6 4 Configure Channel 1 and Encode 14 6 5 Run VLC to View Stream 17 6 6 Streaming RTP 18 6 7 Changing the Bitrate and Frame Rate Dynamically 20 6 8 Adjusting the UDP TS Rate 22 6 9 Tuning for Latency 24 6 10 Using the Aux TS File Option 25 6 11 Encoding Closed Captioning 26 6 13 Stream Multiple Resolutions 27 ...

Page 4: ...mware Update 38 9 4 Using the Password Feature 40 9 5 Enabling Forward Error Correction 42 9 5 1 Encoding with Forward Error Correction 42 9 5 2 Decoding with Forward Error Correction 43 10 0 SUMMARY OF OPTIONS 44 10 1 The System Setup Tab 44 10 2 The User Presets Tab 46 10 3 The Status Tab 47 10 4 The MPTS Tab 48 10 5 The CH1 Tab HDMI Source Only Encode 49 10 6 The CH2 Tab SDI Source Only Encode ...

Page 5: ... Figure 13 Viewing Bitrate in VLC 20 Figure 14 Changing the Bitrate Dynamically 20 Figure 15 Drop in Bitrate after Dynamic Bitrate Change 21 Figure 16 Status Page Output Showing Lower Bitrate 21 Figure 17 Changing TS Rate 22 Figure 18 TS Rate and Lower Bitrate Reflected in VLC 23 Figure 19 Tuning for Latency 24 Figure 20 Using the Aux TS File Enable Option 25 Figure 21 Setting VLC to use the Extra...

Page 6: ...37 Figure 37 User Interface Using DHCP Address 37 Figure 38 Updating the Device Firmware from the Web Interface 38 Figure 39 Updater Screen 39 Figure 40 File Selection Screen 39 Figure 41 Selecting Set Password 40 Figure 42 Changing the Password 40 Figure 43 Password Entry Screen 41 Figure 44 Enabling Pro MPEG FEC Encode 42 Figure 45 Enabling Pro MPEG FEC Decode 43 Figure 46 Z3 MVE 150 with Ear Ra...

Page 7: ...ent encoders decoders giving the user the flexibility to configure the system as two encoders two decoders or one channel of each This unit is a cost effective system suitable for broadcast encoders and IP streaming The Z3 MVE 250 provides immediate access to multi format HD video integrated system peripherals and production qualified codecs The Z3 MVE 250 features multiple I O interfaces includin...

Page 8: ...o VLC how to change bitrate dynamically how to adjust the UDP TS rate and tuning for latency as well as encoding closed captions and streaming one video source into multiple resolutions Details on encoding to RTMP can be found in the follow up section on pages 27 Details on running the Decoder can be found in Section 8 0 RUNNING THE DECODER on page 31 2 2 If You Already have a System from Z3 and N...

Page 9: ...incoln NE 68508 1369 USA 1 402 323 0702 9 3 0 PACKAGE CONTENTS Z3 MVE 250 AC Power Cable 2x BNC to BNC Cable 2x HDMI Cable 2x DB 9 Serial Cable Ear Rack Bracket x 2 4 mm L x 3 mm D Screw x 6 Note The serial cable is included for advanced troubleshooting purposes only and is not needed by the typical user Figure 1 Package Contents for the Z3 MVE 250 ...

Page 10: ... Interfaces to 1Gb Ethernet USB 2 0 x2 RS 232 Outputs MPEG 2 Transport Stream RTP RTSP RTMP RTMPS TSRTP or TS File HTTP based configuration software for user friendly configuration and control RS 232 serial port for technical configuration and control Operating Temperature and Humidity 0 to 40ºC at 20 80 relative humidity non condensing Storage Temperature and Humidity 10 to 65ºC at 20 80 relative...

Page 11: ...t HDMI Input4 3 3G SDI ASI Input HDMI Output 9 3G SDI ASI Input HDMI Output 5 2x USB 2 0 11 2x USB 2 0 6 GigE 12 GigE 13 100 240 VAC Power 1 For advanced troubleshooting purposes only Not needed by typical users 2 For advanced troubleshooting purposes only Not needed by typical users 3 Supports Non HDCP content only For example a Blu Ray player cannot be used as a video source 4 Supports Non HDCP ...

Page 12: ...for your Z3 product may differ from those pictured in this document 6 1 Set up the SDI Video Source 1 Select an HD source with SDI output a Power on the HD source b Connect the HD source via SDI to a monitor c Set the HD Source to 1080p60 or 1080i output d If you are using a media player rather than a video camera select and begin playback of the content you would like to stream 6 2 Connect and Po...

Page 13: ...he encoder is connected 7 Run the ZFinder PC Utility on your Windows PC The ZFinder window appears ZFinder then completes a scan of the network and lists the location of all Z3 systems connected to the network In this case the Z3 MVE 250 appears 8 Click on the Z3 MVE 250 entry in the window to select it This will cause the Edit Device Open Device and Flash LEDs boxes to activate Note Selecting Edi...

Page 14: ... tab The CH1 tab supports an HDMI video source The CH2 tab supports an SDI video source In order to utilize an SDI video source click on the tab to create a tab for an additional channel SDI input is only supported by using the CH2 tab If SDI is your only input the CH1 tab can be stopped or deleted using the Channel Controls on that page Use the Channel Controls options rather than the Start All o...

Page 15: ...mat to UDP 13 You can set the Dest Address to a the IP address of your PC that will be running the VLC media player in the pictured example 192 168 0 6 b or to a multicast address An example multicast address would be 225 1 2 3 If you are on a shared network check with your Network Administrator 14 Make note of the value of Dest Port This will be 5004 by default 1 Change to UDP 2 Change to IP Addr...

Page 16: ...NE 68508 1369 USA 1 402 323 0702 16 15 After 20 seconds the encoder will automatically try to start If it has done so click on stop in the Channel Controls section near the bottom of the screen The status should then change to STOPPED Then click on start If the encoder had not already started simply click start Figure 7 Z3 MVE 250 Configuration Screen UDP ...

Page 17: ...C on your PC version used by Z3 2 1 5 17 Select Media Open Network Stream In the box type udp 192 168 0 6 5004 where 192 168 0 6 matches the values of the computer IP address or multicast address entered for Dest Address and 5004 is the value of Dest Port noted previously 18 Press Enter 19 You will now see video streaming to VLC Figure 9 Example of Z3 Video Streaming to VLC UDP Figure 8 VLC Open N...

Page 18: ... RTP Once you have UDP streaming it is relatively simple to change to RTP streaming All that is needed is one parameter change To stream using RTP complete the following steps 20 Return to the CH2 configuration tab click on stop to stop the current encoding session 21 Change Output Format from UDP to RTP 22 Click on start to start the RTP encoding session Change to RTP Figure 10 Configuration Scre...

Page 19: ...ss is the IP address of the Z3 MVE 250 ch is 1 for CH1 or 2 for CH2 and m is added if a multicast address is being streamed For example if the IP address of the Z3 MVE 250 is 192 168 81 68 encode is being done from CH1 and unicast streaming is being done the user would type in rtsp 192 168 81 6 z3 1 mp4 Note VLC version 2 1 5 or later is needed for RTSP support 25 You will then see RTP video strea...

Page 20: ...nge the bitrate or frame rate without stopping and restarting the encoder To use this feature complete the following steps 26 In VLC click on Tools and select Codec Information This brings up a window with four tabs Select the Statistics tab In this tab you can see the current video audio bitrate 27 In the CH2 tab change the bitrate from 8000K to 2000K and click update Figure 14 Changing the Bitra...

Page 21: ... You should see the video bitrate drop and the quality of the picture in VLC change If you click on the Status tab and click Refresh you will also see the updated bitrate reflected You can also use the update button to modify the Frame Rate Divider Figure 15 Drop in Bitrate after Dynamic Bitrate Change Figure 16 Status Page Output Showing Lower Bitrate Lower bitrate Lower video audio bitrate ...

Page 22: ...tory is a value of 10Mbps corresponding to 8Mbps for the video There are times however when it is desirable to make this value higher For example if the encoder bitrate is very low below 1Mbps it is advisable to allow more leeway in the event there are some challenging scenes to encode The steps below show an example where this might be desirable and what specifically you can do to change this and...

Page 23: ...tart encoding 32 Open VLC to view your UDP stream see Section 6 5 and view the Statistics tab see Section 6 7 You will see a lower value for the overall input rate and for the content rate The value of TS Rate must be higher than video bitrate audio bitrate 1 25 If an attempt is made to input a value less than this the error message TS rate too small to carry elementary streams will appear Input b...

Page 24: ...ent because the encoder has fewer bits over time to work with The tradeoff between latency and quality through this parameter is left up to the user B frames improve the quality of the picture but they also increase the latency by 1 frame time To minimize latency B frames should be disabled done by setting Number of B frames to 0 In general streaming using RTP will result in lower latency than str...

Page 25: ...ux TS File Enable to true When this is done they can then specify the file name in the Aux TS File Location box that appears If a user connects a USB drive for example a value of media sda1 encode_mve100r ts would save to encode_mve150 ts on that drive Sample values are shown below Note After clicking stop the user should wait at least 10 seconds before removing the USB drive from the Z3 MVE 250 T...

Page 26: ...To utilize this feature complete the following 33 Connect an SDI signal with closed caption data to the SDI Input 34 Start the encoder 35 Open VLC Select Media Open Network Stream If the settings are those as shown in Figure 7 on page 16 use the address udp 192 168 0 6 5004 36 In VLC select Subtitle Sub Track Closed Caption 1 This configures VLC to use the extracted closed caption data that the en...

Page 27: ...own menu in the lower right corner of the screen 6 13 1 Using an HDMI Source 4 Click on the CH1 tab and set your desired output resolution and bitrate 5 Click on the CH3 tab and set your desired output resolution and bitrate for your second simultaneous stream If the CH2 or CH3 tabs are not present you can create each additional channel tab by clicking on the tab 6 13 2 Using an SDI Source 6 Click...

Page 28: ...pport RTMP The test player within Wowza Streaming EngineTM is recommended 7 1 Connect the Encoder 1 Follow steps in Section 6 0 to connect the Z3 MVE 250 for encode and bring up the user interface 7 2 Configure CH1 for RTMP Streaming 2 Click on the CH1 tab 3 Set Output Format to RTMP 4 For Dest Address type 192 168 0 4 1935 live 1080 where 192 168 0 4 is the IP address of the PC with the Wowza ser...

Page 29: ...t on Wowza 9 Go to a PC that is on the same network as the Wowza server and open a web browser in this example FireFox is used Type in the URL of the Wowza server with the port 8088 in this example 192 168 0 4 8088 This will bring up the Wowza home page Log in with your user name and password 10 At the top you will see four options Home Server Applications and Help Click on Applications and select...

Page 30: ...2 30 11 You should see the Test Players popup screen Select the Adobe RTMP tab change the Stream name to 1080 should match the directory you are streaming to in the Z3 MVE 250 and click Start You will then see the content streamed from the Z3 MVE 250 Figure 26 Viewing Z3 MVE 150 Content on Wowza 1 Select Adobe RTMP tab 2 Type stream name 3 Click Start 4 Audio and Video start to appear ...

Page 31: ...ing one channel to decode a previously compressed ts file 8 1 Create a ts File using the Encoder 1 Follow the steps in Section 6 0 to access the User Interface and to stream a TS stream 2 Follow the instructions in Section 6 10 to save the stream to a TS file For this example you can call the file encode_mve 250 ts 8 2 Connect the Output 3 Connect an HDMI cable from to HDMI Out of the Z3 MVE 250 t...

Page 32: ...T STE 250 Lincoln NE 68508 1369 USA 1 402 323 0702 32 5 Once you do this the description at the top right will change from Encoder to Decoder and settings for Display Mode Resolution and Layout will appear 6 Leave these settings as is and click the Set Display button Figure 29 System Setup in Decoder Mode New Settings for Display Appear ...

Page 33: ...r 7 Click on the CH1 tab and change the settings to match the output of your encoded stream For decode of the previously recorded ts file use the following configuration example 8 About 5 10 seconds later decode will start and you will see video on the TV monitor 2 Enter same path used when saving file 4 Click start Figure 30 Decoder Configuration Settings for Decode Example 1 Change to TSFILE 3 S...

Page 34: ...red off and back on it automatically uses those settings 1 Click on the User Presets tab 2 Click on the new button 3 This brings up a new text box to enter the preset name For this example type z3_config1 and click ok 4 Return to the System Setup tab 5 Select your newly created configuration from the preset dropdown menu at the bottom of the screen 6 As soon as you select z3_config1 the screen wil...

Page 35: ...mically receive an IP address at startup The IP address that is assigned can be seen through using ZFinder If you prefer you can set your encoder to a static IP address If you would like to have your PC set to a static IP address you will need to set your encoder to a static IP address as well in order for it to be discoverable by ZFinder To set your unit to a static IP address complete the follow...

Page 36: ...u do this a pop up window appears reminding the user that for changes to IP Address Local Netmask Default Gateway to take effect a reboot is required and asking if a reboot is desired Click OK and then OK in the Are you sure window after that to start rebooting Note The very first time settings are saved may take up to 30 seconds This is due to some flash initialization which occurs on the very fi...

Page 37: ...ce Note You may need to also update the network settings on the PC running ZFinder so that the encoder is discoverable If the unit appears in red your computer s IP address or Network Mask may not be compatible with the encoder and changes may be required before you can access the user interface 10 A web browser will then open at the IP address of the Z3 MVE 250 and you will see the user interface...

Page 38: ...chnology LLC 100 N 8th ST STE 250 Lincoln NE 68508 1369 USA 1 402 323 0702 38 9 3 Making a Firmware Update 12 Open the HTTP based Interface Section 6 3 or Error Reference source not found 13 Select update device firmware from the main screen Click here Figure 38 Updating the Device Firmware from the Web Interface ...

Page 39: ...15 This brings you to the File Selection Screen From here select the name of the img file to update with and click Open Figure 40 File Selection Screen The image file to be used will typically have the word UPD in the name 16 Click on Upload and Update 17 You will see screens stating that the image is being uploaded and that the flash is being updated After about one minute you should see the main...

Page 40: ...d to restrict access to the user interface Please note once a password has been set this cannot be undone 19 In the System Setup tab click on go next to Set Password 20 Once you click on go the change password options appear Enter the new password twice and click change 21 Wait for the password options to disappear This indicates that the password has changed Click here Enter new password twice Cl...

Page 41: ...702 41 22 Retype the IP address in the web browser You should then see a prompt for a user name and password Use admin for the user name and the value you had entered before for the password You should now be able to access the web GUI 23 To preserve the password you should save this password configuration in either serial_menu or a user defined preset Figure 43 Password Entry Screen ...

Page 42: ...Output Setup the Output Format must be TSRTP in order to use Pro MPEG FEC 5 After setting the Output Format the FEC Enable dropdown should become visible 6 Change the value for FEC Enable to True This will allow for setting the number of FEC columns and rows The default setting is 5x5 This is a medium level of coverage that will work in many situations The number of columns multiplied by the numbe...

Page 43: ...ect TSRTP as the Input Interface This will cause the FEC Mode dropdown to appear 3 Select AUTO in the FEC Mode dropdown menu 4 Set the remaining settings to those corresponding to your incoming stream 5 Click Start 6 You will see an FEC corrected stream on the display monitor For more information on testing and verifying FEC using a Z3 Technology encoder and decoder with Pro MPEG FEC support pleas...

Page 44: ...ake effect When in DHCP mode this field is not applicable Default Gateway 192 168 a b 192 168 0 1 Sets the network gateway to use for the Z3 MVE 250 Note that a save of these settings and reboot is needed for changes to take effect When in DHCP mode this field is not applicable Use DHCP Checked Unchecked Sets whether DHCP is used to dynamically obtain an IP address at start up DNS Server IP 1 a b ...

Page 45: ...DMI SDI HDMI and SDI are supported in this release Resolution Decode Only See Note 1 1080p60 Sets the resolution to set the display to Layout Decode Only See Note 2 1x1 Determines layout to use for displaying multiple pictures In most cases 1x1 is used 2x2 can be used when four decodes are occurring Other configurations are possible see Note 2 Set Display Decode Only If a display mode resolution o...

Page 46: ...ions default in bold Notes new Define a new configuration file Up to 9 configurations can be created rename Rename a configuration file delete Delete a configuration file export Export current settings to a file All presets get saved to the file settings z3 on the host PC These can be subsequently reloaded with the import command import Load settings from a previously exported file reset All exist...

Page 47: ...d picture Height Height of encoded picture A small i will appear if interlaced is being encoded Audio Status Channel The channel number 1 or 2 Subchannel Always 1 in this release Codec The codec being used to encode audio for that channel Stream Status Channel The channel number 1 or 2 URL URL the channel is being streamed to frames of frames sent from encoder to channel since the beginning of enc...

Page 48: ...logy LLC 100 N 8th ST STE 250 Lincoln NE 68508 1369 USA 1 402 323 0702 48 10 4 The MPTS Tab The MPTS can be used to encode one more streams to DVB ASI out This is not supported by the Z3 MVE 250 standard release but can be made available as an optional upgrade Contact your Z3 sales account manager for more information ...

Page 49: ...is ignored for HD resolutions Video Resolution Follow Input 320x180 1920x1080 The encode resolution for channel 1 If this resolution is different from the capture resolution resizing will occur Follow Input generates the resolution based on the capture resolution see Note 1 for resolutions supported Video Bitrate 100 12000K 8000K The bitrate for channel 1 Video Profile High Main Baseline The H 264...

Page 50: ...put larger than D1 could result in unpredictable behavior Interlace can be used to make progressive input interlaced Noise Filter Off On Not applicable to the Z3 MVE 250 GOP Size 10 240 frames 60 I frame frequency see Note 3 for GOP sizes supported Maximum Delay 0 9999 2000 of ms to buffer The higher the value the smoother the encode but also the higher the latency Audio Enable True False True Enc...

Page 51: ...format is selected the port number associated with that audio channel Max PTS PCR 0 9999 250 Allows user to specify a smaller interval than 250ms between PTS and PCR This is for systems that require tighter PTS PCR intervals It is generally recommended to leave this value at 250 Certain decoders may require a value of Max PTS PCR similar to the video delay If an issue is encountered with a specifi...

Page 52: ...ess Ex media sda1 test h264 If audio is enabled a companion aac file is then created for example for test h264 a companion file test_0 aac is created MPTS can be used to encode one more streams to DVB ASI out This is not supported in the current release Contact Z3 for optional upgrade information Dest Address For all but MPTS x y z w 192 168 0 6 IP address that the encoder is streaming to Dest Por...

Page 53: ...Adjusting the UDP TS Rate FEC Enable TSRTP Only True False Selects whether Pro MPEG Forward Error Correction FEC is enabled FEC Columns L TSRTP Only 5 Allows for setting the number of FEC columns The number of columns multiplied by the number of rows must be less than or equal to 100 FEC Rows D TSRTP Only 5 Allows for setting the number of FEC rows The number of columns multiplied by the number of...

Page 54: ...ta to be detected Note 1 Encode Resolutions Supported QCIF 176x144 WQVGA 320x180 QVGA 320x240 SIF 352x240 CIF 352x288 2 CIF 352x576 640x360 VGA 640x480 4 CIF 704x576 16 9 PAL 1024x576 D1 PAL 720x576 D1 NTSC 720x480 720p 1280x720 XGA 1280x1024 1080 1920x1080 Note 2 If input is interlaced the Frame Rate Divider will divide the number of fields used This means a conversion to progressive is done This...

Page 55: ...cking the tab Please see CH1 values for a detailed explanation Use the CH2 tab for encoding an SDI video source Identical to CH1 except the source is SDI instead of HDMI component Also default values of various parameters change as shown below Parameter CH1 CH2 Video Source HDMI HD SDI Audio PID Sub CH1 120 124 Audio PID Sub CH2 4 121 123 125 127 Audio RTP Ports 8892 8898 8900 8906 Video RTP Port ...

Page 56: ... to Address Multicast Only x y z w 225 1 2 3 The multicast IP address that the decoder retrieves data from used when RTP or UDP is selected for the Input Interface and Is Multicast is checked Port RTP and UDP Only 0 9999 8888 The port the decoder retrieves data from Location TSFILE and FILE Only If decoding from a TSFILE or raw FILE this specifies the location and name of the file example media sd...

Page 57: ... in GUI enc dec factory default Factory settings Can also add more profiles by clicking on new in the User Presets tab Save Click to save value that was selected Operating Mode Encoder Interlaced Progressive Encode 1 to 3 Ch Decoder This selects the operating mode of the unit Encoder Interlaced Progressive is the default mode of operation it can be used to encode up to two channels Encode 1 to 3 C...

Page 58: ...crewdriver Complete the following instructions to install your Ear Rack Mounts on your Z3 MVE 250 1 Place the Z3 MVE 250 face up on a dry flat surface 2 Place one of the ear rack brackets on the left and one on the right of the Z3 MVE 250 so that the holes on the unit align with the brackets The brackets are identical so it does not matter which bracket goes on which side 3 Using the 4 mm L x 3 mm...

Page 59: ...rom your encoder the following steps are needed 1 Log in to the Wowza Streaming Engine Manager Home page by typing http localhost 8088 where localhost is the IP address of the server in this User s Guide 192 168 0 4 2 Click on Server in the top band of options On the left column click on Performance Tuning and then Java Settings Click Edit and then change Java Heap Size to Production Level and Jav...

Page 60: ...ng and RTSP Publishing are both set to Open and Client Restrictions is set to No client restrictions Then click Save The Wowza server is now configured to work with your ZEUS encoder Note You can also specify Require password authentication for RTMP Publishing In this case Authentication on the channel tab needs to be enabled and a valid Wowza user name and password needs to be entered to successf...

Page 61: ...in Dest Address equal the IP address of the PC running VLC Does the port number in Dest Port equal the value entered in the URL for VLC Does the video coming out of the source match the resolution in the encoder settings Is the PC fast enough for 1080p decode on VLC Does the PC have enough DDR to handle 1080p decode on VLC Is VLC version 1 00 or later Problem Do not see video in VLC RTP Is VLC 2 1...

Reviews: