


YZ Systems Milton Roy • 201 Ivyland Road • Ivyland, Pennsylvania • USA • 18974 • P: 281.362.6500 • www.yzsystems.com
Page 31
NJEX 610G / 610F ver.11-2023
Section 9: 610G / 610F System Troubleshooting
1. Verify operating conditions. Correct as
needed.
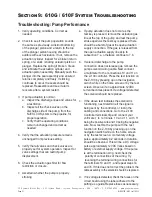
2. Check to see if the pump operation sounds
the same as previously. A distinct bottoming
of the plunger piston and a return to the top
of the plunger piston housing should be
audible with each actuation. If not, remove the
actuation cylinder. Inspect for a broken return
spring, or a stuck / sticking actuator piston or
plunger. Replace the spring if broken. Clean
and lubricate the actuation cylinder and
actuation piston assembly. Manually push the
plunger into the seal assembly and ensure it
returns completely and freely. If sticking
continues to occur, the seals should be
replaced. Reassemble and see if alarm
reoccurs after a system restart.
3. If pump actuation is normal:
a. Inspect the discharge lines and valves for
a restriction.
b. Inspect all the check valves on the
discharge side of the pump, from the
NJEX LVO System to the pipeline, for
proper operation.
c. Verify that the operating conditions
remain unchanged and correct as
needed.
4. Verify that the actuation pressure remains
unchanged from previous setting.
5. Verify that all valves and check valves are
properly set for system operation. Inspect for
valve settings that can restrict pump
displacement.
6. Check the actuation gas filter for flow
restriction or closure.
7. Ascertain whether the pump is properly
stroking.
Troubleshooting: Pump Performance
a. If pump actuation does not occur as the
test key is pressed, remove the actuation gas
line at the top of the pump and test the pump
stroke again. As the Test key is pressed, there
should be a burst of gas at the open actuation
supply connection. If the gas is released from
the open actuation supply line skip to
subsection 7.e., otherwise continue to 7.b.
b. If solenoid discharge to the pump
connection does not release gas, remove the
pump solenoid wiring cable. Next connect
a multimeter to the connections 10 and 11 on
the Z-100 controller. Press the test function on
the Z-100 by pressing up on the navigation
swtich while on the home screen or by the test
screen. Observe if an approximate 12VDC
current becomes present. If a voltage is detected
the solenoid should be replaced.
c. If the above test indicates the solenoid is
functioning, next determine if the signal is
being sent by the controller, or lost in the
cabling and connections. Go to the Z-100
Controller terminal strip and connect your
volt meter, to terminals 10 and 11, with 11
being the positive wire and 10 being the negative
wire. Now, test fire the pump with the test
function on the Z-100 by pressing up on the
navigation swtich while on the home screen
or by the test screen. A momentary voltage
pulse, approximately 0.2 seconds in duration,
should be observed. This will be a DC voltage
pulse, approximately 12VDC Varies based on
battery or external supply voltage. If the pulse
is at the termination strip, next check the
polarity of connections of the wiring. Try
reversing the terminal wiring connections for
the terminals 10 and 11, and repeat steps 7a
and 7b. If this does not correct the problem the
cable assembly to the solenoid should be replaced.
d. If no voltage is detected, check the fuses on the
circuit board using the label adhered to the
potting as a guide. Replace fuses as necessary.