19
Replacing Sensor
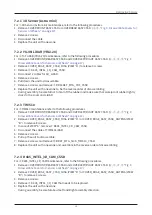
7.2.1 3D Sensor (Astra mini)
For ① 3D Sensor (Astra mini) maintenance, refer to the following procedures.
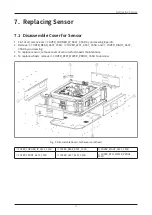
1. Remove COVER FRONT ASSY CSSD or COVER REAR ASSY CSSD. (②, ③,
"Fig. 9: Disassemble Covers for
2. Release 2 screws.
3. Disconnect the cable.
4. Replace the unit with a new one.
7.2.2 YUJIN LiDAR (YRL3-20)
For ② ToF LiDAR (YRL3-20) maintenance, refer to the following procedures.
1. Remove COVER FRONT/REAR ASSY CSSD and COVER LEFT/RIGHT ASSY CSSD. (②, ③, ④, ⑤
Disassemble Covers for Sensors or Wheels" on page 17
2. Remove COVER_EDGE_ASSY_CSSD_FUSA (VIEW ”A”) to release 4 screws.
3. Remove ④ D435_INTEL_3D_CAM_CSSD.
4. Disconnect 2 cables for 3D_LIDAR.
5. Release 2 screws.
6. Pull down the unit to disassemble.
7. Release 3 screws and remove ⑧ BRACKET_MTG_TOF_CSSD.
8. Replace the unit with a new one to be the reverse order of disassembling.
•
During assembly, be careful not to tear off the rubber and make sure that waterproof rubber tightly
sticks to the cover and LiDAR.
7.2.3 TIM510
For ③ TIM510 maintenance, refer to the following procedures.
1. Remove COVER FRONT/REAR ASSY CSSD and COVER LEFT/RIGHT ASSY CSSD. (②, ③, ④, ⑤
Disassemble Covers for Sensors or Wheels" on page 17
2. Remove COVER_EDGE_ASSY_CSSD_FUSA (VIEW ”A”) or COVER_EDGE_ASSY_CSSD_ANTENA (VIEW
”B”) to release 8 screws.
3. In case of VIEW “A”, remove ④ D435_INTEL_3D_CAM_CSSD.
4. Disconnect the cable of TIM510 LiDAR.
5. Release 2 screws.
6. Pull up the unit to disassemble.
7. Release 2 screws and remove ⑩ BRKT_MTG_SICK_TIM510_CSSD.
8. Replace the unit with a new one and assemble in the reverse order of disassembling.
7.2.4 D435_INTEL_3D_CAM_CSSD
For ④ D435_INTEL_3D_CAM maintenance, refer to the following procedures.
1. Remove COVER FRONT/REAR ASSY CSSD and COVER LEFT/RIGHT ASSY CSSD. (②, ③, ④, ⑤
Disassemble Covers for Sensors or Wheels" on page 17
2. Remove COVER_EDGE_ASSY_CSSD_FUSA (VIEW ”A”) or COVER_EDGE_ASSY_CSSD_ANTENA (VIEW
”B”) to release 4 screws.
3. Release 4 screws.
4. Remove ④ D435_INTEL_3D_CAM that needs to be replaced.
5. Replace the unit with a new one.
•
During assembly, be careful about Left and Right assembly direction.


