Installation & User Guide
Revision Mar. 27, 2023
YS7107-UC
Outdoor Alarm Controller 2
Page 1: ...Installation User Guide Revision Mar 27 2023 YS7107 UC Outdoor Alarm Controller 2...
Page 2: ...App Get to Know Your Siren Horn Installation Operation App Settings Control D2D 3rd party Integrations Replacing The Batteries Factory Reset Firmware Update Troubleshooting Warnings Warranty FCC Stat...
Page 3: ...allation with our products or if you have any questions that this manual does not answer please contact us right away See the Contact Us section for more info Thank you Eric Vanzo Customer Experience...
Page 4: ...the device from the app and for full functionality a YoLink hub is required This guide assumes the YoLink app has been installed on your phone and a YoLink Hub or SpeakerHub is installed and online Be...
Page 5: ...03 Included C Outdoor Alarm Controller 2 Siren Horn ES626 Siren Horn ES626 OR 4 x AA Batteries Pre Installed Phillips Head Screws 3 Quick Start Guide...
Page 6: ...04 These tools or items may be required Required Items D Wall Anchors Drill with Drill Bits AC DC Adapter or 12VDC Power Supply Medium Phillips Screwdriver Extra Small Straight Screwdriver...
Page 7: ...Device Start Up Blinking Red And Green Alternately Restoring to Factory Defaults Blinking Red Once Valve Closing Quick Blinking Red Twice Valve is Closed Blinking Green Once Valve Opening Quick Blinki...
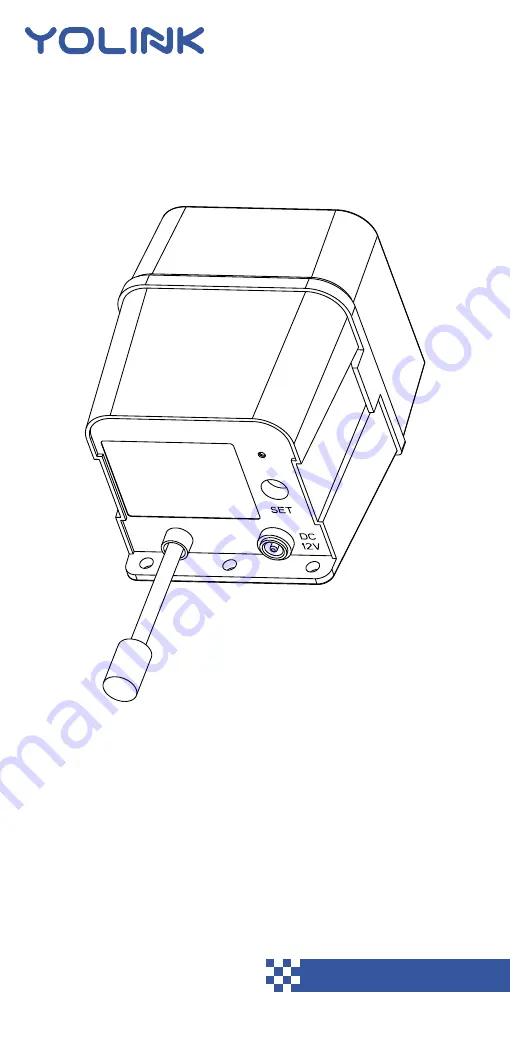
Page 8: ...06 Power Up F Power up the Valve Controller 2 by briefly pressing the SET button until the LED flashes red then green SET button...
Page 9: ...ou receive important messages in the future Log in to the app using your new username and password The app opens to the Favorite screen This is where your favorite devices and scenes will be shown You...
Page 10: ...on 2 Approve access to your phone s camera if requested A view nder will be shown on the app 3 Hold the phone over the QR code so that the code appears in the view nder If successful the Add Device sc...
Page 11: ...09 4 You can change the device name and assign it to a room later Tap Bind device 5 If successful the screen will appear as shown Tap Done Add Your Alarm Controller 2 to the App Continued H...
Page 12: ...10 Mounting Holes 3 Tilt Adjustment Mounting Base Mounting Holes 6 Tilt Adjustment Mounting Base Get to know your Siren Horn I...
Page 13: ...ppropriate mounting hardware screws anchors etc and a means of installing them in the wall or mounting surface on hand It is important to securely mount the Outdoor Alarm Controller and the Siren to t...
Page 14: ...o you can consider installing your siren in the attic if applicable A location in the attic may allow for sound to be carried both inside the home as well as outside depending on siren proximity to ea...
Page 15: ...s The device current draw and inrush current must be under 1 ampere Correct polarity must be observed Do not attempt to power the device for extended periods as this will quickly drain the battery If...
Page 16: ...and appropriate drill bit 3 You can adjust the desired up down tilt of the siren at this time or during testing Install the Siren 1 Holding the siren at the desired location transfer the location of t...
Page 17: ...or mounting surface using a marker or similar means 2 If you are using wall anchors install them per the manufacturer instructions 3 Secure the Alarm Controller to the wall or mounting surface with sc...
Page 18: ...cable turn on the 12V DC power supply or connect the power adapter to AC power at this time 4 Test the siren by pressing the SET button on the controller The siren should activate Press the SET button...
Page 19: ...17 App Settings L In the app tap on your FlexFob s icon Your fob s main screen should be similar to the one shown below Start Alarm Mute...
Page 20: ...18 App Settings Continued L In the app tap on your FlexFob s icon Your fob s main screen should be similar to the one shown below Start Alarm Mute...
Page 21: ...and Hub Device Model Device EUI unique Device SN unique Connection Signal Status of controller and Hub Strong Good Weak Current Battery Level Shown red if replacement is required Firmware Version rea...
Page 22: ...rols another directly A device that sends out commands is called the controller A device that receives the commands is called the responder Examples of a controller are a Water Leak Sensor while examp...
Page 23: ...larm to turn on the siren s then press the Deactivate Button to silence the siren s The steps to pair your Siren Alarm and or Outdoor Alarm Controller with YoLink alarm devices is similar Refer to the...
Page 24: ...airing Continued Unpair Your SirenFob 1 On the SirenFob press and hold the Start Alarm button for 10 to 15 seconds until the LED flashes green then red then release the button 2 On the siren device pr...
Page 25: ...s 1 If you are using an external power supply disconnect or turn it off 2 Remove the cover of the alarm controller to gain access to the battery compartment This may be done by hand or with a flat scr...
Page 26: ...ew batteries 4 To reinstall the cover align the side tabs of the cover with the slots on main assembly and press down snapping it in place Inspect each side of the controller to ensure a proper t 5 On...
Page 27: ...o redo your automations etc Instructions Hold the SET button down for 20 30 seconds until the LED blinks red and green alternately Then release the button Holding the button down longer than 30 second...
Page 28: ...the Detail screen of each device at the bottom you will see the Firmware section as shown in the image below A rmware update is available for your device if it says ready now Tap in this area to star...
Page 29: ...Controller 2 If Hub is not on power on the Hub again and press the SET button on Outdoor Alarm Controller 2 If valve is out of range with Hub relocating the Hub may be required For a device with low b...
Page 30: ...from the damaging effects of intense direct sunlight and or rain over a period of years Do not immerse or allow the devices to be immersed or submerged in water Avoid placing the devices in extremely...
Page 31: ...other type batteries e g zinc blend Do not mix old and new batteries If storing the controller for extended periods remove the batteries Please contact Customer Support before attempting to repair dis...
Page 32: ...nty is limited to the repair or replacement of the device only at YoSmart s sole discretion YoSmart will NOT be liable for the cost of installing removing nor reinstalling this product nor direct indi...
Page 33: ...ned by turning the equipment off and on the user is encouraged to try to correct the interference by one or more of the following measures Reorient or relocate the receiving antenna connect the equipm...
Page 34: ...atement Continued PRODUCT NAME OUTDOOR ALARM CONTROLLER 2 PARTY YOSMART INC TELEPHONE 831 292 4831 MODEL NUMBER YS7107 UC ADDRESS 15375 BARRANCA PKWY SUITE J 107 IRVINE CA 92618 USA EMAIL SERVICE YOSM...
Page 35: ...Monday Friday 9AM to 5PM Paci c You can also nd additional support and ways to contact us at www yosmart com support and service Or scan the QR code Finally if you have any feedback or suggestions for...