background image

9-12

IM AQ1200-01EN

Explanation

This feature is available on models with the /SLT or /HLT option.

You can specify core numbers and tape number types and save data (measurement conditions and 
measured values) to the AQ1200 internal memory. You can also save the data to a file.

Displayed List

You can set the list to show to one of the following options. The list display format changes depending 
on the starting core number, tape number type, and number of fibers (or tapes) that you set in the 
detailed setup screen.

Core List

A list of core numbers and the saved data of the highlighted core number are displayed.

List

The core numbers and saved data are displayed.

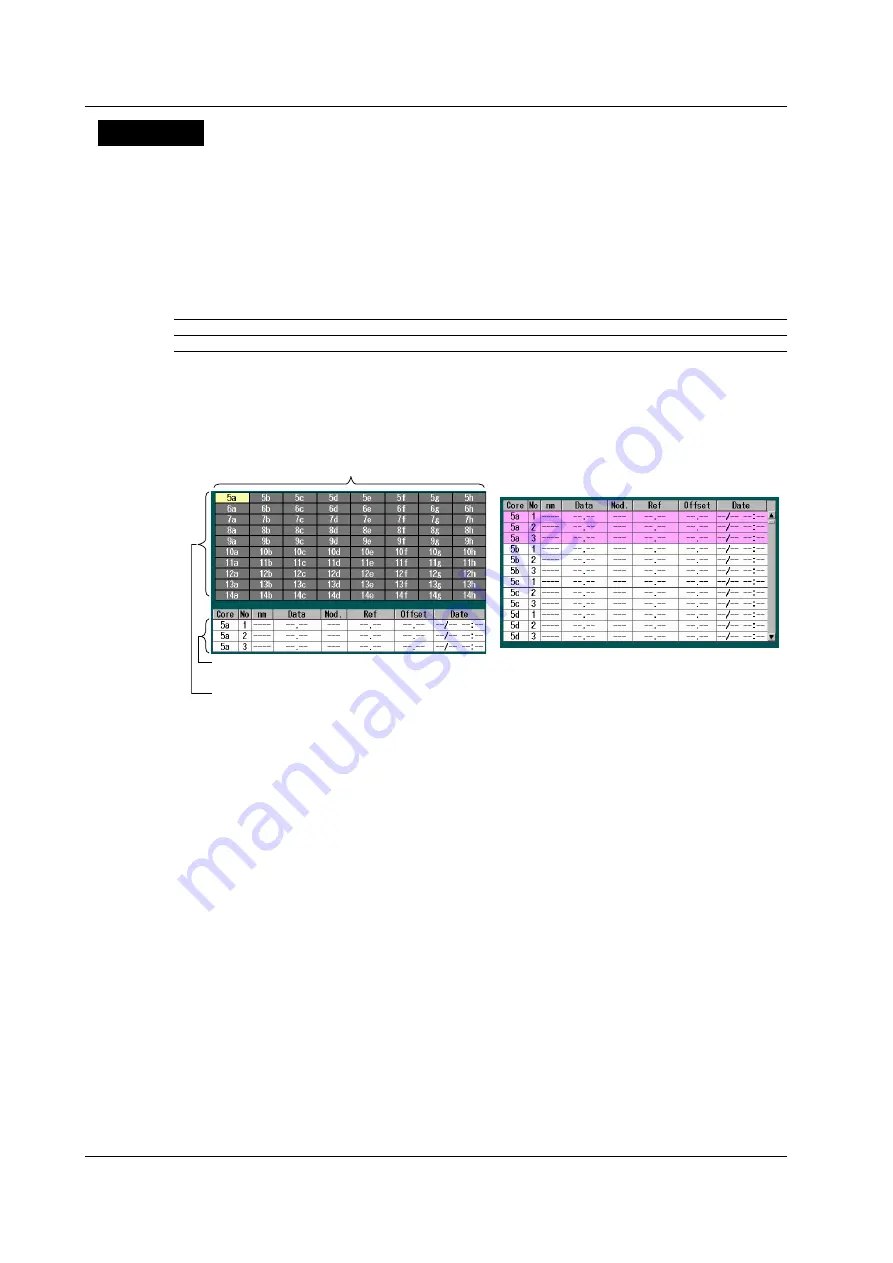
Example When the Starting Core Number Is Set to “5,” the Tape Number Type Is Set 

to “a-h(8),” and the Number of Tapes Is Set to “10”


The list begins with the starting core number 5. 

Each core number is divided into eight tape 

numbers from a to h.

The list begins with the starting core number 5. 

Each core number is divided into eight tape 

numbers from a to h. The data for the core and 

tape number pairs through 14h is displayed.

Use the rotary knob and the arrow keys to scroll 

through the list.

Core List

List

There are 10 tapes, so the cores are 

numbered 5a through 14h.

The data of the highlighted core and tape 

number pair (5a here) is displayed.

Skipping

If you specify Skip for a core number that you don’t need to measure, its data will not be saved. By 
setting which cores to skip beforehand, you can avoid accidentally saving unnecessary data.

Saving Data

You can save up to three sets of data in the save area of the specified core.
For details about saving the data to a file, see section 16.2.

Deleting Data

You can delete the data for individual core numbers in a save area or delete all the data at once.

Starting Core Number

You can set the starting core number to a value within the following range.
1 to 9900

Tape Number Type

You can set the tape number type to one of the following options.
Off, a-b(2), a-c(3), a-d(4), a-e(5), a-f(6), a-g(7), a-h(8)

9.4  Selecting and Saving Core and Tape Numbers

Summary of Contents for AQ1200

Page 1: ...User s Manual AQ1200 OTDR Multi Field Tester IM AQ1200 01EN 2nd Edition...

Page 2: ...al are subject to change without prior notice as a result of continuing improvements to the instrument s performance and functionality The figures given in this manual may differ from those that actua...

Page 3: ...or user s data and precautions that can be taken to prevent such occurrences Note Calls attention to information that is important for proper operation of the instrument Symbols and Conventions Used...

Page 4: ...al Pulse Measurement and Analysis Conditions 3 1 Selecting the Measurement Mode 3 1 Simple Full Auto Mode 3 2 Selecting the Wavelength 3 2 3 3 Automatically Saving Measured Data 3 3 3 4 Selecting the...

Page 5: ...ts 9 5 9 4 Selecting and Saving Core and Tape Numbers 9 10 Chapter 10 PON Power Meter PPM suffix code 10 1 Making Preparations for Measurements 10 1 10 2 Setting PON System Optical Power Measurement C...

Page 6: ...g Power Save Settings 17 2 17 3 Resetting the AQ1200 to Its Factory Default Settings 17 3 17 4 Setting Operation Restrictions 17 4 17 5 Assigning Menus Items That Are Displayed on the Top Menu 17 6 17...

Page 7: ...ptical fiber Telephone exchanges Measurement in cable installations AQ1200 Consumer Corporate user OTDR Features Optical pulse measurement Real time averaged measurement Waveform display Can be zoomed...

Page 8: ...fiber inspection probes contact your nearest YOKOGAWA dealer IP Testing LAN option Simple connection testing that uses PING PON power meter PPM option Simultaneous measurement of the optical power of...

Page 9: ...length and whether measured data is saved automatically or not All other measurement conditions are configured automatically or are fixed Detail In this mode you can set all measurement conditions Mul...

Page 10: ...averaging the specified number of optical pulse measurements or by averaging optical pulse measurements over the specified duration During averaged measurement you cannot change the measurement condit...

Page 11: ...Splice loss Approximated line Reflection caused by a connector Loss caused by bending Reflection at the open end of the fiber Fresnel reflection Dynamic range SNR 1 Optical fiber Near end Reflection T...

Page 12: ...cident optical power 14 7 dB is reflected Glass Air Incident ray 100 Reflected light 3 Light 97 Dynamic Range Dynamic range refers to the range of optical power levels that can be measured The larger...

Page 13: ...correct index of reflection is not specified there will be errors in the distance measurement Setting the Index of Reflection The AQ1200 has preset indices of reflection that correspond to each wavele...

Page 14: ...ur at connections cannot be detected If you are measuring a short distance connect a dummy fiber to move events that are hidden in the near end reflection the distance of the dummy fiber MENU F1 F2 F3...

Page 15: ...a point N that is used to calculate the near end side s approximated line a point E where splice loss is detected a point F that is used to calculate the far end side s approximated line and the far...

Page 16: ...for the return loss measurement you can measure the return loss in the area between B and E S E E E E B Event Analysis You can detect events in the optical pulse measurement waveform and measure the...

Page 17: ...ls with SLT or HLT Suffix Codes Models with PPM Suffix Codes Normal power meter selected PON power meter selected Wavelength Yes Fixed10 11 Fixed10 11 Wavelength mode1 Yes Modulation mode2 Yes Unit Ye...

Page 18: ...r or not the measured values fall within them 10 You can measure the optical power of an upstream signal from the ONU optical network unit the user s optical terminal to the OLT optical line terminati...

Page 19: ...and measures the optical power The following items can be specified or executed For details about these items see section 1 5 The unit reference offset and threshold values can be specified The zero s...

Page 20: ...e Optical Fiber under Loss Test All fibers other than the optical communication fiber can be tested For each optical fiber under loss test connect one end to the master s optical power measurement por...

Page 21: ...lts in the middle of a fiber the fiber end face is detected as a fault You can specify the wavelength and the loss level that is used to determine if a fault is a fiber end face or not when the AQ1200...

Page 22: ...can use a fiber inspection probe to take a photograph that shows the state of a fiber end face You can display this photograph on the AQ1200 screen and save it For information about compatible fiber i...

Page 23: ...test make sure that the optical fiber or line is connected physically IP testing is available on models with the LAN option Ping Test To ping an address perform a simple IP test specify the address a...

Page 24: ...selection USB function selection storage communication Screen color selection Current date and time configuration see the operation guide IM AQ1200 02EN Power save settings Network settings on models...

Page 25: ...For example to select the OTDR feature and confirm your selection Using the rotary knob and ENTER select OTDR Displays an image that shows the selected feature Displays a term that represents the sele...

Page 26: ...tary knob and ENTER to select a feature that is already displayed in the top menu the feature will move to the top position of the top menu If you press a soft key F1 to F5 the feature that you have s...

Page 27: ...on the menu the selected item is con firmed or the action that corresponds to it is performed C The selected setting switches each time you press the soft key To return to the previous menu press ESC...

Page 28: ...R to select the item F The selected setting switches each time you press ENTER G Press ENTER to display a text box Turn the rotary knob or press the up and down arrow keys to increase or decrease a nu...

Page 29: ...hen you are operating the OTDR feature Also you can only make shortcut assignments when you are using the OTDR feature The shortcut feature does not function on the top screen You can assign the same...

Page 30: ...Displays the print menu Displays the scale menu Displays the visible light source menu Starts saving Starts printing Coarse Fine Switches the resolution between coarse and fine for the cursor movement...

Page 31: ...ey to confirm the string that you entered and close the character input dialog box The string be applied to the relevant item You can also confirm the string by moving the cursor to ENT on the display...

Page 32: ...nput history screen 2 Using the rotary knob and ENTER choose the string that you want to enter The string appears in the edit screen Note Entered strings are saved to the input history when you confir...

Page 33: ...are listed below You can view these conditions in the measurement condition information see section 5 1 that is displayed on the screen Item Setup Distance range Automatic Pulse width Automatic Atten...

Page 34: ...SETUP and then the Meas Setup soft key 3 Using the rotary knob and ENTER set Mode to Simple to display the following screen Set Mode to Simple Set the wavelength The available options vary depending...

Page 35: ...de Procedure Measurement Screen 1 Using the rotary knob and ENTER select OTDR 2 Press SETUP and then the Meas Setup soft key 3 Using the rotary knob and ENTER set Mode to Simple to display the followi...

Page 36: ...Setup Screen 1 Using the rotary knob and ENTER select OTDR 2 Press SETUP and then the Analysis Setup soft key 3 Using the rotary knob and ENTER set Mode to Simple to display the following screen Set t...

Page 37: ...the sample interval Normal High Resolution 5cm 10cm 20cm 50cm 1m 2m 4m 8m 16m 32m Set the average count or the duration to average over When the unit is times Auto 2 10 2 11 2 12 2 13 2 14 2 15 2 16 2...

Page 38: ...set the measurement mode to Multi WL on the AQ1200A you can simultaneously make measurements for the 1310 nm and 1550 nm wavelengths Distance Range Specify a distance range that matches the cable len...

Page 39: ...table Pulse Width Selectable Attenuations 3 ns to 50 ns 0 dB 2 50 dB 5 00 dB 7 50 dB 10 00 dB 12 50 dB 15 00 dB 100 ns to 1 s 0 dB 2 50 dB 5 00 dB 7 50 dB 10 00 dB 12 50 dB 15 00 dB 17 50 dB 20 00 dB...

Page 40: ...tions measurements may not have finished when the specified time elapses Times Measurements are performed only the specified number of times Average Count and Average Duration You can select the follo...

Page 41: ...ill be affected When this communication light is present we say that the fiber is in use The fiber in use alarm is a feature that checks if communication light is being transmitted along the optical f...

Page 42: ...Initializes the settings Press to reset the settings to their factory defaults Explanation Index of Reflection The AQ1200 uses indices of reflection in the calculations that it performs to measure di...

Page 43: ...ll Fluctuations in the calculated values are reduced and highly reproducible values can be obtained Demerit If a large reflection or splice loss is present in the section whose loss is being calculate...

Page 44: ...play Events that are greater than or equal to the specified threshold or reflections that are less than or equal to the specified threshold are displayed as fault events Off Events that have exceeded...

Page 45: ...optical pulse wavelength of 1650 nm Even though these differ from the wavelength for optical communication if communication light is present in the optical fiber the fiber is in use the communication...

Page 46: ...ime Turns the alarm notification upon work completion on or off Turns the message display upon work completion on or off Explanation Before you check whether the work is complete move the cursor to th...

Page 47: ...Q1200 checks the work completion a message confirming whether you have set the cursor to a position that is a little after the installation point is displayed No Check The confirmation message is not...

Page 48: ...d AQ1200C Set the distance range Auto 500m 1km 2km 5km 10km 20km 50km 100km 200km Set the pulse width Auto 3ns 10ns 20ns 50ns 100ns 200ns 500ns 1 s 2 s 5 s 10 s Press to configure marker settings See...

Page 49: ...nm Installation Completion Notification Move the cursor to a position a little after the installation point before you perform real time measurement If the fiber end detection position is the same as...

Page 50: ...VG again during an averaged measurement the measurement will stop During measurement a mark appears on the display to indicate that the laser light is on Press to configure marker settings See section...

Page 51: ...xt displayed on the soft key changes from Snapshot to Clear Snapshot Take clear a snapshot If you press this soft key when Snapshot is displayed a snapshot will be taken of the displayed waveform and...

Page 52: ...distance reference is 0 and this displays the distance from the distance reference to the position of the left edge of the screen as a negative value Distance per division on the horizontal axis Wavef...

Page 53: ...nd horizontal directions See section 5 3 Set the amount the cursor moves Fine Coarse Set whether to move the cursor a small amount or a large amount Auto Zoom Automatically zooms in on the waveform at...

Page 54: ...he left edge of the display Down arrow key Zoom in on the waveform in the vertical direction Up arrow key Zoom out on the waveform in the vertical direction Left arrow key Zoom in on the waveform in t...

Page 55: ...splayed Overview Display The overview display is linked to the zoomed waveform display The blue box indicates where in the entire waveform display area the zoomed waveform display is showing When the...

Page 56: ...s where in the entire waveform display area the currently displayed waveform area is Executes auto zoom See section 5 2 Moving the Displayed Waveform 1 Press the arrow keys to move the displayed wavef...

Page 57: ...ay the following screen Initializes the display scales Enables zooming See section 5 2 Enables moving in the vertical and horizontal directions See section 5 3 Executes auto zoom See section 5 2 Set t...

Page 58: ...play setup screen Turns the ghost cursor display on or off Turns the approximated line display on or off Turns the marker information display on or off Turns the event auto zoom on or off Turns the sc...

Page 59: ...ss are measured Each value is calculated in real time as you move the line marker Marker Line Note Line is often used outside of Japan Marker is often used within Japan It is used on existing YOKOGAWA...

Page 60: ...ollowing figure propagates in the direction of II Light ray A that is reflected at connection II is reflected again at connection I and propagates in the direction of II as light ray B At this point t...

Page 61: ...ormation is not displayed On Marker information is displayed Marker information Event Auto Zoom When events have been detected you can zoom in on the event at the cursor position or the selected event...

Page 62: ...ursor type from the following Cross Uses a crosshair to indicate a position on the waveform Line Uses a line to indicate a position on the waveform Crosshair display Line display Event List You can se...

Page 63: ...on that the cursor moves differs depending on the direction that you rotate the rotary knob Clockwise The cursor moves to the right Counterclockwise The cursor moves to the left If you turn the rotary...

Page 64: ...s to the screen that is used to delete markers and the cursor A marker measurement outline is displayed on the screen For details see Explanation later in this section 2 Point Markers 3 Press the 2 Po...

Page 65: ...r 1 1 Press to set all markers together See Distance Reference later in this section See Distance Reference later in this section 1 2 3 Note Set the markers in the order shown above starting with the...

Page 66: ...display the following screen Press to switch to the screen that is used to measure the two point markers See 2 Point later in this section Press to switch to the screen that is used to measure the fiv...

Page 67: ...t them so that the n marker is the measurement start point the distance reference 5 Point Markers 3 Press the 5 Point Markers soft key shown on the previous page to display the following screen Press...

Page 68: ...etails on the approximation methods see section 3 6 4 Point Markers This mode is only enabled when the Marker Mode is set to Marker The AQ1200 uses the following four points to perform the measurement...

Page 69: ...proximated line F f Approximated line n N E Splice loss Return loss b c b c dB km dB km a dB e n E E f f e f dB km dB km The measured loss value differs depending on the specified approximation method...

Page 70: ...on the cursor see section 6 1 The location where the AQ1200 and the optical fiber are connected is the distance reference To perform more accurate measurements zoom in on the waveform Using Markers to...

Page 71: ...select OTDR 2 Press the Marker soft key and then the Distance Ref Setup soft key to display the following screen 3 Turn the rotary knob to move the distance reference marker R to the measurement start...

Page 72: ...r 3 Measured splice loss result When Marker Mode Is Set to Line 1 Using the rotary knob and ENTER select OTDR 2 Press the Marker soft key and then the 5 Point Markers soft key to display the following...

Page 73: ...he AQ1200 detects the peak between the markers and calculates the level between the peak and the rising start point of the event When Marker Mode Is Set to Line 1 Using the rotary knob and ENTER selec...

Page 74: ...ue the measured waveform is saturated If the waveform is saturated the actual reflection value is larger than the value shown To prevent a waveform from being saturated you can Select a large attenuat...

Page 75: ...arkers are already present change these markers to the start point and end point markers 1 2 Press to configure more settings See Adjusting the Reference Level below Set the approximation method see s...

Page 76: ...screen Marker Auto Setup You can automatically set marker 1 or marker n as the start point and marker 2 or marker E as the end point You can use this feature to automatically set markers on waveform d...

Page 77: ...move the distance reference see section 6 3 Press to edit events see section 7 2 Select the rotary knob function Cursor Event Press to configure the two point markers See 2 Point later in this sectio...

Page 78: ...the measurement reference point to each event is displayed If you move the distance reference which is the measurement reference point the distance from the distance reference to each event is display...

Page 79: ...16 17 18 Index App Rotary Knob Feature You can select the operation that occurs when you turn the rotary knob from the following Cursor The cursor moves continuously Event The cursor moves directly b...

Page 80: ...R 2 Press the Event Analysis Setup soft key and then the Event Edit soft key to display the following screen Inserts events You can insert events when Cursor is selected on the Rotary Knob soft key De...

Page 81: ...e reference For details about the distance reference see section 6 3 If you insert an event to the right of the E event the inserted event becomes the E event and a new number is assigned to the forme...

Page 82: ...ly emitted from the wrong port enters the eye Procedure Light Source Screen Using the rotary knob and ENTER select LS_OPM the power meter light source to display the following screen The wavelength an...

Page 83: ...rement Light Wavelength AQ1200A SM 1310 nm SM 1550 nm AQ1200B SM 1625 nm AQ1200C SM 1650 nm The light for a single mode SM optical fiber is emitted from optical port 2 Firmly connect the optical fiber...

Page 84: ...port enters the eye Procedure There are two types of operation screens that you can use to generate visible light a screen that displays the menus for both the measurement light source and the visibl...

Page 85: ...on The visible light turns on A mark appears on the AQ1200 display to indicate that the light is on Turns the light off The light turns off The light mark disappears Explanation The visible light sou...

Page 86: ...Set 1 Using the rotary knob and ENTER select LS_OPM the power meter light source 2 Press SETUP and then the OPM Setup soft key to display the following screen Performs zero set Explanation This featur...

Page 87: ...reshold values Lower threshold line Upper threshold line Set the modulation mode CW 270Hz 1kHz 2kHz Set the unit dB dBm W Set the reference manually 80 to 40 dBm The Reference box appears if you press...

Page 88: ...power display unit to one of the following options dB relative value dBm absolute value W absolute value The following prefixes are attached to W m 10 3 10 6 n 10 9 and p 10 12 The relationship betwee...

Page 89: ...wavelength and modulation mode settings On After On is selected the power meter settings are synchronized to the light source settings Off The power meter settings are not synchronized to the light so...

Page 90: ...ave screen described below Screen display items Logging 3 Press the Display soft key to display the following screen Date and time See the operation guide IM AQ1200 02EN Cursor Value per division on t...

Page 91: ...ff Displaying and Moving the Cursor 5 Turn the rotary knob to display the cursor Cursor Note The direction that the cursor moves differs depending on the direction that you rotate the rotary knob Cloc...

Page 92: ...16 2 Saves the data Set the destination drive internal memory USB memory Explanation This feature is available on models with the SLT HLT or PPM option Creating and Saving Logs The AQ1200 is always me...

Page 93: ...cause the sections that are outside of the measurement range cannot be displayed even if you switch to the other cursor the selected cursor will not be displayed in the center of the screen Auto Zoom...

Page 94: ...ph display vertically Vertical zoom factor 50 Press the left arrow key to zoom the graph display horizontally Horizontal zoom factor 10 Overview Display The overview display is linked to the zoomed gr...

Page 95: ...set as the save destination is highlighted Set the list to show Core List List Data measurement conditions and measured values The data set in section 9 2 is displayed Save area Save area When Display...

Page 96: ...displayed Detailed Setup Screen Press SETUP and then the Data Save Logging soft key to display the following screen Set the starting core number 1 to 9900 Set the number of fibers or tapes up to 100 f...

Page 97: ...starting core number 5 Each core number is divided into eight tape numbers from a to h The data for the core and tape number pairs through 14h is displayed Use the rotary knob and the arrow keys to s...

Page 98: ...et the number of fibers or tapes to a value within one of the following ranges Tape Number Type Number of Fibers or Tapes Off 10 to 100 fibers a b 2 10 to 50 tapes a c 3 10 to 33 tapes a d 4 10 to 25...

Page 99: ...and then start the PON power meter zero set procedure Procedure Performing Zero Set 1 Using the rotary knob and ENTER select PON_OPM PON power meter 2 Press SETUP and then the OPM Setup soft key to d...

Page 100: ...r to display the following screen Holds the measured value display Measured value Bar graph display of the measured value Set the signal direction ONU OLT OLT ONU Lower threshold line Upper threshold...

Page 101: ...from the ONU optical network unit the user s optical terminal to the OLT optical line termination the telephone exchange s optical terminal The optical power of the 1310 nm data wavelength signal is...

Page 102: ...lower threshold value When a measured value is within the upper and lower thresholds its bar graph is green PASS appears in the measured value area When a measured value exceeds the upper threshold or...

Page 103: ...that is set as the save destination is highlighted Example of the data measurement conditions and measured values when the signal direction is ONU OLT The data set in section 10 2 is displayed Save ar...

Page 104: ...Off a b 2 a c 3 a d 4 a e 5 a f 6 a g 7 a h 8 Saving Data to a File Press SETUP and then the File soft key to display the file save screen Follow the procedure in section 16 2 to save the data Explan...

Page 105: ...easure its data will not be saved By setting which cores to skip beforehand you can avoid accidentally saving unnecessary data Saving Data You can save up to three sets of data in the save area of the...

Page 106: ...if the light enters the eye Close the covers of any light source ports that do not have optical fiber cables connected to them On models with two or more light source ports visual impairment may occu...

Page 107: ...optical power measurement section and enables you to obtain more accurate absolute optical power values Perform zero set on the optical power meter Optical Power Adjustment Adjust the optical power of...

Page 108: ...sured value Set the reference manually 80 to 40 dBm The Reference box appears if you press the DREF soft key or set the unit to dB Sets the reference to the currently displayed measured value Holds th...

Page 109: ...the optical fiber cable because light is emitted from the light source port Visual impairment may occur if the light enters the eye Close the covers of any light source ports that do not have optical...

Page 110: ...ditions and measured values The data set on the power meter screen is displayed Save area Save area When Display is set to List Core no When Display is set to Core List You can save up to three sets o...

Page 111: ...cal Power Meter Unit Reference Offset Threshold Values and Holding of the Display of Measured Values For information about the unit reference offset threshold values and the holding of the display of...

Page 112: ...ata measurement conditions and measured values to the AQ1200 internal memory You can also save the data to a file Display List Skipping Saving Deleting Data Starting Core Number Tape Number Type and N...

Page 113: ...et the wavelength SM 1310nm SM 1550nm Measured value Bar graph display of the measured value Set the reference manually 80 to 40 dBm The Reference box appears if you press the DREF soft key or set the...

Page 114: ...the wrong port enters the eye Connect one end of the optical fiber or line that you need to perform loss testing on to the AQ1200 optical power measurement port and connect the other end to the light...

Page 115: ...ection 9 2 Light Source Light is emitted at the measurement light wavelength For details see Explanation in section 11 2 Executing a Loop Back Loss Test To perform loop back loss testing configure the...

Page 116: ...a h 8 Set the number of fibers or tapes up to 100 fibers when Tape no Type is set to Off up to 50 tapes when Tape no Type is set to a b 2 up to 12 tapes when Tape no Type is set to a h 8 Set the wave...

Page 117: ...to 25 tapes a e 5 10 to 20 tapes a f 6 10 to 16 tapes a g 7 10 to 14 tapes a h 8 10 to 12 tapes Measurement Light Wavelength The following measurement light wavelengths can be generated Model Measurem...

Page 118: ...n 4 Press the Project Transmission START soft key to generate the optical signal used to transmit the project information 3 Press the Receive Project from Master soft key On the menu Receive Project f...

Page 119: ...he rotary knob and ENTER select a project information file Restarting an Interrupted Loss Test When the loss test for a shared project is interrupted you can restart it where it left off retaining the...

Page 120: ...ceive the information send it from the master Note When a project is sent loss test results and skip information are not transmitted Loading a Project File Load the same project file onto the master a...

Page 121: ...t enters the eye 3 Press the Loss Test START soft key The optical signal used to transmit the core number is sent to the slave On the menu Loss Test START changes to Loss Test STOP After loss testing...

Page 122: ...oft key to display the file save screen Follow the procedure in section 16 2 to save the data Explanation This feature is available on models with the SLT or HLT option Multicore loss testing is perfo...

Page 123: ...nt ends normally the AQ1200 returns to the previous screen Cancels optical power adjustment The AQ1200 returns to the previous screen Explanation Optical Power Adjustment Adjust the optical power of t...

Page 124: ...ve the distance reference see section 6 3 Press to access the OTDR feature see chapters 3 to 7 If you press this soft key the OTDR screen will be displayed After you use the OTDR feature to perform an...

Page 125: ...fault is displayed Faults are not detected during real time measurement In the fault locator s real time measurement you can perform cursor operations or select the wavelength during measurements If...

Page 126: ...e previous screen Holds the screen Press this soft key to put the screen into the hold state When in the hold state HOLD is displayed at the top of the screen If you press this soft key again the hold...

Page 127: ...se the Ethernet port to execute a ping test Pinging Target Address Specify the address that you want to ping Tx Frame Set the conditions of the frame you will use for pinging Frame Length You can set...

Page 128: ...Stop All soft keys other than the PING Stop soft key are unavailable To stop pinging press the PING Stop soft key PING Stop will change to PING Start Ping Test Results The ping test results are listed...

Page 129: ...ted you can connect or disconnect the USB device at any time regardless of whether the AQ1200 is on or off When the power is on the AQ1200 automatically detects the USB storage medium after it is conn...

Page 130: ...o load Folder path The number of folders and files in the selected folder The file name candidate for the next save operation This indication appears when you set the action to Save Set the destinatio...

Page 131: ...hed to the file name Set the comment up to 30 characters To enter a comment follow the procedure in section 2 4 File name The file name that is determined by the above settings is displayed 1 2 3 1 2...

Page 132: ...measurement conditions such as the wavelength and offset for the specified core and tape numbers is saved Optical power meter measurement data see section 9 4 Loss test results see section 11 2 Loop b...

Page 133: ...mber is automatically appended to the ID number Example If you have a combination of ID No 0 and Tape Number Type a to c 3 the file names will be set as follows 0000a 0000b 0000c 0001a 0001b 0001c Wav...

Page 134: ...Company name Up to 36 characters Name Up to 36 characters Cable ID Up to 36 characters Fiber ID Up to 36 characters Fiber type 652 SMF 653 DSF 655 NZ DSF 651 MMF Single mode fiber Dispersion shifted f...

Page 135: ...les you want to delete or copy Selected files are indicated with this mark To deselect a file press ENTER again Folder path The number of folders and files in the selected folder Deletes the selected...

Page 136: ...e files in the current folder are deselected Deleting The selected files are deleted Setting the Copy Destination and Copying After selecting the files to copy set the destination folder and copy the...

Page 137: ...the action Rename Set the file type Set the extension of the file type of the file whose name you want to change Set the destination drive internal memory USB memory Enter a new file name The characte...

Page 138: ...nter a file name into the character input dialog box that appears Follow the procedure in section 2 4 Use the character input dialog box to enter the extension as well When you press the Commit soft k...

Page 139: ...t dialog box appears To set the folder name follow the procedure in section 2 4 After you have entered the folder name press the Commit soft key in the character input dialog box to create the folder...

Page 140: ...nd ENTER select the folder you want to delete or copy Folder path The number of folders and files in the selected folder Deletes the selected files or displays a screen for selecting the copy destinat...

Page 141: ...al memory to the USB memory or from the USB memory to the internal memory About the File Operation Screen Depending on the model and the selected feature the operations for opening the file operation...

Page 142: ...display the following screen Set the action Format Formats the internal memory Explanation Action Select Format Formatting The internal memory is initialized All the data in the internal memory is del...

Page 143: ...t File Print If you select File Print the drive selection menu is displayed Select the drive or the SOR file that you want to print Print Setup Specify the maker of the printer connected to the AQ1200...

Page 144: ...Year month day hour minute second year month day hour minute year short form month day hour minute month day hour minute hour minute Set what to sort by Date File Name Set the sort order A Z Z A Turn...

Page 145: ...et the language to display on the AQ1200 screen The options that appear vary depending on the product s language specification Turning the Beep On and Off You can make the AQ1200 beep whenever an oper...

Page 146: ...is generating an optical pulse Off The power does not turn off automatically AutoPowerOff 1m The power turns off automatically after one minute AutoPowerOff 5m The power turns off automatically after...

Page 147: ...Measurement Settings All the settings are reset to their factory defaults but the internal memory and the day and time settings excluding the type are not initialized Initializing All Settings All th...

Page 148: ...NTER to select Administrator PIN A screen for entering the PIN appears 5 Using the rotary knob and ENTER enter the administrator PIN that you set and then press SET to display the following screen Ent...

Page 149: ...when the Execute soft key for optical power adjustment is pressed light source loop back test While the AQ1200 is being used as a light source for auto loss testing when the Loss Test START soft key f...

Page 150: ...Press SETUP 2 Using the rotary knob and ENTER select Top Menu Func Setup to display the following screen Select the functions when Button Order is set to Fixed Select Use Frequency Order or Fixed Use...

Page 151: ...PC that has an FTP client and download the data that is stored on the AQ1200 internal memory For details about the network that you intend to connect the AQ1200 to contact your network administrator E...

Page 152: ...nformation when you access the AQ1200 from a PC IP Address You can set the IP address assigned to the AQ1200 The IP address is an ID that is assigned to each device on a network such as the Internet o...

Page 153: ...automatically if no operations have been performed for the specified time Check the settings 17 2 The screen is dark The screen is dark when the LCD Brightness setting is set to Power save Check the...

Page 154: ...le is properly connected between LS port and OPM port 65 Project Information doesn t match between Master and Slave 66 The project sent from master includes an unsuitable wavelength 500 The measuremen...

Page 155: ...s not read only 635 Folder cannot be deleted The path name or the file name is too long 636 Folder cannot be deleted The hierarchy below the specified folder is too deep 637 Folder cannot be deleted T...

Page 156: ...use event analysis is not performed 760 Cannot execute it while printing 761 This operation is not excuted while light is emitting Stop emitting the light then excute the operation 800 This function i...

Page 157: ...ill be powered off in 10 sec Please use AC adapter 914 Errors in the battery or in the charging circuit The instrument may be damaged if it is kept using in this condition The instrument will be power...

Page 158: ...splay the following screen Saves a screen image Explanation The following information about the AQ1200 is displayed Model Name Serial Number Suffix Code Mac Address Version Information etc Executing S...

Page 159: ...enu Press SETUP to display the following menu Executes a self test Explanation The AQ1200 checks the operation of the Internal memory RTC real time clock battery If the results of the self test are no...

Page 160: ...y Explanation To update the firmware select a firmware update file YMC extension You can change file names except for the extension as necessary For instructions on how to change the file name see sec...

Page 161: ...stuck in the connectors malfunction and damage may occur The AQ1200 may not operate properly if its connectors are loose Make sure that There is no external damage or deformation on the outside of the...

Page 162: ...ith clean water and then see a doctor immediately Do not use or charge battery packs with the AQ1200 that are not made by YOKOGAWA When you attach the battery pack to the AQ1200 attach it properly Pro...

Page 163: ...follow the proper disposal regulations as specified by the relevant ordinance in your area When disposing of the batteries in the EU follow the Waste Electrical and Electronic Equipment WEEE Directive...

Page 164: ...case Battery cover Hooks Hook holes Electrodes Charging a Battery Pack When the battery is low a warning message will appear When this happens charge the battery 1 Connect the power cord to the AC ada...

Page 165: ...replace an optical adapter universal or connector adapter while the power is on you may accidentally get light in your eyes damage them and impair your vision Removal 1 Make sure that the AQ1200 power...

Page 166: ...y into the rear shell 4 Pull the optical adapter lock lever down and outwards to lock it If the adapter is screwed in turn the knob to the right to tighten it Good example Bad example Note Insert the...

Page 167: ...identally emit light from the light source port If you clean the optical components while the power is on you may accidentally get light in your eyes damage them and impair your vision 1 Make sure tha...

Page 168: ...en charged or when it has no power left when the instrument will not turn on Storing the battery pack under these conditions will degrade its performance and reduce its longevity It is best to store t...

Page 169: ...g on the environment in which the battery pack is used Consumables We recommend that you replace the following parts at the intervals listed below Part Name Recommended Replacement Interval Notes Back...

Page 170: ...Calibration Periodic calibration is an effective means of keeping the instrument performing correctly for a long time and of detecting malfunctions at an early stage We recommend that you have the AQ1...

Page 171: ...2 13 14 15 16 17 18 Index App Appendix 1 Data File Formats CSV File Formats The following examples show the saved data being displayed in a spreadsheet program Optical Pulse Measurement OTDR Waveform...

Page 172: ...App 2 IM AQ1200 01EN Optical Power Meter Logging Results Measured Data from the Optical Power Meter Loss Test Results Appendix 1 Data File Formats...

Page 173: ...App 3 IM AQ1200 01EN Appendix 3 2 1 4 5 6 7 8 9 10 11 12 13 14 15 16 17 18 Index App Project Information Appendix 1 Data File Formats...

Page 174: ...4 fiber in use alarm 3 9 fiber end face 1 15 fiber end face checking 1 16 fiber ends 3 12 fiber inspection probe 1 16 14 1 file formats App 1 file list 16 16 file name 16 5 file names changing 16 9 I...

Page 175: ...m and minimum value menu 9 4 measurement interval logging 9 7 measurement interval PON 15 1 measurement light 1 11 measurement mode 1 3 measurement reference point 6 7 measurement wavelength 3 6 measu...

Page 176: ...9 12 slave 1 14 snapshot 4 4 speed of light 1 7 splice loss 1 6 1 8 3 12 6 10 7 2 start menu 17 1 status indicators 2 5 storage conditions 18 16 subnet mask 17 8 suffix code 18 6 symbols ii SystemInfo...

Reviews: