


Optional Accessories with Your Phone
143
Connecting to an Available Wireless Network Manually
Before You Begin
Get the password of the wireless network from your system administrator. Make sure that the Wi-Fi mode is activated.
Procedure
1.
Navigate to
Menu
->
Basic
->
Wi-Fi
.
On the SIP-T42S/T41S IP phone, navigate to
Menu
->
Settings
->
Basic Settings
->
Wi-Fi
.
2.
On the SIP-T46S/T46G/T42S/T41S IP phone, highlight the
X Available Network(s)
(X represents the number of avail-
able networks), and then press
Enter
.
3.
(Optional.) To re-search the available network, press
Scan
.
4.
Select the desired wireless network and then press
Connect
.
On the SIP-T48S/T48G IP phone, tap the desired wireless network to connect to your IP phone. Or tap
after the
desired wireless network, and then tap
Connect
.
5.
If the network is secure, enter its password.
6.
Press
OK
.
Related Topics
Connecting to the Wireless Network Using Wi-Fi Protected Setup (WPS)
Wi-Fi Protected Setup (WPS) provides simplified mechanisms to configure secure wireless networks which can auto-
matically configure a wireless network with a network name (SSID) and strong WPA data encryption and authen-
tication.
There are two methods supported by Yealink IP phones in the Wi-Fi protected setup:
l
Push Button Configuration (PBC)
: The user simply has to press WPS key on both the IP phone and gateway/router
to connect.
l
Personal Identification Number (PIN)
: The user has to enter a PIN generated randomly by the IP phone on the gate-
way/router to connect.
Before You Begin
Make sure that the Wi-Fi mode is activated.
Push Button Configuration (PBC)
Procedure
1.
Navigate to
Menu
->
Basic
->
Wi-Fi
.
On the SIP-T42S/T41S IP phone, navigate to
Menu
->
Settings
->
Basic Settings
->
Wi-Fi
.
2.
Press the
WPS
, and then select
WPS
.
On the SIP-T48S/T48G IP phone, tap
WPS
.
The LCD screen prompts “WPS has been activated, connect in 120s!”.
3.
Long press the WPS key on your gateway/router.
Once WPS setup has completed successfully, the LCD screen will prompt “Connect Success.”.
Personal Identification Number (PIN)
Summary of Contents for SIP-T48S
Page 1: ......
Page 14: ...Yealink T4 Series IP Phones User Guide 10...
Page 54: ...50 Yealink T4 Series IP Phones User Guide...
Page 152: ...148 Yealink T4 Series IP Phones User Guide...
Page 156: ...152 Yealink T4 Series IP Phones User Guide...
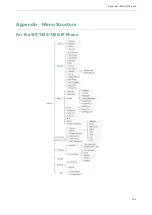
Page 157: ...Appendix Menu Structure 153 Appendix Menu Structure For the SIP T48S T48G IP Phone...
Page 158: ...Yealink T4 Series IP Phones User Guide 154 For the SIP T46S T46G IP Phone...
Page 159: ...Appendix Menu Structure 155 For the SIP T42S T42G T41S T41P T40P T40G IP Phone...