background image

For Service Engineers


Service Information


7/120 

SI1906002J-002 : YSP10 installation and adjustment procedures 

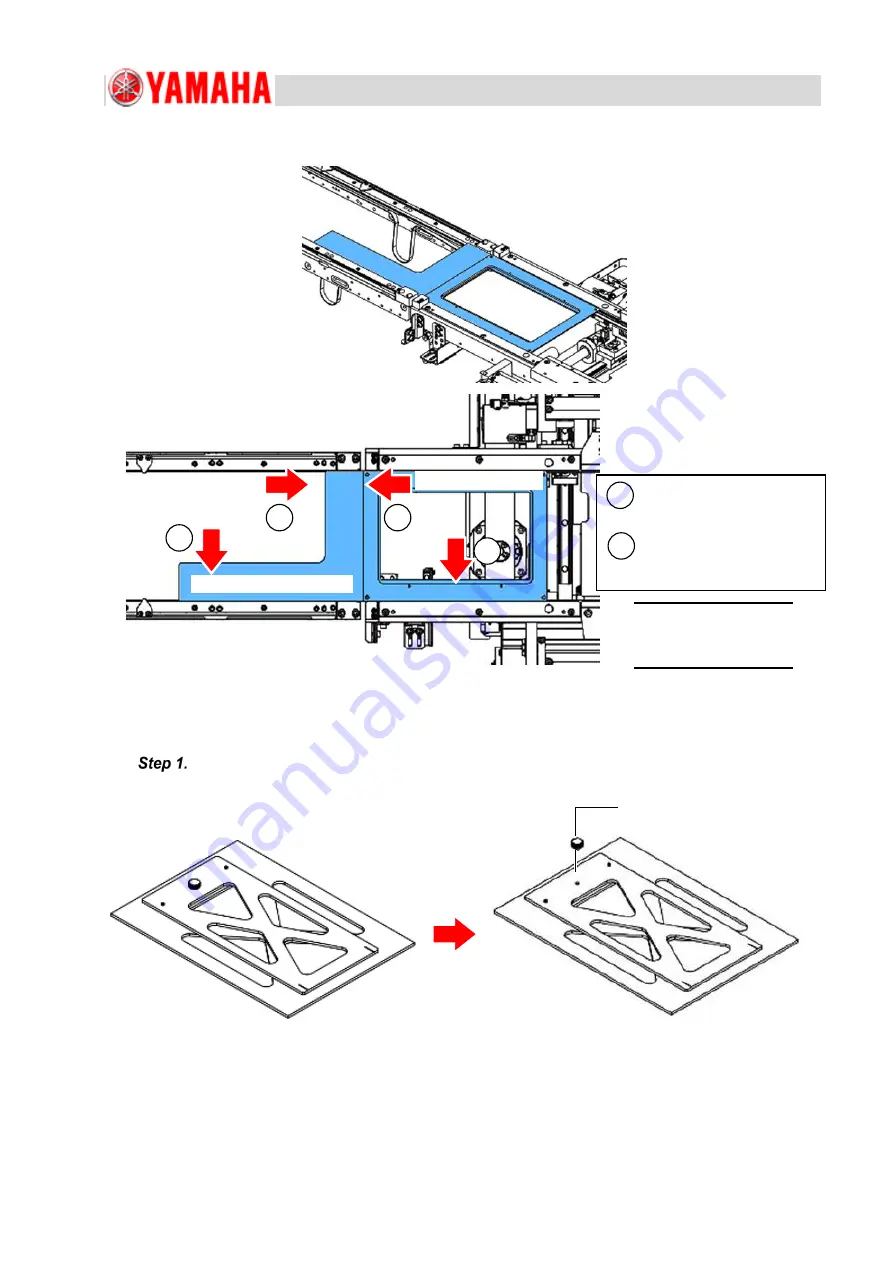
1.2.2.  How to use the L-type line alignment jig with the glass board’s frame 


1.2.3.  How to use the offset line alignment jig set 

Before using the offset line alignment jig, reassemble the LINE MEASURE 1 in advance. 


Remove the knob of the LINE MEASURE 1. 


KKE-M8811-00, see Note. 

Glass board’s frame 

1  Fit the jigs against the 

conveyor rail in the direction 

of arrows 


2  While preserving the 

condition of 

, press the 

jigs with each other. 


Note 
KKE-M8811-10 can 

also be used. 

Remove the knob. 

LINE MEASURE 1 

KLF-M8810-A0


Summary of Contents for YSP10

Page 1: ...ing market conditions it should not be interpreted to be a commitment on the part of YAMAHA and YAMAHA cannot guarantee the accuracy of any information presented after the date of issuance This document is provided for information purposes only and it is provided without any warranties either express or implied It is the responsibility of the user to comply with all applicable copyright laws Witho...

Page 2: ...the shipping brackets for automatic solder transfer unit optional 20 5 Confirm and connect the solvent tank 21 5 1 Confirm the solvent tank condition 21 5 2 Connect the solvent pump joint and the production preparation 21 6 Install accessories packaged with the machine 24 6 1 Install the signal tower 24 6 2 Install the operation monitor on the machine 24 6 2 1 Install the stylus and its holder 26 ...

Page 3: ...board transfer positions Y and Z 77 13 10 Adjust camera lighting conditions 81 13 10 1 Check lightness adjustment tools 81 13 10 2 Adjust the mask camera s lightness 82 13 10 3 Adjust the PCB camera s lightness 85 13 10 4 Adjust the inspection camera s lightness optional 88 13 11 Adjust camera scales and positions 90 13 11 1 Adjust the mask camera s scale 90 13 11 2 Adjust the PCB camera s scale a...

Page 4: ...bars Care must be taken not to stain or damage the installation site Sliding paper 8 sheets at least Paper sheet with one slippery side like a sticker s cover paper Prepare new paper sheets Required size is minimum of 200mm square Prepare extra sheets since the sheets are easy to tear 2 ton jack 1 3 Used when removing sliding paper from under the machine Hand lifter 1 2 1 5m or longer fork 2 ton o...

Page 5: ...E JIG SET KKE M8811 A0 1 set See Note below Note Either KKE M8811 00 or KKE M8811 10 can be used with a glass board with its glass portion removed see below figure as a jig set Glass board KM0 M8810 40 or KM0 M8810 10 with its glass portion removed Use either board with its glass portion removed with KKE M8811 00 or KKE M8811 10 as a jig set See 1 2 2 How to use the L type line alignment jig with ...

Page 6: ... to use the jig set Description Part name Part number Q ty Offset line alignment jig set LINE MEASURE ASSY KLF M8810 00 1 set 1 2 1 How to use the L type line alignment jig set LINE MEASURE 1 KLF M8810 A0 LINE MEASURE 2 KLF M8810 B0 KKE M8811 00 KKE M8811 10 1 1 2 2 1 Fit the jigs against the conveyor rail in the direction of arrows 2 While preserving the condition of press the jigs with each othe...

Page 7: ...et line alignment jig set Before using the offset line alignment jig reassemble the LINE MEASURE 1 in advance Remove the knob of the LINE MEASURE 1 KKE M8811 00 see Note Glass board s frame 2 2 1 Fit the jigs against the conveyor rail in the direction of arrows 2 While preserving the condition of press the jigs with each other Note KKE M8811 10 can also be used Remove the knob LINE MEASURE 1 KLF M...

Page 8: ...moved in step 1 Reinstall the knob removed in step 1 to its original position Set the jig on the conveyor Reassemble JIG PLATE 2 as shown below Insert JIG PLATE 2 of LINE MEASURE 1 onto LINE MEASURE 2 LINE MEASURE 2 LINE MEASURE 1 2 1 Fit the jigs against the conveyor rail in the direction of arrows 2 While preserving the condition of press the LINE MEASURE 1 1 1 Check the conveyor position offset...

Page 9: ...all Make sure that such equipment pieces won t interfere with the machine being transferred If they will ask the customer to move or mask them Ceiling height and door size of the machine transfer route Make sure that sufficient clearance is assured between the machine and the aisle ceiling Especially pay attention to the door opening size and if problem exists report to the customer Order of bring...

Page 10: ...pressure and 65 relative humidity 101 3 KPa absolute pressure is atmospheric pressure This differs from discharge airflow used in a compressor spec sheet etc Note Basically use one hose from the air source to the machine dedicatedly without branching the hose Otherwise required airflow amount per machine may not be obtained Also use air hoses of at least 8mm inner diameter for the same reason Even...

Page 11: ...er may break and or the machine fall off from hand lifter upon moving The center of gravity of the YSP10 is slightly in front of the center So in principle YSP10 is lifted by inserting a hand lifter from the front side of its body However when YSP10 is moved to lateral direction insert a hand lifter from sideways and slightly front of the center of YSP10 Also do not lift all at once but lift a lit...

Page 12: ...the machine page 24 Connect the power cable and air hose to the machine Page 28 Power on the machine and perform return to origin Page 30 Line alignment procedures page 35 Install the air conditioning unit optional page 52 Adjustments after installing YCP10 page 62 Confirm and connect the solvent tank page 21 Connect board transfer signal lines and check their connection page 46 Board transfer tes...

Page 13: ...ion location place the machine on the floor provisionally on the levelling bolts Take care not to stamp on the tracing tapes or erase location markings set by the customer When the provisional installation is complete check with the customer if the machine location is appropriate Note Place the machine near its previous or next machine considering the line alignment procedure Note Communicate suff...

Page 14: ...all shipping brackets beforehand Note Upon removing the shipping bracket it is recommended to place the square cloth or so under the subjected shipping bracket to prepare for a possible falling of the bolts or brackets The removing order of shipping brackets is described as the reversed order of the mounting order of shipping brackets 4 1 Remove the shipping brackets for the universal mask holder ...

Page 15: ...g a hexagon wrench 4 3 Remove the SY axes shipping brackets Part number and quantity Shipping bracket Removing procedure Bracket KMJ M2661 00 Qty 1 M5 x10 Flange Bolt 90990 32J011 Qty 3 Yellow ribbons is tied to the shipping brackets Remove the shipping bracket placed at left of the SY axes using a hexagon wrench 4 4 Remove the CX axes shipping brackets Part number and quantity Shipping bracket Re...

Page 16: ...e shipping brackets Remove the shipping bracket placed at the left side of the Y axis of the head unit using a hexagon wrench 4 6 Remove the squeegee head cable ties Part number and quantity Shipping Condition Removing procedure Cable ties 380mm Qty 4 Yellow ribbons are tied to the cable ties Remove the 2 cable ties attached to the back side of the squeegee head cover using a cutting plier When th...

Page 17: ...it using a hexagon wrench PSC syringe type Part number and quantity Shipping bracket Removing procedure Bracket KMJ M7395 00 Qty 1 M5 x12 Bolt 91312 05012 Qty 4 Yellow ribbon is tied to the shipping brackets Remove the shipping brackets placed at the right side of the PSC unit using a hexagon wrench 4 8 Remove the board press cable ties optional Part number and quantity Shipping Condition Removing...

Page 18: ...e shipping brackets Remove the shipping brackets placed at the right side of the solder guard using a hexagon wrench 4 10 Remove the mask stopper shipping brackets standard model Part number and quantity Shipping bracket Removing procedure M5 x30 Bolt 91312 05030 Qty 1 Yellow ribbon is tied to the bolt Remove the M5 bolt attached to the mask stopper placed at the back side of the squeegee unit usi...

Page 19: ...902 05200 Qty 2 Yellow ribbon is tied to the shipping brackets Remove the shipping bracket attached to the front side of the printing table using a hexagon wrench 4 12 Remove the shipping brackets for automatic mask exchange unit optional Part number and quantity Shipping bracket Removing procedure Bracket KMJ M2924 00 Qty 2 M5 x10 Flange Bolt 90990 32J011 Qty 4 Yellow ribbon is tied to the shippi...

Page 20: ...ic solder transfer unit optional Part number and quantity Shipping bracket Removing procedure Bracket KMJ M28Y1 00 Qty 2 M5 x10 Flange Bolt 90990 32J011 Qty 4 Yellow ribbon is tied to the shipping brackets Remove the shipping brackets attached to the right and left side of the automatic solder transfer unit using a hexagon wrench View from the rear side ...

Page 21: ... up with water and the joints are detached Positions of yellow ribbons 5 2 Connect the solvent pump joint and the production preparation Connect the solvent pump Perform the procedures from Step3 and the following after power and air are supplied Note When the machine is shipped abroad other than Japan the solvent pump is filled up with water and the joint is detached The water inside the pump can...

Page 22: ...stallation and adjustment procedures 22 120 Connect the joint at the cleaner nozzle Remove the yellow ribbons tied to the joint and connect the cleaner nozzle joint Note The joints employ coupler system Push to connect until clicking and then confirm not pulling out ...

Page 23: ...on the Unit Cleaner screen to actuate the solvent pump by hand 2 Confirm that the solvent has reached to the cleaner nozzle that means solvent seeps enough through the roll paper Confirm that there are no air bubbles inside the solvent hoses Confirm visually that there are no air bubbles in the solvent hoses especially near the solvent pump If there are bubbles repeat the operation of Step 5 to re...

Page 24: ...ed with masking tape Connect the sockets and fix to the machine using a hexagon wrench to tighten the mounting bolts After installing the signal tower check the signal tower cables from inside the machine and arrange cables if necessary 6 2 Install the operation monitor on the machine Set screws on the monitor rear side Set 4 screws packaged with the machine on the monitor rear side Do not screw i...

Page 25: ... the monitor mount bracket 1 Loosen the monitor angle mounting bolt using a hexagon wrench 2 Pull out the monitor bracket to the front side Hook the monitor on the bracket Installing holes of the monitor bracket are shaped like U letter or keyhole Mount the monitor Mount the monitor with a Philips screwdriver Monitor angle mounting bolt ...

Page 26: ...ing to the monitor come out Fix the harnesses at the nylon clip using cable ties 2 Connect each harnesses to each sockets on the back of the monitor 3 Arrange and fix the harnesses using cable ties Note First temporarily tighten the cable ties arrange all the harnesses and then fix them 6 2 1 Install the stylus and its holder Install the stylus holder at the lower right part of the operation monit...

Page 27: ...nd using Phillips screwdriver Install the keyboard 1 Set the keyboard on the keyboard stand 2 Fix the keyboard harnesses to the nylon clip mounted on the keyboard stand using the cable ties 3 Connect the USB connector of the keyboard to the upper one of 2 USB port 4 Collect and arrange the harnesses on the keyboard stand or into the keyboard stand Keyboard stand Keyboard Nylon clip USB port for ke...

Page 28: ...ng Electrical wiring work shall be performed by a certified electrician The power specification of YSP10 Power supply frequency Single phase 200 208 220 230VAC 20 50Hz 60Hz Power capacity 6 9kVA Power consumption 50 60Hz 1 2kW The supply air specification of YSP10 Supply air pressure Clean and dry air Supply pressure 0 45MPa or higher Air connecting coupler connector High coupler made by NITTO KOH...

Page 29: ...ized round terminal or fork tongue terminal Select only round terminal for ground wire 7 2 Connect the air hose to the machine Connect the air hose mounting the coupler on the tip to the inlet of air filter placed in the lower left door Fix the air hoses if necessary using cable ties Tips The standard connector for YSP10 Coupler 30SH made by NITTO KOHKI co ltd Connecting unit of air hose Cable tie...

Page 30: ...orm return to origin After turning on the mains electricity and supply of compressed air to the machine turn on the machine and perform return to origin Make sure that all the metal pieces fixing the axes for transportation have been removed Warning If any fixing metal piece remains unremoved when performing return to origin process serious machine damage can result Check all the removed fixing me...

Page 31: ... completing the air pressure adjustment push the knob to lock it Confirm that the Do you want to start Return To Origin message appears Press the READY button on the operation panel to cancel emergency stop status Check that the machine is in safe operating conditions Before the machines are formed into a line a separate machine is unsafe in that the board entrance and exit are open and other oper...

Page 32: ...y Stop button so you can stop the machine immediately just in case In response to the message of step 8 press the Yes button Return to origin process is executed Upon completion of return to origin press the Operator button In the provided screen under GROUP NAME select Administrator Tips See the YSP10 user s manual for further information ...

Page 33: ...h as same as the line alignment jig to be used Tips As to YSP10 it is necessary to load the board data before changing the conveyor width Select the board data CALIB_B0301_PRINTER See the YSP10 User s manual for details Press the Unit button Press the Unit button on the left part of the application screen Select the Conveyor tab Select the Conveyor tab on the upper part of the Unit screen Board da...

Page 34: ...nput the line alignment jig width to the Target Width box Input 170 or 250 in accordance with the line alignment jig to be used Press the OK button to perform the conveyor width adjustment Caution After setting the conveyor width DO NOT apply force on the conveyor frame Otherwise the conveyor width may change Press Offset line alignment jig L shaped line alignment jig or glass frame of board ...

Page 35: ...are keyhole shaped both upper and lower covers that can be removed by simply loosening the screws Loosen 6 screws on the rear upper cover using a Phillips screwdriver Remove the rear upper cover by uplifting a little and pulling out 1 Loosen 4 screws on the rear lower cover using a Phillips screwdriver Remove the rear lower cover by uplifting a little and pulling out 1 For YSP10 with automatic mas...

Page 36: ...rrow clearance to allow sliding paper to be inserted under the leveling bolt will do Note Upon using a jack insert rubber or wooden board between the jack and machine floor to prevent scratching Set two sheets of sliding paper with slippery sides faced inside and place the set under the leveling bolt Lower the jack completely and remove it from the machine Warning When lowering the jack cue bystan...

Page 37: ...en the lock nut of all four leveling bolts Do not rotate the leveling bolts themselves Open the front lower cover and set the spirit level gauge inside of the machine as shown below Set a 46mm spanner on the lock nut upper nut of the leveling bolt Rotate in the direction of arrow to loosen Y direction X direction ...

Page 38: ... hex side by about 0 3mm and 90 degrees by 0 5mm To adjust the machine level rather than rotating one leveling bolt at a time rotating two bolts in conjunction is easier and more efficient for adjusting X or Y direction levels respectively Item Tolerance range Horizontal levels X and Y 0 3mm m 1 2 2 3 3 1 Machine is horizontal OK 2 Machine is somehow slanted but at an acceptable level Machine is u...

Page 39: ...o adjust the distance from the floor to the board transfer height raise or lower all 4 leveling bolts by the same amounts to raise or lower the machine body Adjust the board transfer height to 900mm 10mm and to the heights of the adjacent machines which are to be done the line alignment by rotating the machine leveling bolts Item Allowable range Board transfer height distance from the floor to the...

Page 40: ...of standard specification remove the conveyor cover by detaching the mounting screws using a Phillips screwdriver This procedure is not necessary for the extension specification machines Set the line alignment jig on the conveyor Set another line alignment jig on the downstream or upstream machine which requires line alignment ...

Page 41: ...conveyor connection No height difference or offsets that hinder smooth board transfer Distance between machines Distance between upstream downstream machine 7 3mm Note When the lock nut is fastened at 9 4 Fasten the levelling bolts below the machine height will be raised by the amount of leveling bolt backlash approx 0 5mm In consideration of this the line alignment is to be adjusted Note The desi...

Page 42: ... Adjust the machine height board transfer height by following Step10 in this section Remove the line alignment jigs Caution Be sure to remove the line alignment jigs Otherwise machine crash or other faulty conditions can occur Re measure the horizontality and the board transfer height of the machine following Step 7 through Step 10 If the measurements are out of range repeat the procedure until th...

Page 43: ... necessitate re adjusting the line alignment Raise slightly 0 5mm or less enough to pull out the sliding papers If the machine is raised too high it may cause the offset of the board transfer height Caution Raising the machine by a jack too far may let the YSP10 s conveyor hit another machine s conveyor Be sure to check around the machine before raising Readjust the machine horizontal level and th...

Page 44: ...e for the remaining leveling bolts Note DO NOT actually rotate the leveling bolts The machine horizontal level will change Note that when the footing of the machine is not secure the leveling bolt can rotate with light force In this case rotate the levelling bolt a little to foot to the floor Tighten the lock nuts on the levelling bolts Use two 46mm spanners to tighten the lock nut while holding t...

Page 45: ...ized sound is heard The sound varies depending on the floor material and structure Make sure that similar tapping sound is heard from each leveling bolt Re check the machine horizontal level and the conveyor to conveyor connection following 9 3 Adjust the machine horizontal level and conveyor height Step 8 through Step 17 Readjust the positions as required When the leveling bolts are tightened the...

Page 46: ...10 1 Connect board transfer signal lines to YSP10 Remove the upper and lower covers of the machine rear side relevant connectors can be accessed Connect the signal line from the previous machine to the connector labeled PREVIOUS the line from the next machine to the connector labeled NEXT then arrange the harnesses using cable ties or so Lower cover of rear side Connect a cable with the PREVIOUS m...

Page 47: ...screen Make sure that the CalibSm utility hasn t been started If started close the CalibSm utility The VmSpec screen cannot be opened unless the CalibSm utility is closed Press the Machine button in the application screen The VmSpec screen appears In the left pane of the VmSpec screen select Machine Information Installation Setting ...

Page 48: ...setting 10 3 Check the signal communication from YSP10 to its upstream machine Check that the board transfer signals are communicated properly Execute automatic operation on YSP10 in the skip mode Specify the skip mode by selecting Board Print Execution Skip In the skip mode automatic operation boards are transferred through the machine without production process Check that the upstream machine re...

Page 49: ...ation turn on the address corresponding to BUSY OUT board request signal as shown below If the downstream machine is not a YAMAHA ask the customer or the machine maker s service representative to perform equivalent task Note The BUSY OUT address of the downstream machine differs by machine model In the YSP10 s application screen select the Unit button Example YS24 DS Select Conveyor on the OUTPUT ...

Page 50: ...tion SI1906002E 001 YSP10 installation and adjustment procedures 50 120 In the Unit screen select the Conveyor tab Check that the Busy In signal is ON When the Busy In signal is ON the board request signal is communicated properly Failure ...

Page 51: ... application screen and open the Board tab On the parameter setting table set Print Execution to Skip When the optional inspection function is installed press the Inspection button in the application screen and open the Inspection tab Make sure that the Inspection setting is Not Use Mounters of Xg and after Press the Board button in the application screen and open the Mount tab Press the Edit butt...

Page 52: ... conditioning unit requires separate power supply than for YSP10 thus requires a separate power cable from the mains power supply Warning Electrical wiring work shall be performed by a certified electrician Power supply frequency Three phase AC 200V 10 50 60 Hz Power capacity 5 0kVA Power consumption 50 60Hz 1 74kW 12 2 CE transformer When the air conditioning unit is used in a non Japanese countr...

Page 53: ...e CE transformer Modify cable connections on the terminal block of the CE transformer referring to the cable diagram sticker The cable diagram sticker is on the top of the cover removed in Step 1 Remove two screws using a Phillips screwdriver 1 Remove the cover taking care not to interfere with the circuit breakers inside 2 Two circuit breakers According to the cable diagram sticker colored portio...

Page 54: ...ains power supply Turn off the circuit breaker of the mains power supply or equivalent to shut off power to the CE transformer s power cable Note Turn off the circuit breaker of the mains power supply or equivalent to shut off power to the CE transformer s power cable Remove the front lower cover of the CE transformer Not powered Remove 3 screws using a Phillips screwdriver Cover Remove the cover ...

Page 55: ...he cables which connects to the air conditioning unit to the CE transformer s terminal block right Below the left side breaker Connect the power cable from the mains to the terminal block s lower row Below the right side breaker Connect the air conditioning unit s power cable to the terminal block s lower row Lead cables from mains toward inside CE transformer through those holes ...

Page 56: ... supply or equivalent to shut off power to the air conditioner s power cable Caution Normally the mains power supply is the customer s property Ask the customer to turn off the mains power supply Remove the front cover works as a filter case of the air conditioning unit The front cover can be removed by hooking your fingers into 2 holes left and right on the front cover and uplifting it diagonally...

Page 57: ...of the internal structure Warning Electrical wiring work shall be performed by a certified electrician Tips The power cables of the air conditioning unit can be connected by M5 round terminal or Y terminal But select round terminal for the ground terminal Attach the power supply unit cover and the front cover to their original position Note If the power cables of L1 L2 L3 are connected oppositely ...

Page 58: ... bottom cover Connect the harnesses The communication cable and temperature sensor cable are retracted in the cable duct shown below Connect the communication cable AC ALM to the cable of the air conditioning unit named AC ALM Connect the temperature sensor cable to the connector unit on the rear side of the air conditioning unit On YSP10 On the air conditioning unit Arrange the harnesses retracte...

Page 59: ...heck VmSpec settings Check that use of the air conditioning unit is specified in VmSpec settings Open the VmSpec screen Check VmSpec settings Check that Machine Information Installation Setting Option Air Unit is set to Exist Save the setting if any change has been made Then reload board to data to enable the change ...

Page 60: ...unit 3 Check that conditioned air is emitted from the vent on top of the air conditioning unit Check the operation of float sensor in the drain tank 1 Press the RUN STOP button on the display located at upper right part of the air conditioning unit to run the unit 2 Pull out the drain tank placed at lower part of the air conditioning unit 3 Pull up to remove the float sensor in drain tank 4 Raise ...

Page 61: ...re monitor indicates a raise in temperature Note Wear work gloves and then warm the temperature sensor The temperature sensor is located at left side of the mask holder 12 9 Connect air duct between the air conditioning unit and YSP10 Connect the air conditioning unit vent and the intake port of YSP10 with an air duct of 2 5m length Air from the air conditioning unit to YSP10 shall not be disturbe...

Page 62: ...r if a mark recognition error occurs during adjustment and is not improved after implementation of mark adjust then perform the camera lighting conditions adjustment Check Motor reference values P67 Adjust the R axis initial positions P71 Adjust the R axis linearity P75 Check and adjust the PCB transfer positions Y and Z P77 Adjust camera lighting conditions P81 Adjust camera scales and positions ...

Page 63: ...one gray 3mm hole Part number label on tool s side KM1 M8806 10 KM1 M8806 11 See the tool s label for identification KM1 M8806 1XX KM1 M8806 11 17mm square Mono tone gray KGT M8806 00 KGT M8806 0XX Two or mono tone gray Part number label 11 17 or 35mm square Chamfered on one corner KHW M8896 A0 two tone 35mm square KHW M8806 B0 mono tone 17mm square KHW M8806 C0 mono tone 35mm square KHW M8806 D0 ...

Page 64: ... white seal on the entire back to be recognized its 4 0 5mm holes on the corners Print feedback adjustment Note The mask holder of YSP10 standard model cannot change mask size Prepare a metal mask fitted to the mask to be adjusted Part name Part number Remark Metal mask for adjustment CUK M0301 frame 650x550 KGJ M8821 00 Center datum Board for print feedback CUK B0301 K88 M9809 01 Metal mask for a...

Page 65: ...on conveyor are used When a recognition error occurs perform cleaning or mark adjust No Perform Mark No setting Remark 1 13 11 2 Adjust the PCB camera s scale and position 13 11 3 Adjust the inspection camera s scale and position optional 2 for PCB camera 7 for inspection camera Circle φ2mm 2 13 7 Adjust the R axis initial positions 13 8 Adjust the R axis linearity 2 Circle φ2mm 1 Print table 1 1 ...

Page 66: ...E 001 YSP10 installation and adjustment procedures 66 120 13 4 Start the CalibSm utility Select the Utilities button The CalibSm login message box appears Select Supervisor for User Type in the specialist for Password and select the OK button Supervisor ...

Page 67: ... Check the Motor reference values Start the CalibSm utility Press the 001 Axis button on the Adjustment tab Check that Adjust Item Motor reference is selected Check for safety in and around the machine so that return to origin operation can be safely performed Press the Originize button to perform return to origin ...

Page 68: ...low confirmation message box press the Yes button The past logs can be seen by pressing F2 key Check values in this column Press F2 key on this message Press the button at the head of References The log saved date Saved logs Acceptable range 50 5 Adjust Item Motor reference Dual drive offset Soft limit Originize Brake release Close Update Save log Append mode Browser Close All Update Save log Appe...

Page 69: ...y Press the 001 Axis button on the Adjustment tab Check that Adjust Item Dual drive offset is selected Check for safety in and around the machine so that return to origin operation can be safely performed Press the Originize button to perform return to origin Check the DualOffset values Acceptable range 16 384 000 76 800 Result Current Dual drive offset Dual drive offset ...

Page 70: ...button The past logs can be seen by pressing F2 key Press F2 key on this message The log saved dates appear Press the button at the head of References Saved logs can be checked Adjust Item Motor reference Dual drive offset Soft limit Originize Close Current Result Un originized Update Save log Append mode Browser Close Update Save log Append mode Browser Close ...

Page 71: ...r the adjustment see 13 3 Reference marks used for adjustment Start the CalibSm utility Press the 205 Adjust Axis R button on the Adjustment tab The Adjust Axis R screen appears Under Adjust Item select R Axis Init Pos Check inside and around the machine to confirm safety Press the Execute button When the below message appears press the Emergency Stop button At this point leave the screen as is ...

Page 72: ...yor and center conveyor Open the machine safety door to measure the clearance illustrated below using calipers Enter the measurement of Step 7 in the below message Then press the OK button Enter the measurement of Step 7 17 5 is an example 1 2 Press OK Measure clearance between left side of fixed side main conveyor and left side conveyor Print table ...

Page 73: ...ce between right side conveyor and center conveyor illustrated below using calipers Enter the measurement of Step 9 in the below message Then press the OK button Enter the measurement of Step 9 17 5 is an example 1 2 Press OK Measure clearance between right side of fixed side main conveyor and right side conveyor Print table ...

Page 74: ... 120 Check that the Measured value of Table Angle is within specifications Press the Yes button in the below confirmation message box When the value is within range the adjustment is complete When the value is out of range redo from step 5 Specifications 0 0008 within Value shall be within specifications ...

Page 75: ...bout reference marks used for the adjustment see 13 3 Reference marks used for adjustment Start the CalibSm utility Press the 205 Adjust Axis R button on the Adjustment tab The Adjust Axis R screen appears Under Adjust Item select R Axis Linearity Check inside and around the machine to confirm safety Release the Emergency Stop button Press the Execute button ...

Page 76: ... Measured values X and Y of Standard are within acceptable range When the values are within range fill in the check sheet with the values and finish without saving data When the values are out of range save the data and redo The values are out of range then redo from 13 7 13 7Adjust the R axis initial positions Item Acceptable range Standard of Force Point 0 0003 or below Standard of Force Point 2...

Page 77: ... 13 9 Check and adjust the board transfer positions Y and Z Start the CalibSm utility Press the 201 Machine Position button on the Adjustment tab Check that Adjust Item Carry Position is selected Adjust the board transfer position Y Select PCB Carry PosY Front by tapping its check box Deselect all other items ...

Page 78: ...Make sure that the test board isn t stuck at center left and right conveyors front side The board is not stuck Start the board transfer height Step12 The board is stuck Perform the board transfer positions adjustment Step 8 Press the Move Axis button Move the Y axis to the position not to interfere the conveyor unit of both sides Press Teach button and save values Press to move the Y axis The widt...

Page 79: ...in operation can be safely performed Step 6 Release the Emergency Stop button and press Z1 at Trace column Set 2 test boards on the entrance exit area of center and left conveyor and center and right conveyor Make sure that the test boards don t stuck at the entrance exit area of conveyors The board is not stuck Start the next adjustment The board is stuck Perform the board transfer height adjustm...

Page 80: ... and adjustment procedures 80 120 Press Teach button and save values Remove a test board Press to move the Z axis The width of move can be selected from 0 01 0 1 and 1mm using Step Mode button Adjust the axis position where the board does not stick to the conveyor and press OK ...

Page 81: ...wing table Tool appearance and features Part number CalibSm setting designation Remark Two tone gray No 3mm hole No part number label KM1 M8806 00 KM1 M8806 0XX Two tone gray 3mm hole Part number label on tool s side KM1 M8806 10 KM1 M8806 11 See the tool s label for identification KM1 M8806 1XX KM1 M8806 11 17mm square Mono tone gray KGT M8806 00 KGT M8806 0XX Two or mono tone gray Part number la...

Page 82: ...ness In the CalibSm Main Menu press the 203 camera button Select Mask Camera Set the Adjust Item to Lightness Select a lighting conditions adjustment tool by double clicking Tool Kind field For the list of the adjustment tools see 13 10 1 Check lightness adjustment tools Release the Emergency Stop button Select Mask Camera Select a tool to be used ...

Page 83: ...rt in front of the mask holder Check the image taken by the mask camera on the Move Axis screen Adjust the head unit position manually or by moving axis and make sure that the light gray portion of the lighting axis is projected on whole angle of view Check for safety in and around the machine so that the head unit can be moved safely Release the Emergency Stop button Press the Execute button Set ...

Page 84: ...the check sheet Acceptable ranges Item Acceptable range Result values 2 of target value Bit outer Up to 16128 Bit inner Up to 16128 Bit coax Up to 16128 Bit IR outer Up to 16128 Bit IR inner Up to 16128 Press the Yes button in the provided confirmation message box The measured data is saved and the lightness adjustment of the mask camera is complete Displayed after executing the adjustment ...

Page 85: ... Main Menu Select PCB Camera Select Lightness for Adjust Item Then select a lighting conditions adjustment tool by double clicking Tool Kind field For the list of the adjustment tools see 13 10 1 Check lightness adjustment tools Check for safety in and around the machine so that the head unit can be moved safely Release the Emergency Stop button Select PCB Camera 1 2 Select a tool to be used ...

Page 86: ...he PU axis does not raise press Push up button on Units Conveyor screen and input 4mm for its height Press the Emergency Stop button Set the adjustment tool on the machine Open the machine front door and set some backup pins around center of the front conveyor to set the adjustment tool Set the tool with its light gray side directed inside of machine Backup pins Print table top ...

Page 87: ...e angle of view Check for safety in and around the machine so that the head unit can be moved safely Release the Emergency Stop button Press the Move Adjust Pos button Press the Execute button Check that the measured values are within acceptable ranges Fill the values in the check sheet Item Acceptable range Result values 2 of target value Bit outer up to 16128 Bit inner up to 16128 Bit coax up to...

Page 88: ...era is not used remove the lightness adjustment tool from the machine and finish 13 10 4 Adjust the inspection camera s lightness optional Perform the below steps immediately after the previous procedure 13 10 3 Adjust the PCB camera s lightness Select Inspection Camera Set the Adjust Item to Lightness Select Lightness for Adjust Item Then select a lighting conditions adjustment tool by double cli...

Page 89: ...he inspection camera on the Move Axis screen Adjust the head unit position manually or by moving axis and make sure that the light gray portion of the lighting axis is projected on whole angle of view Press the Execute button Check that the measured values are within acceptable ranges Fill in the values in the check sheet Acceptable ranges Item Acceptable range Result values 2 of target value Bit ...

Page 90: ...ence marks used for the adjustment see 13 3 Reference marks used for adjustment 13 11 1 Adjust the mask camera s scale In the procedure described in this section use the glass QFP Use this QFP with a white seal on the entire back to be recognized its 4 0 5mm holes on the corners In the CalibSm Main Menu press the 203 Camera button Select Mask Camera Tool appearance and features Part number Remark ...

Page 91: ...res 91 120 Set the Adjust Item to Scale Check that settings are exactly as indicated below Release the Emergency Stop button Press the Move Adjust Pos button The mask camera moves to the BaseMACS mark under the mask plate Press the Emergency Stop button Item Setting Mark No 5 Speed 20 Distance 2 000 ...

Page 92: ...view Note The setting procedure is the same as the procedure of the mask camera lighting Check the image taken by the mask camera on the Move Axis screen Adjust the head unit position manually or by moving axis and make sure that the corner mark of the glass QFP is projected at the center of angle of view Release the Emergency Stop button Press the Execute button Place on the front plate part Use ...

Page 93: ...values are within acceptable ranges Fill in the values in the check sheet Acceptable ranges Item Acceptable range Camera Angle 0 0 5 degree Scale X Scale Y 10 58 0 3μm Press the Yes button in the provided confirmation message box The measured data is saved and the scale adjustment is complete Displayed after executing the adjustment ...

Page 94: ...94 120 13 11 2 Adjust the PCB camera s scale and position In the CalibSm Main Menu press the 203 Camera button Select PCB Camera Adjust the PCB camera s scale Set the Adjust Item to Scale Check that settings are exactly as indicated below Select PCB Camera Item Setting Mark No 2 Speed 20 Distance 2 000 ...

Page 95: ...located at the center of front conveyor Press the Execute button Check that the measured values are within acceptable ranges Fill in the values in the check sheet Acceptable ranges Item Acceptable range Camera Angle 0 0 5 degree Scale X Scale Y 10 58 0 3μm Press the Yes button in the provided confirmation message box The measured data is saved and the scale adjustment is complete Displayed after e...

Page 96: ...t procedures 96 120 Adjust the PCB camera s position Set the Adjustment Item to Camera Pos Check the settings are exactly as indicated below Press the Move Adjust Pos button to move the camera axis to the mark position located at the center of front conveyor Item Setting Mark No 2 Speed 20 ...

Page 97: ... and adjustment procedures 97 120 Press the Execute button Press the Yes button in the provided confirmation message box The measured data is saved and the adjustment is complete Note Adjusting the PCB camera s position also adjusts the mark position of extended conveyor plate ...

Page 98: ...ust the inspection camera s scale and position optional In the CalibSm Main Menu press the 203 Camera button Select Inspection Camera Adjust the inspection camera s scale Set the Adjust Item to Scale Check that settings are exactly as indicated below Select Inspection Camera Item Setting Mark No 7 Speed 20 Distance 5 000 ...

Page 99: ...k position located at the center of front conveyor Press the Execute button Check that the measured values are within acceptable ranges Fill in the values in the check sheet Acceptable ranges Item Acceptable range Camera Angle 0 0 5 degree Scale X Scale Y 18 94 0 2μm Press the Yes button in the confirmation message box to save the measured data Continue with next steps Displayed after executing th...

Page 100: ...0 120 Adjust the inspection camera s position Set the Adjust Item to Camera Pos Check that settings are exactly as indicated below Press the Move Adjust Pos button to move the camera axis to the mark position located at the center of front conveyor Press the Execute button Item Setting Mark No 7 Speed 20 ...

Page 101: ...gineers Service Information SI1906002E 001 YSP10 installation and adjustment procedures 101 120 Press the Yes button in the provided confirmation message box The measured data is saved and the adjustment is complete ...

Page 102: ...st board is shot by the PCB camera Print feedback adjustment is performed as shown in the below steps 調整開始 テスト印刷 全自動調整 1 基板搬入 2 印刷 3 マスククリーニング 4 測定 調整終了 マスククリーニング プリントフィードバック 起動と設定 マーク認識確認 調整実行とマシンデータ保存 印刷段取り 補正後の精度確認 補正値確認 N G O K Failure Save offset data Good Start Print set up Test print Clean the mask Edit Print Feedback screen Scan reference mark Adjust and save data Automatic adjustment 1 Ca...

Page 103: ...oard for print feedback Note The mask holder of YSP10 standard model cannot change mask size Prepare a metal mask fitted to the mask to be adjusted Part name Part number Remark Metal mask for adjustment CUK M0301 frame 650x550 KGJ M8821 00 Center datum Board for print feedback CUK B0301 K88 M9809 01 Metal mask for adjustment CUK M0301 frame 736x736 KGJ M8821 10 Center datum ...

Page 104: ...UK B0301 board used for print feedback adjustment Make sure that CALIB_B0301_PRINTER is loaded The CUK B0301 board size Board Size X mm 330 000 Board Size Y mm 250 000 Board Size Height mm 1 600 Check that the edge clamp pressure is 0 169MPa Set the conveyor width for print feedback adjustment 250mm Press the Sw Prod Position button Set backup pins on the conveyor so that the CUK B0301 board can b...

Page 105: ...301 All 70 Points Note When the squeegee size is smaller than 350mm it may not be possible to print solder paste on the left and right area of the board In this case select B0301 Center 40 points Select the Mask Cam Pos Adj Mode option by ticking its checkbox Check that no board exists inside of the machine Normally select B0301 All 70 points If the squeegee size is smaller than 350mm select B0301...

Page 106: ...tton Procedure of Printing mask cleaning Result measurement is performed automatically Press the Emergency Stop button Then set the adjustment board at the conveyor entrance or exit In the provided message box shown below press Yes or No as per where you set the board Conveyor entrance press Yes Conveyor exit press No The board is transferred into place and print process starts automatically Note ...

Page 107: ...01 YSP10 installation and adjustment procedures 107 120 Open the Utility tab by pressing on it Select Cleaning by tapping its check box Deselect all other items Press the Execute button The mask is cleaned automatically Open the Data tab by pressing on it ...

Page 108: ...e machine traces the solder mark of the selected coordinates and the results are shown numerically Press the Mark button of the application screen with the CalibSm screen open Note Closing the CalibSm screen initializes all settings of the print feedback adjustment Keep the CalibSm screen open and tap any part of the application screen to enable its editing ...

Page 109: ...ep 6 Light settings Press the Mark Light button at the lower left part of the Mark Adjust screen In the provided screen check and adjust light settings so that the solder is displayed in black and the background in white Binary mark image and threshold level adjustment Press the Check button at the lower light part of the above screen In the provided screen check that the white area and black area...

Page 110: ...e application screen The CalibSm screen for print feedback adjustment reappears Press any gray cell of Mask Mark dX dY columns The machine traces the mask aperture of the selected coordinates and the results are shown numerically Repeat step 14 and 15 and select the line of No 14 in the upper table of the screen Then press the Mark Adj button ...

Page 111: ... below Mask aperture shape Check on the monitor that the mask aperture is a clean circle If not perform automatic mask cleaning and redo from step 18 Other items to check See step 16 for information Press the Utilities button The CalibSm screen for print feedback adjustment reappears Press the Measure button The machine measures the mask apertures then the solder masks on the board Monitor ...

Page 112: ... shot on the monitor and click the OK button Confirmation message asking whether to save the measurements appears The measured offsets appear at the bottom of the screen When mask camera offsets are unacceptably large confirmation message asking whether to adjust the mask camera offsets appears Depending on the measured results follow the below steps Browse for a destination folder to save the fil...

Page 113: ...and countermeasures are as follows Printing condition is unstable Test print several boards continuously and check printing condition Check print condition settings and mask condition Variation among adjustment boards used Consider changing the adjustment board or use only a single adjustment board through the adjustment Camera and image processing condition is unstable Check condition of the adju...

Page 114: ...ab by pressing on it Select only Carry Out by checking its check box Press the Execute button in the upper screen Perform as follows as per the result of step 26 In step 26 measured data was Not saved Finish the adjustment In step 26 measured data was saved or mask camera offsets were adjusted Redo from step 5 for re adjustment ...

Page 115: ...es to the air conditioning unit 14 2 Move the maintenance board data to a safe location To prevent misuse of the maintenance board data used for installation adjustment move the board data from D Machine No1 to D Machine CalibPCBdata 14 3 Time setting of Windows OS The time setting of Windows OS is set at UTC 9 JST upon shipping Changing its time setting matching to that of countries or territorie...

Page 116: ...tment procedures 116 120 4 Press the Windows Setting Change button on the screen below The machine is rebooted automatically and then the screen with green background as published on next page 5 Select Control Panel from Start menu The Control Panel screen appears 6 Select Date and Time ...

Page 117: ...ss the Change time zone button 8 Select Time zone from pulldown menu matching the territories where the machine is installed Then press the OK button 9 Close Windows OS by pressing the Shut down button on Start menu 10 Turn the machine OFF by confirming It is now safe to turn off your computer 11 Turn the machine ON ...

Page 118: ...anual for information 14 5 Backup CalibSm adjustment data Save the data obtained through the CalibSm adjustments in a USB flash drive Bring back the USB flash drive for YAMAHA Service use Insert the USB flash drive into the machine s USB port located at the lower position of machine monitor If the CalibSm utility screen is closed reopen the screen In the CalibSm Main Menu press the Get Information...

Page 119: ...press the OK button to save the data Remove the USB flash from the machine s USB port See the YSP10 user s manual for information Note The obtained data is necessary for corresponding a machine trouble Bring back the data and store safely 14 6 Check machine operating conditions Check the following machine operating conditions at the occasion of actual production or so PCB board transfer condition ...

Page 120: ...ark Date 000 First release September 18 2019 001 1 Added shipping brackets for following optional automation functions Automatic mask exchange function Automatic solder transfer function Automatic pushup pin exchange function 2 Added cautions upon transporting with hand lifter March 1 2020 002 Time Setting of Windows OS is added November 4 2021 ...

Reviews: