background image

Display-based Controls

Basic Operations — Organizing Your Data

62

TYROS Owner’s Manual

 Display Messages

................................................................................................

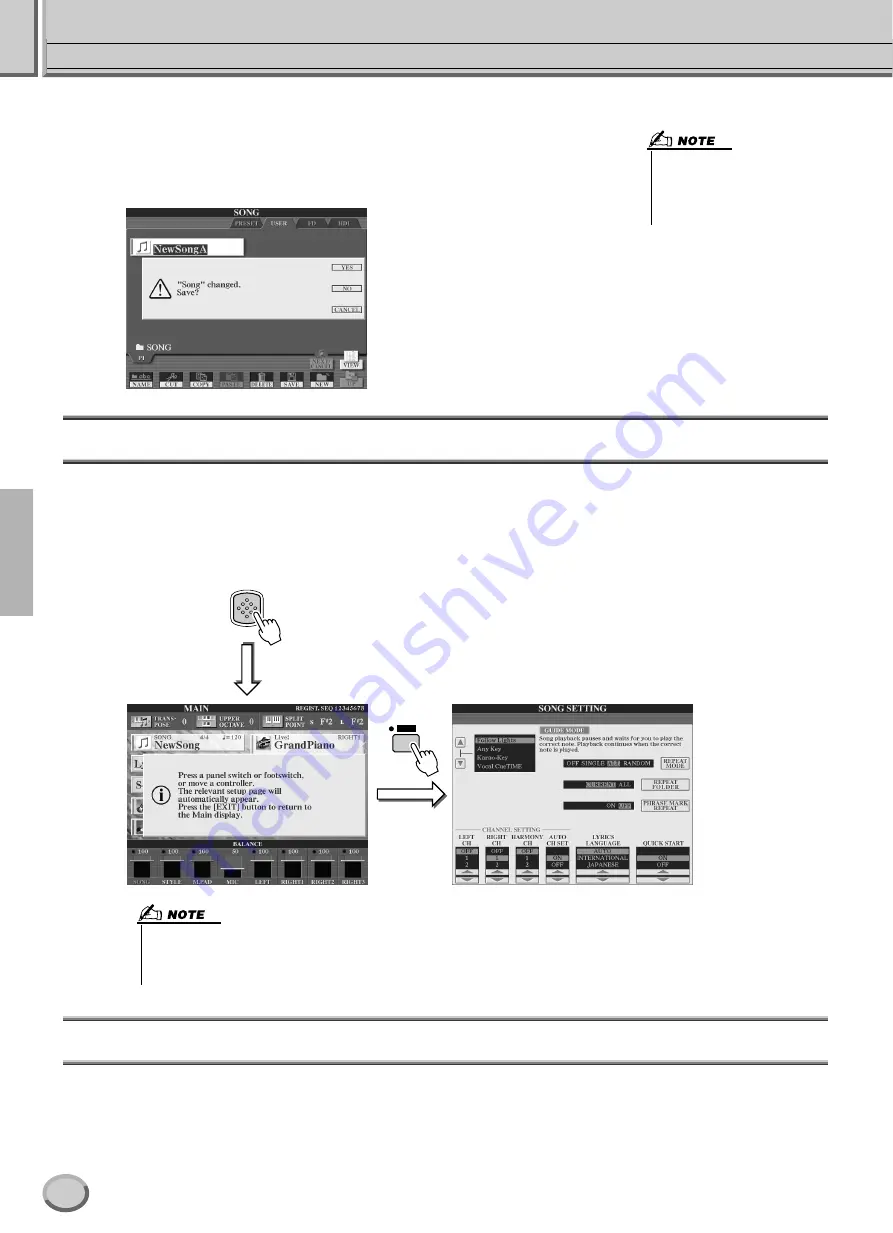
Thanks to the large LCD panel, the TYROS can display comprehensive messages and 
prompts that clearly guide you through the various operations. When such messages 
appear, simply follow the instructions as shown by pressing the corresponding LCD but-
ton. 

Direct Access — Instant Selection of Displays

With the convenient Direct Access function, you can instantly call up the desired display — with just a single additional button 
press. Press the [DIRECT ACCESS] button and a message appears in the display prompting you to press the appropriate button. 
Then, simply press the button corresponding to the desired setting display to instantly call up that display. In the example below, 
Direct Access is used to call up the display for selecting the Guide settings (page 48). 
Refer to the separate Data List for a list of the displays that can be called up with the Direct Access function. 

Basic Structure of File/Folder and Memory Drives

The TYROS utilizes a variety of data types — including voices, styles, songs and registration memory settings. Much of this data 
is already programmed and contained in the TYROS; you can also create and edit your own data with some of the functions on 
the instrument. All this data is stored in separate files — just as is done on a computer.
Here, we’ll show you the basic structure in handling and organizing the data of the TYROS in files and folders using several 
memory drives.

• These messages can be dis-

played in one of five different lan-
guages. You can select the 
desired language of the display 
messages. See page 61.
 

DIRECT

ACCESS

GUIDE

Press the [DIRECT ACCESS] but-
ton again to go back to the original 
display. 

• Here’s a convenient way to return to the Main 

display (page 24) from any other display: 
Simply press the [DIRECT ACCESS] button, 
then the [EXIT] button. 

60

Summary of Contents for TYROS

Page 1: ......

Page 2: ...tery Notice This product MAY contain a small non rechargable battery which if applicable is soldered in place The average life span of this type of battery is approx imately five years When replacement becomes necessary contact a qualified service representative to perform the replacement Warning Do not attempt to recharge disassemble or incin erate this type of battery Keep all batteries away fro...

Page 3: ...ors heat registers and other devices that pro duce heat should be avoided 8 This product was NOT designed for use in wet damp loca tions and should not be used near water or exposed to rain Exam ples of wet damp locations are near a swimming pool spa tub sink or wet basement 9 This product should be used only with the components supplied or a cart rack or stand that is recommended by the man ufact...

Page 4: ...nd have the instrument inspected by qualified Yamaha service personnel CAUTION Always follow the basic precautions listed below to avoid the possibility of physical injury to you or others or damage to the instrument or other property These precautions include but are not limited to the following When removing the electric plug from the instrument or an outlet always hold the plug itself and not t...

Page 5: ... When you change settings in a display page and then exit from that page System Setup data listed in the Parameter Chart of the separate Data List booklet is automatically stored However this edited data is lost if you turn off the power without properly exiting from the relevant display Backing up the floppy disk To protect against data loss through media damage we recommend that you save your im...

Page 6: ... an extended period of use will pick up a layer of magnetic particles from the disks used that will eventu ally cause read and write errors To maintain the disk drive in optimum working order Yamaha recommends that you use a commercially avail able dry type head cleaning disk to clean the head about once a month Ask your Yamaha dealer about the avail ability of proper head cleaning disks Never ins...

Page 7: ...dulcimer and cimbalom shown in the displays of the TYROS are courtesy of the Gakkigaku Shiryokan Collection for Organolgy Kunitachi College of Music The following instruments shown in the displays of the TYROS are on display at the Hamamatsu Museum of Musical Instruments balafon gender kalimba kanoon santur gamelan gong harp hand bell bagpipe banjo carillon man dolin oud pan flute pungi rabab shan...

Page 8: ... the SMF Standard MIDI File standard with greater functionality and open ended expandability for the future The TYROS is capable of displaying lyrics when an XF file containing lyric data is played Vocal Harmony Vocal Harmony employs state of the art digital signal processing technology to automatically add appropriate vocal harmony or harmonies to a lead vocal line sung by the user Vocal Harmony ...

Page 9: ...e the relationship of the various functions and quickly locate desired information Reference page 78 Once you re familiar with everything above lightly go over this comprehensive guide to all functions You won t need or want to read everything at once but it is there for you to refer to when you need information about a certain feature or function Troubleshooting page 164 If the TYROS does not fun...

Page 10: ...0 Searching the Ideal Setups by Keyword 41 Creating a Set of Favorite Records 42 Song Playback 43 Playback of Song Disks 43 Using Song Position Markers 44 Adjusting the Volume Balance between the Song and the Keyboard 45 Turning Song Parts On Off 45 Singing with a Connected Microphone 46 Connecting a microphone 46 Singing Along with Lyrics 46 Applying harmony to your voice 47 Keyboard and Vocal Pr...

Page 11: ...rding for Notes using the Event List 117 Assembling a Style from Existing Pattern Data 118 Groove and Dynamics 118 Editing Data for each Channel 120 Making Style File Format Settings 120 Custom Style Recording via an External Sequence Recorder 122 The Multi Pads 124 Multi Pad Editing using the Open Save display 124 Multi Pad Creating Editing Digital Recording 124 Music Finder 126 Music Finder Reco...

Page 12: ...s RIGHT1 2 3 and LEFT Page 74 Playing the drum percussion voices Page 79 Playing the Mega Voices Page 80 Understanding Initial touch and Aftertouch Pages 81 154 Setting the touch sensitivity of the keyboard Page 154 Turning Initial Touch on or off for each keyboard part RIGHT1 2 3 LEFT Page 154 Turning Aftertouch on or off for each keyboard part RIGHT1 2 3 LEFT Page 154 Setting the Modulation whee...

Page 13: ...e TYROS features Pages 63 65 Creating your original voices Sound Creator Page 85 Creating your original Organ Flutes voices Sound Creator Page 83 Creating your original styles Style Creator Page 114 Assembling a custom style from existing patterns Page 118 Recording a rhythm pattern Page 116 Memorize panel settings to the One Touch Setting contained in the style Page 110 Creating your original son...

Page 14: ...e Lyrics on a separate TV monitor Page 90 Singing with the Guide functions and song playback Page 50 Using the Talk Setting function Page 132 Matching the Song Transpose setting to a comfortable singing pitch Page 135 Matching the Keyboard Transpose setting to a comfortable singing pitch Page 135 Live performance tips and techniques Assigning specific panel operations functions for foot control Pa...

Page 15: ...ng the File Utility software Page 58 Using disks data storage options Installing an optional Hard Disk unit to the TYROS Page 162 Formatting the optionally installed Hard Disk Page 157 Formatting floppy disks Page 157 Backing up your floppy disk copying from one floppy disk to another Page 157 Other Tips Registering your name to the TYROS Page 158 Importing a favorite pitcure for the Main display ...

Page 16: ...MASTER VOLUME MAX MAX INPUT VOLUME FREEZE TALK EFFECT VOCAL HARMONY MIC SETTING VH TYPE SELECT TRANSPOSE TEMPO STOP RESET 1 2 3 4 MIC STYLE CONTROL SONG CONTROL REGIST BANK MIXING CONSOLE BALANCE CHANNEL ON OFF MIN MIN OVER SIGNAL MIC LINE IN SONG POWER ON OFF RESET PART PART A B C D E DIRECT ACCESS 1 2 3 4 LCD CONTRAST PITCH BEND MODULATION UP MAX MIN DOWN PHONES STYLE SP1 SP2 SP3 START STOP SYNC...

Page 17: ...ENTER DSP DSP VARIATION POLY MONO INITIAL TOUCH UPPER SUSTAIN LOWER MEMORY TION MEMORY HELP FUNCTION DIGITAL RECORDING SOUND CREATOR SONG STYLE MULTI PAD DISK IN USE 5 6 7 8 USER ORGAN FLUTES CUSTOM VOICE VOICE EFFECT MENU DEMO ACCORDION PAD PERC DRUM KIT FLUTE CLARINET PROGRAMMABLE ONE TOUCH SETTING VOICE RESET BACK NEXT F G H I J EXIT 5 6 7 8 PROGRAMMABLE MUSIC FINDER HARMONY ECHO 9 0 1 2 3 4 5 ...

Page 18: ...verheating The TYROS default setting for the external television video monitor signal is PAL Depend ing on your particular locale the standard may be different and the setting should be changed accordingly For example NTSC is generally used in North Amer ica Check the standard used by your television or video monitor and if it is not PAL change the setting in theVIDEO OUT display to NTSC page 151 ...

Page 19: ... with a 1 4 phone plug can be plugged a dynamic microphone with an impedance of 250 ohms is recommended The microphone or line input can be used with the TYROS vocal har mony function See pages 46 130 The LOOP SEND jacks deliver the output of the TYROS for connection to external signal processing devices such as distortion or filter effects The output from the signal processor can be returned to t...

Page 20: ...he AC voltage supplied in the area in which it is to be used as listed on the rear panel Con necting the unit to the wrong AC supply can cause serious damage to the internal cir cuitry and may even pose a shock hazard Use only the AC power cord supplied with the TYROS If the supplied cord is lost or damaged and needs to be replaced contact your Yamaha dealer The use of an inappro priate replacemen...

Page 21: ...crewdriver Music rest brackets 2 Music rest 3 1 2 OUT IN OUT IN VIDEO OUT NTSC PAL USB 1 2 INPUT AC INLET MIC LINE IN L L R R MAIN SUB LINE OUT L L R R LOOP SEND MIDI A MIDI B ASSIGNABLE FOOT PEDAL TRIM MIN MAX L L R R AUX IN LOOP RETURN TRIM MIN MAX VOLUME DSP VARIATION SUSTAIN TO LEFT SPEAKER TO SUB WOOFER L R TO RIGHT SPEAKER L L R R LOOP SEND Screws for attaching the music rest brackets 3 1 2 ...

Page 22: ... Connect any external devices or auxiliary equipment such as a computer MIDI instruments audio equipment micro phone etc to the TYROS Turn on all connected external devices and auxiliary equipment POWER ON OFF If necessary save any data you ve created using the connected external devices to the appropriate media Turn off the optional TRS MS01 speaker system Turn off all connected external devices ...

Page 23: ... back of the display panel Then lift the panel and tilt it toward you The panel will click as you tilt it back these clicks are the four latched positions Once you ve reached a satisfactory position release the panel It will gently fall back to the nearest latched position Closing the Display Panel To return the panel to its closed and locked position gently pull it back toward you until the posit...

Page 24: ...guages Text is used for the Demos below Help page 61 and the Display Messages page 62 Before playing the Demo select the desired language by following the instructions below TheTYROS features an extensive variety of Demo songs that showcase its rich authentic voices and its dynamic rhythms and styles POWER ON OFF switch POWER ON OFF Registration Sequence page 128 Split Point that separates the sty...

Page 25: ...the LCD buttons to call up the display of the correspond ing function Press any of the LCD buttons to call up the display of the correspond ing function Select the desired num bered word or topic in the display by pressing the corresponding LCD button Depending on the particular display you may need to use the BACK NEXT buttons to call up other topics and menus Even if you do not press any of thes...

Page 26: ...List booklet LEFT LEFT HOLD RIGHT1 RIGHT2 RIGHT3 PART ON OFF PART SELECT UPPER LOWER STRINGS CHOIR PIANO E PIANO VOICE BACK NEXT In this example Galaxy EP is selected one of the E PIANO category voices If necessary use the BACK NEXT buttons to call up the PRE SET page The voice selection display shown here is called the Open Save display for the voice The Open Save display actually has two dif fer...

Page 27: ...le Cool JazzGuitar Dynamic fingered jazz guitar Lead Guitar Soulful guitar sound with natural distortion Strings Live Strings Rich stereo sampled strings orchestra Live Allegro Rich stereo sampled strings orchestra with fast attack Sweet Violin Excellent solo violin with natural vibrato Trumpet Sweet Trump Expressive trumpet with natural vibrato Sweet MutedTrump Jazzy muted trumpet with natural vi...

Page 28: ...ne voice while the notes you play with your right sound a different voice or voices Voices RIGHT 1 3 are meant to be played with the right hand Voice LEFT is played with the left hand Adjusting the Octave Setting The UPPER OCTAVE button allows the RIGHT1 RIGHT2 and RIGHT3 parts to be simulta neously transposed up or down by one octave LEFT LEFT HOLD RIGHT1 RIGHT2 RIGHT3 PART ON OFF PART SELECT UPP...

Page 29: ... adjust the footage settings 4 Try out some of the other Organ Flutes voices STRINGS TRUMPET CHOIR SAXOPHONE GUITAR BASS PIANO E PIANO ORGAN FLUTES CUSTOM VOICE ACCORDION PAD VOICE FUNCTION SOUND CREATOR MENU 1 2 3 4 5 6 7 8 BACK NEXT Use LCD D button to adjust the 16 or 5 1 3 footage You can select the desired footage 16 or 5 1 3 with the E LCD button Use these to select the desired page of param...

Page 30: ...can select open various files such as voices pages 26 29 styles page 32 songs page 43 and Reg istration Memory banks page 52 as well as save the various files to the User drive or Disk drive 1 Press the USER button to call up the Voice selection Open Save display for the User drive In this case any keyboard part RIGHT 1 3 can be selected 2 From this display path make a new folder to which your fav...

Page 31: ...es are contained in this display Also try copying preset voice s to floppy disk in the same way as explained here STRINGS CHOIR PIANO E PIANO VOICE 1 2 3 4 5 6 7 8 1 2 3 4 5 6 7 8 1 2 3 4 5 6 7 8 BACK NEXT Press the COPY LCD button lower 3 button Press the OK LCD button lower 7 button The Voice located in the PRESET drive is copied to the USER drive Select the folder created in step 2 Press the NE...

Page 32: ...following the chords you play With the auto accompaniment style playback function even a solo performer can enjoy playing with the backing of an entire band or orchestra The TYROS features a variety of accompaniment styles rhythm patterns in a variety of different musical genres Try out the different styles on your own checking the style name printed above each STYLE button on the panel or referri...

Page 33: ...tyle can be used for many of your favourite ballads Intro III showcas es the powerful new French Horn sound Dance Ibiza2002 Using new drum bass and synth voices this vibe is fresh from the sun drenched island Swing Jazz BigBandFast1 Sparkling new sounds are used to revive the Golden Age of the big band Swing along with this style and enjoy complete control over an entire big band Dixieland1 Close ...

Page 34: ...r variations for the fill in sections each spe cially programmed to match the selected main section Even when AUTO FILL is turned off pressing the same button of the currently playing section automatically plays a fill in before returning to the same main section BREAK This lets you add dynamic breaks in the rhythm of the accompaniment to make your performance sound even more professional ENDING T...

Page 35: ... This also applies to the Auto Fill in If you want to come back into the style right away after an Ending simply press the INTRO button while the Ending section is playing If you press one of the MAIN button while the ending is playing a fill in will immediately start playing when the AUTO FILL IN is turned on continuing with the main section If you press the SYNC START button while a style is pla...

Page 36: ...p style playback by pressing the STYLE START STOP button or any of the ENDING buttons You can also create your own One Touch Setting setups For details refer to page 110 Adjusting the Volume Balance between the Style and the Keyboard Press the BALANCE button so that the mixer window pop up appears at the bottom of the LCD display You can adjust the volume balance between style playback and your ri...

Page 37: ...ons then press the NEXT button to select the FD drive and display the files contained on the floppy disk 3 Select and play the desired style page 32 Tip Convenient way to select styles MIXING CONSOLE BALANCE CHANNEL ON OFF PART PART 1 2 3 4 5 6 7 8 EXIT Pressing the CHANNEL ON OFF button repeat edly switches among the style parts channels and song channels Press the corresponding LCD button From t...

Page 38: ...laying back and ACMP is on simply play a chord with your left hand and press any of the Multi Pads Chord Match changes the pitch to match the chords you play You can also use this with the style stopped with the Stop Accompaniment function page 33 Keep in mind that some Multi Pads are not affected by Chord Match BANK 01 MULTI PAD The Multi Pads can be used to play a number of short pre recorded rh...

Page 39: ...ay some notes in the right hand range of the keyboard You can also use the Harmony effect with the style stopped with the Stop Accompaniment function page 33 Simply hold down a chord with your left hand and play a melody with your right Try out Harmony Echo with some of the voices below Many of the voices have been automatically set to play certain Harmony Echo types that match the partic ular voi...

Page 40: ...t Rotate the DATA ENTRY dial to move the cursor on the Record list Once the desired song name or music genre is highlighted press the ENTER button to call up the cor responding Music Finder setup Keep in mind that the panel setup actually called up is the one pre programmed as the One Touch Setting 3 Play the styles If you want to play in a certain genre of music but don t know which style and voi...

Page 41: ... page 70 After entering the music genre or keyword press the OK LCD button to return back to this display Press this button to call up the Style selection display After selecting the desired style press the EXIT button to return back to this display This convenient function lets you find all songs that use a certain accompaniment style Press this button to specify the time signature for the search...

Page 42: ...ord has been added 1 2 3 4 5 6 7 8 F G H I J Sort the records by each item Change the order of the records ascending or descending The order method is determined by the sort item above Shows the number of records of the currently displayed page Press this button to create a new record by edit ing the currently selected one Page 126 These sets of buttons are used when the Record list is sorted by S...

Page 43: ...isk Drive FDD and Floppy Disks on page 6 SONG BACK NEXT If necessary use the BACK NEXT buttons to call up the FD Floppy Disk page The song selection display shown here is called the Open Save display for the song The Open Save display actually has two dif ferent display modes 1 a direct selection display shown at left and 2 a numeric input display that lets you select the voice by input ting the s...

Page 44: ...OP SYNC START NEW SONG SP4 REC TOP REW FF LOOP SONG CONTROL If a marker has already been entered to the button the lamp is lit in green or red Double clicking on the button will set the marker to a new song position Top of the song SP1 SP2 SP3 SP4 End of the song To store your marker settings save the song data to the User drive FD drive or HD drive if an optional hard disk has been installed Keep...

Page 45: ...ayback Adjusting the Volume Balance between the Song and the Keyboard Press the BALANCE button so that the mixer window pop up appears at the bottom of the LCD display page 36 You can adjust the volume balance between song playback and your right hand keyboard performance by using LCD buttons 1 5 6 7 and 8 Turning Song Parts On Off Press the CHANNEL ON OFF button so that the pop up window appears ...

Page 46: ... Or use the TYROS for karaoke and sing alongs applying various DSP effects to your voice as you sing with the auto accompaniment or song playback FADE IN OUT MAX INPUT VOLUME MIN OVER SIGNAL MIC LINE IN INPUT MIC LINE IN TRIM MIN MAX To avoid possible feedback or other interference separate the microphone from the speakers as much as possible Since the MIC LINE IN jack is highly sensitive it may p...

Page 47: ...ied in the Lower part LEFT section of the keyboard VOCODER Chord data contained in the XF song CHORDAL Detected chords based on notes contained in the song data CHORDAL VOCODER TALK EFFECT VOCAL HARMONY MIC SETTING VH TYPE SELECT MIC SP1 SP2 SP3 START STOP SYNC START NEW SONG SP4 REC TOP REW FF LOOP SONG CONTROL The lyrics inidicated on the LCD display can be output via the VIDEO OUT terminal You ...

Page 48: ...you control the song and accompaniment playback with just one finger while you sing along Simply play a key on the keyboard in time with music any key is fine and the accompaniment parts of the song follow your playing For this function the notes of the keyboard do not sound Vocal Cue Time With this function song playback pauses waiting for you to sing the notes correctly When you sing the correct...

Page 49: ...button to go back to the Main display 4 Call up the Song Score display by pressing the Score LCD button C button 5 Turn the GUIDE button on 6 Start the song playback 7 Song playback automatically pauses indicating that you should play a certain melody note Look at the notation in the LCD to see which note to play 8 To stop the practice session in the middle of the song stop song playback A B C D E...

Page 50: ...tton to go back to the Main display 5 Call up the Song Score display by pressing the Score LCD button C button 6 Turn the GUIDE button on 7 Start song playback 8 Song playback automatically pauses indicating that you should sing a certain melody note Look at the notation in the LCD to see which note to sing 9 To stop the practice session in the middle of the song stop song playback 1 2 3 4 5 6 7 8...

Page 51: ...for each parameter group Enter checkmarks only to those parameter groups you want to be memorized Moves the cursor to the parameter group You can move the cursor by using the DATA ENTRY dial Cancels the regis tration and returns to the previous dis play Enters a checkmark to the selected box param eter group Removes the checkmark from the selected box parameter group When a checkmark is entered to...

Page 52: ... 1 Memorize your custom panel settings to each of the eight Registra tion Memory buttons as described on page 51 It is not necessary to memorize settings for all eight buttons If a button has no memo rized data it is unlit 2 Press the REGIST BANK button to call up the Registration Mem ory Bank selection Open Save display 3 If desired call up the Registration Edit display and make other set tings f...

Page 53: ...is is where the Freeze function comes in handy It lets you maintain the settings of certain parameter groups and leave them unchanged even when selecting other Registration Memory buttons 1 Select the parameter group you want left unchanged or frozen page 128 2 Turn the FREEZE button on 3 Change the Registration Memory number Calling up Registration Memory numbers in order Registration Sequence pa...

Page 54: ...Creator feature lets you record your own keyboard performances to the user drive floppy disk or the optionally installed hard disk With multiple channels for recording comprehen sive editing features plus the use of the style and the Multi Pads you can record complex fully orchestrated pieces of music in any music style or arrangement from solo piano and church organ to rock band big band Latin en...

Page 55: ...ulti Pads 5 Press the REC button to stop recording 6 Listen to your newly recorded performance Press the TOP button so that the song playback position returns back to the top and press the SONG CONTROL START STOP button 7 If necessary re record a specific section of the recorded song or record an additional section to the end of the recorded song Repeat steps 2 6 above You can selectively re recor...

Page 56: ... for re cording with each channel assigned a spe cific part See chart at left Channels to be recorded must be enabled for record ing manually However parts are automatically as signed to MIDI channels as shown in the chart at left When re re cording an al readyrecorded song The channel part assign ments made in the origi nal recording are maintained Channels to be recorded must be enabled for reco...

Page 57: ...function allow you to re record or edit the already recorded song Re recording a specific section of the already recorded song Punch In Out Page 94 Editing the recorded data for each channel Quantizing or aligning the timing Page 96 Deleting the data of the specified channel Page 96 Mixing Merging the data of the specified two channels Page 97 Transposing the recorded note data of each channel Pag...

Page 58: ... and organize data on the TYROS For example you can use the included Voice Editor pro gram to edit theTYROS custom voices There is also a special File Utility pro gram that lets you use your computer to manage files in the USER FD HD optional drive A type B type USB cable USB USB is an abbreviation for Univer sal Serial Bus It is a serial inter face for connecting a computer with peripheral device...

Page 59: ...The voices you create can be saved to the PRESET drive on the TYROS as Custom Voices and can be called up any time by pressing the CUSTOM VOICE button 1 Turn the computer s power on then turn the TYROS power on 2 Start Voice Editor on the computer 3 Edit the voice parameters on the computer to create your original voice For details refer to the Voice Editor documentation on the CD ROM 4 When you v...

Page 60: ... two ways Entering the values For parameters indicated at the bottom of the Main display such as the slider controls in the mixer window page 36 you can conveniently use the DATA ENTRY dial in tandem with the LCD 1 8 buttons Simply select the desired parameter with the appropriate LCD button the name changes color then use the DATA ENTRY dial to adjust it This convenient technique also works well ...

Page 61: ...the power is turned on Help Display Messages Help The Help messages give you informative explanations and descriptions of the main func tions and features of the TYROS BACK NEXT BACK NEXT Tabs that indicate menus EXIT HELP FUNCTION DIGITAL RECORDING SOUND CREATOR SONG STYLE MULTI PAD MENU DEMO 1 2 1 2 3 4 5 6 7 8 3 BACK NEXT Select the desired Help topic Select the Language if necessary The langua...

Page 62: ...uide settings page 48 Refer to the separate Data List for a list of the displays that can be called up with the Direct Access function Basic Structure of File Folder and Memory Drives The TYROS utilizes a variety of data types including voices styles songs and registration memory settings Much of this data is already programmed and contained in the TYROS you can also create and edit your own data ...

Page 63: ...rious voices and styles Memory Drives to which folders files are saved Folders and files described above are saved to the following memory drives PRESET drive The files that are pre programmed and installed internally to the TYROS are kept here Preset files can be loaded called up but cannot be re written to the drive because it uses ROM Read Only Memory USER drive Files kept here are those contai...

Page 64: ...er Effect Music Finder Main Display Picture Song Background Picture Copy Copy Paste Cut Paste Voice Editor You can create your original voice as a Custom Voice on Preset drive by using a computer and the included Voice Editor software Normally data cannot be stored to the Preset drive how ever voice data created with the Voice Editor can be stored to the Preset drive This is the Voice Open Save di...

Page 65: ...ce Voice Editor Unedited voice Edit Record Assemble Memorize Memorize Creating a New Record Record Record Edit Edit Edit Edit Edit RAM Features Memory for indefinitely saving the data Memory for temporarily storing the data Flash ROM Compare User drive Flash ROM Disk drive Floppy disk Hard disk optional PRESET drive Save The Save operation is executed from the Open Save display The corresponding O...

Page 66: ...NG POP ROCK BALLAD DANCE R B COUNTRY MOVIE SHOW LATIN SWING JAZZ WORLD BALLROOM PARTY STYLE PRESET USER DISK Panel buttons Main display Multi Pad Bank Other displays MIDI template etc Voice Song Style Voice Registration Memory Bank The Voice Open Save display is shown here For changing the view mode of the Open Save display Page 71 Song Style For selecting the next highest directory folder For cre...

Page 67: ...ser drive folder directo ries can contain up to four levels The maximum total number of files and folders which can be stored is 3 200 but this may differ depending on the length of the file names On the User FD Floppy Disk HD optionally installed Hard Disk the maximum number of files which can be stored in a folder will be 250 1 2 3 4 5 6 7 8 F G H I J A B C D E BACK NEXT DATA ENTRY ENTER 1 2 3 4...

Page 68: ...e destination display The Preset drive cannot be selected as the destination Create a new folder page 67 at the destination page path as needed 6 Presvs the PASTE LCD button lower 4 button The folders files copied from the source page path appear on the display Moving Folders Files Cut Paste Folders and files can be freely moved among the installed drives with the exception of the Preset drive dat...

Page 69: ...instructions Saving Files This operation lets you save your original custom data such as songs and voices you ve created to the User Floppy Disk or optional Hard Disk drives Note that if you re saving the currently open file step 1 is not necessary 1 After you ve created a song or voice in the relevant Song Creator or Sound Creator display press the SAVE LCD button The corresponding Open Save disp...

Page 70: ...ve selected a language other than Japanese in the FUNCTION UTILITY OWNER display page 158 the following types of characters are available CASE Alphabet capital letters half size numbers half size marks half size case Alphabet lowercase letters half size numbers half size marks half size Move the cursor to the desired position by using the DATA ENTRY dial Press the OK LCD button upper 8 button to a...

Page 71: ... between the two types by pressing the upper 7 LCD button From the Direct Selection type you select the desired file directly by pressing the appropriate LCD letter button The Number Input type on the other hand lets you call up the desired file by entering the appropriate file number see below Since the TYROS has many files spread out over several pages Number Input may be quicker and more conven...

Page 72: ...call up a specific file no matter how deeply hidden with a single button press In the example instructions below the Open Save display for songs is used 1 First select the Number Input type then call up the path to be memorized to the button and press the MEMORY LCD button LCD E button 2 Press the desired button in the SONG section for songs to which the path selected in step 1 above is to be memo...

Page 73: ...the status of the button function as described here Off No data is currently assigned to the button Green Data has been assigned to the button Red Data has been assigned to the button and the button is active or playing back For details about each button see below Off Green Red REGISTRATION MEMORY buttons No panel settings are memorized to the button Panel settings are memorized to the button Pane...

Page 74: ...hro Start Song Playback To turn Synchro Start on or off simultaneously hold down the TOP button and press the START STOP button in the SONG CONTROL section When Synchro Start is on the song starts from the current position as soon as you play the keyboard LEFT LEFT HOLD RIGHT1 RIGHT2 RIGHT3 PART ON OFF UPPER LOWER LEFT LEFT HOLD RIGHT1 RIGHT2 RIGHT3 PART ON OFF UPPER LOWER LEFT LEFT HOLD RIGHT1 RI...

Page 75: ... of the selected song 43 START STOP button Starting stopping playback or recording of the selected song 43 REW button Pop up window Fast reverse of the song playback position 43 91 FF button Pop up window Fast forward of the song playback position 43 91 y FADE IN OUT buttons Producing smooth fade ins and fade outs when starting and stopping the style song 109 u SONG buttons SONG The Open Save disp...

Page 76: ...le playback related parameters such as Split Point settings 112 CHORD FINGERING Selecting the way in which chords are played with your left hand 108 CONTROLLER FOOT PEDAL Assigning the foot pedal function 152 KEYBOARD PANEL Setting the keyboard related parameters such as Initial Touch and After touch 154 REGIST SEQUENCE FREEZE VOICE SET REGISTRATION SEQUENCE Setting the Registration Memory Sequenc...

Page 77: ...ANNEL Editing recorded style data for each part channel 120 PARAMETER Editing various parameters related to the Style File Format 120 EDIT Recording MIDI events for each channel using the Event List 117 MULTI PAD CREATOR Creating a User Multi Pad 124 RECORD Turning Repeat and Chord Match on or off and recording a Multi Pad 124 EDIT Recording MIDI events for each pad using the Event List 125 4 PROG...

Page 78: ...ng voices such as strings are held continuously while decay type voices such as piano decay more slowly as if the sustain pedal has been pressed This function is especially effective when used with style playback For example if you play and release a chord in the Chord section of the keyboard with the Left part on and the Left voice set to Strings the strings part sustains adding a natural richnes...

Page 79: ...wever voice data created with the Voice Editor software pages 59 85 can be saved to the Preset drive as Custom Voice data CustomVoices saved to the Preset drive can be called up via the CUSTOMVOICE button STRINGS TRUMPET CHOIR SAXOPHONE SYNTH GUITAR BASS BRASS PIANO E PIANO ORGAN USER ORGAN FLUTES CUSTOM VOICE ACCORDION PAD PERC DRUM KIT FLUTE CLARINET VOICE The USER button lets you directly acces...

Page 80: ...0 75 60 45 30 15 0 The sounds of various guitar performance techniques are inde pendently assigned to different velocity and note ranges Harmonics Slide Hammer on notes Muted Dead notes Open hard Open mid Open soft Strumming Fret Noise Example Mega Voice Guitar Velocity Since the Mega voices are fundamentally different from the other voices of the TYROS you should keep in mind the following points...

Page 81: ...on the upper section of the keyboard RIGHT1 3 parts have a longer sustain The Sustain level for each voice can be adjusted via the Sound Creator function page 85 and can be saved as a User voice Poly Mono This determines whether the part s voice is played monophonically only one note at a time or polyphoni cally When this is set to MONO the Portamento effect can be controlled depending on the sele...

Page 82: ...rd Transpose The TRANSPOSE buttons affect the pitch of the keyboard sound the style playback pitch and the pitch of the Multi Pads for which Chord Match has been set to on Note that the transposition is applied from the next note or style chord played after one of the TRANSPOSE buttons has been pressed Song Transpose The TRANSPOSE buttons affect only song playback Note that the transposition is ap...

Page 83: ...ttons determine the basic sound of the organ flutes The term footage is a reference to the sound generation of traditional pipe organs in which the sound is produced by pipes of different lengths in feet The longer the pipe the lower the pitch of the sound Hence the 16 setting determines the lowest pitched component of the voice while the 1 setting determines the highest pitched component The high...

Page 84: ...3 and 2 controls increase or reduce the volume of attack sound at the corresponding footages The longer the graphic bar the greater the attack sound volume LENG Length Affects the attack portion of the sound producing a longer or shorter decay immediately after the initial attack The longer the graphic bar the longer the decay REVERB DEPTH See Effect on page 136 CHORUS DEPTH See Effect on page 136...

Page 85: ...ROM Save to the Preset drive Save to the User Disk drive Basic Procedure Sound Creator BACK NEXT 1 3 2 FUNCTION SOUND CREATOR MENU STRINGS TRUMPET CHOIR SAXOPHONE SYNTH GUITAR BASS BRASS PIANO E PIANO ORGAN USER ORGAN FLUTES CUSTOM VOICE ACCORDION PAD PERC DRUM KIT FLUTE CLARINET VOICE 4 Select the desired voice other than an Organ Flutes voice Press the SOUND CREATOR button to call up the Sound C...

Page 86: ...e of the edited voice up or down in octaves When the edited voice is used as any of the RIGHT1 3 parts the R1 R2 R3 parameter is available when the edited voice is used as the LEFT part the LEFT parameter is available MONO POLY Determines whether the edited voice is played monophonically or polyphonically page 81 PORTAMENTO TIME Sets the portamento time when the edited voice is set to MONO above F...

Page 87: ...toff frequency or effective frequency range of the filter see diagram Higher values result in a brighter sound HARMONIC CONTENT Determines the emphasis given to the cutoff frequency resonance set in BRIGHTNESS above see diagram Higher values result in a more pronounced effect ATTACK Determines how quickly the sound reaches its maximum level after the key is played The higher the value the slower t...

Page 88: ...nect a microphone and you can even have your voice mixed with the song as it plays With the sophisticated Guide features you can let the TYROS teach you how to play the song properly and even how to sing it with the correct pitches Basic Procedure Score EXIT 3 2 4 1 5 Select a song Go back to the Main display and press the Score LCD button As the song plays back a red ball bounces along through th...

Page 89: ...is selected AUTO The MIDI channels in the song data for the right and left hand parts are as signed automatically setting the parts to the same channel as the channel which is specified in the FUNCTION SONG SETTING display page 92 1 16 Assigns the specified MIDI channel 1 16 to each of the left and right hand parts OFF LEFT CH only No channel assignment this disables display of the left hand key r...

Page 90: ...cedure Lyrics above Basic Procedure Lyrics EXIT EXIT 3 2 1 Select a song Go back to the Main display and press the Lyrics LCD button As the song plays back the lyrics are shown in succession in the LCD dis play The language used for lyrics display depends on the particular lyric data If the lyrics are garbled or unreadable you can remedy this by changing the LYRICS LANGUAGE setting from the FUNCTI...

Page 91: ...x xxxxx any character except 01 04 and any number of letters is OK are handled as Loop End Markers Since the Event List in the Song Creator function does not let you freely name Markers the instructions above are recommended for creating new Markers However with sequence software on a computer you can create new Markers and assign appropriate names to them By naming Markers in this way you can eas...

Page 92: ...n Open Save display Simply enter the number of the song you want to hear next and it will be put in the rotation Here the settings on the FUNCTION SONG SETTING display and the Open Save display for songs are explained together with the points above Song Setting Basic Procedure 3 2 1 Press the FUNCTION button Press the SONG SETTING LCD button Set the desired parameters next page Selects one of the ...

Page 93: ...tion RIGHT CH This parameter is available when the AUTO CH SET below is set to OFF This parameter determines which MIDI channel in the song data is assigned to the Right hand part of the Guide function and the Song Score function HARMONY CH Determines the MIDI channel in the song data of which the note events are used for applying the Vocal Harmony to the microphone sound AUTO CH SET When set to O...

Page 94: ...obal events for the entire song and specific events for each channel The MIDI Event List is a useful Song Creator tool that arranges all events in a song in chronological order in measures beats clocks and allows you to make detailed changes to those events Among the events included are Chord Section These style playback events let you enter Chords and Sections Intro Main Ending and so on MIDI cha...

Page 95: ... set with the corresponding LCD button REPLACE ALL This deletes all data following the point at which recording is stopped PUNCH OUT The song position at which recording is stopped is regarded as the Punch Out point This setting maintains all data following the point at which recording is stopped PUNCH OUT AT Actual overwrite recording continues until the specified Punch Out measure set with the c...

Page 96: ...the specified amount Ap plying less than 100 quantization lets you preserve some of the human feel in the recording 1 3 2 4 Executes the operation for the dis played page After the operation with the exception of the SETUP page is completed this button changes to UNDO letting you restore the original data if you are not satisfied with the Operation results The Undo function only has one level only...

Page 97: ...tion channel DESTINATION Determines the channel into which the mix or copy results will be placed SONG Records the tempo setting and all settings made from the Mixing Console KEYBOARD VOICE Records the current panel settings including the voice of the keyboard played parts RIGHT1 2 3 and LEFT and their on off status Panel settings recorded here are same as the ones memorized to the One Touch Setti...

Page 98: ...t EXIT 001 1 1440 The song position at which you edit or input the event is indicated by the following three values This sets the size of the next Chord Section event to be entered in step recording and deter mines to what position the pointer will advance after the event has been entered Use the CHD display if you wish to edit the already recorded Chord events one by one Use the STEP RECORD displ...

Page 99: ...and play chords as shown at right 002 3 000 Dm7 002 4 000 G7 CM7 Dm7 Em7 Dm7 G7 C MAIN D FILL IN C MAIN C MAIN VARIATION Select this resolution and play chords as shown at right 003 1 000 C 004 1 000 C The MAIN C section is auto matically selected START STOP SYNC START NEW SONG START STOP SYNC START NEW SONG REC TOP REW FF REC TOP REW FF You can also move the song position to the top of the song b...

Page 100: ...e playback and the melody explained here separately Press this to convert the recorded chord and section entries into song data You ll need to execute the Expand operation to properly play back the data you entered in the STEP RECORD page described on the previous page Chord and Section data recorded with Realtime Recording cannot be indicated and edited on this display EXIT 001 1 1440 The song po...

Page 101: ...ct mf as specified in the example Value Actual recorded velocity Kbd Vel fff ff f mf mp p pp ppp Actual playing strength 127 111 95 79 63 47 31 15 Sets the Gate Time or the length of the note as a percent age Here we ll select Tenuto as specified in the example Value Actual recorded velocity Normal Tenuto Staccato Staccatissimo Manual 80 99 40 20 The gate time note length can be set to any desired...

Page 102: ...e ll select mp as specified in the example Sets the Gate Time or the length of the note as a percentage Here we ll select Normal as speci fied in the example Use these buttons to set the resolution of the next note s Here we ll set the resolution to a half note as specified in the example 7 While holding F on the keyboard press the 1 8 note LCD button This enters a half note for F and a tied 8th n...

Page 103: ...ntered notes Determines the velocity loudness of the note to be entered Here we ll select f as specified in the example Sets the Gate Time or the length of the note as a percentage Here we ll select Normal as speci fied in the example Use these buttons to set the resolution of the next note Here we ll set the resolution to a dotted half note as specified in the example Use these buttons to set the...

Page 104: ...e Time or the length of the note as a percentage Here we ll select Normal as speci fied in the example Use these buttons to set the resolution of the next note Here we ll set the resolution to an 1 8 note as specified in the example 7 Do not release C3 yet Keep holding the note as you execute the following steps While holding the key C3 press the 1 8 note LCD button 7 Do not release C3 and E3 yet ...

Page 105: ...he 1 8 note LCD button then press the half note LCD button All notes in the example have now been entered and you can release the keys Determines the channel for the MIDI event edited here or entered to the STEP RECORD display Calls up the Filter display page 107 letting you select only the events you wish to be shown in the Event List Holding this button down while using the A and B buttons lets ...

Page 106: ...e signature Determines the time signature Key Key signature Determines the key as well as the major minor setting This setting is used for displaying the notation Song Score function XG Prm XG parameters Allows you to make various detailed changes to the data For more information on XG parameters refer to the separate Data List booklet MIDI Data Format SYS EX System Exclusive Displays the System E...

Page 107: ... the desired Filter category from the three below then checkmark the items you want to be shown in the Event List displays MAIN Displays all main types of events CTRL CHG Displays all specific Control Change message events STYLE Displays all types of style playback related events Enters removes the checkmark for the selected event type The checked event types can be shown on the Event List display...

Page 108: ...the keyboard This type is available only for style play back The abbreviated chord fingerings described below are used FINGERED Lets you finger your own chords on the Chord section of the keyboard while the TYROS supplies appropriately orchestrated rhythm bass and chord accompaniment in the selected style The Fingered recognizes the various chord types which are listed on the separate Data List bo...

Page 109: ...ver this can be changed to any value between 5 and 500 beats per minute by using the TEMPO button This can be done either before the style playback is started or while it is playing When you select a different style while the style is not playing the default tempo for that style is also selected If the style is playing the same tempo is maintained even if you select a different style Tap function ...

Page 110: ... select a style for your performance then you press a ONE TOUCH SET TING button to match the panel settings to that style OTS Link The convenient OTS One Touch Setting Link function lets you automatically have One Touch Settings change when you select a different Main section A D The Main sec tions A B C and D correspond to One Touch Settings 1 2 3 and 4 respectively This is especially powerful fo...

Page 111: ...th the Number Input Type page 71 2 First select the style to be memorized by calling up the appropriate path then press the MEMORY LCD button 3 Check that the path set in step 2 above has been properly memorized First call up a different path for example the Open Save display for voices then select the path just memorized by turning on the USER DISK button and pressing the appropriate STYLE button...

Page 112: ...e the Chord Match func tion page 38 with the Multi Pads or the Harmony effect page 39 without having to play back a style From the display above you can determine whether the chord played in the chord section will sound or not in the Stop Accompaniment status OFF The chord played in the chord section will not sound STYLE The chord played in the chord section will sound via the voices for the Pad p...

Page 113: ...volume changes in response to your playing strength in the chord section of the keyboard Section Set Determines the default section that is automatically called up when selecting different styles when style playback is stopped When set to OFF and style playback is stopped the active section is maintained even if the different style is selected When any of the Main A D sections is not included in t...

Page 114: ...for example INTRO I and MAIN A are created by recording the new data to all the parts and MAIN B is cre ated by assembling the pattern data for all parts from the other styles INTRO III and ENDING A C are created by keeping and using the original data MAIN C and FILL INA are created via three ways Recording Assembly and using the origi nal data Style Data Structure Creating Styles Part Section RHY...

Page 115: ... specified in the chord section of the keyboard The Style Creator lets you set the parameters that determine how the note is transposed and set the parameters that determine how notes held through chord changes will be handled The Style File Format SFF combines all of Yamaha s auto accompaniment style playback know how into a single unified format By using the Style Cre ator you can take advantage...

Page 116: ...yle will be lost if you change to another style or you turn the power off without executing the save operation page 69 Execute Realtime recording Execute Assembly page 118 Edit the already recorded parts channels Execute Step Recording using the Event List Set the desired part channel to REC by pressing the corresponding lower LCD button while holding the REC CH button Only one part channel can be...

Page 117: ...ges you make during your performance The chord which forms the basis for thios note conversion is called the Source Chord and is set by default to CM7 as in the example illustration above You can change the Source Chord its root and type fromthe PARAMETER display on page 120 Keep in mind that when you change the Source Chord from the default CM7 to another chord the chord notes and recommended not...

Page 118: ...he desired sections and channels to be copied Determines the playback setting for each channel You can assemble the accompa niment style while the style section and channel that will be copied are playing SOLO Mutes all but the selected channel Any parts channels set to ON in the RECORD pop up window on the BASIC page are played back simultaneously ON Plays back the selected part channel Any parts...

Page 119: ...d ORIGINAL BEAT value is 8 Beat the Swing parameter will selectively delay the 2nd 4th 6th and 8th beats of each measure to create a swing feel The settings A through E produce different degrees of swing with A being the most subtle and E being the most pronounced FINE Selects a variety of Groove templates to be applied to the selected section The PUSH settings cause certain beats to be played ear...

Page 120: ...selected channel 1 4 2 3 5 Use these to select the desired edit operation Set the parameters for executing the data edit Executes the selected operation on the respective page After the opera tion is completed you can hear the result and this button changes to UNDO letting you restore the origi nal data if you re not satisfied with the result of each operation The Undo function only has one level ...

Page 121: ...LODIC MINOR 5th Var In addition to the Melodic Minor transposition above augmented and diminished chords affect the 5th note of the Source Pattern HARMONIC MINOR When the played chord changes from a major to a minor chord this table lowers the third and sixth intervals in the scale by a semitone When the chord changes from a minor to a major chord the minor third and flatted sixth intervals are ra...

Page 122: ...mpatible tone generator for optimum results Record the sections in the order listed below with a Marker Meta event at the top of each section Enter the Marker Meta events exactly as indicated in the chart on the next page including upper lower case characters and spaces Also include an SFF1 Marker Meta event SInt Marker Meta event and style name Meta event at 1 1 000 the top of the sequence track ...

Page 123: ...bars Intro Pattern up to 255 bars Corresponds to INTRO III 22 1 000 23 4 479 Ending C 2 bars Intro Pattern up to 255 bars Corresponds to ENDING III 24 1 000 25 4 479 Main D 2 bars Main Pattern up to 255 bars Corresponds to MAIN D 26 1 000 26 4 479 Fill In DD 1 bar Fill In Pattern Corresponds to FILL IN D Initial Setup Source Pattern Section Length Intro 255 measures max Main 255 measures max Fill ...

Page 124: ...ain display by pressing the LCD E button Instructions for these operations are the same as in the other Open Save displays such as voices songs and styles These operations can be used on each individual pad just as with the banks on the display at left Settings here can be saved to user or disk drive as a bank file on the Open Save display You can use these operations to collect your favorite Mult...

Page 125: ...ame as that for Song Recording pages 100 105 with the exception of the points listed below There is no LCD button for switching channels since Multi Pads contain data for only a single channel In the Multi Pad Creator only the channel events and System Exclusive messages can be entered Chord and Lyrics events are not available You can switch between the two types of Event Lists by pressing the LCD...

Page 126: ...ed record to the Favorite page Determines the tempo set when this record is selected Determines the genre to which the current record belongs Creates a new genre for inclu sion of the current record and lets you enter a genre name Press this LCD button to add the cur rently edited record to the Music Finder as a new record Press this to store the settings here to the current record on Flash ROM an...

Page 127: ...sired Music Finder file from the User or Disk drive All Music Finder records can be stored together as a single file When selecting a stored file a message appears prompt ing you to replace or append the records as desired REPLACE All Music Finder records currently in the instrument are deleted and replaced with the records of the selected file APPEND The records called up are added to the vacant ...

Page 128: ...g the Registration Memory number Registration Sequence As convenient as the Registration Memory buttons are there may be times during a performance when you want to quickly switch between settings without having to take your hands from the keyboard The convenient Registration Sequence function lets you call up the presets in any order you specify by simply using the BACK NEXT buttons or the pedal ...

Page 129: ...nging Registra tion Memory banks or when turning the power off unless you ve saved it with the Registration Memory bank file Indicates the file name of the selected Registration Memory bank Determines which pedal is used to advance increment through the sequence Determines which pedal is used to reverse decrement through the sequence Indicates the Registration Mem ory preset numbers in the order o...

Page 130: ... HARMONY MIC SETTING VH TYPE SELECT MIC MIN OVER SIGNAL MIC LINE IN Make sure to adjust the INPUTVOLUME so that the SIGNAL lamp lights but the OVER lamp does not This turns the Vocal Harmony effect on or off If you connect a microphone to the TYROS you can sing along with the song or style and have vocal har mony parts added automatically This calls up the Microphone setting display and lets you a...

Page 131: ...NDER DEPTH Adjusts the degree of gender change applied to harmony notes higher than the UPPER GENDER THRESHOLD The higher the value the more feminine the harmony voice becomes The lower the value the more masculine the voice LOWER GENDER DEPTH Adjusts the degree of gender change applied to harmony notes lower than the LOWER GENDER THRESHOLD The higher the value the more feminine the harmony voice ...

Page 132: ...chorus effects applied to the microphone sound TOTAL VOLUME ATTENUATOR This determines the amount of attenuation to be applied to the overall sound excepting the microphone input allowing you to effectively ad just the balance between your voice and the overall instrument sound DSP MIC ON OFF This turns the DSP effect applied to the microphone sound ON or OFF DSP MIC TYPE This selects the type of ...

Page 133: ...pendent on the selected Vocal Harmony mode and this parameter determines how the harmony is applied to your voice The three modes are described below CHORD The following parameters determine which data in a recorded song is used for chord detection MIC Microphone The following parameters determine how the microphone sound is controlled SONG CHANNEL MUTE PLAY When set to MUTE the channel selected b...

Page 134: ... save the song to the User or Disk drive page 55 Parts making up the TYROS sound LEFT LEFT HOLD RIGHT1 RIGHT2 RIGHT3 PART ON OFF PART SELECT UPPER LOWER CHANNEL ON OFF PART MULTI PAD CONTROL Keyboard parts Consists of RIGHT1 RIGHT2 RIGHT3 LEFT Split Point page 112 Multi Pad parts Consists of Multi Pads 1 2 3 and 4 Microphone sound part Style parts Consists of Rhythm 1 2 Bass Chord1 2 Pad Phrase 1 ...

Page 135: ... OCTAVE button TUNING Determines the pitch of each keyboard part TRANSPOSE Allows the pitch to be transposed up or down in semitone increments Setting this to MASTER transposes the overall sound of the instru ment while SONG transposes song playback and KEYBOARD transposes the keyboard pitch as well as that of style playback and the Multi Pads since these are also affected by keyboard play in the ...

Page 136: ... Style part all channels Song part all channels In addition to the Reverb and Chorus types the TYROS has special DSP effects that in clude additional effects usually used for a spe cific part such as distortion and tremolo System Insertion 3 DSP2 DSP3 DSP4 DSP5 RIGHT1 RIGHT2 RIGHT3 LEFT Song part all chan nels Any unused DSP blocks are automatically as signed to the appropriate parts channels as n...

Page 137: ...fect About DSP 1 In most cases the DSP 1 effect block is available for either the song or style part For songs and styles the effect block is applied to only the last selected or played part For example when selecting or starting a song during style playback the DSP 1 effect applied to the style part is cancelled and is applied instead to the song part Particularly if the style data originally is ...

Page 138: ...ring the name of the edited Effect type Enter the desired name and press the OK LCD button to save the edited effect to the location specified at left Select an Effect category type to be edited Select a parameter to be edited Parameters displayed differ depending on the selected Effect type Refer to the separate Data List booklet for details When the edited effect block is a System Effect the Eff...

Page 139: ...ngs by adjusting the frequency bands and save the settings to one of two User Master EQ types Along with the five Preset EQ settings these can be called up as needed from the MIXING CONSOLE EQ display 0 Master EQ type selection and Part EQ adjusting Select a Master EQ type Master EQ type editing Selecting a Master EQ type automatically set the parameters displayed at the bottom of this display Whe...

Page 140: ...s of the TYROS provide all you need for processing and mixing complex multi Part songs However there may be times when you want to sweeten or process a certain Voice or sound with a favorite outboard effect unit or record a Part to a separate track of a tape recorder The Line Out settings are designed just for these kinds of applications Master Compressor type selection and editing Selecting a Mas...

Page 141: ...be output in stereo 1 left 2 right When the SUB1 SUB2 box is checkmarked the part channel or percussion sound will be output in mono respectively Line Out settings for each part or channel Select the desired part Line Out settings for each instrument key Set the output configuration for the selected part by checkmarking or un checkmarking the appropriate column jack Set the output configuration fo...

Page 142: ...eceiving compatible Note Control Change Program Change and various other types of MIDI data or messages The TYROS can control a MIDI device by transmitting note related data and various types of controller data The TYROS can be controlled by the incoming MIDI messages which automatically determine tone generator mode select MIDI channels voices and effects change param eter values and of course pl...

Page 143: ...ransmitted or received via two sets of MIDI terminals MIDI A IN OUT MIDI B IN OUT or the USB connector MIDI IN Receives MIDI data from another MIDI device Two ports A B are provided and each can receive MIDI messages of 16 channels MIDI OUT Transmits the TYROS keyboard information as MIDI data to another MIDI device Two ports A B are provided and each can transmit MIDI messages of 16 channels USB ...

Page 144: ...s you a set of comprehensive flexible MIDI controls It also gives you a set of ten pre programmed templates that let you instantly and easily reconfigure the instrument to match your particular MIDI application or external device Call up these templates from the FUNCTION MIDI display next page Template name Descriptions ALL PARTS Transmits all parts including the keyboard parts RIGHT1 2 3 LEFT KBD...

Page 145: ... MIDI template Press the EXIT button to return to the MIDI template display As desired set the MIDI parameters Press the EDIT LCD button to call up the display for setting the MIDI parameters Here you can see and edit the detailed settings that correspond to the MIDI template selected in step 3 Setting the Chord Type for Style Playback via MIDI receive page 148 Setting the Chord Root for Style Pla...

Page 146: ... page 82 is applied to the note events the TYROS received via MIDI or not START STOP Determines whether incoming FA start and FC stop messages affect song or style playback Message Switch SYS EX The Tx setting turns MIDI transmission of MIDI system exclusive messages on or off The Rx setting turns MIDI reception and recognition of MIDI system exclusive messages generated by external equipment on o...

Page 147: ...h briefly when ever any data is received on the channel s Turns reception of the specified data type of the selected channel on or off Determines the part to which the received MIDI messages of the selected channel are assigned With the exception of the two parts below see page 134 for details about the parts KEYBOARD The received note messages control the TYROS key board performance EXTRA PART1 4...

Page 148: ...edure is basically the same as that of the ROOT display above MFC10 Settings The explanations here apply when you call up the MFC10 page in step 5 of the Basic Procedure on page 145 By connecting an optional MFC10 MIDI Foot Controller to the TYROS you can conveniently control a wide range of operations and functions by using your feet perfect for changing settings and controlling the sound while y...

Page 149: ...termines the MIDI port which is to be used when communicating with the MFC10 Here the USB port USB1 USB2 can be selected even though the MFC10 does not have the USB connector This is because the computer can be used instead of the MFC10 The computer can transmit the data equiv alent to the data the MFC10 transmits to the TYROS For details see the bottom of this page Select FOOT SWITCH or FOOT CONT...

Page 150: ...t This function allows each individual note of the octave to be tuned in cents 1 cent 1 100th of a semitone for each part especially useful for playing period pieces to match the tuning system used during specific musical eras Basic Procedure Function 1 2 3 FUNCTION SOUND CREATOR MENU Press the FUNCTION button Select the desired menu by pressing the corresponding LCD button Page 150 Page 92 Pages ...

Page 151: ...ents on the mean tone and Pythagorean scales The main fea ture of this scale is that each key has its own unique character The scale was used extensively during the time of Bach and Beethoven and even now it is often used when performing period music on the harpsichord ARABIC1 2 Use these tunings when playing Arabic music Use these to select the desired part These determine whether the cor respond...

Page 152: ...h when the pedal is released The following parameters can be set for this function on this display UP DOWN determines whether the pitch change goes up is raised or down is lowered RANGE determines the range of the pitch change in semitones ON SPEED determines the speed of the pitch change when the pedal is pressed OFF SPEED determines the speed of the pitch change when the pedal is released LEFT R...

Page 153: ...on INTRO 1 Same as the INTRO I button INTRO 2 Same as the INTRO II button INTRO 3 Same as the INTRO III button MAIN A Same as the MAIN A button MAIN B Same as the MAIN B button MAIN C Same as the MAIN C button MAIN D Same as the MAIN D button FILL DOWN A fill in plays automatically followed by the Main section of the button on the immediate left FILL SELF A fill in plays automatically followed by ...

Page 154: ...ouch sensitivity setting HARD 2 Requires strong playing to produce high volume Best for players with a heavy touch HARD 1 Requires moderately strong playing for higher volume NORMAL Standard touch response SOFT 1 Produces high volume with moderate playing strength SOFT 2 Produces relatively high volume even with light playing strength Best for players with a light touch TOUCH OFF LEVEL Determines ...

Page 155: ...molo or Trill is selected in Type above ASSIGN This lets you determine the keyboard part via which the harmony echo notes will be sounded This parameter is available for all types with the exception of Multi Assign CHORD NOTE ONLY When this is set to ON the Harmony effect is applied only to the note that belongs to a chord played in the chord section of the keyboard This parameter is not available...

Page 156: ...following parameters can be set from the FUNCTION UTILITY CONFIG2 display Display Voice Number Determines whether or not the voice bank and number are shown in the Voice selection display Open Save display This is useful when you want to check the proper bank select MSB LSB values and program number to specify when selecting the voice from an external MIDI device Speaker Determines whether or not ...

Page 157: ...tically deletes all data on the disk After formatting the capacity of a 2HD disk is 1 44 MB and that of a 2DD disk is 720 KB When you wish to format a floppy disk press the FLOPPY DISK FORMAT LCD button on the FUNCTION UTILITY DISK display after inserting a floppy disk into the floppy disk drive then follow the on screen instructions When you wish to format a hard disk press the HARD DISK FORMAT L...

Page 158: ...TILITY OWNER display to call up the Open Save displays for main pictures You can select a picture from among various pictures provided on the Preset drive After selecting press the EXIT button to return to the Main display The newly selected picture is shown as the background of the Main display Using your own pictures Even though a variety of pictures are available on the preset drive you can loa...

Page 159: ...ia the Mixing Console display to the original factory settings MUSIC FINDER Restores the Music Finder data all records to the original factory settings page 127 FILES FOLDERS Deletes all files and folders stored in the User drive CUSTOM VOICE Deletes all Custom Voices page 79 on the Preset drive SYSTEM SETUP Parameters set on the various displays such as the FUNCTION UTILITY and microphone setting...

Page 160: ... MIC LINE IN L L R R MAIN SUB LINE OUT L L R R LOOP SEND MIDI A MIDI B ASSIGNABLE FOOT PEDAL TRIM MIN MAX L L R R AUX IN LOOP RETURN TRIM MIN MAX VOLUME DSP VARIATION SUSTAIN TO LEFT SPEAKER TO SUB WOOFER L R TO RIGHT SPEAKER L L R R LOOP SEND Installation screws for speaker brackets 3 1 2 OUT IN OUT IN VIDEO OUT NTSC PAL USB 1 2 INPUT AC INLET MIC LINE IN L L R R MAIN SUB LINE OUT L L R R LOOP SE...

Page 161: ...he subwoofer to an appropriate AC outlet 8 First set the volume controls MASTER VOLUME on theTYROS and BASS on the sub woofer to minimum Finally turn on the power of the subwoofer then the TYROS 9 Adjust the volume controls MASTER VOLUME on the TYROS and BASS on the sub woofer to appropriate levels TYROS Sub Woofer POWER ON OFF MASTER VOLUME MAX MIN BASS 10 0 Turn the subwoofer on from the rear pa...

Page 162: ...hese parts may result in a faulty contact Be careful not to misplace any of the screws since all of them are used Do not use any screws other than what are installed on the instrument Before beginning installation switch off the power to the TYROS and connected peripherals and unplug them from the power outlet Then remove all cables connecting the TYROS to other devices Leaving the power cord conn...

Page 163: ...corresponding missing hole to the hard disk as shown Turn on the power go to the FUNCTION UTILITY DISK display and execute the HD Format function page 157 If the format is completed with no trouble and the HD drive tab appears on the Open Save display the hard disk is OK If you have installed the hard disk that was once used for the PSR 9000 9000Pro and turn the TYROS power on you can immediately ...

Page 164: ... not be sounded Check whether or not the selected part is turned on page 74 Not all simultaneously played notes sound You are probably exceeding the maximum polyphony of the TYROS The TYROS can play up to 128 notes at the same time including voice RIGHT2 voice RIGHT3 voice LEFT style song and multi pad notes When the maximum polyphony is exceeded the earliest played notes will stop sounding lettin...

Page 165: ...left hand section of the key board You may be using single finger type fingering page 108 The displayed disk free area value does not coincide with the actual value The displayed value is an approximate value Appropriate harmony notes are not produced by the Vocal Harmony feature Make sure you are using the appropriate method to specify the har mony notes for the current Vocal Harmony mode See pag...

Page 166: ...Harmony Echo Initial Touch Sustain and Poly Mono Event List A useful Song Style Multi Pad Creator tool that arranges all events in a song in chronological order in measures beats clocks and allows you to make detailed changes to those events F Factory Reset Refers to the original factory programmed settings of User drive memory loaded to the instrument before it is shipped Flash ROM ROM that can b...

Page 167: ... depends on the size of the room or space and the materials and furnishings in the room Reverb Effect types use digital signal processing to simulate these charac teristics Right hand section of the keyboard The section of keys to the right of the split point used to play the RIGHT 1 3 voices Revoice A function that changes the voice for each part or channel of the selected style or song to one of...

Page 168: ...style and song parameters including depth can be edited DSP Effects 183 Preset 10 User 4 blocks for RIGHT1 2 3 and LEFT parameters including depth can be edited DSP Effect 183 Preset 10 User 1 block for microphone parameters including depth can be edited DSP Variation Available 4 blocks for RIGHT1 2 3 and LEFT Poly Mono Available When set to MONO the Portamento Time can be set Vocal Harmony 60 Pre...

Page 169: ...0 dot Lyrics Available XF TUNE1000 Lyrics others Available KAR M Live Score Available SMF File Selection type Direct Selection Number Input Voices styles songs Multi Pad banks Registration Memory banks can be selected Disk Compatible format XG XF GM GM Level2 SMF DOC Piano Player ESEQ Style File Format SFF User drive 3 3 MB Up to 250 files folders can be created in one folder Floppy disk 3 5 2HD 2...

Page 170: ...r 58 CONFIG 76 156 Control Change 105 142 CONTROLLER 76 77 Copy 68 Current 93 Cursor 73 Custom Voice 79 85 159 Cut 68 Cutoff Frequency 87 D DATA ENTRY 60 Decay 87 Delay 87 Delete 69 96 DEMO 17 76 Demo 24 Depth 87 Destination 97 DIGITAL RECORDING 17 77 Digital Recording 94 114 124 Direct Access 62 DISK 76 156 Disk 6 Disk drive 64 65 Display Message 62 Display Voice Number 156 DOC 8 DORIAN 121 Drum ...

Page 171: ...art 78 134 Keyboard Transpose 82 Keyword 41 L Language 61 93 158 LCD 17 60 151 LCD buttons 60 LCD contrast 23 LEFT 28 74 153 Left Hold 78 Length 84 LFO 86 LINE OUT 76 Line Out Settings 140 Local Control 146 LOOP 75 Loop 43 44 Loop End Marker 91 Loop Recording 115 Lower 146 LYRICS 77 151 Lyrics 90 Lyrics Background Picture 63 90 M MAIN 153 Main display 24 MAIN jacks 141 Main picture 63 158 MAIN VAR...

Page 172: ...ORTAMENTO 152 Portamento 81 Portamento Time 86 135 POWER ON OFF 22 24 75 PRESET 75 Preset drive 31 63 64 65 Program Change 105 142 PROGRAMMABLE MUSIC FINDER 17 77 PROGRAMMABLE ONE TOUCH SETTING 17 77 Property 71 PUNCH IN AT 95 Punch In Out 94 PUNCH OUT AT 95 PURE MAJOR 151 PURE MINOR 151 PYTHAGORIAN 151 Q Quantize 96 Quick Recording 54 Quick Start 93 R RAM 65 Random 93 Realtime Message 142 Realtim...

Page 173: ...top Window 112 SYS EX 77 146 SYSTEM 76 System 146 System Effect 137 System Exclusive Message 142 System Message 142 SYSTEM RESET 76 System Reset 159 System Setup 63 159 T TALK 75 153 Talk Setting 132 Tap 35 109 TAP TEMPO 16 75 153 TEMPO 16 75 Tempo 106 109 Time Signature 106 TOP 75 TOUCH LIMIT 155 Touch Sense 86 TRANSMIT 76 Transmit 146 TRANSMIT CLOCK 146 TRANSPOSE 16 75 Transpose 82 135 TRANSPOSE...

Page 174: ... on different branch circuit breaker or fuse circuits or install AC line filter s In the case of radio or TV interference relocate reorient the antenna If the antenna lead in is 300 ohm ribbon lead change the lead in to co axial type cable If these corrective measures do not produce satisfactory results please contact the local retailer authorized to distribute this type of product If you can not ...

Page 175: ...0 Las Rozas Madrid Spain Tel 91 201 0700 GREECE Philippe Nakas S A Navarinou Street 13 P Code 10680 Athens Greece Tel 01 364 7111 SWEDEN Yamaha Scandinavia AB J A Wettergrens Gata 1 Box 30053 S 400 43 Göteborg Sweden Tel 031 89 34 00 DENMARK YS Copenhagen Liaison Office Generatorvej 8B DK 2730 Herlev Denmark Tel 44 92 49 00 FINLAND F Musiikki Oy Kluuvikatu 6 P O Box 260 SF 00101 Helsinki Finland T...

Page 176: ...strument Division Yamaha Corporation 2002 Yamaha Corporation V922620 PO 02B0 Printed in China Yamaha PK CLUB Portable Keyboard Home Page English only http www yamahaPKclub com Yamaha Manual Library http www2 yamaha co jp manual english ...

Reviews: