background image

Menu:  [File] menu

S90 XS/S70 XS Editor Owner’s Manual

37

Import

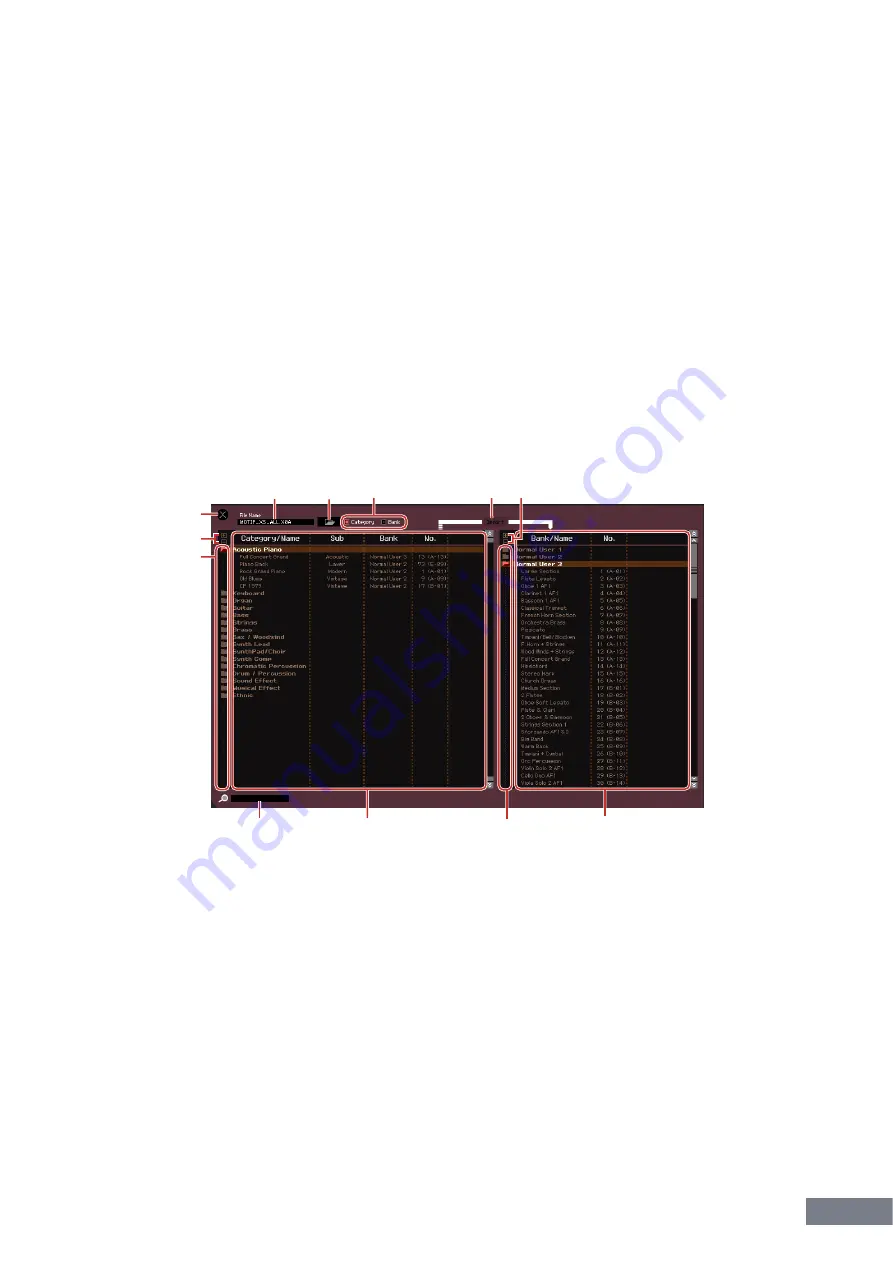
Imports the Voice data (a specific Voice in a specific folder or all Voices in a specific folder) from a different 

file to the current file. 

Click the File Select button (

3

), select a file including your desired Voice(s) so that the folders in the selected 

file are listed as the Source Voice list (

8

), select a Voice or Voices or a folder or folders in the list (

8

), select 

a destination location in the Destination Voice list (

9

) of the current file, then click [Import] to execute the 

Import operation. 

The following file types can be selected. 

• S90 XS/S70 XS Editor (.X2E)

• MOTIF XS Editor (.X0E)

• MOTIF-RACK XS Editor (.X1E)

• S90 ES Voice Editor (.S7E)

• S90 ES Multi Part Editor (.M6E)

• S90 XS/S70 XS All (.X2A)

• S90 XS/S70 XS All Voice (.X2V)

• MOTIF XS All (.X0A)

• MOTIF XS All Voice (.X0V)

1

[X] (Close) button

Click this to close this window without importing. 

2

File name 

(Indication only)

Indicates the currently selected file. 

3

File selection button

Click this to open the dialog for file selection. 

4

[Category]/[Bank] checkboxes

Click either of these boxes to determine whether the Voices in the Source Voice list (

8

) are divided into 

Categories or Banks.

1

2

3

4

5 6

7

6

9

7

8

)

Summary of Contents for S70 XS

Page 1: ...not be held responsible for the results of the use of this manual and the software The screen displays as illustrated in this Owner s Manual are for instructional purposes and may appear somewhat diff...

Page 2: ...h as Cubase 4 or Cubase AI 4 For more information refer to the Studio Manager PDF manual Studio Connections Studio Connections is a joint project begun by Steinberg and Yamaha Music production systems...

Page 3: ...en Plug in Technology Open Plug in Technology OPT is a software format that enables you to control MIDI devices from a music DAW application software For example this allows you to start up and operat...

Page 4: ...the S90 XS S70 XS instrument is connected to the computer properly with the ONLINE status editing a parameter on the S90 XS S70 XS Editor affects the same parameter on the S90 XS S70 XS itself and vic...

Page 5: ...rks to the boxes of Por ts 1 and 4 for the S90 XS S70 XS in both the Input Ports and the Output Ports as illustrated below n A MIDI Thru function is available on Studio Manager version 2 3 0 or later...

Page 6: ...OFFLINE indication is set to OFFLINE 3 On the Auto Sync window set communication related parameters such as Input Port Output Port and Device Number in the Data Port section then set the direction of...

Page 7: ...and vice versa 5 Edit the Voice in the Voice mode 5 1 On the V row of the Voice section click the Bank name or Voice name to call up the VOICE LIBRARY window 5 2 From the list in the VOICE LIBRARY sel...

Page 8: ...panel next to the main window to call up the Detailed Parameter section 6 Store the edited settings as a User Voice as necessary 6 1 Click Store Voice under Edit in the menu bar to open the Store wind...

Page 9: ...rument will be overwritten Select the destination Voice number carefully to prevent important data from being erased accidentally n You can store the settings of the parameters in the G row by clickin...

Page 10: ...oice assigned to each Part If you want to change the parameter values from the original ones of the selected Multi click drag and drop each of the parameters such as EQ and effect lined up to the righ...

Page 11: ...6 2 6 3 and 6 4 9 Select Save or Save As under File on the menu bar to save the edited data as a file extension X2E All the settings you made and the Voice data you stored to the User Banks will be sa...

Page 12: ...able is disconnected accidentally 1 Indicates that the current status is set to ONLINE Clicking this calls up OFFLINE 2 described below Keep in mind that the ONLINE indication cannot be enabled when t...

Page 13: ...the edited data as a file This indication is the same as the green F indicator page 29 Ins FX Insertion Effect Turns the Insertion Effect on or off Chorus Turns the Chorus on or off and selects the Ch...

Page 14: ...as the blue V indicator page 29 n The MIDI monitor mark is at the left side of the V mark A small red LED lights when MIDI messages are received Category Bank No Voice Name Indicates the Category Bank...

Page 15: ...ng closing all the folders Determining whether the Voices listed here are divided into Category folders or Bank folders Copying pasting Changing the Voice name Deleting all the checkmarks of the Favor...

Page 16: ...ted below Cho Rev Pan Chorus Reverb Pan Adjusts the Chorus Send level Reverb Send level and stereo Pan position for the A D Part in the Voice mode by using the graphic knobs Volume Adjusts the Volume...

Page 17: ...ip lets you edit the main parameters in the Multi mode such as effect related ones Clicking G turns this section on as illustrated below n When editing any of the Global parameters described below a s...

Page 18: ...closes n By right clicking this section and selecting a menu you can use the following function Opening closing all the folders 4 Search Box You can search for your desired Multi by inputting a keywor...

Page 19: ...S S70 XS and vice versa even if the Editor is in the ONLINE status If you come across such a situation and you want to match the Part number of the S90 XS S70 XS with the one in the Editor change the...

Page 20: ...t as the Output Select parameter on the S90 XS S70 XS Editor ARP Arpeggio Turns Arpeggio playback on or off for each Part n Up to four Parts can play back the Arpeggio simultaneously When AD Part is s...

Page 21: ...et to Voice You can edit detailed parameters for the current Part by clicking the button located near the top right of the window just below the model name to call up the Detailed Parameter section Ca...

Page 22: ...in white the Detailed Parameter section is hidden and you can call it up by clicking here When only the right arrow is indicated in white the Detailed Parameter section is shown on the display allowi...

Page 23: ...Elements in a single window 3 Element Parameter categories available when the Normal Voice is selected Indicates the categories of Element parameters Clicking each of the categories calls up the corr...

Page 24: ...et to Multi You can edit detailed parameters for the current Part by clicking the button located near the top right of the window just below the model name to call up the Detailed Parameter section Ca...

Page 25: ...gories calls up the corresponding Global parameters in the Detailed Parameter section 3 Part Common This is shown when one of Parts 1 16 is selected in the Mixer section Clicking each of the parameter...

Page 26: ...dit a parameter n These indicators V G and F are linked with the small squares at the top right of the V box and G box in the Mixer section The V and G indicators disappear if you execute the Voice St...

Page 27: ...ry section calls up the parameters such as Voice name and pitch related parameters in the Detailed Parameter section On the S90 XS S70 XS instrument these parameters are the same as those called up by...

Page 28: ...ed on the S90 XS S70 XS instrument Oscillator Pitch Clicking this in the Parameter Category section calls up the parameters related to the Oscillator and Pitch in the Detailed Parameter section Filter...

Page 29: ...espectively The F indicator and the small squares at the top right of the G box in the Mixer section disappear only if you execute the File Save operation All the indicators and the small squares disa...

Page 30: ...of the 1 16 rows in the Mixer section consists of the following sub categories General Clicking this calls up the GENERAL window in the Parameter Category section This window lets you edit the Voice C...

Page 31: ...the Normal Voice is assigned to the current Part while the Drum Key is shown when the Drum Voice is assigned The parameters belonging to this category lets you make the settings applied to each of th...

Page 32: ...ction Destination is assigned to the corresponding Source controller When a lamp is turned off no function Destination is assigned to the corresponding Source controller 2 Quick Setup From this sectio...

Page 33: ...is related to All AF off AF1 on and AF2 on selected as a value of the XA Control parameter on the OSCILLATOR PITCH window of the Normal Voice Element Edit For details refer to the Owner s Manual of t...

Page 34: ...oice Arpeggio Type You can search for the desired Voice Multi and Arpeggio Type on the VOICE LIBRARY window page 14 MULTI LIBRARY window page 18 and ARP LIBRARY window just by inputting a keyword in t...

Page 35: ...he cursor key or Page Up Page Down key If you want to make fine adjustments to the value drag the mouse while holding the Shift key The specific operation of the slider is determined by the setting of...

Page 36: ...S70 XS Editor X2E S90 ES Multi Part Editor M6E S90 XS S70 XS All Files X2A CAUTION Unlike files of other applications such as word processors only a single file can be opened and edited on the S90 XS...

Page 37: ...nt file then click Import to execute the Import operation The following file types can be selected S90 XS S70 XS Editor X2E MOTIF XS Editor X0E MOTIF RACK XS Editor X1E S90 ES Voice Editor S7E S90 ES...

Page 38: ...tton to open all the folders so that all Voices appear in all folders Click the button to close all folders 7 Folder button Bank or Category Double click here to open or close the folder 8 Source Voic...

Page 39: ...Port 4 for the S90 XS S70 XS in the MIDI In setting then select Port 1 and Port 4 for the S90 XS S70 XS in the MIDI Out settings n When is shown at left of the Port name e g Yamaha USB IN 0 1 this in...

Page 40: ...On and one of the following operations is executed data synchronization will be started automatically as soon as the Auto Sync window is opened When clicking OFFLINE after setting the MIDI IN OUT para...

Page 41: ...w the Slider illustrated at right responds to your mouse control Jump When this is selected clicking any location in the slider jumps the slider pointer to that location Touch When this is selected yo...

Page 42: ...is selected clicking the button decreases the value by 1 while clicking the L button moves the cursor downward by one item Dec Dec When this is selected clicking the button decreases the value by 1 wh...

Page 43: ...70 XS Editor parameters on the above window S90 XS S70 XS instrument 1 Tone Note Shift UTILITY General Note Shift Tune UTILITY General Tune 2 Auto Load Setup Power On Mode UTILITY General Power On Mod...

Page 44: ...setup to the clipboard Paste Pastes the Voice s entire Part setup and characters from the clipboard to the specified location Initialize Current Voice in the Voice mode Initialize Current Part Voice...

Page 45: ...oice mode or Part Common parameters when the Editor is set to the Multi mode 4 with Wave Assignment When this is turned on clicking Start initializes the Waveform assignment for all Elements of the cu...

Page 46: ...s for initializing are available Normal When this is selected clicking Start initializes the Editor setup to the normal default settings GM When this is selected clicking Start initializes the Editor...

Page 47: ...o store the Voice as a User Voice or Mixing Voice available only in the Multi mode 1 X Close button Click this to close this window without executing the Store operation 2 Voice Name Enter an original...

Page 48: ...e Bank folders Store Mixing only in the Multi mode This menu lets you store the Mixing settings in the Multi mode Select the desired Multi number and enter the desired name then click the Store button...

Page 49: ...g Start button transmits data from the instrument to the Editor 3 Data type to be transmitted received Here you can set which data type is to be transmitted or received Clicking the All button turns a...

Page 50: ...ick the Start button to actually execute data transmission 6 Stop button This button is available only when data transmission is being executed and allows you to cancel the transmission Help menu Manu...

Page 51: ...hen the connection between the S90 XS S70 XS and a computer are corrected after appropriately correcting the setup of the S90 XS S70 XS and the computer When the settings on the S90 XS S70 XS instrume...

Page 52: ...the S90 XS S70 XS instrument or the cable connection between the S90 XS S70 XS and the computer Check the MIDI Port setting and Device No setting page 39 Bulk data is not transmitted received successf...

Reviews: