Step-Write Pattern Programming
An understanding of the QUANTIZE function,
described below, is essential for effective use of the
step write function. We recommend that before
actually trying out the step write function you should
read through this section and then the “Quantize”
section below. Then come back to this section and try
out the function.
While the REAL TIME WRITE function, described above,
lets you input rhythm patterns in real time by playing on
the instrument keys, the STEP WRITE function is used to
input notes one at a time. This method is ideal for
programming rhythm patterns from written scores, or
from the pattern charts provided in the RX15 PATTERN
BOOK. It also makes it possible to input extremely
complex rhythm patterns that would be impossible to
program using the real time method.
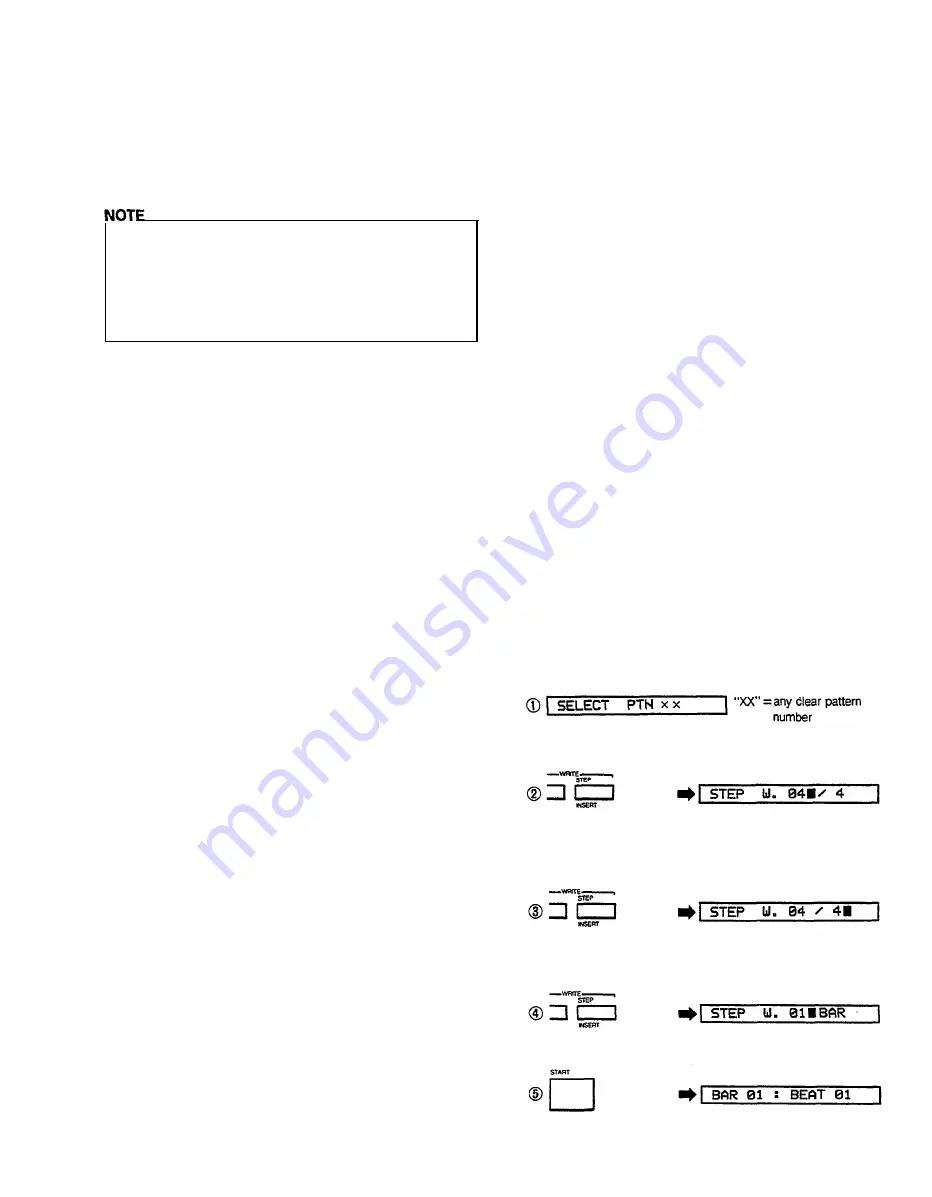
First select a clear pattern, then enter the step write
mode by pressing the STEP WRITE button (from the
pattern mode). The LCD panel will indicate that the step
write mode is active, and prompt you to input the time
signature: “STEP W. 04 / 4”. The default time signature
is 4/4 (“04 / 4” on the LCD panel), and need not be
entered if this is the time signature you need. Time
signature entry is the same as for real time write, as is
entry of the pattern length in bars.
The entire STEP WRITE parameter input process is as
follows:
1. Press STEP WRITE button to enter step write mode.
2. Enter first part of time signature via white number
buttons (integer markings, two digits).
3. Press STEP WRITE button to move cursor to second
part of time signature.
4. Enter second part of time signature via number
buttons (fraction markings).
5. Press STEP WRITE button to prompt for number of
bars in pattern.
6. Enter number of bars via number buttons. (integer
markings, two digits)
l
The step write mode can be exited at any time by
pressing the STOP/CONTINUE button
l
Steps 2-6 above can be skipped if the default
parameters (4/4 time, 1 bar) are acceptable.
You are now ready to enter your pattern.
Tap the START button and the LCD panel will respond
with “BAR 01 : BEAT 01”, prompting you to input the
first beat of bar one. You can now enter an instrument
on beat 1 by pressing the appropriate instrument button,
or a rest by pressing the + 1/YES button. In either case,
the beat will advance one count and you are then ready
to enter the next instrument or rest. This process is
continued until the last beat of the bar (the number of
beats per bar is determined by the setting of the
QUANTIZE function, described below). If a one-bar
pattern has been selected, the RX15 will then cycle back
to the first beat of the bar, allowing you to continue to
add new instruments. In the step write mode, only one
instrument can be entered at a time. If more than one
instrument is to be entered on a single beat, each
instrument must be entered on successive cycles
through the bar. If the pattern is more than one bar in
length, the bar count will advance by one once the
maximum beat count has been reached for each bar.
The RX15 will cycle back to the first beat of bar 1 after
the last beat of the last bar has been entered.
Exit the step write mode by pressing the
STOP/CONTINUE button.
STEP WRITE mistakes can be corrected in the same
way as REAL TIME WRITE mistakes: when you reach
the beat at which the erroneous entry was made, simply
hold down the CLEAR button and press the instrument
button corresponding to the instrument to be cleared.
Patterns can be edited by adding new parts and deleting
unwanted parts simply by re-entering the step write
mode and stepping through the pattern using the
+ 1 /YES button until the edit point is located. The
addition of new parts and deletion of unwanted parts is
carried out as described above.
The time signature or bar length of a programmed
pattern CANNOT be changed. Time signature and
number of bars can only be programmed in clear
patterns (see the CLEAR function, below).
Step Write (EX: 4/4 time, 1 bar)
In this example 4/4 time will be accepted
1-bar pattern is accepted
12
Summary of Contents for RX-15
Page 1: ...YAMAHA AUTHORIZED PRODUCT MANUAL DIGITAL RHYTHM PROGRAMMER...
Page 2: ...YAMAHA DIGITAL RHYTHM PROGRAMMER OWNER S MANUAL...
Page 4: ...CONTROL PANEL 3...
Page 5: ...CONNECTIONS QX SEQUENCER CX5M MUSIC COMPUTER DX SYNTHESIZER 4...
Page 6: ...5...
Page 33: ...CASSETTE OPERATIONS Save Data to Cassette and Verify 3 2 Load Data from Cassette...
Page 34: ...MIDI FUNCTIONS Sync Mode Selection Midi Reception Parameters 33...
Page 38: ...PATTERN CHART 37...


