background image

17

Installing and Checking the Driver

This section explains how to install the driver software and confirm that it has been 
installed correctly. When the RP-U100 is connected to the PC’s USB port, Windows 98 
automatically detects it and installs the necessary driver software. Windows 98 needs the 
driver software in order to communicate with the RP-U100.

1. Make sure that the RP-U100 power 

cable is plugged into an AC outlet.

The RP-U100 can be on or in standby 
mode when installing the driver.

2. Connect the RP-U100 to a USB port 

on the PC using the supplied USB 
cable.

Windows 98 automatically detects the 
RP-U100 and installs the necessary 
driver software. You may be requested 
to insert your Windows 98 CD-ROM.
Next you need to confirm that the 
driver software has been installed cor-
rectly.

3. Click the Windows 98 “Start” button 

and select Settings, Control Panel.

The Control Panel window appears.

4. Double-click the System icon.

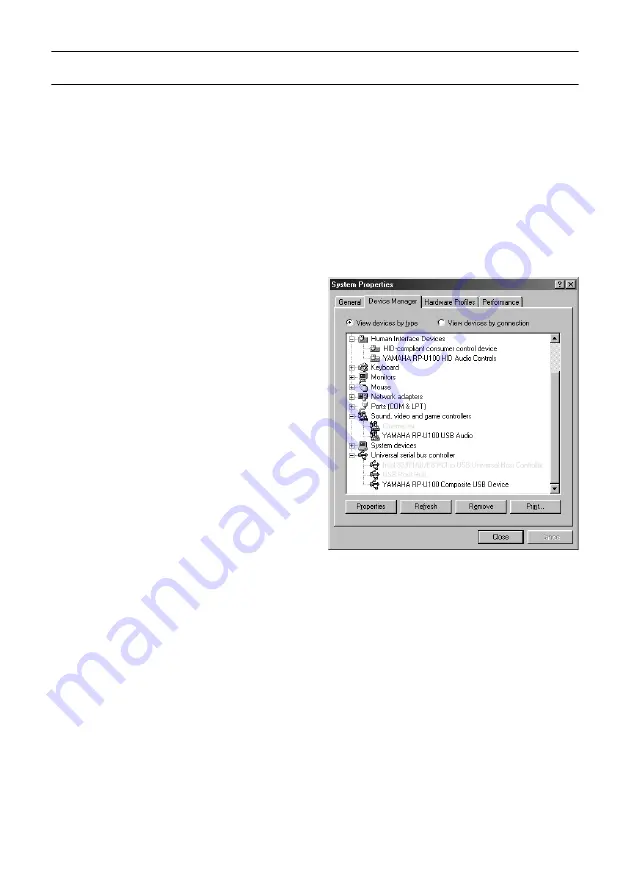
The System Properties window 
appears, as shown.

5. Click the Device Manager tab.

The Device Manager window appears.

6. Click the View devices by type option 

button.

7. Click the “+” symbol next to 

“Human Interface Devices,” and 
make sure that “YAMAHA RP-U100 
HID Audio Controls” appears in the 
list, as shown.

8. Click the “+” symbol next to “Sound, 

video and game controllers,” and 
make sure that “YAMAHA RP-U100 
USB Audio” appears in the list, as 
shown.

9. Click the “+” symbol next to 

“Universal serial bus controller” and 
make sure that “YAMAHA RP-U100 
Composite USB Device” appears in 
the list, as shown.

Note: 

The device list on your PC may 

differ to that shown here.

Summary of Contents for RP-U100

Page 1: ...ets 12 Storing Presets Manually 12 Storing Presets Automatically 12 Selecting Presets 13 Copying Presets 13 Recording 14 Using Sound Field Programs 15 Using RP U100 Application Software 16 System Requirements 16 Installing the RP U100 Application Software 16 Installing and Checking the Driver 17 Reinstalling the Driver Software 18 Using the RP U100 Application Software and Online Help 19 Uninstall...

Page 2: ...Heat The unit should be situated away from heat sources such as radiators stoves or other appliances that produce heat 10 Power Sources The unit should be connected to a power supply only of the type described in the operating instructions or as marked on the unit 11 Power Cord Protection Power supply cords should be routed so that they are not likely to be walked on or pinched by items placed upo...

Page 3: ...icle 810 of the National Electrical Code ANSI NFPA 70 provides information with regard to proper grounding of the mast and supporting structure grounding of the lead in wire to an antenna discharge unit size of grounding conductors location of antenna discharge unit connection to grounding electrodes and requirements for the grounding electrode We Want You Listening for a Lifetime YAMAHA and the E...

Page 4: ...ill not result in harmful interference with other electronic devices This equipment generates uses radio frequencies and if not installed and used according to the instructions found in the users manual may cause interference harmful to the operation of other electronic devices Compliance with FCC regulations does not guarantee that interference will not occur in all installations If this product ...

Page 5: ...ge used must be the same as that specified on this unit Using this unit with a higher voltage than specified is dangerous and may result in fire or other accidents YAMAHA will not be held responsible for any damage resulting from use of this unit with a voltage other than specified 7 Digital signals generated by this unit may interfere with other equipment such as tuners receivers or TVs Move this...

Page 6: ...s unique DSP technology the RP U100 can bring excitement and realism to any audio source by simulating the acoustic environments of concert halls movie the aters and so on with only two speakers With its stylish vertical design the RP U100 allows you to use various audio sources including your PC CD player MD or tape recorder and the built in AM FM tuner as shown below Although the RP U100 can be ...

Page 7: ...lections are the initial sound waves that bounce off the floor ceiling and walls Natural reverberation is made up of sound waves that gradually attenuate as they bounce repeatedly off multiple surfaces Since the way you hear early reflections and reverberation depends on the shape and size of the building as well as the material and construction of the walls and ceiling each venue has its own uniq...

Page 8: ...inputs the signal received at the DIGI TAL AUX 1 OPT IN is used AUX2 key This key selects the equipment con nected to the ANALOG AUX 2 IN con nectors as the input source TUNER key This key selects the AM and FM bands of the built in tuner as the input source The following bands can be selected FM Auto Stereo FM Mono or AM BDisplay The display shows various settings selected input source sound fiel...

Page 9: ... power in standby mode Rear Panel AANALOG inputs outputs These connectors are used to connect to the analog inputs and outputs of a PC sound card CD player or MD tape recorder The SUB WOOFER OUT can be connected to an optional subwoofer such as the Yamaha YST SW45 for enhanced bass performance BANTENNA These connectors are used to connect AM and FM antennas CSPEAKERS These connectors are used to c...

Page 10: ...cation Software Audio from your PC can be fed to the RP U100 using any of following connectors USB as explained above DIGITAL PC COAX IN DIGITAL PC OPT IN or ANALOG PC IN To play DVD Video discs encoded with Dolby Digital your computer must have a DVD ROM drive and DVD Video decoder board which should be connected to the RP U100 via the DIGITAL PC COAX IN or DIGITAL PC OPT IN Note Make sure that t...

Page 11: ...careful not to mix up the left and right connections Protective Caps When connecting to an optical connector remove its protective cap first When an optical connector is not being used replace its cap to prevent dust entering the connector Note The DIGITAL AUX 1 OPT IN has priority over the ANALOG AUX 1 IN so if you connect to both inputs the signal received at the DIGITAL AUX 1 OPT IN is used DIG...

Page 12: ...lose strands which can cause short circuits Speaker Connectors Flip open the speaker connector levers insert the bare ends of the speaker cables into the terminal holes then close the levers Try pulling gently on each cable to make sure that it s secure ANALOG PC IN AUX 1 IN SUB WOOFER OUT IN OUT AUX 2 R L ANTENNA AM FM 75 Ω UNBAL GND DIGITAL SPEAKERS 6Ω MIN SPEAKER USB OPT OUT AUX 1 OPT IN COAX I...

Page 13: ... best performance place the left and right speakers either side of your com puter monitor as shown below and posi tion them so that their fronts are flush To get the best from the sound field programs and surround effects the left and right speakers and the listener should be posi tioned so as to form a triangle with a 3 4 ratio so if for example the speakers are 60 cm 23 5 apart the listener shou...

Page 14: ...by Digital encoded digital audio signal is selected as the input source EMEMORY This indicator flashes when a preset sta tion is stored FST STEREO This indicator appears when a stereo FM signal of sufficient strength is received GMessage area Various messages and information appear here HVOL volume This indicator graphically displays the volume level setting IAM This indicator appears when the AM ...

Page 15: ... both inputs the signal received at the DIGITAL PC OPT IN is used AUX1 Press the AUX1 key to select the equip ment connected to the ANALOG AUX 1 IN or DIGITAL AUX 1 OPT IN connector as the input source Note The DIGITAL AUX 1 OPT IN has priority over the ANALOG AUX 1 IN so if you connect to both inputs the signal received at the DIGITAL AUX 1 OPT IN is used AUX2 Press the AUX2 key to select the equ...

Page 16: ...e the radio frequency is displayed as shown here 3 Press and hold the Down or Up key to start Auto Search Auto Search starts from the current radio frequency Use the Down key to search down the Up key to search up The RP U100 stops search ing when it locates a station To search for another station repeat step 3 Note If Auto Search cannot locate a station due to its weak signal try locating the sta...

Page 17: ...dly to selectoneofthefollowingtunerbands FM Auto Stereo FM Mono or AM 2 Press and hold the P SET key until AutoP appears on the display After a few seconds A1 E8 appears on the display This is the range of pre sets that will be used to store stations You can specify the first preset initially A1 as follows The last preset E8 can not be changed 3 While A1 E8 is displayed use the P SET key to select...

Page 18: ... You may for example want to copy your favorite radio station to preset A1 1 Use the P SET key to select Preset mode as shown below 2 Use the P SET key to select the preset group and the Down and Up keys to select the preset number of the preset you want to copy 3 Press and hold the P SET key until MEMORY flashes on the display 4 While MEMORY is flashing use the P SET key to select the preset grou...

Page 19: ...r to the DIGITAL OPT OUT as explained on page 6 2 Turn on the recorder and the RP U100 3 Use the input selector keys to select an input source as explained on page 10 See page 11 for more information about using the tuner 4 Start recording on your tape or MD recorder 5 Start the input source Input Source Output Input Selector Display Input Connector ANALOG AUX 2 OUT DIGITAL OPT OUT USB PC USB USB ...

Page 20: ...program called HP3D which is specifically tai lored for headphone listening Sound field programs for Audio Visual MOVIE The realism provided by this program gives the impression that you re actu ally in the scene For these sound field pro grams a Yamaha DSP effect is applied to Dolby Pro Logic Dolby Digital and other sur round sounds for motion pic ture audio LIVE This program produces an enthusia...

Page 21: ... U100 Do not connect the RP U100 to the PC s USB port until the installation is complete as the driver software will not be installed correctly and you will havetoinstallitagain asexplainedon page 18 Make sure that your PC meets the sys tem requirements listed previously You may be requested to insert your Windows 98 CD ROM during the installation so have it ready before commencing 1 Turn on your ...

Page 22: ...to insert your Windows 98 CD ROM Next you need to confirm that the driver software has been installed cor rectly 3 Click the Windows 98 Start button and select Settings Control Panel The Control Panel window appears 4 Double click the System icon The System Properties window appears as shown 5 Click the Device Manager tab The Device Manager window appears 6 Click the View devices by type option bu...

Page 23: ...ou must reinstall the RP U100 device driver if you want the PC to rec ognize the RP U100 correctly as explained below 1 Make sure that the RP U100 is con nectedto the PC s USB port 2 On the System Properties window click the symbol next to Universal serial bus controller 3 Select USB Composite Device 4 Click Delete The dialog box shown on the below appears 5 Click OK to delete 6 Confirm that USB c...

Page 24: ...line help which explains how to use the RP U100 Application Software starts Uninstalling the RP U100 Application Software This section explains how to uninstall the RP U100 Application Software 1 Quit the RP U100 Application Soft ware and online help 2 Click the Windows 98 Start button and select Settings Control Panel The Control Panel window appears 3 Double click the Add Remove Programs icon Th...

Page 25: ... to an outdoor antenna Use the supplied F type adapter to connect an outdoor FM antenna with an F type connector If you cannot obtain good AM reception using only the AM loop antenna connect 5 to 10 meters 16 to 32 ft of ordinary PVC coated wire to the AM connector on the RP U100 feed it through a window or other outlet and extend it horizontally Be sure to also connect the AM loop antenna Using a...

Page 26: ... the analog plugs cor rectly Using the RP U100 affects TV reception or the performance of other equipment These equipment may be situ ated too close to the RP U100 Move these equipment away from the RP U100 The Presets do not work The preset settings are lost if the RP U100 is unplugged for more than two weeks Reprogram the presets Symptom Possible Cause Remedy A popping noise can be heard Interfe...

Page 27: ...he direction of the AM loop antenna If that does not improve the sound adjust the angle and location of the antenna to find the optimum position Auto tuning cannot locate a sta tion The station is too weak Try reconnecting the AM loop antenna Use manual tuning Use an outdoor AM antenna A continuous popping noise can be heard Interference noise is being caused by lightning a fluores cent light a mo...

Page 28: ...HA ELECTRONICS CORPORATION USA 6660 ORANGETHORPE AVE BUENA PARK CALIF 90620 U S A YAMAHA CANADA MUSIC LTD 135 MILNER AVE SCARBOROUGH ONTARIO M1S 3R1 CANADA YAMAHA ELECTRONIK EUROPA G m b H SIEMENSSTR 22 34 25462 RELLINGEN BEI HAMBURG F R OF GERMANY YAMAHA ELECTRONIQUE FRANCE S A RUE AMBROISE CROIZAT BP70 CROISSY BEAUBOURG 77312 MARNE LA VALLEE CEDEX02 FRANCE YAMAHA ELECTRONICS UK LTD YAMAHA HOUSE ...

Page 29: ...Opening Page YAMAHA RP U100 Application Help ...

Page 30: ...help are trademarks or registered trademarks of their respective owners Changes may be made in the help contents without prior notice Contents Index and Search FUNCTIONS Contents Display the index by selecting the Contents tab on the move pane The help contents are arranged hierarchically ...

Page 31: ...nter the word you want to find and a list of pages containing that word will be displayed Select the related page you need from the page list to view its contents The pointer changes to a hand when placed on an item that can be clicked Hand Symbol Clicking on the item indicated by the hand brings up a related page or image Basic knowledge of Windows 98 Internet Explorer or similar software is need...

Page 32: ...ties of world famous concert halls and live venues Exciting theater type sound compatible with DVD movie formats such as Dolby Digital is also available Virtual 3D Gives the Feeling of Being There Sophisticated Yamaha technology transports you right to where the action is Usually several front and rear speakers are needed to reproduce multichannel sources such as Dolby Digital The unique Virtual 3...

Page 33: ...olby Laboratories Dolby Pro Logic and the double D symbol are trademarks of Dolby Laboratories Confidential Unpublished Works 1992 1997 Dolby Laboratories All rights reserved Virtual 3D Technology Reproducing a Dolby Digital or Dolby Pro Logic source requires the use of a total of 4 6 speakers placed before and behind the listener using a substantial amount of space that may not always be availabl...

Page 34: ...pplication does not include a recording function Please use appropriate recording software installed on the computer For information on how to use the software please refer to its documentation The sound recorded with the USB capture function is the original sound of the input signal The effects of the DSP sound field programs of the RP U100 are not recorded The data format supplied to the compute...

Page 35: ...ailable on the RP U100 main unit and the Application Function List O Available X Not available Function Main unit application Power on standby O O Input mode select O O Customizing input selector display X O Volume adjustment O O USB Mix Level X O Mute X O Level balance X O Tuner Band FM AM O O Manual tuning O O Auto tuning O O Preset Store Call up Edit O O Preset station frequency display O O Aut...

Page 36: ...d Rev 1 0 Intel and Pentium are registered trademarks and MMX is a trademark of Intel Corporation Windows is a registered trademark of Microsoft Corporation in the United States and or other countries Check the USB connection between the RP U100 and the PC Connect the RP U100 to the personal computer using a USB cable How to make the USB connection The RP U100 main unit can only be operated with t...

Page 37: ...U100 USB Audio as the Preferred Device for playback and recording 3 Start up the application and check that the RP U100 is controlled by the application 4 Play some audio on the computer CD MIDI WAVE etc and confirm that the RP U100 reproduces the sound Disconnection Procedure 1 Set the RP U100 to Standby or Off 2 Turn off the power to the computer 3 Disconnect the USB cable linking the RP U100 wi...

Page 38: ...Opening Page 9 68 ページ Setup Dialog Lets you set various system parameters Details Tuner Panel Frequency Display Lets you perform manual and scan tuning Details ...

Page 39: ...Opening Page 10 68 ページ Tuner Panel Preset Display Lets you select preset stations Details Preset Edit Panel Lets you store stations in memory Details ...

Page 40: ...Opening Page 11 68 ページ DSP Sound Field Selector Panel Lets you set various DSP parameters Details DSP Parameter Setting Panel Lets you set various DSP parameters Details ...

Page 41: ...Opening Page 12 68 ページ Virtual 3D Parameter Setting Panel Lets you set various Virtual 3D parameters Details Dynamic Range Setting Panel Lets you control the dynamic range Details ...

Page 42: ...ation How to Quit the Application Click the Close button in the upper right corner of the main panel You can also quit the Application as follows Quitting from the system menu Right click on the YAMAHA RP U100 icon in the task bar and select X ...

Page 43: ...stem menu Method 1 Open the Windows Start menu and select YAMAHA RP U100 The choices RP U100 and Help appear To start the RP U100 Application select RP U100 To call up the help file select Help Method 2 If a shortcut icon has been created on the desktop start the RP U100 Application by double clicking the shortcut icon Shortcut icon ...

Page 44: ...arameter settings Setup Dialog details Tuner Panel frequency display Lets you manually select a station on the tuner Tuner Panel frequency display details Tuner Panel preset display This panel is for selecting a preset station on the tuner Tuner Panel preset display details Preset Edit Panel This panel serves for storing preset stations Preset Edit panel details DSP Sound Field Selector Panel Lets...

Page 45: ...he USB signal to the AUX1 AUX2 or TUNER IN input signal The setting is made by dragging a slider on the Setup panel USB MIX LEVEL details SETUP DEVICE NAME This item lets you specify names that are displayed for audio devices connected to the RP U100 The setting is made by entering the names in fields on the Setup panel SETUP DEVICE NAME details MAX VOL POSITION This item sets the upper limit for ...

Page 46: ...ted from boundaries such as walls floors and the ceiling Finally we hear reverberation namely the sound being repeatedly bounced back and forth and gradually decaying The early reflections and reverberation characteristics depend on factors such as the size and shape of the interior space and the type of furnishing The resulting acoustics are unique to a particular hall or room This is what is cal...

Page 47: ...s the user to control the position of the virtual simulated rear speakers The setting is done using a graphic image on the DSP Parameter Setting Panel Virtual Rear Speaker Position details Test Tone The test tone is used to check the virtual rear speaker position Test Tone details Balance This refers to the level balance between the left and right channels The setting can be changed on the DSP Par...

Page 48: ...ing the application Click the Minimize button to turn the application into an icon on the task bar Minimizing details Quitting the application Click the Close button to quit the application Quitting details Main Panel If the RP U100 main unit is on the Application will also start in the On mode The error message Can t find RP U100 appears at start up when the main unit and personal computer are no...

Page 49: ...Opening Page 20 68 ページ ...

Page 50: ...og box Windows mouse settings dialog box Power Control Clicking the Power Control button will switch the RP U100 unit alternately between ON and Standby Power control details Setup Dialog display Click the SETUP button to calls up the SETUP DIALOG Setup Dialog details Minimizing the application Click the Minimize button to turn the application into an icon on the task bar Minimizing details Quitti...

Page 51: ...sound field icon to bring up the DSP Sound Field Selector Panel DSP Sound Field Selector Panel details DSP Sound Field Selector display Right clicking the DSP button brings up a list of sound field programs Select the DSP sound field from them DSP Sound Field Selector details Muting Click the mute button to turn the speaker output on or off Mute button details Tuner Panel display To bring up Tuner...

Page 52: ...s There are digital optical and analog signal input jacks Automatic switching gives priority to digital signals AUX2 This mode serves for playing back the signal from a component connected to the AUX2 inputs There are only analog signal input jacks TUNER This mode serves for playing back the signal from the built in tuner PC Personal Computer Mode PC mode When the input selector is set to PC mode ...

Page 53: ...ty to the optical input ANALOG This position serves for playing back an analog audio signal from the computer supplied to the RP U100 via the analog input jacks The USB capture function is not available in PC input mode USB capture details AUX1 Mode AUX1 mode This mode serves for playing back the external input signal There are digital optical and analog signal input jacks Automatic switching give...

Page 54: ...LEVEL setting is active the mixed signal from a computer connected with the USB cable cannot be captured USB capture details Tuner Mode Tuner Mode In tuner mode clicking on the input selector brings up the Tuner Panel Tuning Functions The tuner lets you select stations either by manually changing the frequency or by using auto scan A preset display for calling up stations that have been stored in ...

Page 55: ...on serves to temporarily cut off the sound It can be turned on or off by clicking the Mute button Headphones not connected MUTE OFF MUTE ON Headphones connected MUTE OFF MUTE ON The mute function can only be switched on from the application Muting is automatically canceled when the volume is adjusted either on the RP U100 main unit or with the Application Turning the power on or setting the unit t...

Page 56: ... increase the volume drag the dot clockwise To decrease the volume drag the dot counterclockwise Using the Setup Dialog you can set the upper volume limit for the volume as adjusted with the application This helps to prevent excessively loud settings made by mistake If the volume control on the RP U100 main unit was used to set the volume to a level higher than the upper limit for the application ...

Page 57: ...ction is off The selected sound field icon appears when the DSP function is on Sound field program details Right clicking on the DSP button brings up the sound field selector regardless of whether the DSP function is on or off DSP Sound Field Selector details DSP button function during DSP OFF Clicking the in the lower part of the DSP button brings up the graphic equalizer appear ...

Page 58: ... the Close Button or the lower part of the DSP button to close the graphic equalizer When DSP is activated the graphic equalizer panel closes but the graphic equalizer shown as part of the DSP sound field parameter edit panel can be used instead DSP Parameter Setting Panel graphic equalizer details DSP button function during DSP ON Clicking in the lower part of the sound field icon brings up the D...

Page 59: ...up Dialog details Minimizing the Application How to Minimize the Application Click the Minimize button on the upper part of the main panel The application is minimized and displayed in the task bar To return to the original size click YAMAHA RP U100 on the task bar or right click Restore on the system menu ...

Page 60: ...nit and personal computer are not connected with a USB cable Connect the RP U100 unit to the computer with a USB cable when using the application Even if the RP U100 unit and computer are connected by a USB cable the error message will appear if the power cord of the RP U100 is not plugged into the AC outlet ...

Page 61: ...be up to five characters long PC DIGITAL NAME This sets the name of the audio device connected to PC DIGITAL Input jacks Digital coaxial and optical Priority Optical PC ANALOG NAME This sets the name of the audio device connected to PC ANALOG Input jacks Analog AUX1 NAME This sets the name of the audio device connected to AUX1 Input jacks Digital optical and analog Priority Digital AUX2 NAME This ...

Page 62: ... DSP sound field programs affect only the sound from input sources other than USB not the audio signals from the computer Drag the slider towards MAX to increase the mix ratio of audio signals from the computer connected by USB Dragging the slider towards MIN decreases the ratio of audio signals from the computer A appears at the default setting Changing the mix ratio does not affect the level of ...

Page 63: ...u should therefore use caution when setting the MAX VOL POSITION OK CANCEL RESET Buttons Saves all changes and closes the Setup Dialog Aborts all changes and closes the Setup Dialog Resets all items to the factory defaults Closing the Setup Dialog Click the Close button to close the Setup Dialog If changes were made be sure to save them by clicking OK before clicking the Close button ...

Page 64: ...eristics delay time and many other factors The RP U100 incorporates sound field programs based on such sound field data The programs let you select the sound field of a famous concert hall or theater to be recreated on your personal computer equipment setup DSP sound field programs for music The DSP programs for music create a sound field giving the realistic impression of being in a specific loca...

Page 65: ...cking the on the lower part of the sound field icon on the main panel brings up the DSP Sound Field Selector Panel DSP button details DSP Sound Field Program icons There are eight icons with images of DSP sound fields HALL JAZZ CHURCH GAME MOVIE LIVE VDD HP3D HP3D is displayed instead of VDD when headphones are used Sound field icons ...

Page 66: ...ected program is displayed The sound field program can also be selected directly from the main panel DSP Sound Field Selector details Main Panel details Calling Up the DSP Parameter Setting Panel Clicking EDIT brings up the DSP parameter setting panel DSP Parameter Setting Panel details Calling Up the Virtual 3D Parameter Setting Panel Clicking brings up the Virtual 3D Parameter Setting Panel Virt...

Page 67: ...Opening Page 38 68 ページ DSP Sound Field Selector Click the Close button to close a panel DSP button Right click on the DSP ON OFF button to display the sound field selector ...

Page 68: ...is the sound field of a beautiful gothic type monastery in a Paris suburb The reverberations blend in the numerous domed ceiling spaces formed by stone pillars producing beautiful sustained notes GAME This program adds a feeling of depth and ambience to game sounds Allows enjoying the pressure and excitement of a game as if actually there MOVIE This sound field recreates the sensation of an expans...

Page 69: ...Page 40 68 ページ HP3D This program Headphone 3D simulates multi speaker surround sound when listening with headphones It is automatically activated instead of VDD mode when headphones are plugged into the RP U100 ...

Page 70: ...nce that is truly original and thrilling DSP Parameters Parameter FUNCTION Effect Trim Makes fine adjustments to the effect level sound effect Rear Effect Trim Makes fine adjustments to the rear effect level sound effect Initial Delay Adjusts the sensation of distance between walls and sound source Room Size Adjusts the sense of expansiveness Liveness Adjusts the apparent reflectivity of the walls...

Page 71: ...e the selection The selected button changes to green Detailed parameter settings Besides the basic parameters more parameters can be adjusted on the advanced parameter setting screen Click to go to the Advanced parameter setting screen Click to return to the Basic parameter setting screen Each sound field program has some parameters that can be changed Advanced parameter details In order to change...

Page 72: ...sound field program Setting the Graphic Equalizer Drag the of a frequency up and down Click to return all frequencies to flat response A total of six equalizer settings can be stored in the memory with SAVE Saved settings 1 6 can be recalled with LOAD Closing the Panel Click the EDIT button or click the Close button to close the panel ...

Page 73: ...ter for making fine adjustments to the overall effect sound level Rear Effect Trim Can be set for HALL JAZZ CHURCH GAME MOVIE LIVE VDD HP3D Rear Effect Trim Setting Screen Function Makes fine adjustments to the rear effect level sound effect Variable range 3 dB to 3 dB Description This is a parameter for making fine adjustments to the overall rear effect sound level including the Virtual 3D sound ...

Page 74: ... 1 to 2 0 Description This parameter controls the sense of spatial expansiveness The larger the value the wider the perceived space When there is a larger distance between the walls of a room the number of reflections increases and the time interval between reflections becomes longer Therefore controlling the time between adjacent reflections makes it possible to change the impression of spaciousn...

Page 75: ...eater this value the greater the delay occurring in the surround sound field With Dolby Pro Logic The parameter controls the delay time between the direct sound and the surround sound field The greater this value the greater the delay occurring in the surround sound field There is no surround sound source S Initial Delay Surround Initial Delay With Dolby Digital source Can be set for GAME MOVIE LI...

Page 76: ...nuates This is based on the time required for the reverberation sound to attenuate at a frequency of approximately 1 kHz The smaller this figure the faster the attenuation of the reverberation sound Adjusting this parameter lets you make a dead sounding source or listening room appear more lively Conversely you may want reduce an excessively bright feeling to achieve natural sounding reverberation...

Page 77: ...iable range 0 ms to 250 ms Description This parameter controls the time lag until reverberation is produced The greater this value the more the delay occurring in the reverberation after the early reflection Even with the same Reverb Time setting choosing a higher Delay Time value will result in a larger perceived space with more intense reverberation ...

Page 78: ...ge On Panel image Off Calling Up the Virtual 3D Parameter Setting Panel Click on the DSP Sound Field Selector Panel To display the DSP sound field selector panel click in the lower part of the sound field icon on the main panel DSP button details Virtual 3D Parameters ...

Page 79: ...meters as needed to match your personal preferences Balance Sets the level balance for the left and right speakers Other Listening Position The listening position refers to the spot where the listener actually sits and listens to the sound This is not a parameter set on the RP U100 but the actual position has a considerable influence on the Virtual 3D effect Setting the Virtual Rear Speaker Positi...

Page 80: ... the pointer or clicking the left right arrows Test Tone The test tone moves automatically through the available virtual speaker positions Clicking START produces a test tone at the current position set for the virtual rear speakers The test tone moves automatically through the available virtual speaker positions Click STOP to turn off the test tone Closing the Panel Click or click to close the pa...

Page 81: ...Up the Dynamic Range Setting Panel Click on the DSP Sound Field Selector Panel DSP Sound Field Selector Panel details D RANGE Dynamic Range D RANGE Dynamic Range Setting Panel Allows you to set 3 types of dynamic range MAX STD or MIN for Dolby Digital playback ...

Page 82: ...EL CUT and low level boost L LEVEL BST and set the dynamic range to any desired point between MAX and MIN Click or drag the left or right to adjust the H LEVEL CUT and low level boost L LEVEL BST MIN Dynamic range specially tailored for late night viewing listening Improves clarity at low volume levels Closing the Panel Click the Close button or click to close the panel ...

Page 83: ... frequency band for stations Auto scan may not be able to tune in a station if its signal is weak Auto scan function Clicking the Scan button starts the station search The search ends when a station is found Click the Scan button again if the scan stops during the search Search stops also when the auto scan button is clicked during search To restart search click the auto scan button If no station ...

Page 84: ...all up the preset page display On the RP U100 main unit 5 preset pages from A to E can be stored Using the application a total of 26 preset pages from A to Z can be stored Each preset page contains up to 8 stations Preset Page details FM mode selector button Click the FM mode selector button to select FM Auto Stereo or FM Monaural FM mode selection items Functions FM Auto Stereo Tuner automaticall...

Page 85: ...Opening Page 56 68 ページ ...

Page 86: ... display details Preset Page The preset page lets you easily call up a broadcast station that has been stored The preset page carries a page identifier and page title page identifier page title can be edited On the RP U100 main unit 5 preset pages from A to E can be stored Using the Application a total of 26 preset pages from A to Z can be stored Each preset page contains up to 8 stations ...

Page 87: ...d frequency display AM FM 8 stations can be stored on one page Preset Edit Panel details Preset page identifier Identifies the page On the RP U100 unit 5 pages from A to E can be stored On the RP U100 application a total of 26 pages from A to Z can be stored Preset page title Descriptive title of the page The page title can be edited as needed Preset Edit Panel details Clicking moves through the p...

Page 88: ...Opening Page 59 68 ページ display button Click the EDIT button to call up the preset edit panel Closing the Panel Click the Close button to close the panel ...

Page 89: ...to the edit panel Storing Preset Station You create a preset station by storing its frequency on a preset page On the RP U100 main unit 5 preset pages from A to E can be stored Using the application a total of 26 preset pages from A to Z can be stored Each preset page contains up to 8 stations Page identifiers A E appear on the RP U100 unit display when the selected preset page is A E When the pag...

Page 90: ...frequency you want to delete from the preset page F Z and click the CLEAR button The entry for that frequency is deleted Stored stations frequencies can be deleted only from pages F Z not from pages A E Frequency delete details Displaying auto frequency search results Displays frequencies where stations were found with auto search Results are displayed in order of frequency from lowest to highest ...

Page 91: ...store the station in FM Mono FM Mono Tuner receives FM broadcasts in mono If tuner receved too much noise in stereo reception store the station in FM Mono Check that the ADD button is active and click it Not Active Active Up to 8 stations can be stored on each page Deleting a Stored Frequency on pages F Z only Click the frequency you want to delete from the preset page Frequency to be deleted Chec...

Page 92: ...Opening Page 63 68 ページ ...

Page 93: ...SB connection Even if the computer and RP U100 are connected by USB cable the Application will not start unless the power cord of the RP U100 is plugged into an AC outlet Check that the power cord is properly connected Don t know how to quit application Refer to quitting details page Don t know how to operate application Operation steps are described in this help file Check Page Contents or search...

Page 94: ...nna connection and related items please refer to the instruction manual of the RP U100 No sound is produced if the audio wiring or USB cable are not connected correctly Check that the connections to each audio device and to the personal computer are correct No sound from computer although PC input is selected When PC DIGITAL or PC ANALOG is selected for the PC input the sound may sometimes not be ...

Page 95: ... if the settings on the recording software running on the computer are incorrect Refer to the description page for USB capture when making the data recording settings Refer to the USB capture details In case of problems with Windows refer to or check the Windows documentation Windows Help Latest Information Up to date information on this product can be obtained at the site listed below YAMAHA Cons...

Page 96: ...the uninstall with the RP U100 application closed and this help page RP U100 Help closed Select YAMAHA RP U100 and click Add Remove If uninstall is performed while the RP U100 application or help are open the application and help files will not be fully uninstalled In this case close the RP U100 application and help and manually delete the RP U100 install folder ...

Page 97: ...Opening Page 68 68 ページ ...

Reviews: