background image

CS-R5 Owner’s Manual

16

E

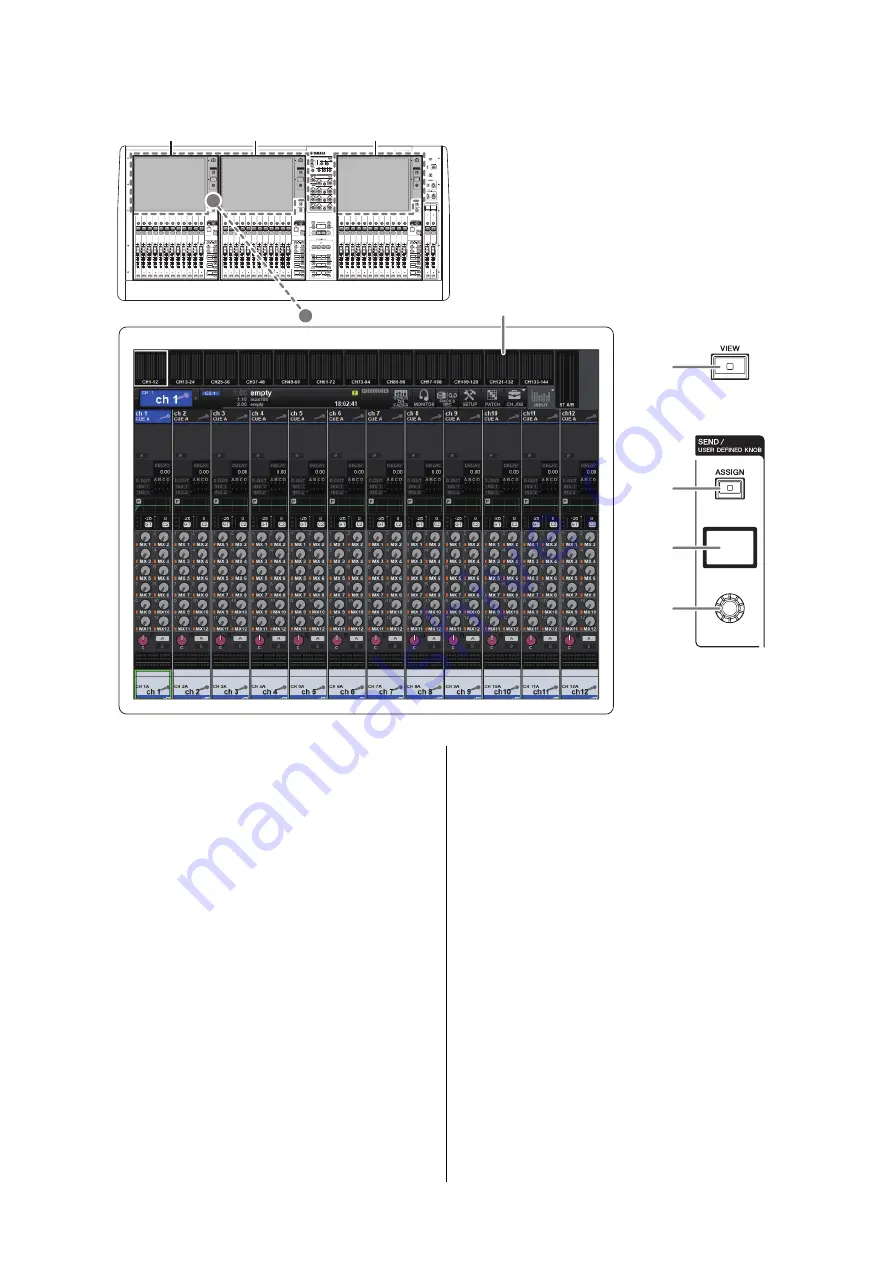
 Touch Screen section (Bay L, Bay C, Bay R)

1

Touch screen

This is a multi-touch screen that you can operate by 
touching it with your finger to select menus or set 
parameters. The touch screen will not respond 
correctly if you are wearing gloves.

NOTICE

Never use a sharp or pointed object such as your fingernail 
to operate the touch screens. Doing so may scratch the 
screens and render the touch screens inoperable.

NOTE

• If the touch screens become dirty, wipe them with a soft 

dry cloth.

• Before use, be sure to remove the transparent film 

applied to the touch screens to protect them during 
transport.

2

[VIEW] key

Recalls and toggles between the OVERVIEW and 
SELECTED CHANNEL VIEW screens.

SEND / USER DEFINED KNOB

This section enables you to specify the send bus 
destination, and adjust the send level for the corresponding 
bus. You can also switch to the USER DEFINED KNOB 
function to control the assigned function.

3

[ASSIGN] key

Displays a screen that enables you to specify the send 
destination bus and switch to the USER DEFINED 
KNOB function.
The factory default bus is set to SEND TO MIX 1.

4

Display

While the SEND function is enabled, the display 
indicates the selected bus and its send level.
While the USER DEFINED KNOB function is 
enabled, the display indicates the assigned function 
parameter and its value.

5

SEND / USER DEFINED knob 

Adjusts the send level for the corresponding bus 
while the SEND function is enabled.
Enables you to control the assigned function while 
the USER DEFINED KNOB function is enabled.

2

3

4

5

1

Bay L

Bay C

Bay R

Bay

A “bay” consists of a group of 12 faders 
located across the Touch Screen section 
and the Channel Strip section.
The CS-R5 contains three bays. You can 
control these bays independently.

Summary of Contents for RIVAGE PM5

Page 1: ...EN CONTROL SURFACE CS R5 Owner s Manual ...

Page 2: ...as been dropped UL60065_03 PRÉCAUTIONS CONCER NANT LA SÉCURITÉ 1 Lire ces instructions 2 Conserver ces instructions 3 Tenir compte de tous les avertissements 4 Suivre toutes les instructions 5 Ne pas utiliser ce produit à proximité d eau 6 Nettoyer uniquement avec un chiffon propre et sec 7 Ne pas bloquer les orifices de ventilation Installer l appareil conformément aux instructions du fabricant 8...

Page 3: ...ation of America Electronic Service Division 6600 Orangethorpe Ave Buena Park CA90620 The above statements apply ONLY to those products distributed by Yamaha Corporation of America or its subsidiaries FCC INFORMATION U S A COMPLIANCE INFORMATION STATEMENT Supplier s declaration of conformity procedure Responsible Party Yamaha Corporation of America Address 6600 Orangethorpe Ave Buena Park Calif 90...

Page 4: ...ord is connected to the AC outlet the product will not be disconnected from the power source Remove the electric plug from the outlet when the product is not to be used for extended periods of time Do not touch the product or the electric plug during an electrical storm Be sure to connect to an appropriate outlet with a protective grounding connection Improper grounding can result in electrical sh...

Page 5: ...manufacturer for information on security best practices Do not use the product in the vicinity of a TV radio or other electric products Otherwise the product TV or radio may generate noise Do not expose the product to excessive dust or vibration or extreme cold or heat in order to prevent the possibility of panel disfiguration unstable operation or damage to the internal components Do not install ...

Page 6: ...ike or on physical media compact discs digital versatile discs semiconductor chips hard drives memory cards and the like An independent license for such use is required For details please visit http mp3licensing com About this manual The illustrations and screens as shown in this manual are for instructional purposes only Yamaha Corporation make no representations or warranties with regard to the ...

Page 7: ...23 Installing and Removing Optional Cards 24 Installing a Mini YGDAI card 24 Removing the Mini YGDAI card 24 Touch Screen 25 Basic touch screen operations 25 On screen user interface 25 Viewing a touch screen 26 Other Operations 27 Initializing the unit to factory default settings 27 Adjusting the faders Calibration function 27 Troubleshooting 29 Specifications 30 General Specifications 30 Audio S...

Page 8: ...allation Guide This guide describes how to install the RIVAGE PM Editor RIVAGE PM StageMix User Guide This guide describes an iPad application that enables you to control the RIVAGE PM series system wirelessly Using the PDF manual The RIVAGE PM series Operation Manual and the Editor Installation Guide are electronic files in PDF format You can read this book on a computer Use Acrobat Reader to rea...

Page 9: ...listed above or to the Installation Guide attached to the downloaded software program Firmware updates You can update the unit firmware to improve operations add functions and correct possible malfunctions Details on updating the firmware are available on the following Yamaha Pro Audio global website http www yamahaproaudio com For information on updating and setting up the unit please refer to th...

Page 10: ...nel A Selected Channel section page 11 B UTILITY section page 13 C SCENE MEMORY section page 14 D USER DEFINED KEYS section page 15 E Touch Screen section page 16 F Channel Strip section page 17 Part Names Functions F F D A E B E C ...

Page 11: ...EDs Indicates the input level of selected Dynamics 3 DYNAMICS 1 2 GR LEDs Indicates the gain reduction amount of selected Dynamics 4 DYNAMICS 1 2 ON key Switches Dynamics on or off 5 DYNAMICS 1 2 setting knobs These knobs enable you to make detailed settings for Dynamics 1 or 2 The available knob functions vary depending on the type of selected Dynamics For more information regarding the type of D...

Page 12: ...justs the HPF cutoff frequency 4 PAN knob Adjusts the panning of the signal sent to the stereo buses 5 Fn Function knob Adjusts the specified parameter EQUALIZER 1 EQUALIZER ON key Switches EQ on or off 2 EQUALIZER Q knobs Specify the Q value 3 EQUALIZER GAIN knobs Adjust the gain 4 EQUALIZER FREQUENCY knobs Adjust the frequency 1 2 3 4 5 2 3 4 1 ...

Page 13: ...t information on which USB flash drives can be used with the system visit the Yamaha Pro Audio global website at http www yamahaproaudio com NOTICE Do not remove the USB flash drive from the USB connector or turn off the power to the unit while the unit is accessing data e g saving loading or deleting data Doing so may damage your flash drive or may damage the data in the unit or on your media dev...

Page 14: ...ne 3 UPDATE key Updates scene data by overwriting the current scene that has been recalled most recently with the current mix data 4 SCENE MEMORY display Indicates the selected scene memory 5 PREVIEW key Switches Preview mode on or off 6 STORE key Stores the current scene settings to the selected scene memory If you select the existing scene as the store destination it will be overwritten NOTE Use...

Page 15: ...EFINED A B C D BANK keys Select the bank A B C or D for the USER DEFINED knobs or USER DEFINED keys 2 USER DEFINED keys 1 12 Control the functions as assigned by the user 3 USER DEFINED KEYS displays Indicate the functions assigned to the USER DEFINED keys 3 1 2 ...

Page 16: ...send bus destination and adjust the send level for the corresponding bus You can also switch to the USER DEFINED KNOB function to control the assigned function 3 ASSIGN key Displays a screen that enables you to specify the send destination bus and switch to the USER DEFINED KNOB function The factory default bus is set to SEND TO MIX 1 4 Display While the SEND function is enabled the display indica...

Page 17: ...knob is turned on This feature will be supported by a future update 4 TOUCH AND TURN knob Controls the parameter of the knob you selected by touching the touch screen 5 SHIFT key Combine with another key to perform a certain function The following table shows an example of using the SHIFT key combined with another key For more information please refer to the RIVAGE PM series Operation Manual 6 SEN...

Page 18: ...l Strip section or on the display When the channel is selected the key LED will light 9 ON key Switches the channel on or off If the channel is on the key LED will light If the channel is in a mute group the key indicator will flash In SENDS ON FADER mode see 6 SENDS ON FADER key on page 17 this key works as an on off switch for signals sent from each channel to the currently selected MIX MATRIX b...

Page 19: ... to select a Custom bank The bank numbers 1 5 are labeled adjacent to these keys A Layer displays Indicates the name of the layer selected via the Layer select keys see B on page 19 B Layer select A B C D E F keys Enable you to select a layer Different layers are recalled to the faders depending on the combination of the keys as shown in the table below Please refer to the Note regarding the INPUT...

Page 20: ...l 20 Front panel 1 PHONES A B LEVEL knobs Adjust the level of the signal output from the PHONES output jacks respectively 2 PHONES A B output jacks These are headphone jacks for monitoring the MONITOR or CUE signal 2 1 1 ...

Page 21: ...nt temperature is within the specified operating range and in any situation in which fan noise is not a problem 5 RESET switch Resets the control surface Only the controls screens indicators and control keys and knobs on the control surface will restart without interrupting audio Use this switch in case the control surface becomes non responsive to your operations 6 OMNI IN jacks These are balance...

Page 22: ...connected to the STP cable s shield by conductive tape or comparable means The use of Ethernet cables with Neutrik etherCON CAT5 compatible RJ 45 plugs is recommended Standard RJ45 plugs can also be used Cable length can span up to 100 meters between devices Maximum practical distance may vary depending on the cable used Vent The control surface is equipped with cooling fans These vents let warm a...

Page 23: ... as patching may be altered when you turn the power on again For more information on storing a scene please refer to the RIVAGE PM series Operation Manual NOTICE If you turn off the power to the control surface without following the shutdown procedure data inside the built in storage may be damaged Be sure to perform the shutdown procedure to turn off the power to the control surface 1 Press the S...

Page 24: ...se 3 Align both edges of the card with the guide rails inside the slot and then insert the card into the slot Push the card all the way into the slot so that the connector at the end of the card is correctly inserted into the connector inside the slot 4 Fasten the card using the screws attached to the card If the card is not fastened securely component failure or malfunction may occur Removing the...

Page 25: ...ff Faders knobs Faders and knobs on screen move in tandem when you operate the top panel faders and knobs The current value appears immediately below the fader or knob If you press once a knob that can be operated by the TOUCH AND TURN knob a thick frame appears around the knob This frame indicates that the knob has been selected for operation NOTE Pressing certain knobs a second time while a thic...

Page 26: ...ions Press the X symbol located in the upper right corner to close the popup window and return to the previous screen Dialog boxes A dialog box like the following will appear when you need to confirm the operation you just performed Press the OK button to execute the operation The operation will be canceled if you press the CANCEL button Viewing a touch screen The following examples describe two t...

Page 27: ...ation operation starts NOTE The control surface will restart after initialization Adjusting the faders Calibration function Depending on the environment in which you use the system discrepancies may occur in the motion of the motorized faders You can use the Calibration function to correct these discrepancies The RIVAGE PM5 system features two types of fader calibration NOTE An alarm message will ...

Page 28: ...alibration has failed Press the START button to perform calibration again If POSITIONING is selected For the specified faders in the Channel Strip section and Master section the fader position will be calibrated 5 Press the SEL key for each fader that you want to calibrate Faders for which a problem was detected in the fader settings at start up will already be selected 6 Press the START button 7 ...

Page 29: ...re that the fader of the input channel is raised Sound is not loud enough Make sure that the head amp gain is set to an appropriate level Make sure that the digital gain is set to an appropriate level Make sure that the fader of the input channel is raised Make sure that the fader of the output channel is raised Sound is distorted Make sure that the head amp is set correctly Make sure that the fad...

Page 30: ... including the rubber feet Weight 42 kg NC value 2 2 Measured 30 cm horizontally away and vertically up from the unit front pad FAN speed LOW NC 15 HIGH NC 25 Temperature range Operating temperature range Min 0 C Max 40 C Storage temperature range Min 20 C Max 60 C Accessories Owner s Manual AC power cord 2 Dust cover Nuendo Live DAW software Optional items Mini YGDAI card Gooseneck Lamp LA1L Inpu...

Page 31: ...62 dBu 0 616 mV 42 dBu 6 16 mV XLR 3 31 type Balanced 2 2 1 GND 2 HOT 3 COLD 3 0 dBu 0 775 Vrms 4 OMNI IN 1 8 feature 48V DC phantom power which is switchable for each jack individually 6 dB 10 dBu 245 mV 10 dBu 2 45 V 30 dBu 24 5 V Output Jack Output Impedance Load Impedance Max Output Level Select Switch 1 1 The unit features an internal switch to change the maximum output level Output Level Con...

Page 32: ...s are recommended for connections GPI 5 5 Input pin CH 1 7 TTL input voltage 0 5 V CH 8 Photo coupler input voltage 0 24 V low level 1 V or lower high level 5 V or higher Output pin CH 1 7 Open drain max supply voltage 12 V max sink current pin 75 mA CH 8 Relay contact max 1 A 30 VDC Power supply pin 5 V 5 max output current 600 mA D sub 25 pin Female LAMP 1 3 0 12 V XLR 4 31 type 6 6 3 GND 4 12 V...

Page 33: ...ms The contents of this manual apply to the latest specifications as of the publishing date To obtain the latest manual access the Yamaha website then download the manual file Unit mm Approximate Munsell value of exterior color N5 414 1444 643 ...

Page 34: ...ptional Cards Mini YGDAI card 24 OVERLAY 14 P P Power switches A B 22 R Rear panel 21 RESET 21 S Screen encoder 18 SEL 18 SEND USER DEFINED KNOB 16 SENDS ON FADER 17 SHIFT 17 Shutting down 23 T Top panel Channel Strip section 17 SCENE MEMORY section 14 Selected Channel section 11 Touch Screen section 16 USER DEFINED KEYS section 15 UTILITY section 13 TOUCH AND TURN 17 Touch Screen 25 V VIEW 16 Ind...

Page 35: ...6686168 SWEDEN FINLAND ICELAND Yamaha Music Europe GmbH Germany filial Scandinavia JA Wettergrensgata 1 400 43 Göteborg Sweden Tel 46 31 89 34 00 DENMARK Yamaha Music Denmark Fillial of Yamaha Music Europe GmbH Tyskland Generatorvej 8C ST TH 2860 Søborg Denmark Tel 45 44 92 49 00 NORWAY Yamaha Music Europe GmbH Germany Norwegian Branch Grini Næringspark 1 1332 Østerås Norway Tel 47 6716 7800 CYPRU...

Page 36: ...Manual Development Group 2020 Yamaha Corporation Published 03 2020 IPTO A0 VCV0310 Yamaha Downloads https download yamaha com Yamaha Pro Audio global website http www yamahaproaudio com ...

Reviews: