background image

37 

En

PLAYING BACK TUNES FROM YOUR iPhone/iPod/Bluetooth™ COMPONENT

BA

S

IC


OPE

R

A

T

IO

N

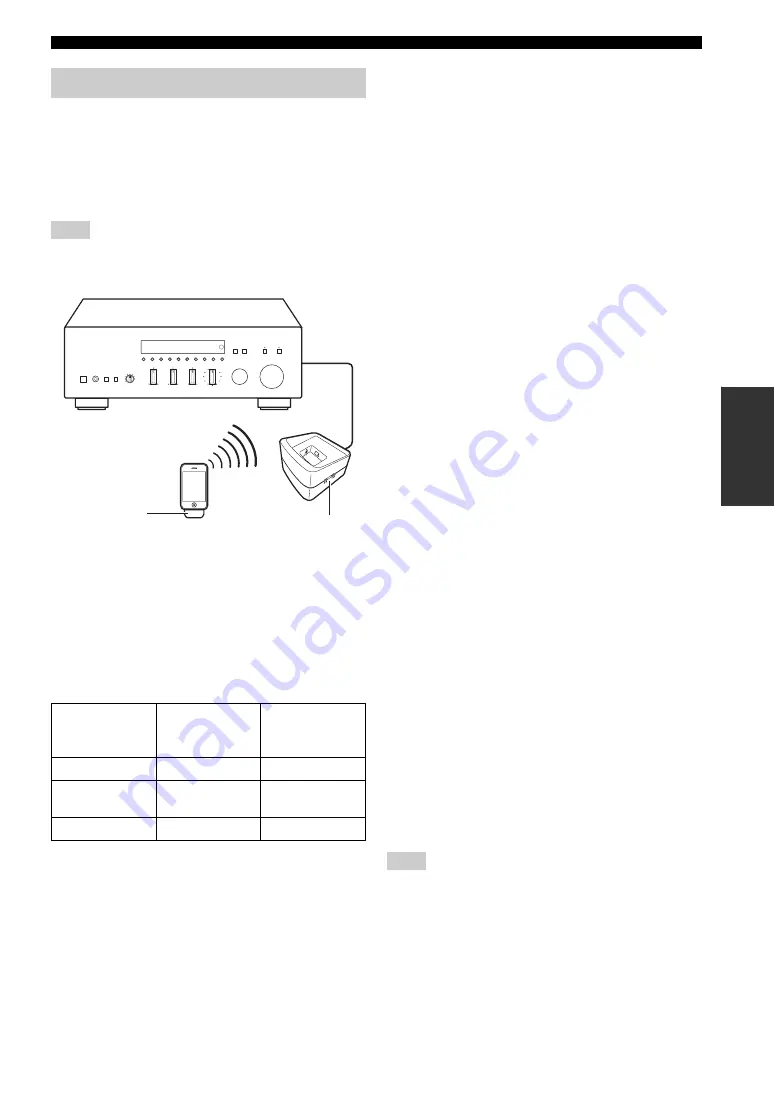
By connecting a Wireless System for iPod to this unit, you 
can play songs on your iPhone/iPod and listen to them 
using a wireless connection.

y

You can use the remote control to control the iPhone/iPod. For 
more information, see page 36.

When playing an iPhone/iPod using a Wireless System for iPod, 
playback information is not displayed on the front panel display.

Establishing a wireless connection

Once the iPhone/iPod is connected to the YID-W10 
transmitter and playback begins, it takes about 5 seconds 
for audio to be heard. During this time the wireless 
connection between the YID-W10 transmitter and 
receiver is established.
The status of the wireless connection between the 
YID-W10 transmitter and receiver is indicated by the 
respective indicator.

Controlling this unit with your iPhone/
iPod

• When playback begins on an iPhone/iPod that is 

connected to a YID-W10 transmitter, and if the 
YID-W10 transmitter is within range of the YID-W10 
receiver, this unit performs as follows:
– If this unit is already turned on when playback 

begins: The input source switches to DOCK.

– If this unit is in standby mode when playback 

begins: This unit turns on and the input source 
switches to DOCK.

• In the following situations, the wireless connection 

between the transmitter and receiver is disconnected. 
After 30 seconds this unit automatically enters standby 
mode.
– The iPhone/iPod is not operated for about 30–120 

seconds after the playback is paused.

– The sleep timer of the iPhone/iPod is activated.
– The iPhone/iPod is disconnected from the 

YID-W10 transmitter.

– The iPhone/iPod battery level decreases to a level 

where it cannot provide enough power to the 
YID-W10 transmitter.

– The YID-W10 transmitter is moved outside of the 

wireless communication range of the YID-W10 
receiver.

– Communication between the YID-W10 transmitter 

and receiver becomes disrupted due to interference 
from other wireless LAN devices, cordless 
telephones, microwave ovens, etc.

y

These features can be disabled by setting “Interlock” to “OFF” in 
the Option menu (see page 42).

• Adjusting the volume on the iPhone/iPod also adjusts 

the volume of this unit. The iPhone/iPod can increase 
the volume to up to 0 dB (or the value set for the 
“MaxVol” setting in the Option menu). To further 
increase the volume, adjust the volume using this unit’s 
VOLUME control or the remote control.

y

• When this unit is turned on or is in standby mode, your iPhone/

iPod can be charged automatically if the YID-W10 transmitter 
connected to your iPhone/iPod is stationed in the YID-W10 
receiver. The MAIN ZONE indicator remains brightly lit when 
an iPhone/iPod is being charged.

• Refer to the operating instructions of the YID-W10 for more 

information.

When the iPhone/iPod is used in Zone 2, these features are not 
available.

Using a Wireless System for iPod

Note

Status of 

Connection

YID-W10 

transmitter 

indicator

YID-W10 

receiver 

indicator

No connection

Off

Off

Confirming 
connection

Green, flashing

Blue, flashing

Connected

Green, lit

Blue, lit

YID-W10 receiver

YID-W10 
transmitter

Note

Summary of Contents for R-S700BL

Page 1: ...Receiver OWNER S MANUAL U ...

Page 2: ...s accessories specified by the manufacturer 12 Use only with the cart stand tripod bracket or table specified by the manufacturer or sold with the apparatus When a cart is used use caution when moving the cart apparatus combination to avoid injury from tip over 13 Unplug this apparatus during lightning storms or when unused for long periods of time 14 Refer all servicing to qualified service perso...

Page 3: ...requencies and if not installed and used according to the instructions found in the users manual may cause interference harmful to the operation of other electronic devices Compliance with FCC regulations does not guarantee that interference will not occur in all installations If this product is found to be the source of interference which can be determined by turning the unit OFF and ON please tr...

Page 4: ... clean dry cloth 12 Only voltage specified on this unit must be used Using this unit with a higher voltage than specified is dangerous and may cause fire damage to this unit and or personal injury Yamaha will not be held responsible for any damage resulting from use of this unit with a voltage other than specified 13 To prevent damage by lightning keep the power cable and outdoor antennas disconne...

Page 5: ...tations 25 LISTENING TO SIRIUS Satellite Radio 26 Connecting the SiriusConnect tuner 27 Activating SIRIUS Satellite Radio subscription 27 SIRIUS Satellite Radio operations 28 Registering and recalling SIRIUS Satellite Radio channels 30 Setting the Parental Lock 32 Displaying the SIRIUS Satellite Radio information 34 PLAYING BACK TUNES FROM YOUR iPhone iPod Bluetooth COMPONENT 35 Using a Universal ...

Page 6: ...e controls the names of the buttons on the remote controls are given in parentheses In case the buttons on the remote control and the Zone 2 remote control have certain functions in common the illustrations of the buttons on the remote control are used for explanation throughout the manual This manual is printed prior to production Design and specifications are subject to change in part as a resul...

Page 7: ...e them from the remote control to prevent an explosion or acid leak If you find leaking batteries discard the batteries immediately taking care not to touch the leaked material If the leaked material comes into contact with your skin or gets into your eyes or mouth rinse it away immediately and consult a doctor Clean the battery compartment thoroughly before installing new batteries Do not use old...

Page 8: ... off this unit 5 FM MODE INFO Changes the FM radio wave reception mode stereo or monaural when TUNER is selected as the input source see page 21 Changes the SIRIUS Satellite Radio information displayed on the front panel display when SIRIUS is selected as the input source see page 34 Changes the playback information displayed about the song playing on the iPhone iPod when DOCK is selected as the i...

Page 9: ...CD DIRECT AMP will function Zone 2 cannot be used while this function is turned on F PURE DIRECT and indicator Allows you to listen to a source in the purest possible sound see page 17 The indicator above it lights up and the front panel display turns off when this function is turned on Zone 2 cannot be used while this function is turned on G PHONES jack Outputs audio to your headphones for privat...

Page 10: ...ing for a SIRIUS channel by category 6 TUNED indicator Lights up when this unit is tuned in to an FM or AM station 7 STEREO indicator Lights up when this unit is receiving a strong signal for an FM stereo broadcast 8 HOLD indicator Blinks when the hold function is used to display the artist name song title etc while listening to a SIRIUS channel 9 ZONE 2 indicator Lights up when Zone 2 is turned o...

Page 11: ...h as the YDS 12 Wireless System for iPod YID W10 or Bluetooth Wireless Audio Receiver YBA 10 see page 35 9 PHONO jacks Used to connect a turntable see page 12 0 CD jacks Used to connect a CD player see page 12 A LINE 1 3 jacks Used to connect audio components see page 12 B iPod VIDEO output jack R S700 only Used to send iPhone iPod video content to a video monitor such as a TV see page 35 Video co...

Page 12: ...see page 47 7 OPTION Turns the OPTION menu on and off see page 40 8 SPEAKERS A B Turns on and off the set of speakers connected to the SPEAKERS A and or SPEAKERS B terminals on the rear panel of this unit when the corresponding button is pressed 9 MUTE Mutes the sound output Press again to restore the sound output to the previous volume level 0 VOLUME R S700 only Increases or decreases the sound o...

Page 13: ...pecifies the frequency or the preset number of the FM AM station when TUNER is selected as the input source see page 21 Specifies the channel number or preset number of the SIRIUS channel when SIRIUS is selected as the input source see page 30 H INFO Changes the SIRIUS Satellite Radio information displayed on the front panel display when SIRIUS is selected as the input source see page 34 iPod cont...

Page 14: ... is selected as the input source for Zone 2 8 FM CATEGORY l AM CATEGORY h Sets the FM AM tuner band to FM or AM when TUNER is selected as the input source see page 20 Selects a channel category when SIRIUS is selected as the input source see page 29 9 PRESET j i Selects a preset FM AM station when TUNER is selected as the input source see page 24 Selects a preset SIRIUS channel when SIRIUS is sele...

Page 15: ... Not all Yamaha CD players can be controlled by the Zone 2 remote control Installing batteries Replacing the battery in the Zone 2 remote control Change the battery when the operation range of the Zone 2 remote control decreases Operation range The remote controls transmit a directional infrared beam Be sure to aim the remote controls directly at the remote control sensor on the front panel of thi...

Page 16: ...the appropriate position before connecting speakers See page 13 for details Do not let bare speaker wires touch each other or any metal part of this unit This could damage this unit and or the speakers y The PHONO jacks are designed for connecting a turntable with an MM cartridge Connect your turntable to the GND terminal to reduce noise in the signal However for some turntables you may hear less ...

Page 17: ...another set of terminals Connect the other speaker to the other set of terminals in the same way When making bi wire connections set the IMPEDANCE SELECTOR switch to HIGH or LOW depending on the impedance of your speakers 6 Ω or higher HIGH R S700 8 Ω or higher HIGH R S500 4 Ω or higher LOW See page 13 for more information about the IMPEDANCE SELECTOR switch When making bi wire connections remove ...

Page 18: ...ied AM loop antenna Connecting the wire of the AM loop antenna Connecting the FM and AM antennas Note Indoor FM antenna included Outdoor AM antenna Use 5 to 10 m of vinyl covered wire extended outdoors from a window Outdoor FM antenna Ground GND terminal For maximum safety and minimum interference connect the antenna GND terminal to a good earth ground A good earth ground is a metal stake driven i...

Page 19: ...d If you do not use the COUPLER jacks never remove the jumper pins from these jacks If removed no sound will be output from this unit Before installing or removing the jumper pins be sure to disconnect the power cable of the unit Leaving the power cable connected could cause noise to be emitted from the speakers or damage the unit When you use this unit as a power amplifier connect the output jack...

Page 20: ...When speaker set A or speaker set B are turned on SP A or SP B is displayed on the front panel display accordingly see page 6 When one set of speakers is connected using bi wire connections or when using two sets of speakers simultaneously A and B make sure SP A and SP B are displayed on the front panel display When listening with headphones turn off the speakers 4 Play the source 5 Rotate the VOL...

Page 21: ...er to use the CD DIRECT AMP feature This setting is retained even if you turn off this unit Using the PURE DIRECT switch Routes input signals from your audio sources so that the input signals bypass the BASS TREBLE BALANCE and LOUDNESS controls thus eliminating any alterations to the audio signals and creating the purest possible sound The PURE DIRECT indicator lights up and the front panel displa...

Page 22: ...ing for the human ears loss of sensitivity to high and low frequency ranges at low volume If the CD DIRECT AMP switch R S700 only or the PURE DIRECT switch is turned on with the LOUDNESS control set at a certain level the input signals bypass the LOUDNESS control resulting in a sudden increase in the sound output level To prevent your ears or the speakers from being damaged be sure to press the CD...

Page 23: ...ce and begin recording using the recording device connected to the REC jacks TAPE and or LINE 1 on the rear panel See page 12 Use this feature to automatically set this unit to standby mode after a certain amount of time The sleep timer is useful when you are going to sleep while this unit is playing or recording a source The sleep timer can only be set with the remote control The sleep timer auto...

Page 24: ... 1 second to begin automatic tuning Press ii or H to tune in to a higher frequency Press jj or I to tune in to a lower frequency When you tune in to a station the frequency of the station is displayed on the front panel display If the tuning search does not stop at the desired station because the station signals are weak try using the manual tuning method Auto Mute feature When listening to an FM ...

Page 25: ...ency tuning mode using TUNING CH jj ii on the front panel or TUN CH H I on the remote control before pressing the numeric buttons WRONG STATION is displayed on the front panel display if you enter a frequency that is out of receivable range Make sure that the entered frequency is correct BASIC OPERATION Improving FM reception If the signal from the station is weak and the sound quality is not good...

Page 26: ...remote control to select FM as the reception band FM is displayed on the front panel display 3 Press OPTION on the remote control The Option menu for TUNER is displayed see page 40 4 Press B C on the remote control to select Auto Preset and then press ENTER This unit starts scanning the FM band about 5 seconds later from the lowest frequency upwards y Before scanning begins you can specify the fir...

Page 27: ...umber i e the preset number following the last preset number used 3 Press PRESET j i on the front panel or PRESET F G on the remote control to select the preset number to which the station will be registered When you select a preset number to which no station is registered EMPTY is displayed When you select a preset number to which a station has already been registered the frequency of the station...

Page 28: ...buttons on the remote control during normal tuning a frequency is entered Set the tuning mode to preset tuning mode using PRESET j i on the front panel or PRESET F G on the remote control before pressing numeric buttons Follow the steps below to clear a preset station 1 Select the desired preset station number See Recalling a preset station on page 24 2 Press CLEAR on the front panel The selected ...

Page 29: ...ontrol to select Clr All Preset and then press ENTER y To cancel the operation and return to the Option menu press RETURN on the remote control 4 Press D E on the remote control to select YES and then press ENTER y To cancel without clearing the presets select NO When all presets have been cleared PRESET CLEARED is displayed and then the display returns to the Option menu 5 To exit the Option menu...

Page 30: ...the option of adding The Best of XM programming to the SIRIUS service The Best of XM service is not available to SIRIUS Canada subscribers at this time Please check with SIRIUS Canada for any updates using the numbers and web address below Family friendly packages are also available to restrict channels featuring content that may be inappropriate for children To subscribe to SIRIUS U S and Canadia...

Page 31: ... outlet If CHECK SR TUNER or ANTENNA ERROR is displayed on the front panel display the SiriusConnect tuner or antenna is not connected correctly In such cases check the connection of the SiriusConnect tuner and the antenna If NOT SUPPORTED is displayed on the front panel display this unit does not support the connected SiriusConnect tuner Before using the SIRIUS Satellite Radio feature you need to...

Page 32: ...remote control to select SIRIUS as the input source The SIRIUS indicator lights up on the front panel display and the SIRIUS Satellite Radio information such as channel number channel name category artist name or song title for the currently selected channel is displayed on the front panel display y When you select SIRIUS as the input source this unit automatically recalls the previously selected ...

Page 33: ... channel search mode 1 Press TUNING CH jj ii on the front panel or TUN CH H I on the remote control repeatedly to search for a channel from a list of all channels y You can search for a channel quickly by holding down TUNING CH jj ii on the front panel or TUN CH H I on the remote control You can skip to channels in the previous or next category by pressing CATEGORY l h on the front panel or CATEGO...

Page 34: ...the remote control to confirm your entry This unit automatically accepts your entry if you do not press ENTER on the remote control within a few seconds after entering the number If the selected channel is locked PIN ___ is displayed on the front panel display Enter the 4 digit Parental Lock code number by using the numeric buttons or press ENTER on the remote control to cancel see page 32 If the ...

Page 35: ...PRESET F G on the remote control to select preset number y You can also select a preset number using the numeric buttons on the remote control If you select a preset number that is being used i e if the currently registered channel number is displayed next to the preset number the current preset will be overwritten 4 Press MEMORY on the front panel Recalling a preset channel Preset Search mode You...

Page 36: ...y and then the display returns to its original state You can use the Parental Lock feature to limit access to certain SIRIUS Satellite channels This unit automatically skips the locked channels when this unit is in the all channel search mode or category search mode and you search for a channel by pressing TUNING CH jj ii on the front panel or TUN CH H I on the remote control Setting the code numb...

Page 37: ...is locked 6 Press ENTER on the remote control to lock or unlock the selected channel If the selected channel is locked the channel number and LOCKED are displayed on the front panel display If the selected channel is unlocked the front panel display changes from LOCKED to the channel name 7 Repeat steps 5 and 6 to lock or unlock other channels as desired 8 Press OPTION once or press RETURN repeate...

Page 38: ...tellite Radio information contains a character that cannot be recognized by this unit the character will be displayed as a space When the antenna of the SiriusConnect tuner cannot receive the signals ACQUIRING is displayed on the front panel display When an information is unavailable is displayed To hold or release the displayed information press ENTER on the remote control While it is held the HO...

Page 39: ...ilent mode PLAYING BACK TUNES FROM YOUR iPhone iPod Bluetooth COMPONENT Universal Dock for iPod Wireless System for iPod Bluetooth Wireless Audio Receiver Model As of July 2010 YDS 12 YDS 11 YDS 10 YID W10 YBA 10 This unit can play back Audio and video Only audio Only audio Operated by Remote control Zone 2 Remote control R S700 only iPhone iPod connected to the dock iPhone iPod connected to the Y...

Page 40: ...od VIDEO jack using a composite video cable you can use the video monitor to watch videos stored on or streamed from your iPhone iPod iPhone iPod operation screens are not displayed on the video monitor Using a Universal Dock for iPod Remote control Zone 2 remote control R S700 only Operation MENU MENU Displays the menu ENTER ENTER If an item is selected Confirms the item and displays the next scr...

Page 41: ... iPod is not operated for about 30 120 seconds after the playback is paused The sleep timer of the iPhone iPod is activated The iPhone iPod is disconnected from the YID W10 transmitter The iPhone iPod battery level decreases to a level where it cannot provide enough power to the YID W10 transmitter The YID W10 transmitter is moved outside of the wireless communication range of the YID W10 receiver...

Page 42: ... the Bluetooth component you want to pair and set it to pairing mode 3 Press OPTION on the remote control The Option menu for DOCK displayed see page 40 4 Press B C on the remote control to select Pairing and then press ENTER Searching is displayed and pairing begins y To cancel pairing press RETURN on the remote control 5 Make sure the Bluetooth component recognizes the Bluetooth Wireless Audio R...

Page 43: ...te control to select Connect and then press ENTER When wireless connection is complete Connected is displayed on the front panel display To exit the Option menu press OPTION on the remote control Not found is displayed if there is a connection error Check that the following conditions have been satisfied and try to establish a wireless connection again Both this unit and the Bluetooth component ar...

Page 44: ...new setting 5 To exit the Option menu press OPTION on the remote control To return to the previous menu press RETURN on the remote control If B C D E on the remote control or other buttons do not work after closing the Option menu rotate the INPUT selector on the front panel or press one of the input selector buttons on the remote control to select the current input source again The following menu...

Page 45: ...niVol Initial volume above y The ZONE 2 indicator on the front panel display flashes when the Zone2 volume is adjusted If MaxVol is set to a value lower than the IniVol setting the setting for MaxVol overrides the IniVol setting For example if you set MaxVol to 30 0dB and IniVol to 0 0dB the volume is automatically set to 30 0dB the next time this unit is turned on Trigger Out R S700 only Use this...

Page 46: ...played in the Option menu only when TUNER is selected as the input source Parental Lock Sets the Parental Lock see page 32 Parental Lock is displayed in the Option menu only when SIRIUS is selected as the input source Interlock When an iPhone iPod is connected to this unit wirelessly using a Wireless System for iPod the iPhone iPod can be used to turn this unit on set it to standby mode or select ...

Page 47: ...ut resetting all parameters to their factory presets Select YES to reset all parameters to their factory presets If YES is selected the parameters are reset the next time you turn on the power of this unit The ADVANCED SETUP menu is displayed in the front panel display y Audio output is muted while setting parameters in the ADVANCED SETUP menu While setting parameters in the ADVANCED SETUP menu mo...

Page 48: ... Press and hold the ID button and the numeric button 2 on the remote control together for about 3 seconds When you change the remote control ID you must change the remote control ID of this unit see page 43 If the remote control batteries are weak or removed the remote control ID will switch to the default setting ID2 In this case replace the batteries and set the remote control ID again Switching...

Page 49: ...nel of this unit If you own one of these products you may not need to use an infrared emitter Up to six Yamaha components can be connected as shown below Multi room configuration and connections The following illustration shows an example of a multi room system configuration and connections y Since there are many possible ways to connect and use this unit in a multi room configuration we recommend...

Page 50: ... hold the MAIN ZONE 2 button and the numeric button 1 on the remote control together for about 3 seconds To control Zone 2 Press and hold the MAIN ZONE 2 button and the numeric button 2 on the remote control together for about 3 seconds 2 Use the remote control as desired For information about the buttons that can be used to control Zone 2 see Remote control on page 8 Buttons that can be used to c...

Page 51: ...ermine the remote control code that corresponds to your TV and assign that code to the TV A button or to another input selector button on the remote control For details about assigning remote control codes see page 49 1 These buttons control your TV if your TV s remote control code has been assigned to an input selector button 2 These buttons described below control your TV if your TV s remote con...

Page 52: ...the component and assign that code to the desired input selector button on the remote control For details about assigning remote control codes see page 49 To switch the input source and control the corresponding component press the input selector button on the remote control and then press the desired control button y If you are unable to operate this unit after using the remote control to operate...

Page 53: ... Use the numeric buttons on the remote control to enter the four digit remote control code corresponding to the component you want to assign When the component has been assigned OK is displayed on the front panel display If an error occurs NG is displayed If the manufacturer of your component has more than one remote control code assign each code one at a time until you find the code that successf...

Page 54: ...UT selector on the front panel or one of the input selector buttons on the remote control 16 The SPEAKERS A B switches are not set properly Turn on the corresponding SPEAKERS A or SPEAKERS B 16 Speaker connections are not secure Secure the connections 12 Output has been muted Turn off the mute 8 The MaxVol or IniVol setting is set too low Set the setting to a higher value 40 The component correspo...

Page 55: ...he power of the component The sound is degraded when listening with the headphones connected to the CD player or the tape deck connected to this unit The power of this unit is turned off or this unit is set to standby mode Turn on the power of this unit 16 The sound level is low The loudness control function is operating Turn down the volume set the LOUDNESS control to the FLAT position and then a...

Page 56: ...o preset stations are registered Register stations you want to listen to as preset stations before operation 22 WRONG STATION is displayed An invalid FM AM frequency has been input Input a frequency that can be received 21 AM The desired station cannot be tuned in with the automatic tuning method The signal is weak or the antenna connections are loose Tighten the AM loop antenna connections and or...

Page 57: ...e connected SIRIUS Satellite Radio tuner Connect the SiriusConnect tuner that this unit supports ACQUIRING The signal is too weak Adjust the orientation of the antenna of the SiriusConnect tuner Check the antenna reception level from the Antenna information on the front panel display 34 UPDATING The SiriusConnect tuner is updating the channel list Wait until the updating is complete The period of ...

Page 58: ...ith this unit via wireless transmission 37 Disconnected Your iPhone iPod is removed from the Universal Dock for iPod Your iPhone iPod is disconnected with this unit via wireless transmission The wireless connection is poor Place the YID W10 receiver as far away from this unit as possible 35 Problem Cause Remedy See page When using the Universal Dock for iPod Your iPhone iPod is not being charged e...

Page 59: ...The pairing is canceled Connected The connection between the Bluetooth Wireless Audio Receiver and the Bluetooth component is established Disconnected The Bluetooth component is disconnected from the Bluetooth Wireless Audio Receiver Not found The Bluetooth component is not found During pairing pairing must be performed on the Bluetooth component and this unit simultaneously Check if the Bluetooth...

Page 60: ...me manufacturer using LIST OF REMOTE CONTROL CODES at the end of this manual 49 Even if the remote control code is correctly set there are some models that do not respond to the remote control Use the supplied remote control for the components You did not press the input selector button corresponding to the component you are trying to control Press the input selector button corresponding to the co...

Page 61: ...ut shorted 87 dB or more CD etc PURE DIRECT on 200 mV input shorted 100 dB or more R S700 CD CD DIRECT AMP on 200 mV input shorted 107 dB or more Residual noise IHF A network 30 µV Channel separation CD etc 5 1 kΩ input shorted 1 10 kHz 65 50 dB or more Tone control characteristics BASS Boost Cut 50 Hz 10 dB Turnover Frequency 350 Hz TREBLE Boost Cut 20 kHz 10 dB Turnover Frequency 3 5 kHz Continu...

Page 62: ...3 0337 0340 0342 0343 0350 0351 CMS 0277 CMS Hightec 0282 Coby 0197 Colortyme 0008 0026 Commercial Solutions 0021 Concerto 0008 0026 Concorde 0323 0343 Condor 0161 0277 0320 0323 0342 0350 0351 Contec 0179 0277 0323 0342 0343 0344 Contec Cony 0012 0058 Continental Edison 0345 Cosmel 0323 0343 Craig 0058 0179 Crosley 0010 0037 0171 0339 Crown 0058 0161 0171 0179 0320 0323 0343 0349 0350 0351 CS Ele...

Page 63: ...0 0342 0343 0348 Kamosonic 0342 Kamp 0277 0342 Kapsch 0347 Karcher 0161 0320 0342 0343 0349 Kawasho 0008 0026 0055 0277 KEC 0179 Kendo 0161 0320 0341 0346 Kenwood 0008 0026 0050 KIC 0282 Kingsley 0277 0342 KLH 0039 Kloss Novabeam 0057 0058 Kneissel 0161 0168 0320 Kolster 0320 0350 Konka 0340 Korpel 0320 0349 0350 Korting 0161 0339 Kosmos 0320 Koyoda 0343 KTV 0007 0050 0058 0179 0183 0282 0342 Kyot...

Page 64: ...058 Radiola 0282 0320 0349 0350 Radiomarelli 0320 0339 Radiotone 0161 0320 0323 0350 Rank 0344 RCA 0008 0021 0024 0025 0026 0027 0042 0049 0052 0053 0063 0136 0225 Realistic 0019 0031 0050 0179 Recor 0320 Redstar 0320 Reflex 0320 Revox 0161 0320 0349 0350 Rex 0337 0346 0347 RFT 0161 0168 0339 Rhapsody 0277 R Line 0320 0349 0350 Roadstar 0323 0337 0340 0343 Robotron 0339 Rowa 0277 0282 Royal Lux 01...

Page 65: ...80 0081 0082 0083 0086 0087 Yamishi 0282 0320 Yokan 0320 Yoko 0161 0277 0282 0320 0323 0337 0340 0342 0343 0349 0350 Yorx 0340 Zanussi 0282 0346 Zenith 0008 0028 0029 0030 0031 0054 0061 0062 VCR ABS 1016 Adventura 1069 Adyson 1008 Aiwa 1024 1026 1027 1069 Akai 1021 1027 Akiba 1008 1029 Akura 1008 1027 1029 Alba 1008 1009 1024 1025 1029 1030 Alienware 1016 Ambassador 1030 American High 1068 Amstra...

Page 66: ...va 1008 RadioShack 1071 RadioShack Realistic 1065 1068 1069 1070 1071 Radiola 1028 Radix 1071 Randex 1071 RCA 1019 1068 1070 1075 1110 1113 1122 1125 Realistic 1065 1068 1069 1070 1071 ReplayTV 1022 1123 Rex 1027 RFT 1008 1028 1030 Ricavision 1016 Roadstar 1008 1009 1025 1029 1031 Royal 1008 Runco 1114 Saba 1027 Saisho 1024 1029 Samsung 1002 1034 1041 1043 1057 1060 1070 1084 1110 1116 1122 1124 1...

Page 67: ...8 KeyPlug 2362 Kiiro 2362 Kingavon 2358 Kiss 2380 KLH 2131 2149 Koda 2358 Koss 2013 2148 2158 KXD 2359 Landel 2143 Lasonic 2132 Lawson 2355 Lecson 2381 Lenco 2358 2362 2367 Lenoxx 2136 2153 LG 2002 2033 2038 2057 2129 2133 2189 2191 2223 2238 2270 2288 2335 2373 2375 Life 2182 Lifetec 2182 Limit 2355 Liquid Video 2158 Liteon 2043 2051 2142 Loewe 2320 LogicLab 2355 Magnavox 2025 2050 2137 2150 2159...

Page 68: ...2034 2058 2062 2116 2117 2119 2120 2121 2123 Philips 2008 2044 2050 2051 2147 Pioneer 2017 2035 Pye 2144 Samsung 2000 2112 2216 Sansui 2073 Sanyo 2217 Sony 2004 2005 2007 2052 2068 2069 2074 2208 2210 2211 Sylvania 2239 Toshiba 2032 2036 2037 2039 2049 2054 2055 2076 Yamaha 2056 Cable TV ABC 3002 3003 3017 3066 3067 3086 3093 3119 3122 ADB 3020 Adelphia 3081 Alcatel 3016 Americast 3124 Amstrad 302...

Page 69: ...Emanon 4001 Emme Esse 4008 4024 Engel 4217 Ep Sat 4006 EURIEULT 4031 Eurodec 4052 Europa 4053 4218 4219 Europhon 4219 Eurosat 4011 Eurosky 4024 4011 4008 4215 4218 4219 Eurostar 4011 4215 4219 Eutelsat 4217 Exator 4001 4004 Expressvu 4117 Fenner 4024 4212 4217 Ferguson 4006 4052 4214 Fidelity 4218 Finlandia 4006 Finlux 4006 FinnSat 4050 4052 Flair Mate 4217 Foxtel 4222 Freecom 4001 4049 4218 FTEma...

Page 70: ...14 SEG 4024 4001 4008 4013 Seleco 4048 Servi Sat 4031 4217 Siemens 4015 Silva 4049 Skantin 4217 Skardin 4009 Skinsat 4218 SKR 4217 Skymaster 4017 4022 4005 4212 4217 Skymax 4055 4053 SkySat 4212 4218 4219 4217 Skyvision 4048 SM Electronic 4212 4217 Smart 4215 4217 Sony 4067 4070 4213 SR 4011 4054 Star Choice 4019 Starland 4217 Starring 4013 Start Trak 4001 Strong 4024 4001 4004 4008 4049 4222 STS ...

Page 71: ...Printed in Malaysia WV17360 2010 Yamaha Corporation ...

Reviews: