background image

Listening to FM/AM radio

25 

En

English

BA

S

IC


OPERA

T

ION

Note

R-N803D does not include an AM tuner.

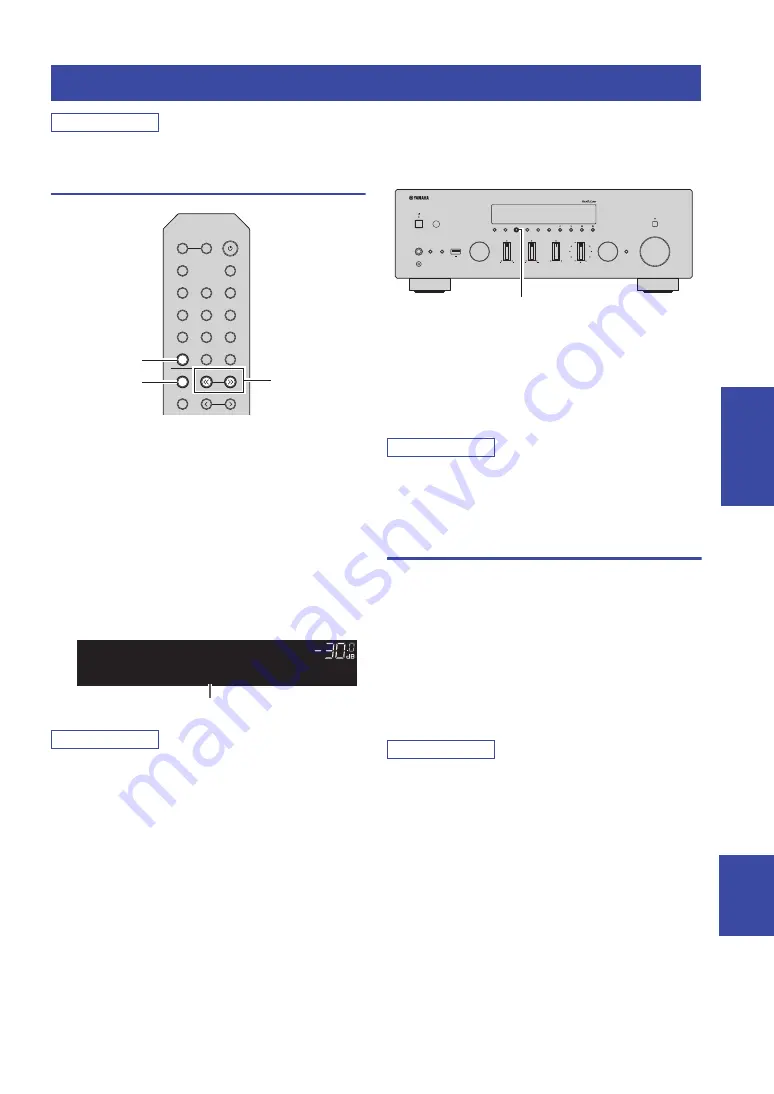
FM/AM tuning

1

Press TUNER to select “TUNER” as the input 
source.

2

Press BAND repeatedly to select the 
reception band (FM or AM).

3

Press TUNING 

jj

 / 

ii

 to set a frequency.

To search stations automatically, press and hold 
TUNING 

jj

 / 

ii

 for a second.

If a broadcast is being received, “TUNED” indicator 
on the front display will be lit. If a stereo broadcast is 
being received, the “STEREO” indicator will also lit.

Note

• If the station signals are weak, tuning search does not stop at the 

desired station.

• When FM radio reception is unstable, switching the FM mode 

to "Mono" may improve it.

Improving FM reception (FM mode)

If the signal from the station is weak and the sound quality 
is not good, set the FM band reception mode to monaural 
mode to improve reception.

1

Press MODE repeatedly to select “Stereo” 
(automatic stereo mode) or “Mono” 
(monaural mode) when this unit is tuned in to 
an FM radio station.

When “Mono” is selected, FM broadcasts will be 
heard in monaural sound.

Note

The STEREO indicator on the front panel lights up while 
listening to a station in stereo mode.

Registering favorite radio stations 
(presets)

You can register up to 40 radio stations as presets. Once 
you have registered stations, you can easily tune into them 
by selecting their preset numbers.
You can automatically register FM radio stations that have 
strong signals (auto preset). For AM radio stations or FM 
radio stations with weak signals, register them manually 
(p. 26).

Registering FM radio stations 
automatically (auto preset)

Note

• When you register radio stations automatically, radio stations 

currently registered to preset numbers may be overwritten.

• If the station you want to register is weak in signal strength, try 

using the manual preset tuning method.

• FM stations registered as presets using the automatic preset 

registration feature will be heard in stereo.

• (U.K. and Europe models only)

Only Radio Data System broadcasting stations can be preset 
automatically.

Listening to FM/AM radio

TUNING 

jj

 / 

ii 

TUNER

BAND

LINE 1

OPT 1

OPT 2

CD

COAX 1

COAX 2

BLUETOOTH

NET

U

S

B

LINE 2

LINE 

3

TUNER

PRE

S

ET

TUNING

BAND

MEMORY

S

LEEP

PHONO

B

A

S

PEAKER

S

   FM 98.50MHz

VOL.

TUNED

STEREO

A

Frequency

VOLUME

PURE DIRECT 

RETURN

CONNECT

PUSH - ENTER

TUNING

PRESET

BAND

MEMORY

CLEAR

BASS

INPUT

5V

1A

BALANCE

L

R

TREBLE

LOUDNESS

FLAT

-30dB

DIMMER

MODE

DISPLAY

SELECT

PHONES

YPAO MIC

SPEAKERS

USB

A

B

MODE

Summary of Contents for R-N803

Page 1: ...nual EN The R N803 and R N803D network receivers allow you to play back sound in high quality stereo at your own home This manual explains preparations and operations for everyday users of the unit Network Receiver ...

Page 2: ... might spill into any openings A liquid such as water getting into the unit may cause a fire electric shocks or malfunctions If any liquid such as water seeps into the device turn off the power immediately and unplug the power cord from the AC outlet Then request an inspection from the dealer where you purchased the unit or from qualified Yamaha service personnel Never insert or remove an electric...

Page 3: ...ury or cause damage to the unit itself Hearing loss Do not use the unit speakers or headphones for a long period of time at a high or uncomfortable volume level since this can cause permanent hearing loss If you experience any hearing loss or ringing in the ears consult a physician Before connecting the unit to other devices turn off the power for all devices Also before turning the power of all d...

Page 4: ...nterface could not only cause this unit to malfunction but could also damage the speakers Handling Do not place vinyl plastic or rubber products on this unit Failure to observe this may cause discoloration or deformation in the panel of this unit If the ambient temperature changes drastically such as during unit transportation or under rapid heating or cooling and there is a chance condensation ma...

Page 5: ...etooth 32 Connecting a Bluetooth device pairing 32 Playing back Bluetooth device contents 32 Disconnecting a Bluetooth connection 33 Playing back music stored on media servers PCs NAS 34 Setting the media sharing of music files 34 Playback of PC music contents 35 Listening to Internet radio 37 Playing back iPhone iTunes music via a network AirPlay 38 Playback of iPhone iTunes music contents 38 Pla...

Page 6: ... back music files stored on your NAS p 34 5 Play back music files stored on your iPod iTunes with AirPlay p 38 6 Play back audio content from Bluetooth devices p 32 7 Play back music files stored on your USB device p 39 8 Play back your external component p 10 9 Listening to radio p 25 29 Note For details on connecting the external devices see Connections p 10 What you can do with this unit VOLUME...

Page 7: ...R N803D YPAO microphone Power cord The supplied power cord varies depending on the region of purchase Batteries x2 AA R6 UM 3 One of the above is supplied depending on the region of purchase G Network Receiver Réseau Ampli Tuner Сетевой ресивер R N803 R N803D Owner s Manual CD ROM Europe model R N803D Quick Start Guide Europe model G Network Receiver R N803 R N803D Owner s Manual except Europe mod...

Page 8: ...T or USB is selected as the input source p 41 8 CLEAR Clears a preset radio station when TUNER is selected as the input source p 27 30 Clears a preset song or a preset streaming station when NET or USB is selected as the input source p 41 9 BAND Sets the radio tuner band when TUNER is selected as the input source p 25 29 0 Front display Shows information about the operational status of this unit p...

Page 9: ...roduces a flat response p 23 K BALANCE control Adjusts the sound output balance of the left and right speakers to compensate for sound imbalances caused by speaker locations or listening room conditions p 23 L LOUDNESS control Retains a full tonal range at any volume level p 24 Note The LOUDNESS control does not function when the YPAO Volume function p 50 is enabled M SELECT ENTER Turn the dial to...

Page 10: ...tes as an access point The strength of the wireless network signal can be verified by the indicator status 4 SLEEP indicator Lights up when the sleep timer is on p 24 5 STEREO indicator Lights up when the unit is receiving a stereo FM radio signal 6 TUNED indicator Lights up when the unit is receiving an FM AM radio station signal 7 YPAO VOL indicator Lights up when the YPAO volume p 50 function i...

Page 11: ...ce wirelessly p 14 7 VOLTAGE SELECTOR General models only Selects the switch position according to your local voltage p 14 8 AC IN jack For connecting the supplied power cord p 14 9 CD jacks For connecting to a CD player etc p 10 0 ANTENNA terminals For connecting to the radio antennas p 13 A TRIGGER OUT jacks For connecting to a subwoofer that supports the trigger function p 10 B SUBWOOFER OUT ja...

Page 12: ...p 25 or a DAB radio station p 29 when TUNER is selected as the input source 5 Preset keys MEMORY Registers the current radio station as a preset when TUNER is selected as the input source p 25 30 Registers the current playback song or streaming station as a preset when NET or USB is selected as the input source p 41 PRESET j i Recalls a preset radio station p 27 30 or song streaming station p 41 6...

Page 13: ...erform other operations for network sources Bluetooth devices and USB devices Note The playback keys may not work depending on the Bluetooth device Installing batteries Note Change all batteries if the operation range of the remote control narrows Before inserting new batteries wipe the compartment clean Operation range The remote controls transmit a directional infrared beam Be sure to aim the re...

Page 14: ...nts to the main power until all connections between components are complete Do not let bare speaker wires touch each other or any metal part of this unit This could damage this unit and or the speakers Connections Only PCM signals can be input to the digital OPTICAL COAXIAL jacks of this unit A B SPEAKERS NETWORK COAXIAL OPTICAL FM AM 75Ω ANTENNA SUBWOOFER OUT TRIGGER OUT IN 2 IN 1 IN OUT OUT 3 1 ...

Page 15: ... impedance setting of this unit in SP IMP p 52 in the ADVANCED SETUP menu Connecting speaker cables Speaker cables have two wires One is for connecting the negative terminal of the unit and the speaker and the other is for the positive terminal If the wires are colored to prevent confusion connect the black wire to the negative and the other wire to the positive terminal a Remove approximately 10 ...

Page 16: ... set of terminals in the same way Note When making bi wire connections remove the shorting bridges or cables on the speaker Refer to the speakers instruction manuals for more information To use the bi wire connections press SPEAKERS A and SPEAKERS B on the front panel or on the remote control so that both A and B indicators light up on the front display A B SPEAK This unit Speaker VOLUME PURE DIRE...

Page 17: ...e wires of the AM antenna have no polarity Assembling the supplied AM antenna Connecting the wires of the AM antenna Connecting the DAB FM antenna R N803D Connect the supplied DAB FM antenna to this unit and fix the antenna ends to a wall Note If you experience poor reception quality install an outdoor antenna The antenna should be stretched out horizontally COAXIAL OPTICAL FM AM 75Ω ANTENNA 1 2 1...

Page 18: ...e Do not apply excessive force on the wireless antenna Doing so may damage the antenna Connecting the power cord After all the connections are complete connect the supplied power cord to this unit and then to an AC wall outlet WARNING General model only Before connecting the power cord make sure you set VOLTAGE SELECTOR of this unit according to your local voltage Improper setting of VOLTAGE SELEC...

Page 19: ...s Accessory Configuration If you turn on the power to the unit right after you purchase or initialize it the unit will automatically use the network settings of the iOS device iPhone iPad iPod touch and try to connect to a wireless LAN unless the unit is already connected to a wired LAN If you have an iOS device follow the procedure from Step 6 in Sharing the iOS device setting p 16 If you plan to...

Page 20: ...f you set up a wireless connection with this method all the network settings will be initialized This configuration does not work if the security method of your wireless router access point is WEP In this case use other connection method 1 Press SETUP 2 Use the cursor keys B C to select Network and press ENTER Note To return to the previous state press RETURN 3 Use the cursor keys B C to select Co...

Page 21: ...NTER Note To return to the previous state press RETURN 3 Use the cursor keys B C to select Connection and press ENTER 4 Use the cursor keys B C to select Wireless and press ENTER 5 Press ENTER twice Connecting appears on the front display 6 Push the WPS button on the wireless router access point When the connection process finishes Completed appears on the front display When the setting finishes v...

Page 22: ...ss RETURN Settings None WEP WPA2 PSK AES Mixed Mode Note If you select None the connection may be insecure since the communication is not encrypted 10 Use the cursor keys B C to select Security Key and press ENTER 11 Use the cursor keys to enter the security key on the wireless router access point and press RETURN to previous state If you select WEP in step 9 enter either 5 or 13 character string ...

Page 23: ...nsecure since the communication is not encrypted 8 Use the cursor keys B C to select Security Key and press ENTER 9 Use the cursor keys to enter the security key on this unit and press RETURN to previous state Enter 8 to 63 character string or 64 hexadecimal digits Use the cursor keys D E to move the edit position and the cursor keys B C to select a character Press PRESET i to insert a character a...

Page 24: ...nked to play music simultaneously Supports music playback through Internet radio streaming services Network settings for devices that support MusicCast Visit the following website for more information on MusicCast and on which devices are compatible http www yamaha com musiccast Note For details on MusicCast download the MusicCast Setup Guide from the Yamaha Download website http download yamaha c...

Page 25: ...uctions to set up the network This completes the MusicCast network registration and wireless network connection settings Use MusicCast CONTROLLER to play back music Note AirPlay and DSD sound cannot be transmitted Music can be played back only from this unit When Pure Direct p 23 is turned on only the network sources such as Internet radio Bluetooth device sources and USB storage device sources ca...

Page 26: ...e power When you press A power on the remote control this unit set to standby mode Switching information on the front display When you select a network source or USB as the input source you can switch playback information on the front display 1 Press DISPLAY Each time you press the key the displayed item changes About 3 seconds later the corresponding information for the displayed item appears Not...

Page 27: ... dB to 10 dB 20 Hz TREBLE control When you feel there is not enough treble high frequency sound rotate clockwise to boost When you feel there is too much treble rotate counterclockwise to suppress Control range 10 dB to 10 dB 20 kHz Adjusting the BALANCE control The BALANCE control adjusts the sound output balance of the left and right speakers to compensate for sound imbalance caused by speaker l...

Page 28: ... volume level If the effect of the LOUDNESS control setting is too strong or weak readjust the LOUDNESS control Using the sleep timer Use this feature to automatically set this unit to standby mode after a certain amount of time The sleep timer is useful when you are going to sleep while this unit is playing or recording a source Note The sleep timer can only be set with the remote control 1 Press...

Page 29: ...ning to a station in stereo mode Registering favorite radio stations presets You can register up to 40 radio stations as presets Once you have registered stations you can easily tune into them by selecting their preset numbers You can automatically register FM radio stations that have strong signals auto preset For AM radio stations or FM radio stations with weak signals register them manually p 2...

Page 30: ...RY Note By holding down MEMORY for more than 3 seconds you can skip the following steps and automatically register the selected station to an empty preset number i e the preset number following the last preset number used 3 PRESET j i to select the preset number to which the station will be registered If you select a preset number to which no station is registered the message Empty is displayed 4 ...

Page 31: ...eared Cleared appears and then the next in use preset number is displayed 5 Repeat step 4 until all desired preset stations are cleared 6 To exit from the Option menu press OPTION On the front panel 1 Rotate the INPUT selector to select TUNER as the input source 2 Press CLEAR 3 Press PRESET j i to select a preset station to be cleared and press CLEAR If the preset station is cleared Cleared appear...

Page 32: ... p 25 2 Press DISPLAY Each time you press the key the displayed item changes About 3 seconds later the corresponding information for the displayed item appears Note Program Service Program Type Radio Text and Clock Time are not displayed if the radio station does not provide the Radio Data System service Program Service Program service name Program Type Current program type Radio Text Information ...

Page 33: ...s on the front display Note If no DAB radio stations are found by an initial scan Not Found appears on the front display followed by Off Air Press BAND twice to re select the DAB band and scan again You can check reception strength of each DAB channel label p 31 To perform an initial scan again after some DAB radio stations are stored select Initiate Scan p 46 in the OPTION menu If you perform an ...

Page 34: ...e Note To cancel registration press RETURN or do not perform any operations for about 30 seconds Recalling a preset station Tune into a registered DAB radio station by selecting its preset number 1 Press TUNER to select TUNER as the input source 2 Press BAND to select the DAB band 3 Press PRESET j i to select the desired DAB radio station Note Preset numbers to which no stations are registered are...

Page 35: ...N 4 Use the cursor keys B C to select Tune Aid and press ENTER 5 Use the cursor keys B C to select the desired DAB channel label 6 To exit from the OPTION menu press OPTION Item Information Service Label Station name DLS Dynamic Label Segment Information on the station Ensemble Label Ensemble name Program Type Station genre Date and Time Current date and time Audio Mode Audio mode monaural stereo ...

Page 36: ... pairing operation 2 Turn on the Bluetooth function of the Bluetooth device 3 On the Bluetooth device select the unit network name from the available device list After pairing has been completed and the unit is connected to the Bluetooth device Connected appears on the front display and Bluetooth indicator will be light up Note If the pass key is required enter the number 0000 You can change the n...

Page 37: ...source other than Bluetooth on the unit Bluetooth Bluetooth is a technology for wireless communication between devices within an area of about 10 meters 33 ft employing the 2 4 GHz frequency band a band which can be used without a license Handling Bluetooth communications The 2 4 GHz band used by Bluetooth compatible devices is a radio band shared by many types of equipment While Bluetooth compati...

Page 38: ...o play back music files in your computer with this unit you need to make the media sharing setting between the unit and computer Windows Media Player 12 or later In here setting with Windows Media Player in Windows 7 is taken as an example When using Windows Media Player 12 1 Start Windows Media Player 12 on your PC 2 Select Stream then Turn on media streaming The control panel window of your PC a...

Page 39: ...back For details see DMC Control p 49 Repeat shuffle settings You can configure the repeat shuffle settings for the playback of PC music content 1 When the input source is Server press REPEAT or SHUFFLE on the playback key repeatedly to select the playback method NET USB TUNER PRESET TUNING BAND MEMORY SETUP HOME MUTE NOW PLAYING VOLUME RETURN ENTER REPEAT SHUFFLE OPTION RETURN OPTION NOW PLAYING ...

Page 40: ...cally play back music from your PC or from the NAS when turning on the unit or when selecting Server as the input source 1 When the input source is Server press OPTION 2 Use the cursor keys B C to select Auto Playback and press ENTER 3 Use the cursor keys D E to select On enable or Off disable 4 To exit from the menu press OPTION ...

Page 41: ...played Use the following remote control keys to control playback Note You can register the current playback station as a preset p 41 If you press the DISPLAY on the front panel repeatedly you can switch the playback information on the front display p 22 Some information may not be available depending on the station Listening to Internet radio NET USB TUNER PRESET TUNING BAND MEMORY SETUP HOME MUTE...

Page 42: ...omatically when starting playback on iTunes or iPhone by setting Standby Network Standby p 49 in the Setup menu to On You can edit the network name the unit s name on the network displayed on iPhone iTunes in Network Name p 49 in the Setup menu You can adjust the unit s volume from the iPhone iTunes during playback CAUTION Adjusting the volume on iTunes or iPhone may make the volume unexpectedly l...

Page 43: ...connect it from the USB jack You cannot connect the PC to the USB jack of the unit This unit cannot charge USB storage devices while it is in standby mode Playback of USB storage device contents Follow the procedure below to operate the USB storage device contents and start playback Note _ underscore will be displayed for characters not supported by the unit 1 Press USB to select USB as the input ...

Page 44: ...o Playback and press ENTER 3 Use the cursor keys D E to select On enable or Off disable 4 To exit from the menu press OPTION Keys Function Cursor keys Select a music file or folder ENTER Starts playback if pressed while a music file is selected Moves down one level if pressed while a folder is selected RETURN Moves up one level Playback keys p e Pauses resumes playback s Stops playback b w Skips f...

Page 45: ...ng steps and automatically register the selected song station to an empty preset number i e the preset number following the last preset number used 3 PRESET j i to select the preset number to which the song station will be registered If you select a preset number to which no station is registered the message Empty is displayed 4 Press MEMORY When registration is complete the display returns to the...

Page 46: ...he crossover frequency is adjustable set it to maximum 3 Configure the following settings Press SPEAKERS A B on the front panel or remote control to select the speakers to be used Set the BASS control and TREBLE control on the front panel to 0 center position Set the BALANCE control on the front panel to the center position Set the LOUDNESS control on the front panel to FLAT center position If Pur...

Page 47: ... Error Info appears press the cursor key E to check the error message p 44 6 To check the measurement result press the cursor key E If No Warning appears on the front display the measurement is properly completed Note If any warning message such as W 1 appears on the front display see Warning messages p 45 7 Press the cursor key D or RETURN 8 To save the measurement results use the cursor keys B C...

Page 48: ... been removed Connect the YPAO microphone to the YPAO MIC jack firmly and start the measurement again E 4 User Cancel The measurement has been canceled Start the measurement again as necessary E 5 PHONES The headphones are connected to the PHONES jack of this unit Disconnect the headphones and start the measurement again E 10 Internal Error An internal error has occurred Exit YPAO and then turn of...

Page 49: ...with the reverse polarity check the cable connections of the speakers If the speaker is connected incorrectly turn off this unit and then reconnect the speaker cable Depending on the type of speakers or room environment this message may appear even if the speakers are connected correctly In this case you can ignore the message W 2 Over Distance A speaker is placed more than 24 m 80 ft from the lis...

Page 50: ...ck sources Option menu Item Function Page Volume Trim Corrects volume differences between input sources 46 Signal Info Displays information about the audio signal 46 Auto Preset Automatically registers FM radio stations with strong signals as presets 25 Clear Preset Clears radio stations registered to preset numbers 27 Initiate Scan R N803D only Performs an initial scan for DAB radio reception 29 ...

Page 51: ...ress ENTER 3 Use the cursor keys D E to select a setting and press ENTER Note To return to the previous state during menu operations press RETURN 4 To exit from the menu press SETUP Configuring various functions Setup menu PRESET MEMORY SETUP HOME MUTE NOW PLAYING VOLUME RETURN ENTER OPTION RETURN SETUP ENTER Cursor keys B C D E Network SETUP Volume SETUP Max Volume VOLUME 16 5dB MAX VOL ...

Page 52: ... measurement 50 VOL YPAO Volume Enables disables the YPAO volume function 50 Volume Max Volume Sets the maximum volume to prevent excessive loudness 50 Initial Volume Sets the initial volume for when this receiver is turned on 50 AutoPowerStdby Auto Power Standby Sets the amount of time for the auto standby function 51 ECO Mode Enables disables the eco mode power saving mode 51 Wired Select this o...

Page 53: ...ce to enter the name edit display 3 Use the cursor keys D E to move the edit position and the cursor keys B C to select a character You can insert delete a character by pressing PRESET i insert or PRESET j delete 4 To confirm the new name press ENTER 5 To exit from the menu press SETUP Off Does not use a DHCP server Configure the network parameters manually For details see Manual network settings ...

Page 54: ...en at low volume Note The YPAO Volume function is disabled when YPAO On Off is set to Off When the YPAO volume function is enabled the YPAO VOL indicator on the front display lights up The LOUDNESS control p 24 does not function when the YPAO Volume function is enabled Volume Configures the volume related settings Max Volume Sets the maximum volume to prevent excessive loudness Setting range 30 dB...

Page 55: ...hen the eco mode is enabled you can reduce the unit s power consumption The new setting will take effect after the unit is restarted Be sure to press ENTER to restart the unit after selecting a setting Note When ECO Mode is set to On the front display may become dark Off Does not set the unit to standby mode automatically On Sets the unit to standby mode automatically While NET BLUETOOTH or USB is...

Page 56: ...rol ID so that it matches the remote control s ID Select ID1 normally Select AUTO only when you use the remote control supplied with some Yamaha player Settings ID1 Default AUTO Configuring the system settings ADVANCED SETUP menu Item Function Page VERSION Checks the version of firmware currently installed on the unit 52 SP IMP Changes the speaker impedance setting 52 REMOTE ID Selects the unit s ...

Page 57: ...rmware update is necessary Also make sure you read the information supplied with updates before updating the firmware 1 Press SELECT ENTER repeatedly to select USB or NETWORK and press DISPLAY to start firmware update Choices Note If the unit detects newer firmware over the network NEW FW Available appears as the Information menu item in Network In this case you can also update the unit s firmware...

Page 58: ...e front panel The firmware update is complete Notification of new firmware update When new firmware is available on the network NEW FW will be displayed on the front display for a short period of time when the unit is turned on To update the firmware press ENTER as described in Step 6 while the notification is displayed If UPDATE SUCCESS appears on the front display press A power on the front pane...

Page 59: ...If the problem persists disconnect the power cable from the AC wall outlet and plug it again The power does not turn off The internal microcomputer has frozen due to an external electric shock such as lightning or excessive static electricity or to a drop in the power supply voltage Press A power on the front panel to turn off the unit and turn it on again after at least 15 seconds elapse If the p...

Page 60: ...e problem persists the cables may be defective 10 No connection from the turntable to the GND terminal Make the GND connection between the turntable and this unit 10 The volume level is low while playing a record The record is being played on a turntable with an MC cartridge The turntable should be connected to this unit through the MC head amplifier The sound is degraded when listening with the h...

Page 61: ...ailable outdoor antenna may help to reduce noise The AM radio signal is weak Change the direction of the AM antenna 13 Select the station manually 25 Use a commercially available outdoor antenna Connect the supplied AM antenna to the ANTENNA AM jack AM radio stations cannot be registered preset The stations may have been registered automatically Auto Preset Auto presets can be used with FM radio s...

Page 62: ... emit electromagnetic waves The Bluetooth device does not support the A2DP protocol Use a Bluetooth device that supports the A2DP protocol 62 The connection profile registered in the Bluetooth device may not be functioning correctly for some reason Delete the connection profile in the Bluetooth device and then connect the Bluetooth device to this unit 32 The passkey on the Bluetooth adapter or oth...

Page 63: ...rby When connecting wirelessly do not use this unit near devices that emit electromagnetic waves Access to the network is restricted due to a firewall on the wireless LAN router access point Check the firewall settings of the wireless LAN router access point The PC server cannot be detected The media sharing settings on the PC server is incorrect Change the media sharing settings so that this unit...

Page 64: ...reless LAN router access point that supports multiple SSIDs is used The network separator function on the wireless LAN router access point may be preventing this unit from being accessed When connecting to this unit with a mobile device use an SSID on which this unit can be accessed try connecting via the primary SSID Firmware update via the network is failed The network connection is no good Try ...

Page 65: ...t the bare wires of the cables firmly and connect to the unit and speakers properly No content There are no playable files in the selected folder Select a folder that contains files supported by the unit Please wait The unit is preparing for connecting to the network Wait until the message disappears If the message stays more than 3 minutes turn off the unit and turn it on again Unable to play The...

Page 66: ... iPhone SE iPhone 6s Plus iPhone 6s iPhone 6 Plus iPhone 6 iPhone 5s iPhone 5c iPhone 5 iPhone 4s iPad Pro 9 7 and 12 9 iPad mini 4 iPad Air 2 iPad mini 3 iPad Air iPad mini 2 iPad mini iPad 3rd and 4th generation iPad 2 iPod touch 5th and 6th generation as of June 2017 Supported file formats USB PC NAS Linear PCM format only Note To play back FLAC files stored on a PC or NAS you need to install s...

Page 67: ...ernet Explorer Windows Media Audio and Windows Media Player are either registered trademarks or trademarks of Microsoft Corporation in the United States and or other countries Android Google Play Android and Google Play are trademarks of Google Inc The Wi Fi CERTIFIED Logo is a certification mark of Wi Fi Alliance The Wi Fi Protected Setup Identifier Mark is a certification mark of Wi Fi Alliance ...

Page 68: ...put 1 kHz 200 mV OUT 200 mV 1 0 k SUBWOOFER OUT 4 0 V 1 2 kΩ Cut off frequency 90 Hz PHONES 8 load 470 mV 470 Frequency response CD etc 20 Hz to 20 kHz 0 0 5 dB CD etc 10 Hz to 100 kHz PURE DIRECT on 0 1 0 dB RIAA equalization deviation PHONO MM 0 5 dB Total harmonic distortion PHONO MM to OUT 20 Hz to 20 kHz 2 5 V 0 03 or less CD etc to SPEAKERS 20 Hz to 20 kHz 50 0 W 8 0 019 or less Signal to no...

Page 69: ...and General models 450 W Dimensions W H D 435 151 392 mm 17 1 8 6 15 7 16 Including legs and protrusions Reference Dimensions W H D with wireless antenna upright 435 215 392 mm 17 1 8 8 1 2 15 7 16 Including legs and protrusions Weight 11 0 kg 24 25 lbs The contents of this manual apply to the latest specifications as of the publishing date To obtain the latest manual access the Yamaha website the...

Page 70: ...VANCED SETUP menu 52 FM antenna 13 FM radio 25 Front display 6 Front display switching information 22 H HOME remote control 8 I Information Network setup menu 48 INIT ADVANCED SETUP menu 53 Initialize ADVANCED SETUP menu 53 Initiate Scan option menu 46 Input selection keys remote control 8 INPUT selector 5 Internal Error front display message 44 Internet radio 37 iOS device setting sharing wireles...

Page 71: ... content 40 Signal Info option menu 46 Signal strength indicator 6 SLEEP 6 Sleep timer 24 SP IMP ADVANCED SETUP menu 52 Speaker impedance ADVANCED SETUP menu 52 Speaker connection 10 SPEAKERS A B 5 SPEAKERS terminals 7 Standby Network Standby Network setup menu 49 STEREO 6 SUBWOOFER OUT jack 7 Subwoofer connection 10 T TREBLE control 23 TRIGGER OUT jacks 7 Tune Aid option menu 46 TUNED 6 Turntable...

Page 72: ...ise from inappropriate waste handling For more information about collection and recycling of old products and batteries please contact your local municipality your waste disposal service or the point of sale where you purchased the items For business users in the European Union If you wish to discard electrical and electronic equipment please contact your dealer or supplier for further information...

Page 73: ...декларира че този тип радиосъоръжение R N803D е в съответствие с Директива 2014 53 ЕС Цялостният текст на ЕС декларацията за съответствие може да се намери на следния интернет адрес https europe yamaha com en support compliance doc html CS Czech ZJEDNODUŠENÉ EU PROHLÁŠENÍ O SHODĚ Tímto Yamaha Music Europe GmbH prohlašuje že typ rádiového zařízení R N803D je v souladu se směrnicí 2014 53 EU Úplné z...

Page 74: ...doc html SK Slovak ZJEDNODUŠENÉ EÚ VYHLÁSENIE O ZHODE Yamaha Music Europe GmbH týmto vyhlasuje že rádiové zariadenie typu R N803D je v súlade so smernicou 2014 53 EÚ Úplné EÚ vyhlásenie o zhode je k dispozícii na tejto internetovej adrese https europe yamaha com en support compliance doc html SL Slovenian POENOSTAVLJENA IZJAVA EU O SKLADNOSTI Yamaha Music Europe GmbH potrjuje da je tip radijske op...

Page 75: ...ed 06 2017 AM A0 2017 Yamaha Corporation Manual Development Group Yamaha Downloads http download yamaha com Yamaha Global Site https www yamaha com AV16 0039 10 1 Nakazawa cho Naka ku Hamamatsu 430 8650 Japan ...

Reviews: