background image

82

 PSR-S950/S750 Owner’s Manual

8

Microphone

– Adding Vocal Harmony Effects to Your Singing –

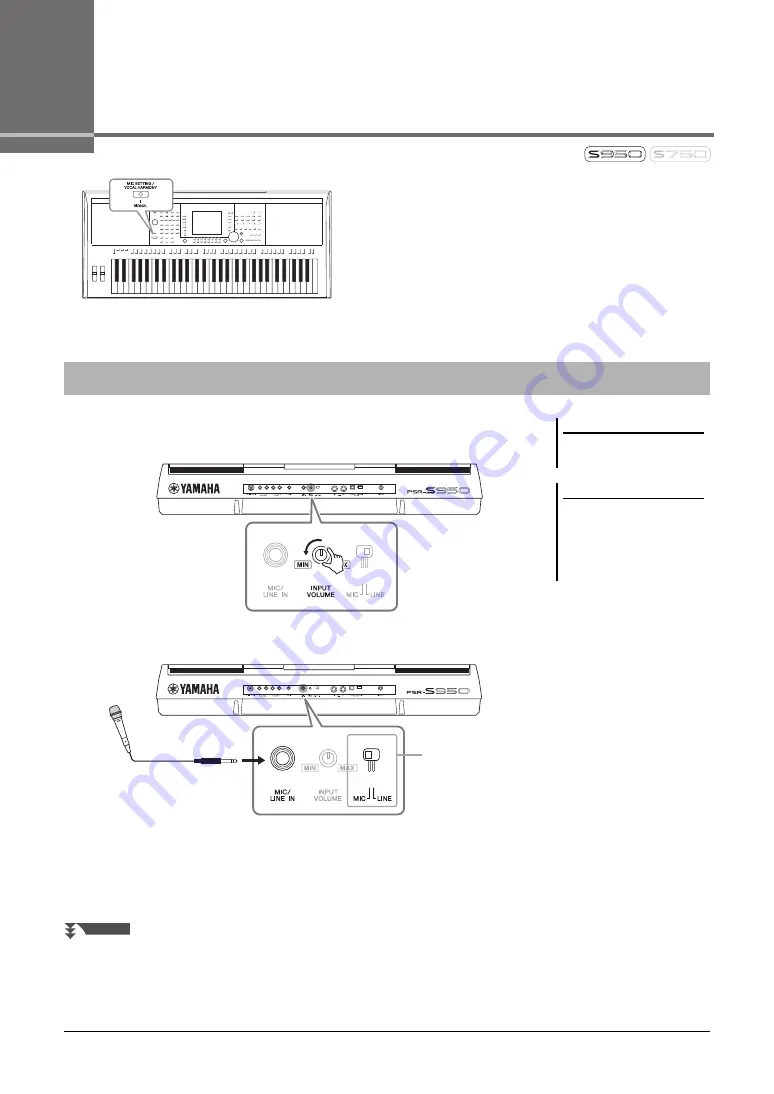
By connecting a microphone to the [MIC/LINE IN] jack (standard 
1/4” phone jack), you can enjoy singing along with your keyboard 
performance or with Song playback. The instrument outputs your 
vocals through the built-in speakers. Moreover, you can 
automatically apply various Vocal Harmony effects to your voice 
as you sing.

1

Before turning on the power of the instrument, set the [INPUT 
VOLUME] knob to the minimum position.

2

Connect the microphone to the [MIC/LINE IN] jack.

3

Set the [LINE MIC] switch to “MIC.”

4

Turn on the power of the instrument.

Connecting a Microphone

NOTE

Make sure you have a conventional 
dynamic microphone.

NOTE

Always set the [INPUT VOLUME] knob 
to minimum when nothing is con-
nected to the [MIC/LINE IN] jack. 
Since the [MIC/LINE IN] jack is highly 
sensitive, it may pick up and produce 
noise even when nothing is connected.

3

NEXT PAGE

Summary of Contents for PSR-S950

Page 1: ...t lisez attentivement la section PR CAUTIONS D USAGE aux pages 4 et 5 Thank you for purchasing this Yamaha Digital Workstation We recommend that you read this manual carefully so that you can fully ta...

Page 2: ...on Score 56 Displaying Lyrics Text 57 Turning Song Channels On Off 57 Practicing the Right hand Part with Guide Functions 58 Repeat Playback 59 Recording Your Performance 60 4 USB Audio Playback and R...

Page 3: ...ow a function or effect works when the unit is operating as designed are not covered by the manufacturer s warranty and are therefore the owners responsibility Please study this manual carefully and c...

Page 4: ...spected by Yamaha service personnel The power cord or plug becomes frayed or damaged It emits unusual smells or smoke Some object has been dropped into the instrument There is a sudden loss of sound d...

Page 5: ...cleaning fluids or chemical impregnated wiping cloths Saving data The edited Songs Styles Voices Multi Pads and MIDI settings are lost when you turn off the power of the instrument without saving Save...

Page 6: ...ffects The Yamaha XF format enhances the SMF Standard MIDI File standard with greater functionality and open ended expand ability for the future This instrument is capable of displaying lyrics when an...

Page 7: ...tory book To obtain these materials access the Yamaha Manual Library enter PSR S950 PSR S750 or MIDI Basics to the Model Name box then click SEARCH The illustrations and LCD screens as shown in this m...

Page 8: ...pop jazz Latin and various other music genres in the world and let the instrument be your backing band Play Along with Song Data Chapter 3 Songs Displaying Music Score page 56 While playing back a Son...

Page 9: ...cally produces backup vocal harmonies for lead vocals that you sing into a microphone You can even change the gender of the harmony voices for example letting you add female backup to your own male vo...

Page 10: ...MPO TEMPO buttons Page 47 Controls the tempo for Style Song and Metronome playback 8 TRANSPOSE buttons Page 38 Transposes the entire pitch of the instrument in semitone steps 9 METRONOME button Turns...

Page 11: ...ormance in audio format D USB button page 24 Calls up the display for selecting a file in the USB flash memory E VOICE CONTROL buttons Page 39 Applies various effects to the keyboard performance F MUS...

Page 12: ...onnecting a microphone or guitar 6 INPUT VOLUME knob PSR S950 page 83 For adjusting the input level of the MIC LINE IN jack 1 2 3 4 5 6 7 Air Vents NOTICE This instrument has special air vents in the...

Page 13: ...to a computer USB TO DEVICE terminal Page 92 For connecting a USB flash memory VIDEO OUT jack PSR S950 Page 90 For connecting to a television or video monitor 8 9 Using the Headphones Connect a pair o...

Page 14: ...ER VOLUME dial to adjust the volume to an appropriate level Turning the Power On and Playing the Keyboard WARNING Use the specified adaptor page 100 only The use of an incompatible adaptor may cause i...

Page 15: ...4 5 buttons to set the value If you do not want to turn the power off automatically disable the Auto Power Off select OFF CAUTION Even when the instrument is turned off electricity is still flowing t...

Page 16: ...F OWNER 2 Use the 4 5 buttons to select the desired language Disabling Auto Power Off simple method Turn the power on while holding down the lowest key C1 on the keyboard An Auto power off disabled me...

Page 17: ...atures and functions as well as sound demonstrations 1 Press the DEMO button to call up the Demo display 2 Press one of the A E and J buttons to show a specific Demo Pressing one of the F I buttons pl...

Page 18: ...1 Example 2 Display based Controls A E buttons see below F J buttons see below TAB E F buttons page 19 DIRECT ACCESS button page 21 DATA ENTRY dial and ENTER button page 20 1 8 buttons page 19 EXIT b...

Page 19: ...or down correspondingly for functions shown directly above them TAB E F buttons 1 8 buttons For menus that appear in this section of the display use the 1 8 buttons For menus that appear in this sect...

Page 20: ...the DATA ENTRY dial in tandem with the 1 8 buttons to adjust parameters indicated in the display This convenient technique also works well with pop up parameters such as Tempo and Transpose Simply pre...

Page 21: ...button 2 Press the button or move the wheel or connected pedal corresponding to the desired setting display to instantly call up that display For example pressing the GUIDE button calls up the displa...

Page 22: ...rent chord name will be displayed 4 Transpose Displays the amount of transposition in semitone units page 38 5 Upper Octave Displays the amount that the octave value is shifted page 38 6 Style name an...

Page 23: ...indication appears While recording REC appears Registration Sequence Indicates the sequence order of the Registration Memory page 79 numbers which can be called up via the TAB E F buttons or the pedal...

Page 24: ...es or Styles are also saved here in the Expan sion folder USB Location where data on USB flash memory is saved This appears only when USB flash memory is connected to the USB TO DEVICE terminal page 9...

Page 25: ...and your own original are saved as files NOTE The number of pages shown varies depending on the Selection display Closing the current folder and calling up the next highest level folder In the PRESET...

Page 26: ...data by using the TAB E F buttons 2 Press the 6 SAVE button The naming display is called up 3 Enter the file name page 30 Even if you skip this step you can rename the file at any time after saving it...

Page 27: ...tton The naming display for a new folder is called up 3 Input the name of the new folder see page 30 Creating a New Folder NOTE The maximum number of files folders which can be saved in a folder is 50...

Page 28: ...aste it them to another location folder You can also copy folders but not move them by using the same procedure 1 In the File Selection display select the appropriate tab USER or USB which contains th...

Page 29: ...ndividual or multiple files folders 1 In the File Selection display select the appropriate tab USER or USB which contains the file folder you want to delete by using the TAB E F buttons 2 Press the 5...

Page 30: ...ess the 7 DELETE button To delete all characters on the line at once press and hold the 7 DELETE button Entering marks or space 1 Press the 6 SYMBOL button to call up the mark list 2 Use the DATA ENTR...

Page 31: ...FUNCTION I UTILITY TAB E F OWNER 3 Press the D BACKUP button to save the data to the USB flash memory You can also back up a specified setting Call up the operation display FUNCTION I UTILITY TAB E F...

Page 32: ...t Voices For example press the STRINGS button to display various strings Voices Playing Preset Voices Selecting a Voice RIGHT 1 and playing the keyboard IMPORTANT For information on the keyboard parts...

Page 33: ...website NOTE You can call up the information for the selected Voice by pressing the 7 INFO button Some Voices do not have an information display To close the information display press the EXIT button...

Page 34: ...LEFT button to turn it on 3 Press one of the VOICE category selection buttons to call up the Voice Selection display for the Left part 4 Press one of the A J buttons to select the desired Voice 5 Pla...

Page 35: ...e Split Point are set for playing the RIGHT 1 and 2 parts You can confirm the currently selected part by checking which lamp of the PART SELECT buttons is lit To select the desired keyboard part press...

Page 36: ...rs The instrument will be restarted automatically 6 Press the EXPANSION USER button in the VOICE or STYLE category selection buttons to see if the Expansion Pack data has been installed successfully E...

Page 37: ...ly Song Style or Registration Memory containing Expansion Voices or Styles Song Style or Registration Memory containing any Expansion Voices or Styles will not sound properly or cannot be called up if...

Page 38: ...art in the Mixing Console display called up via MIXING CONSOLE TAB E F TUNE 1 3 TRANSPOSE Fine tuning the pitch of the entire instrument Although the entire pitch of this instrument is set to 440 0 Hz...

Page 39: ...to each of the keyboard part FUNCTION D CONTROLLER TAB E F KEYBOARD PANEL A B 2 MODULATION WHEEL You can apply some effects to the keyboard performance The effects can be turned on or off by using the...

Page 40: ...he DSP VARI button is used to change between variations of the DSP effect You could use this while you play for example to change the rotating speed slow fast of the rotary speaker effect Among the Vo...

Page 41: ...buttons Creating Your Original Organ Flutes Voices NOTE The term footage is a reference to the sound generation of traditional pipe organs in which the sound is pro duced by pipes of different length...

Page 42: ...t related settings Setting the touch sensitivity of the keyboard FUNCTION D CONTROLLER TAB E F KEY BOARD PANEL Selecting the Harmony Echo type FUNCTION G HARMONY ECHO Pitch related settings Fine tunin...

Page 43: ...f the A J buttons to select the desired Style Pressing one of the 1 4 buttons or pressing the same STYLE button again can call up the other display page 3 Press the ACMP button to turn on the Auto Acc...

Page 44: ...natural feel ambience and warmth to the drums and percussion of the Style giving your performance greater expressive potential Specifically it retains the subtle nuances and grooves that are difficul...

Page 45: ...ng types can be selected for example Single Finger This method lets you easily play chords in the accompaniment range of the keyboard using only one two or three fingers AI Full Keyboard Playing just...

Page 46: ...e Main section ENDING rit I III buttons The instrument features three different Ending sections to add an ending to your performance When you press one of the ENDING I III buttons while Style is playi...

Page 47: ...display you can also use the DATA ENTRY dial to adjust the value Pressing the TEMPO buttons simultaneously resets the tempo to the default value TAP TEMPO button During Style playback you can change...

Page 48: ...he selected Style will be shown in the display 3 Use the 2 3 buttons to select the desired panel setting Calling up Appropriate Panel Settings for the Current Style Repertoire We recommend that you im...

Page 49: ...n as you play a chord with your left hand the selected Style starts Each Style has four One Touch Setting setups Press other ONE TOUCH SETTING 1 4 buttons to try out other setups Calling up Appropriat...

Page 50: ...ou play for one or two measures 1 In the Style selection display page 43 press the 8 RECOMMEND button to call up the STYLE RECOMMENDER display The keyboard is divided by B1 key into two sections as be...

Page 51: ...be listed in the display 3 Select the desired Style from the list by using the 1 6 buttons Listen to the Styles by changing the sections page 47 playing the chord on the Piano section and adjusting th...

Page 52: ...e the basic parts of the Style containing the drum and percussion rhythm patterns BASS The bass part uses various appropriate instrument sounds to match the Style CHD1 2 Chord 1 2 These are rhythmic c...

Page 53: ...ole display you can adjust the volume for each Style part See page 87 Advanced Features Refer to the Reference Manual on the website Chapter 2 Selecting the Chord Fingering type FUNCTION C STYLE SETTI...

Page 54: ...Press the SONG SELECT button to call up the Song Selection display 2 Press the TAB E F buttons to select the location of the desired Song If you want to playback Song in the USB flash memory connect t...

Page 55: ...or H FF button once to move back forward one measure Hold the G REW or H FF button to scroll backward forward continuously Queuing the next Song for playback While a Song is playing back you can queue...

Page 56: ...score indicating the current position You can change the displayed notation style by using the 1 8 buttons For details refer to the Reference manual on the website NOTE Phrase Mark is a pre programme...

Page 57: ...you want to view the text file created on your computer press the 5 6 TEXT FILE button to select the desired text file then press the 1 TEXT button to display the selected file For more information a...

Page 58: ...dicator of the TR 1 button goes out You can now play that part by yourself 4 Press the SONG F K PLAY PAUSE button to start playback Practice the muted part while viewing the Score display After your p...

Page 59: ...is played back repeatedly 4 To stop playback press the SONG J STOP button The Song position will return to Point A 5 Press the REPEAT button to turn off Repeat playback Repeat Playback NOTE You can p...

Page 60: ...he Multi Track recording If you want to record on a USB flash memory read Connecting a USB Flash Memory page 92 then follow the instructions below after connecting the USB flash memory to the USB TO D...

Page 61: ...save the Song by using the TAB E F buttons 6 3 Press the 6 SAVE button The naming display is called up 6 4 Enter the file name page 30 6 5 Press the 8 OK button to save the file NOTE When recording w...

Page 62: ...button while holding down the REC button to set the channel 1 to REC Then use the C D buttons to select RIGHT 1 in step 3 3 Use the C D buttons to assign the desired part for the channel to be record...

Page 63: ...Save opera tion press the 8 CANCEL but ton Advanced Features Refer to the Reference Manual on the website Chapter 3 Editing Music Notation settings SCORE 1 8 buttons Editing Lyrics Text display settin...

Page 64: ...DEVICE terminal 2 Press the USB AUDIO PLAYER button to call up the USB AUDIO PLAYER display 3 Press the H FILE button to display the audio files saved to the connected USB flash memory Playing Back Au...

Page 65: ...file you want to listen to 5 Press the 8 AUDIO PLAY button to start playback The display automatically returns to the USB AUDIO PLAYER display 6 To stop playback press the 2 STOP button 5 5 NOTICE Nev...

Page 66: ...w play back repeatedly 3 To cancel Repeat playback press the C button again Repeat Playback mode via the D REPEAT MODE button OFF Plays through the selected file then stops SINGLE Plays through the se...

Page 67: ...to 140 Time Stretch cannot be applied to MP3 files of 48 0 kHz sample rate 8 PITCH SHIFT Shifts the key in semitones NOTE Pitch Shift cannot be applied to MP3 files of 48 0 kHz sample rate H VOCAL CA...

Page 68: ...file of the recorded performance in the File Selection display press the H FILE button NOTE The USB flash memory of USB1 is selected as the recording destination when multiple USB flash memories are...

Page 69: ...AD CONTROL SELECT button repeatedly then use the A J buttons to select the desired bank 2 Press any of the MULTI PAD CONTROL 1 4 buttons to play a Multi Pad phrase The corresponding phrase in this cas...

Page 70: ...imultaneously If you execute step 1 during playback of Style or Song To start playback of the corresponding Pad at the top of the next bar press any note when ACMP is off or play a chord with your lef...

Page 71: ...WAVE file by using the A J buttons To confirm the information of the selected WAVE file Press the 7 INFO button to call up the information window You can confirm the information file name title name t...

Page 72: ...Pad to which the WAVE file is assigned by selecting them in the USER or USB page of the Multi Pad Bank Selection display Although you can play via the same operations in page 69 note the following lim...

Page 73: ...ites all your records panel settings Song audio and Style files shown in the MUSIC FINDER display Make sure that all important data has been saved to the USER or USB in the File Section display as des...

Page 74: ...ch corresponds to the file to display the message for selecting REPLACE APPEND of the panel settings 7 Press the F REPLACE button to delete all records currently in the instrument and replace them wit...

Page 75: ...el settings Sorting the records Press the F SORT BY button to sort the records by MUSIC STYLE BEAT and TEMPO Press the G SORT ORDER button to change the order of the records ascending or descending Wh...

Page 76: ...me Pressing the A button calls up the pop up window to enter the song name To clear the entered Music press the F CLEAR button B KEYWORD Searches by keyword Pressing the B button calls up the pop up w...

Page 77: ...red file For audio files 1 1 Press the USB AUDIO PLAYER button to call up the USB AUDIO PLAYER display 1 2 Press the H FILE button to display audio files in the connected USB flash memory 2 Press the...

Page 78: ...s the J F PLAY button in the MUSIC FINDER display after selecting the AUDIO record You can stop playback by pressing the J J STOP button in the MUSIC FINDER display To play a Style start playing chord...

Page 79: ...le 1 Set up the panel controls such as Voice Style effects and so on as desired 2 Press the MEMORY button in the REGISTRATION MEMORY section The display for selecting the items to be registered appear...

Page 80: ...Registration Bank Selection Display 2 Press the 6 SAVE button to save the Bank file For instructions on saving refer to page 26 NOTICE If you select the button whose lamp is lit in red or green here t...

Page 81: ...tion You can call up the information display to confirm which Voices and Style are memorized to the 1 8 buttons of a Registration Memory Bank 1 Simultaneously press the REGIST BANK and buttons to call...

Page 82: ...armony effects to your voice as you sing 1 Before turning on the power of the instrument set the INPUT VOLUME knob to the minimum position 2 Connect the microphone to the MIC LINE IN jack 3 Set the LI...

Page 83: ...sound page 53 This section covers the Vocal Harmony Effects that can be applied to your voice via the microphone connected in the previous instructions 1 Press the MIC SETTING VOCAL HARMONY button to...

Page 84: ...ed by the chords you play in the chord section with ACMP turned on the left hand section with ACMP turned off and LEFT turned on or the chord data of a Song Microphone with FX The harmony notes are de...

Page 85: ...Vocoder Mono the effect is only applied to a single note last note played Using the Talk function Turning the Talk function on by pressing the G TALK button in the Mic Setting display lets you tempora...

Page 86: ...2 Press the MIXING CONSOLE button repeatedly to call up the MIXING CONSOLE display for the relevant parts The part name is indicated at the top of the display Basic Procedure 3 NOTE You can switch bet...

Page 87: ...ings Register them to Registration Memory page 79 To save the STYLE display settings Save them as Style data 1 Call up the operation display FUNCTION F DIGITAL REC MENU B STYLE CREATOR 2 Press the EXI...

Page 88: ...t MIC or LINE IN depending on the connected equipment When the output level of the connected equipment such as a microphone guitar bass is low set the MIC LINE switch to MIC When the output level of t...

Page 89: ...off Other wise damage to the instrument and external device may occur Because this instrument s power may automatically be turned off due to the Auto Power Off func tion page 15 turn off the power to...

Page 90: ...VIDEO IN VIDEO OUT Video cable Screen Out Settings 1 2 MONITOR TYPE Selects the desired output monitor type NTSC or PAL to correspond to the standard used by your video equipment NOTE The instrument...

Page 91: ...nctions by pedal Example Controlling Song Start Stop by footswitch Connect a footswitch FC4 or FC5 to one of the FOOT PEDAL jacks To assign the function to the connected pedal select SONG PLAY PAUSE i...

Page 92: ...ource and the power must be on Only one USB hub can be used If an error message appears while using the USB hub disconnect the hub from the instrument then turn on the power of the instrument and re c...

Page 93: ...ated Operations on the Yamaha website page 7 Formatting a USB Flash Memory NOTICE The format operation deletes any previously existing data Make sure that the USB flash memory you are formatting does...

Page 94: ...For detailed information about the instrument s MIDI settings refer to the Reference Manual Connecting External MIDI Devices MIDI IN OUT terminals MIDI IN MIDI OUT MIDI transmit MIDI receive playback...

Page 95: ...Off CONFIG 2 General settings such as displayed items for Voice Style selection display pop up display time etc SCREEN OUT PSR S950 Monitor type and display content settings which are necessary when c...

Page 96: ...change them accordingly referring to the Reference Manual Not all simultaneously played notes sound You are probably exceeding the maximum polyphony page 99 of the instrument When the maximum polypho...

Page 97: ...ted If the size of the Style data is large about 120 KB or greater the Style cannot be selected because the data is too large to be han dled by the instrument Song Songs cannot be selected This may be...

Page 98: ...e original sound In the case of Song playback you can restore the original sound by returning to the beginning of the Song and playing back from that point In the case of Style play you can restore th...

Page 99: ...t 1 Right 2 Left Styles Preset Number of Styles 408 325 Featured Styles 25 Audio 1 FreePlay 350 Pro 32 Session 295 Pro 30 Session Fingering Single Finger Fingered Fingered On Bass Multi Finger AI Fing...

Page 100: ...Settings 60 Vocal Effect 23 Storage Internal Memory approx 6 7 MB approx 1 9 MB Internal Memory for Expansion Pack approx 64 MB External Drives USB Flash Memory etc via USB TO DEVICE Connections DC IN...

Page 101: ...Contrast 16 COPY File 28 CUT File 28 D Data List 7 DELETE Delete 29 Demo 17 33 Direct Access 21 Drum Voice 32 DSP 40 E EDIT Vocal Harmony 85 EFFECT 39 87 EFFECT EQ 42 Ending section 46 EQ 87 Expansio...

Page 102: ...nual 7 REGIST BANK 80 Registration Memory 80 REGISTRATION SEQUENCE 81 Repeat 59 66 REPERTOIRE 48 RESTORE 31 Rewind 55 RHY1 2 Style Channel 52 Right 1 2 parts 32 33 35 ROTARY SP SPEED 41 S S Art Super...

Page 103: ...PSR S950 S750 Owner s Manual 103 Index...

Page 104: ......

Page 105: ...municipalit votre service de traitement des d chets ou le point de vente o vous avez achet les produits Pour les professionnels dans l Union Europ enne Si vous souhaitez vous d barrasser des d chets d...

Page 106: ...ange the lead in to co axial type cable If these corrective measures do not produce satisfactory results please contact the local retailer authorized to distribute this type of product If you can not...

Page 107: ...ments will cause this warranty to be void This warranty covers only the Original Owner and is not transferable In Order to Obtain Warranty Service Warranty service will only be provided for defective...

Page 108: ...ppos Nakas S A The Music House 147 Skiathou Street 112 55 Athens Greece Tel 01 228 2160 SWEDEN Yamaha Music Europe GmbH Germany filial Scandinavia J A Wettergrens Gata 1 Box 30053 S 400 43 G teborg Sw...

Page 109: ...PSR S950 S750 Owner s Manual 109...

Page 110: ...ZA70190 U R G Digital Musical Instruments Division 2012 Yamaha Corporation 205POZC 01A0 Printed in Indonesia Yamaha Global Site http www yamaha com Yamaha Manual Library http www yamaha co jp manual...

Reviews: