background image

PSR-S975/S775 Reference Manual

111

9

Mixing Con

s

ole

Equalizer (also called “EQ”) is a sound processor that divides the frequency spectrum into multiple bands 
that can be boosted or cut as required to tailor the overall frequency response. 
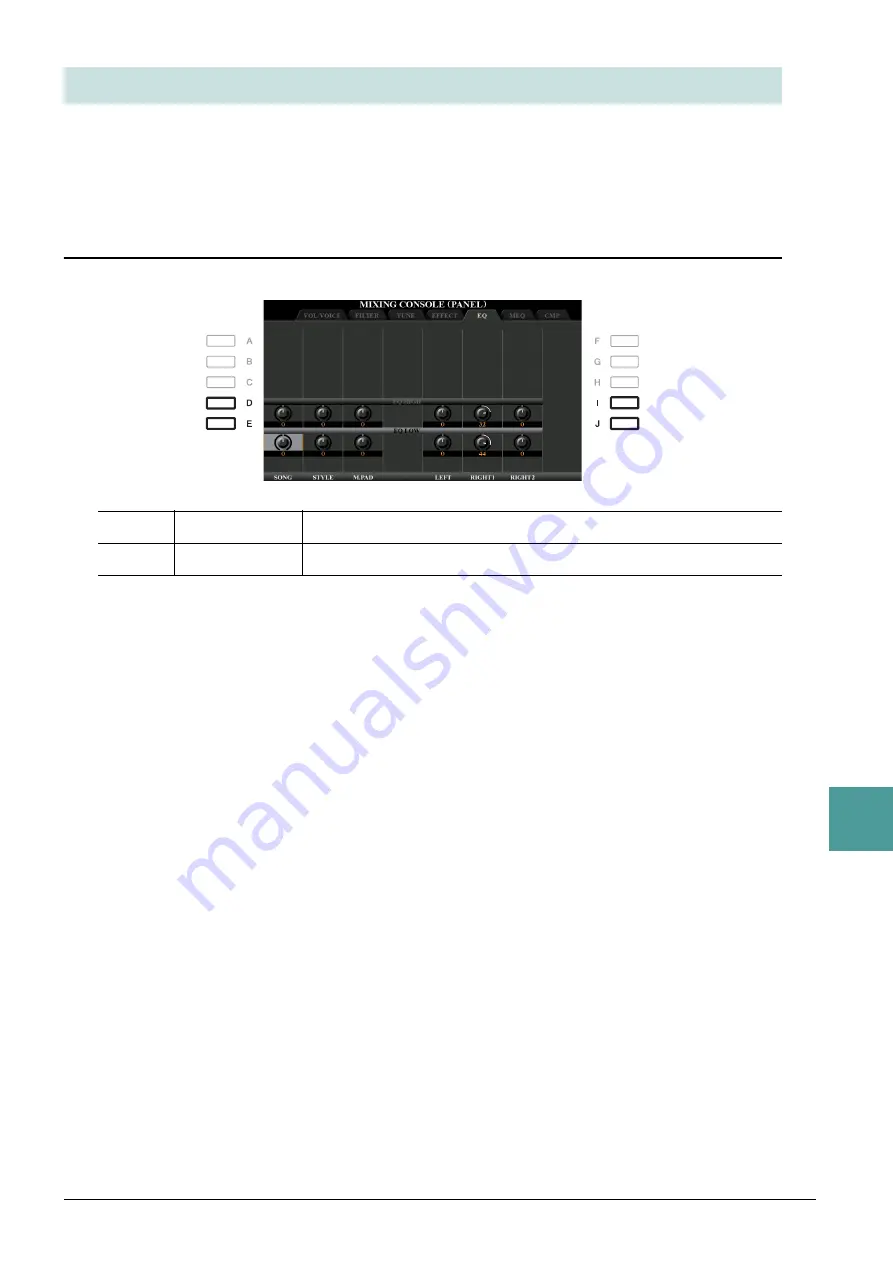
The “EQ” page lets you adjust the EQ for each corresponding part, while the “MEQ” page lets you make 
overall EQ adjustments for the entire instrument.

Editing Part EQ Parameters

Editing EQ Parameters

[D]/[I]

EQ HIGH

Boosts or attenuates the high EQ band for each part.

[E]/[J]

EQ LOW

Boosts or attenuates the low EQ band for each part.

Summary of Contents for PSR-S775

Page 1: ...EN This Reference Manual explains advanced features of the PSR S975 S775 Please read the Owner s Manual first before reading this Reference Manual Reference Manual Digital Workstation ...

Page 2: ...sole 104 Editing VOL VOICE Parameters 104 Editing FILTER Parameters 105 Editing TUNE Parameters 106 Editing EFFECT Parameters 107 Editing EQ Parameters 111 Editing Master Compressor CMP Parameters 113 Block Diagram 115 10 Connections 116 Footswitch Foot Controller Settings 116 MIDI Settings 120 Connecting with an iPhone iPad via Wireless LAN 126 11 Other Functions 128 UTILITY 128 SYSTEM 132 Index ...

Page 3: ...rformance advantages are described below Voice Types Characteristics S Art Super Articulation These Voices provide many benefits with great playability and expressive con trol in real time For example with the Saxophone Voice if you play a C and then a D in a very legato way you will hear the note change seamlessly as though a saxophone player played it in a single breath Similarly with the Concer...

Page 4: ...fer to the Drum SFX Kit List in the Data List on the website Live SFX These are various high quality special effect sounds and percussion sounds that take full advantage of Stereo Sampling and Dynamic sampling Organ Flutes This authentic organ Voice lets you use the Voice Set to adjust the various foot ages and craft your own original organ sounds See page 20 for details MegaVoice These Voices mak...

Page 5: ...ons other than the ORGAN FLUTES and EXPANSION USER buttons to call up the Voice Selection display 3 Press the 8 UP button to call up the Voice categories 4 Press the 2 P2 button to display page 2 5 Press the desired A J button to call up the Voice Selection display of GM XG Voices GM2 Voices etc NOTE You can find the Legacy folder in this display This folder contains previous Yamaha keyboards Voic...

Page 6: ...he A button to select 1 TOUCH RESPONSE 3 Use the 1 2 and 4 7 buttons to set the Touch Response Touch Response and Effect Related Settings 1 2 TOUCH Determines the Touch Response type HARD 2 Requires strong playing to produce high volume Best for play ers with a heavy touch HARD 1 Requires moderately strong playing for higher volume MEDIUM Standard Touch Response SOFT 1 Produces high volume with mo...

Page 7: ...armony Arpeggio notes generated by the Harmony Arpeggio function NOTE When you are using certain Voices such as Organ Voices in which the TOUCH SENSE DEPTH is set to 0 in the VOICE SET display page 16 the volume does not change 4 5 ASSIGN Determines the keyboard part to which the effect is assigned AUTO Applies the effect to the part RIGHT 1 2 for which PART ON OFF is on If the Harmony Echo catego...

Page 8: ...CHORD NOTE ONLY This parameter is only available when the Harmony category is selected When this is set to ON the Harmony effect is applied only to the note played in the right hand section of the keyboard that belongs to a chord played in the chord section of the keyboard 8 TOUCH LIMIT It determines the lowest velocity value at which the Harmony Echo Tremolo or Trill note will sound This allows y...

Page 9: ...y used tuning in music today PURE MAJOR PURE MINOR These tunings preserve the pure mathematical intervals of each scale especially for triad chords root third fifth You can hear this best in actual vocal harmonies such as choirs and a cappella singing PYTHAGOREAN This scale was devised by the famous Greek philosopher and is created from a series of perfect fifths which are collapsed into a single ...

Page 10: ...ermines the base note for each scale When the base note is changed the pitch of the keyboard is transposed yet maintains the original pitch relationship between the notes 3 4 TUNE Select the desired note to be tuned by using the 3 buttons and tune it in cents by using the 4 buttons NOTE In musical terms a cent is 1 100th of a semitone 100 cents equal one semitone 5 8 PART SELECT Determines whether...

Page 11: ... 4 buttons for knob 1 and the 5 7 buttons for knob 2 to select the functions to be assigned For information on available functions see pages 12 14 5 Press the EXIT button to close the PARAMETER ASSIGN window 6 If necessary repeat steps 2 5 to change the functions for other numbers NOTE The settings here are maintained even when you turn off the power NOTE The settings here can be saved to a Regist...

Page 12: ...oice Effect Rev Cho R1 Adjusts both the Reverb depth and Chorus depth for the RIGHT 1 or 2 part Rotating the knob to the right makes it deeper Voice Effect Rev Cho R2 Voice Balance R1 R2 Adjusts the volume balance between the RIGHT 1 and 2 parts Rotating the knob to the left increases the RIGHT 1 volume while rotating it to the right increases the RIGHT 2 volume Voice Arp Velocity Adjusts the volu...

Page 13: ...s the Reverb depth for the microphone or the guitar input sound Rotating the knob to the right makes it deeper MIC Gt Effect Chorus Adjusts the Chorus depth for the microphone or the guitar input sound Rotating the knob to the right makes it deeper MIC Gt Effect DSP Adjusts the DSP effect depth for the microphone or the guitar input sound Rotating the knob to the right makes it deeper NOTE Dependi...

Page 14: ...dio Player and input from the AUX IN jack Rotating the knob to the left increases the MIDI volume while rotating it to the right increases the Audio volume Filter Voice Style Adjusts the cutoff frequency of the filter and the resonance for all key board parts and the Style to change the timbre or tone of the sound Reverb Voice Style Adjusts the Reverb depth for all keyboard parts and the Style Rot...

Page 15: ...ll up the VOICE SET display 3 Use the TAB E F buttons to call up the relevant setting page For information on the available parameters in each page see the Editable Parameters in the VOICE SET Displays on page 16 4 As necessary use the A B buttons to select the item parameter to be edited and edit the Voice by using the 1 8 buttons By pressing the D COMPARE button you can compare the sound of the ...

Page 16: ...of decaying sounds such as a guitar when they are played with legato with the edited Voice set to MONO above When NORMAL is selected the next note sounds after the previous note is stopped When LEGATO is selected the sound of the previously played note is maintained and only the pitch changes to that of the next note NOTE This parameter is unavailable for Super Articulation Voices Organ Flute Voic...

Page 17: ...Cutoff Frequency For details about the filter see below 3 AMPLITUDE Determines the degree to which the MODULATION wheel modulates the amplitude volume 5 LFO PMOD Determines the degree to which the MODULATION wheel modulates the pitch or the vibrato effect 6 LFO FMOD Determines the degree to which the MODULATION wheel modulates the Filter modulation or the wah effect 7 LFO AMOD Determines the degre...

Page 18: ...ow quickly the sound decays to silence after the key is released The lower the value the quicker the decay 6 DEPTH Determines the intensity of the Vibrato effect Higher settings result in a more pronounced Vibrato 7 SPEED Determines the speed of the Vibrato effect 8 DELAY Determines the amount of time that elapses between the playing of a key and the start of the Vibrato effect Higher settings inc...

Page 19: ... you can also disable this feature by the operation in the relevant display as explained below For example if you want to change the Voice yet keep the same effect set the EFFECT parameter to OFF in the display explained below 1 Call up the operation display FUNCTION TAB E MENU 1 F VOICE SET FILTER 2 Use the A B buttons to select a keyboard part 1 2 CATEGORY Selects the DSP effect category and typ...

Page 20: ...ay 3 Use the TAB E F buttons to call up the relevant setting page FOOTAGE VOLUME ATTACK or EFFECT EQ For information on the available parameters in each page see pages 20 21 4 Edit the Organ Flutes Voice 5 Press the I PRESET button to call up the Organ Flutes Voice Selection display 6 Save your edited Voice For instructions on the Save operation refer to Basic Operations in the Owner s Manual NOTI...

Page 21: ... controlled by the Vibrato On Off F G buttons and Vibrato Depth H button 4 MODE The MODE control selects between two modes FIRST and EACH In the FIRST mode attack percussive sound is applied only to the first notes played and held simultaneously while the first notes are held any subse quently played notes have no attack applied In the EACH mode attack is applied equally to all notes 5 7 4 2 2 3 2...

Page 22: ...ired Pack Installation file ppi or cpi is saved to the USB TO DEVICE terminal 2 Call up the operation display FUNCTION TAB F MENU 2 F PACK INSTALLATION 3 Use the A J buttons to select the desired Pack Installation file 4 Press the 6 INSTALL button 5 Follow the on display instructions This installs the selected Pack data to the Expansion folder in the USER drive Uninstalling the Expansion Pack data...

Page 23: ...the accompanying manual 1 Connect the USB flash memory to the USB TO DEVICE terminal NOTE Before using a USB flash drive be sure to read Connecting USB Devices in the Owner s Manual chapter 10 2 Call up the operation display FUNCTION TAB F MENU 2 G SYSTEM TAB E OWNER 3 Press the D EXPORT INSTRUMENT INFO button 4 Follow the on display instructions This saves the Instrument Info file to the root dir...

Page 24: ...rd changes and colorful harmonies are instantly transformed into lifelike musical accompaniment Session These Styles provide even greater realism and authentic backing by mixing in original chord types and changes as well as special riffs with chord changes with the Main sections These have been pro grammed to add spice and a professional touch to your performances of certain songs and in certain ...

Page 25: ... lowest note played in the Chord section of the keyboard is used as the bass note allowing you to play on bass chords In the Fingered type the root of the chord is always used as the bass note FULL KEYBOARD Detects chords in the entire key range Chords are detected in a way similar to Fingered even if you split the notes between your left and right hands for example playing a bass note with your l...

Page 26: ...3 5 b7 Cm7 Minor seventh flatted fifth m7b5 1 b3 b5 b7 Cm7 b5 Minor add ninth m 9 1 2 b3 5 Cm add9 Minor seventh ninth m7 9 1 2 b3 5 b7 Cm7 9 Minor seventh eleventh m7 11 1 2 b3 4 5 b7 Cm7 11 Minor major seventh flatted fifth mM7b5 1 b3 b5 7 CmM7 b5 Minor major seventh mM7 1 b3 5 7 CmM7 Minor major seventh ninth mM7 9 1 2 b3 5 7 CmM7 9 Diminished dim 1 b3 b5 Cdim Diminished seventh dim7 1 b3 b5 6 ...

Page 27: ... with the Style stopped and still hear the accompaniment chord In this condition called Stop Accompaniment any valid chord fingerings are recognized and the chord root type are shown in the display Here you can determine whether the chord played in the chord section will sound or not in the Stop Accom paniment status OFF The chord played in the chord section will not sound STYLE The chord played i...

Page 28: ...when select ing different Styles when Style playback is stopped When set to OFF and Style playback is stopped the active section is maintained even if the different Style is selected When any of the MAIN A D sections is not included in the Style data the nearest section is automatically selected For example when MAIN D is not contained in the selected Style MAIN C will be called up 7 TEMPO This de...

Page 29: ...ress one of the ONE TOUCH SETTING 1 4 buttons to which you wish to memorize your panel settings A message appears If you are sure you want to memorize the current settings to the selected button press the F YES button If you want to change the settings press the G NO button then repeat steps 2 4 as necessary NOTE For ONE TOUCH SETTING buttons to which your original panel settings have not been mem...

Page 30: ... Section select the pattern length via the 5 6 buttons After selecting press the D EXECUTE button to actually enter the specified length Note that if an Audio Style is selected as the basic data PSR S975 changing the pattern length deletes the corresponding Audio part For the entire current Style use the A B buttons to select 2 TEMPO BEAT then set the Tempo via the 3 4 buttons and the Time Signatu...

Page 31: ...6 pages Lets you change the rhythmic feel quantizing and velocity etc Editing the SFF parameters on the PARAMETER page page 41 Lets you edit the SFF Style File Format related parameters of the already recorded channels Editing the rhythm part on the BASIC page by using the Drum Setup function page 46 Lets you edit the rhythm part of the Style such as changing the sounds of the individual instrumen...

Page 32: ...sting data Realtime Recording Characteristics in the Style Creator Loop Recording Style playback repeats the rhythm patterns of several measures in a loop and Style recording is also done using loops For example if you start recording with a two measure MAIN section the two measures are repeatedly recorded Notes that you record will play back from the next repetition loop letting you record while ...

Page 33: ...5 turn the Audio part on or off via the H button If necessary you can delete channel data While holding down the J DELETE button press one of the 1 8 desired channel buttons 4 As soon as loop playback returns to the first beat in the first measure start playing the rhythm pattern to be recorded If the rhythm is difficult to play in real time break it up into individual parts and play each separate...

Page 34: ... a phrase in CM7 for playing appropriate notes while chords change during performance Rules when recording a Main or Fill With the default initial settings the Source Root Chord page 42 is set to CM7 This means that you should record a Source Pattern using a CM7 scale which will change according to the chords you specify during normal performance Record a bass line phrase or chord backing which yo...

Page 35: ... 1 8 desired channel buttons 4 As soon as loop playback returns to the first beat in the first measure start playing the bass line chord backing or phrase to be recorded 5 Press the START STOP button to stop playback If you want to add more notes press the START STOP button again to continue recording To hear the playback sound of the already recorded channels with another Source Root Chord 1 Use ...

Page 36: ... It cannot be set on the EDIT page Unlike in Song Creator Chord and Lyrics data cannot be entered This is because such data is not necessary for Style playback For instructions on Step Recording refer to pages 59 62 For information on the EDIT page called as Event List display in Song Creator refer to page 72 Style Assembly ASSEMBLY This allows you to copy channel data as a Source Pattern from ano...

Page 37: ... CON TROL START STOP button to play back the Style 4 As desired repeat step 3 for another channel NOTICE The created Style will be lost if you change to another Style or turn off the power to the instrument without carrying out the Save operation step 7 on page 31 Playing the Style During Style Assembly You can play back the Style while you are assembling a Style and the playback method can be sel...

Page 38: ...ple when ORIGI NAL BEAT is set to 8 BEAT and BEAT CONVERTER is set to 12 all 8th notes in the section are shifted to 8th note triplet timing The 16A and 16B Beat Converter which appear when ORIGINAL BEAT is set to 12 BEAT are variations on a basic 16th note setting 5 6 SWING Produces a swing feel by shifting the timing of the back beats depend ing on the ORIGINAL BEAT parameter above For example i...

Page 39: ...done NOTICE The edited Style will be lost if you change to another Style or turn off the power to the instrument without carrying out the Save operation step 7 on page 31 1 2 CHANNEL Selects the desired channel part to which Dynamics is to be applied The selected channel is shown at the upper left of the display 3 4 ACCENT TYPE Determines the type of accent applied in other words which notes in th...

Page 40: ...within the selected channel 5 REMOVE EVENT This function lets you remove specific events from the selected channel 2 Use the 1 2 CHANNEL buttons to select the channel to be edited The selected channel is shown at the upper left of the display 3 Use the 4 8 buttons to edit the data 4 Press the D EXECUTE button to actually enter the edits for each display After the operation is completed this button...

Page 41: ...eated on this instrument can be played back only on instruments which are compatible with SFF GE 1 In the PARAMETER page use the A B buttons to select the edit menu For details of the edit menu see page 42 Set these parameters before recording Set these parameters after recording Source Pattern settings Source Root Source Chord Determines what key and what chord type are used for playing Note Conv...

Page 42: ... should set these parameters which determine what key is used for playing when you record the Source Pattern to the Bass Chord Pad or Phrase channel If you set this to Fm7 your recorded original phrase Source Pattern will be triggered by specifying Fm7 during normal performance CM7 Source Chord Root C and Source Chord Type M7 is set by default Depending on the settings here the playable notes chor...

Page 43: ... that contain melody lines ROOT FIXED The note is kept as close as possible to the previ ous note range For example the notes C3 E3 and G3 in the key of C become C3 F3 and A3 when they are transposed to F Use this setting for chan nels that contain chord parts GUITAR This is exclusively for transposing guitar accompaniment Notes are trans posed to approximate the chords played with natural guitar ...

Page 44: ...nged Use this for chord channels of Sections which respond only to major minor chords such as in Intros and Endings NATURAL MINOR 5th In addition to the Natural Minor transposition above augmented and dimin ished chords affect the 5th note of the Source pattern DORIAN When the played chord changes from a major to a minor chord this table lowers the third and seventh intervals in the scale by a sem...

Page 45: ...ious setting of this range you can ensure that the Voices sound as realistic as possible in other words that no notes outside the natural range are sounded e g high bass sounds or low pic colo sounds 7 NOTE LIMIT HIGH STOP The notes stop sounding PITCH SHIFT The pitch of the note will bend without a new attack to match the type of the new chord PITCH SHIFT TO ROOT The pitch of the note will bend w...

Page 46: ...ounds are set to that of the current section in order to use the Drum Setup function 2 Press the G DRUM SETUP button to call up the DRUM SETUP window 3 If necessary press the STYLE CONTROL START STOP button to start playback of the rhythm part The sounds played back are indicated on the display keyboard letting you to check the note to edit 4 Use the 1 2 NOTE buttons to select the note to edit NOT...

Page 47: ...nd at the same time Pan Determines the stereo position Reverb Send For adjusting the reverb depth Chorus Send For adjusting the chorus depth Variation Send For adjusting the variation effect DSP1 depth When the Connection parameter is set to Insertion on the Mixing Console dis play and this rhythm channel is selected as the assign part this parameter affects as below When Variation Send is set to ...

Page 48: ...s the emphasis given to the cutoff frequency resonance set in Filter Cutoff above Higher values result in a more pronounced effect EG Attack Determines how quickly the sound reaches its maximum level after the key is played The higher the value the quicker the attack EG Decay 1 Determines how quickly the sound reaches its sustain level a slightly lower level than maximum The higher the value the q...

Page 49: ... Position of the Song 65 Re recording a Specific Section Punch In Out 66 Editing Channel Events of Existing Song Data 69 Editing Chord Events Notes System Exclusive Events and Lyrics 72 To view the music notation of the selected Song press the SCORE button You can change the Score display as desired to suit your personal preferences The settings here are maintained even when the power is turned of...

Page 50: ...sing these buttons can display the Pedal events instead of displaying Lyrics 5 NOTE ON OFF Enables disables display of the note name pitch The note name is indicated at the left of the note When the space between the notes is too small the indication may be moved to the top left of the note When the Song contains Fingering events pressing these buttons can display the fingering instead of displayi...

Page 51: ...e notation from among the following three types The settings here are available when the NOTE ON OFF parameter above is set to ON A B C Note names are indicated as letters C D E F G A B Fixed DO Note names are indicated in solfeggio with the note of C fixed to DO The notes C D E F G A B are always indicated as Do Re Mi Fa So La Ti when the language is set to English Note that the note name indicat...

Page 52: ... results in no text file being selected If you want to restore the text indication select the text file again via the 5 6 buttons 3 4 FIXED 16 28 PROPORTIONAL 16 28 only when a text file is selected Determines the text type fixed or proportional and font size Fixed is suitable for displaying lyrics with chord names since the positions of chord names are fixed to the corresponding lyrics Proportion...

Page 53: ...button to turn on the auto accompaniment function then press the SYNC START button to enable synchronized start of the accompaniment 5 Press the STYLE CONTROL START STOP button or play chords in the chord section The Song and Style starts playing When you play chords pressing the SCORE button and turning CHORD on page 49 allows you to see the chord information NOTE When playing back a Song and a S...

Page 54: ...veral measures each in the Song When this is set to ON the section corresponding to the Phrase Mark specified via the SONG G REW and H FF buttons is played back repeatedly Note that this parameter can be set only when the Song playback is stopped 2 3 TRACK 2 These parameters determine which MIDI channel in the Song data is assigned to the left or right hand part of the Guide function and the Song ...

Page 55: ...yback JUMP Pressing H button once instantly sets the playback position to the next measure without sounding Holding H button scrolls for ward continuously SCRUB Pressing and holding H plays and sounds the Song at high speed 2 3 LYRICS LANGUAGE Determines the language displayed in the Lyrics display AUTO When the language is specified in the Song data the lyrics are displayed accordingly When the l...

Page 56: ...ly play a key on the keyboard in time with the music and Song playback continues Your Tempo The same as Follow Lights except that Song playback matches the speed at which you play Guide mode for singing Karao Key This function lets you control the Song playback timing with just one finger while you sing along This is useful for singing to your own performance Song playback pauses waiting for you t...

Page 57: ... chord type After stopping playback go to the next step 2 Call up the operation display FUNCTION TAB E MENU 1 H SONG SETTING TAB F OTHERS 3 Use the 6 7 buttons to turn P A T performance assistant technology on 4 Press the SONG F K PLAY PAUSE button to start playback 5 Play the keyboard Along with Song playback try playing the bass line with the left hand area while playing various phrases or chord...

Page 58: ...E For re recording a Song See page 66 SETUP For selecting the panel setups to be recorded to the top position of the Song See page 65 CHANNEL For editing Channel events See page 69 Creating Editing Songs Song Creator Channel 1 Song Channel 2 Channel 3 Channel 4 Channel 5 Channel 6 Channel 7 Channel 8 Channel 9 Channel 10 Channel 11 Channel 12 Channel 13 Channel 14 Channel 15 Channel 16 System Excl...

Page 59: ...lodies Step Recording 1 Press the SONG REC and SONG J STOP buttons simultaneously A blank Song New Song is called up for recording 2 Call up the operation display FUNCTION TAB F MENU 2 B SONG CREATOR TAB E F 1 16 3 Press the F button to select the channel for recording 4 Press the G STEP REC button to call up the STEP RECORD display 5 Start Step Recording by using the A J buttons and 1 8 buttons a...

Page 60: ...ocity loudness of the note to be entered The velocity value can be specified within a range from 1 to 127 The higher the velocity value the louder the actual sound KBD VEL Actual resulting velocity fff 127 ff 111 f 95 mf 79 mp 63 p 47 pp 31 ppp 15 H Determines the gate time actual length of the note to be entered Normal 80 Tenuto 99 Staccato 40 Staccatissimo 20 Manual The gate time can be set to a...

Page 61: ...to select Tenuto 1 3 Press the I button to select the dotted note type 1 4 Select the dotted quarter note length by using the 6 buttons 1 5 Play the C3 key This enters the first note 1 6 Press the I button to select the normal note type 1 7 Press the 7 button to select the eight note length 1 8 Play the D3 key This enters the second note 2 Enter the next notes and apply staccato 2 1 Press the H bu...

Page 62: ... the button release the keys This enters the notes G3 and C4 notes have been entered as shown in the notation on the previous page Recording Chords Step Recording In Step Recording you can record the precise change timing of chords and Sections such as Intro Main and Ending of the current Style on the single display After the operations are finished the recorded information or events will be conve...

Page 63: ...ress the I SAVE button to carry out the Save operation For details refer to Basic Operations in the Owner s Manual NOTICE The recorded Song data will be lost if you select another Song or turn off the power to the instrument without carrying out the Save oper ation Example of Step Recording Chord detailed instructions of step 5 above NOTE This example uses a Style in 4 4 time Before executing the ...

Page 64: ...ROL BREAK button 2 2 Press the 6 button to select the quarter note length 2 3 Play the chords F and G7 in the chord section of the keyboard NOTE If you want to record the Fill In Section turn on the AUTO FILL IN button then press one of the MAIN VARIATION A D buttons 3 Enter the chords for the Main B section 3 1 Press the STYLE CONTROL MAIN VARIATION B button 3 2 Press the 4 button to select the w...

Page 65: ...The items selected here can be recorded only to the top position of the Song except for the KEYBOARD VOICE VOICE VOLUME PAN FILTER EFFECT TEMPO EQ Records the tempo setting and all settings made from the Mixing Con sole KEYBOARD VOICE Records the panel settings including the Voice selection of the keyboard parts RIGHT 1 2 and LEFT and their on off status Panel settings recorded here are same as th...

Page 66: ...normally to guide you in the Punch In Out timing NOTE The Style Retrigger function page 13 cannot be used when recording over existing data overdubbing 1 Select the desired Song for re recording 2 Call up the operation display FUNCTION TAB F MENU 2 B SONG CREATOR TAB E REC MODE 3 Determine the settings for recording 4 5 MARK ON Add or remove a checkmark to the selected item Checked items are recor...

Page 67: ...t at which recording is stopped PUNCH OUT AT Actual overwrite recording continues until the begin ning of the specified Punch Out measure set with the corresponding display button at which point recording stops and normal playback continues This setting maintains all data after the point at which recording is stopped You can set the Punch Out measure by pressing the 6 buttons 7 8 PEDAL PUNCH IN OU...

Page 68: ...rt overwrite recording 1 Start overwrite recording 1 Play back original data Play back original data Play back original data Play back original data Play back original data Play back original data Play the keyboard to start overwrite recording Play the keyboard to start overwrite recording Play the keyboard to start overwrite recording Start overwrite recording Start overwrite recording Start over...

Page 69: ...t menu and available settings see pages 70 71 4 Press the D EXECUTE button to carry out the operation for the current display After the operation is completed this button changes to UNDO letting you restore the original data if you are not satisfied with the operation results The Undo function only has one level only the previous operation can be undone 5 Press the I SAVE button to carry out the S...

Page 70: ...me time For example when the straight eighth notes and eighth note triplets are contained in the same channel if you quantize by the straight eighth notes all notes in the channel are quantized to straight eighth notes completely eliminating any triplet feel However if you use the eighth note eighth note triplet setting both the straight and triplet notes will be quantized correctly 7 8 STRENGTH D...

Page 71: ... these channels If you transpose the channels of Drum Kits the instruments assigned to each key will be changed 2 3 SOURCE 1 Determines the MIDI channel 1 16 to be mixed All MIDI events of the channel specified here are copied to the destination channel 4 5 SOURCE 2 Determines the MIDI channel 1 16 to be mixed Only note events of the channel specified here are copied to the destination channel Bes...

Page 72: ...r left right and selects the desired parameter of the high lighted event H FILTER Calls up the Filter display page 74 letting you select only the events you wish to be shown in the event list I SAVE Press to save the edited Song J MULTI SELECT Holding this button while using the A B buttons lets you select multi ple events 1 BAR Determines the position bar beat clock of the data One clock is equal...

Page 73: ...CH BEND wheel A T Aftertouch This event is generated when pressure is applied to a key after the note is played Note that the keyboard of this instrument does not feature Aftertouch ScBar Score Start Bar Determines the top measure of a Song Tempo Determines the tempo value Time Time signature Determines the time signature Key Key signature Determines the key signature as well as the major minor se...

Page 74: ...shown C MAIN Displays all main types of events D CC Displays all specific Control Change message events E STYLE Displays all types of Style playback related events H ALL ON Checkmarks all event types I NOTE ALL OFF CHORD NOTE shown when C MAIN is on selects only the NOTE data CHORD shown when E STYLE is on selects only the CHORD data ALL OFF shown when D CC is on removes all checkmarks J INVERT Re...

Page 75: ...not contain lyrics data you can view the lyrics on the display by loading a text file having the same name as the audio file 1 Connect the USB flash drive containing the audio files to the USB TO DEVICE terminal 2 Press the USB AUDIO PLAYER button to call up the USB AUDIO PLAYER display 3 Select the desired audio file 3 1 Press the H FILES button to call up the Audio File Selection display 3 2 Pre...

Page 76: ...B E FOOT PEDAL 2 STOP Stop playback of the audio file 3 PLAY PAUSE Starts or pauses playback at the current position of the audio file 7 8 BACKGROUND Allows changing of the background picture of the Lyrics display After making the setting press the EXIT button to return back to the Lyrics display NOTE This setting is applied also to the LYRICS display of MIDI songs page 52 Priority of Lyrics data ...

Page 77: ...art performance will be recorded as Multi Pad phrases you should select the desired Voice for the RIGHT 1 part beforehand The Super Articulation Voices and the Organ Flutes Voices cannot be used for Multi Pad Recording If one of these Voices is set for RIGHT 1 part it will be replaced with the Grand Piano Voice when recording Since recording can be done along with and synchronized to Style playbac...

Page 78: ...NTROL START STOP button to stop recording when you ve finished playing the phrase 9 Listen back to your newly recorded phrase by pressing the appropriate MULTI PAD button 1 4 To re record the phrase repeat steps 6 8 10 Turn the Repeat parameter of each pad On or Off by using the 1 4 buttons If the Repeat parameter is on for the selected pad playback of the corresponding pad will continue until the...

Page 79: ...ad Bank and each of the Multi Pads belonging to the Bank For instructions on managing the Multi Pad Bank file refer to Basic Operations in the Owner s Manual This section covers how to manage each Multi Pad 1 Select the Multi Pad Bank containing the Multi Pad to be edited Press the MULTI PAD CONTROL SELECT button to call up the Multi Pad Bank Selection display use the TAB E F buttons to call up PR...

Page 80: ... Multi Pad 1 Press the 3 COPY button in step 4 above 2 Select the Multi Pads to be copied by using the A B F and G buttons then press the 7 OK button The selected Multi Pad s is copied to the clipboard 3 Select the destination location by using the A B F and G buttons If you want to copy the selected Pad s to another bank press the 8 UP button to call up the Multi Pad Bank Selec tion display selec...

Page 81: ...a and Style data you use frequently 1 Select the desired Record from the MUSIC FINDER display 2 Press the H ADD TO FAVORITE button then press the G YES button to add the selected Record to the FAVORITE page 3 Select the FAVORITE page by using the TAB E F buttons and check to see if the Record has been added As with the ALL page you can select the Record in the FAVORITE page then start your perform...

Page 82: ...is play After selecting the desired Style press the EXIT button to return back to the EDIT display For SONG or AUDIO Records this field cannot be edited D BEAT Changes the beat time signature of the Record for search purposes For SONG or AUDIO Records this field cannot be edited NOTE Keep in mind that the Beat setting made here is only for the Music Finder search function this does not affect the ...

Page 83: ...return to the EDIT display in step 2 press I CANCEL 4 Press the G YES button to delete the current Record The Music Finder feature handles all the Records including the presets and additionally created Records as a single file Keep in mind that individual Records panel settings Song audio and Style files cannot be handled as separate files 1 Press the 7 FILES button in the MUSIC FINDER display to ...

Page 84: ...3 Press the A J buttons to select the desired Music Finder file A message appears prompting you to select one of the following options G REPLACE All Music Finder Records currently in the instrument are deleted and replaced with the Records of the selected file NOTICE Selecting REPLACE automatically deletes all your original Records from internal memory Make sure that all important data has been ar...

Page 85: ...istration Bank Selection display then press one of the A J buttons to select the desired Bank 2 Press the 7 EDIT button of MENU 1 to call up the REGISTRATION EDIT display 3 Select a particular Registration Memory to be edited by pressing any of the A D and F I buttons 4 Press the 1 button to rename or the 5 button to delete the selected Registration Memory For details on the Rename and Delete oper...

Page 86: ...EZE TAB F FREEZE 2 Use the 1 3 buttons to select the desired item then use the 4 5 buttons to enter or remove the checkmark Items having checkmarks will be frozen when the FREEZE button on the panel is turned on 3 Press the EXIT button to exit from the operation display NOTICE Settings in the FREEZE display are automatically saved to the instrument when you exit from this display However if you tu...

Page 87: ...RATION SEQUENCE 4 If you use a pedal specify here how the pedal will be used to advance or to reverse through the sequence Use the B or C button to select the pedal for advancing or reversing through the Registration Sequence For example if two pedals are connected Pedal 1 is used for advancing while Pedal 2 is used for reversing Note that the pedal settings here other than OFF will take priority ...

Page 88: ...Banks unless you ve saved it with the Reg istration Memory Bank file For instructions on saving see the section below Saving the Registration Sequence Settings The settings for the Sequence order and how Registration Sequence behaves when reaching the end of the sequence SEQUENCE END are included as part of the Registration Memory Bank file To store your newly programmed Registration Sequence save...

Page 89: ...tion Memory number The box appears around the left most number indicating that this Registration Memory number is currently selected 4 Use the TAB buttons or Foot Pedal during your keyboard performance To return to the status in which no Registration Memory number is selected press the TAB E and F buttons simultaneously while the Main display is called up NOTE The pedal can be used for Registratio...

Page 90: ...ess the A MIC GUITAR button to set it to ON This lets you talk into the microphone or play the guitar and hear the changes made while setting the parameters 2 Press the B EQ CMP button to call up the EQ CMP SETTING display 3 Select the desired page MIC GUITAR or TALK by using the TAB E F buttons NOTE The settings on the TALK page are the settings that are active when the F TALK button is on 4 Use ...

Page 91: ...e microphone guitar falls below a specified level This effectively cuts off extraneous noise allowing the desired signal vocal etc to pass COMPRESSOR selected by C D buttons This effect holds down the output when the input signal from the microphone guitar exceeds a specified level This is especially useful for smoothing out vocals that have widely varying dynamics It effectively compresses the si...

Page 92: ...e from low to high 3 4 BACKGROUND NOISE CUT THRU 200Hz 300Hz 400Hz 500Hz This allows you to filter out low noises that would interfere with the Vocal Harmony effect A setting of THRU turns the noise filter off 5 6 SPEED 1 SLOW 4 NORMAL 15 FAST Adjusts the response of the Vocal Harmony effect or how quickly harmo nies are generated in response to your voice NOTE When the Vocal Harmony s Pitch Detec...

Page 93: ... NOTE Check that the microphone is properly connected Owner s Manual chapter 8 and the settings Reference Manual page 90 are adjusted correctly before setting the Vocal Harmony Control parameters here 2 Press the 8 SET UP button to call up the Setup display then set the value by using the 2 5 and 7 buttons For information on each parameter see page 94 3 After you finish setting the value press the...

Page 94: ...ny 4 5 KEYBOARD OFF Keyboard performance does not affect the Vocal Harmony UPPER Notes played to the right of the Split Point control the har mony LOWER Notes played to the left of the Split Point control the har mony NOTE The separate point of the Keyboard settings OFF UPPER LOWER is Split Point LEFT NOTE When the settings of both keyboard performance and Song data are applied those settings are ...

Page 95: ...desired tab then edit the Vocal Harmony by using A G buttons and 1 8 buttons There are three tabs in the VOCAL HARMONY EDIT display refer to pages 96 99 for editing each tab OVERVIEW Edits basic parameters for Vocal Harmony type including mode Chordal Type and Vocal Effect etc PART Adjusts volume and panning etc for each of the harmony notes Harm 1 2 3 and Lead DETAIL Detailed editing for Vocal Ha...

Page 96: ...singing voice For information on each parameter see page 97 3 Press the G VOCAL EFFECT EDIT button to edit the Vocal Effect On the display called up via this operation use the 3 5 buttons to select the parameter then use the 6 7 buttons to set the value If necessary you can change the Effect Type from the one selected in step 1 also on this display via the 1 2 buttons For information on each param...

Page 97: ...d the amount of the effect applied to the lead and harmony vocal sounds 3 4 TYPE Determines the specific Vocal Effect type applied to the lead and har mony vocal sounds A wide range of reverb delay modulation distor tion and other special effects are available For a list of the effect types refer to the Vocal Harmony Parameter List in the Data List on the website 5 LEAD Determines the amount of Vo...

Page 98: ... 3 octaves 3 octaves Harmony 1 2 3 36 semitones 36 semitones DEGREE Settings Lead 3 octaves 3 octaves Harmony 1 2 3 3 octaves 22 scale degrees Unison 3 octaves 22 scale degrees DETUNE selected by B button Determines the fine pitch setting for each part Adjust this to produce a warm chorusing effect or to achieve a natural less than perfect vocal sound When Pitch Correct is set to OFF the Lead part...

Page 99: ...d vocal at center for example results in a naturally wide stereo sound Settings L63 Left C Center R63 Right VOLUME selected by E button Determines the volume setting for each part Use this to adjust the relative level balance among the vocal parts Settings 0 127 PITCH CORRECT set by 7 8 buttons Determines how Pitch Correct affects your voice For information on each parameter refer to the Vocal Har...

Page 100: ...esired tab then edit the Synth Vocoder by using A E G and J buttons and 1 8 buttons There are two tabs in the SYNTH VOCODER EDIT display refer to pages 101 103 for editing each tab OVERVIEW Edits basic parameters for Synth Vocoder type including Carrier Vocoder Attack Release and HPF High Pass Filter etc DETAIL Detailed editing for Synth Vocoder type NOTICE The settings here will be lost if you ch...

Page 101: ...rmation on each parameter see pages 102 103 2 Press the G VOCAL EFFECT EDIT button to edit the Vocal Effect On the display called up via this operation use the 3 5 buttons to select the parameter then use the 6 7 buttons to set the value If necessary you can change the Effect Type from the one selected in step 1 also on this display via the 1 2 buttons For information on each parameter refer to th...

Page 102: ...t sound in other words close to the original Setting this to higher val ues emphasizes the higher frequency consonant and sibilant sounds making words easier to understand Settings Thru 500Hz 16kHz 4 LEVEL Determines the level of the microphone sound output from the HPF Settings 0 127 5 SHIFT Determines the amount in BPF by which the cutoff frequency value of the BPFs for the Inst Input is shifted...

Page 103: ...lowest Formant while the BPF 10 corresponds to the highest Formant Settings 18dB 18dB 4 5 TYPE Determines the specific type of effect applied to the lead Synth Vocoder sound A wide range of reverb delay modulation distortion and other special effects are available You can edit the vocal effect by pressing the G VOCAL EFFECT EDIT button step 2 on page 101 For a list of the effect types refer to the...

Page 104: ...ion of the Mixing Console refer to the Block Diagram on page 115 Use the TAB E F buttons to select the various pages that follow Editing VOL VOICE Parameters B C G H VOICE Allows you to re select the Voices for each part NOTE Note the following operation limitations For each Style channel you can select the Voices for recording on pages 33 and 34 For each Style or Song channel you cannot select Vo...

Page 105: ...05 9 Mixing Console Editing FILTER Parameters D I HARMONIC CONTENT Allows you to adjust the Resonance page 17 for each part E J BRIGHTNESS Determines the brightness of the sound for each part by adjusting the Cut off Frequency page 17 ...

Page 106: ...rd part The range is from 0 to 12 with each step corresponding to one semitone D I OCTAVE Determines the range of the pitch change in octaves over two octaves up or down for each keyboard part The value set here is added to the setting made via the UPPER OCTAVE buttons E J TUNING Determines the pitch of each keyboard part in cents NOTE In musical terms a cent is 1 100th of a semitone 100 cents equ...

Page 107: ...ust the Send Level Depth for each Part as well as Return Level for all Parts When the Connection parameter is set to Insertion the Effect of this Block is applied to a specific channel of the Style and Song DSP2 4 The Effects of these Blocks are applied to a specific Part or Channel with the exception of the Multi Pads and microphone guitar input Different Effect Types can be selected for each of ...

Page 108: ...cteristics REVERB All parts Recreates the warm ambience of playing in a concert hall or jazz club CHORUS All parts Produces a richly textured sound as if several parts are being played simultaneously In addition other type effects such as reverb delay etc can also be selected in this effect block DSP1 Style part Song channel 1 16 In addition to Reverb and Chorus a wide variety of Effect Types are ...

Page 109: ...an edit detailed parameters of the selected Effect Type and these settings can be saved as your original Effect Type as well as to a Registration Memory Style or Song as described in the previous section This section covers how to save the settings as an original Effect Type 1 Once you ve selected an Effect Block and Effect Type in the previous section press the H PSR S975 or F PSR S775 button to ...

Page 110: ...the 8 VARI DETAIL button to call up the Variation parameter select a parameter via the 2 4 buttons and then use the 5 6 buttons to edit the value This parameter is effective only when the DSP VARI button lamp lights on the panel To close this display press the EXIT button 4 Press the I SAVE button to call up the display for the Save operation 5 Use the 3 5 buttons to select the destination for sav...

Page 111: ... cut as required to tailor the overall frequency response The EQ page lets you adjust the EQ for each corresponding part while the MEQ page lets you make overall EQ adjustments for the entire instrument Editing Part EQ Parameters Editing EQ Parameters D I EQ HIGH Boosts or attenuates the high EQ band for each part E J EQ LOW Boosts or attenuates the low EQ band for each part ...

Page 112: ...ofer such as the KS SW100 sold separately Flat Flat EQ settings The gain of each frequency is set to 0dB User1 2 Your own custom EQ settings stored in step 4 2 Use the E J buttons to move the cursor to the GAIN row then adjust the GAIN level to boost or cut each of the eight bands Use the 1 8 buttons to adjust the level Changing the value while the E or J button is held lets you boost or cut all t...

Page 113: ...s NOTE Master Compressor cannot be applied to audio playback or the metronome sound Editing Master Compressor CMP Parameters G ON OFF Turns the Master Compressor effect on or off 2 3 TYPE Selects a Master Compressor type Standard Standard Compressor settings Lite Light Compressor settings in which the effect is slight Moderate Moderate Compressor settings in which the effect is moder ately pronoun...

Page 114: ...Select the destination to which the User Master Compressor is to be saved by using the 3 5 buttons If necessary change the User Master Compressor name Press the 6 RENAME button to call up the Character Entry window enter the name then press the 8 OK button 3 Press the 8 OK button to carry out the Save operation 4 Press the EXIT button to return to the previous display The saved Master Compressor t...

Page 115: ...PSR S975 S775 Reference Manual 115 9 Mixing Console PSR S975 PSR S775 Block Diagram Connection System Effect Connection Insertion Effect Connection System Effect Connection Insertion Effect ...

Page 116: ...op Style playback or use the foot controller to produce pitch bends NOTE For information on how to connect a foot pedal or what kinds of pedals can be connected refer to the Owner s Manual chapter 10 1 Call up the operation display FUNCTION TAB E MENU 1 D CONTROLLER TAB E FOOT PEDAL 2 Use the A B buttons to select one of the two foot pedals to which the function is to be assigned On the display th...

Page 117: ...al while holding the note s the notes will sustain as long as the pedal is held However all subsequent notes will not sustain This makes it possible to sustain a chord for example while other notes are played staccato You can turn this pedal function on or off for each keyboard part on this display NOTE This function will not affect any of the Organ Flutes and only some of the Super Articulation V...

Page 118: ... HARMONY ARPEGGIO Same as the HARMONY ARPEGGIO button PEDAL ARP HOLD While the pedal is pressed Arpeggio playback continues even after you release the keyboard and then Arpeggio stops when the pedal is released Make sure that any one of the Arpeggio type is selected and the HARMONY ARPEG GIO button is turned on VOCAL HARMONY PSR S975 Same as the 3 4 HARMONY buttons in the MIC GUITAR SETTING displa...

Page 119: ... the FINGERED and FINGERED ON BASS modes page 25 BASS HOLD While the pedal is pressed the Accompaniment Style bass note will be held even if the chord is changed during Style playback If the fingering is set to AI FULL KEYBOARD the function does not work PERCUSSION The pedal plays a percussion instrument selected by the 4 8 but tons You can use the keyboard to select the desired percussion instrum...

Page 120: ...lect a pre programmed template from the PRESET page page 121 If you have already created your original template and saved it to the USER page you can also select that template from the USER page 3 To edit the template press the 8 EDIT button to call up the MIDI display 4 Use the TAB E F buttons to call up the relevant page then set various parameters to edit the current MIDI template SYSTEM MIDI S...

Page 121: ...zes with an external MIDI clock instead of the instrument s internal clock This template should be used when you wish to set the tempo on the MIDI device connected to the instrument MIDI Accord 1 MIDI accordions allow you to transmit MIDI data and play connected tone generators from the keyboard and bass chord buttons of the accordion This template lets you play melodies from the keyboard and cont...

Page 122: ...rnal sequencer MIDI computer or other MIDI device and you want to synchronize it to that device set this parameter to the appropriate setting MIDI USB 1 or USB 2 In this case make sure that the external device is connected properly e g to the instrument s MIDI IN terminal and that it is properly transmitting a MIDI clock signal NOTE When CLOCK is set to a value other than INTERNAL the tempo is ind...

Page 123: ...t played on the left side of the keyboard from the Split Point for the Voices This is not affected by the on off status of the ACMP button 2 Use the 3 buttons to select a channel via which the selected part will be transmitted NOTE If the same transmit channel is assigned to several different parts the transmitted MIDI messages are merged to a single channel resulting in unex pected sounds and pos...

Page 124: ... as a 32 channel multi timbral tone generator by using these five parts in addition to the parts except for the microphone guitar sound 3 Use the 4 8 button to determine the types of data to be received For information on the MIDI messages which can be set here see Note Events on page 73 MIDI transmission reception via the USB terminals and MIDI terminals The relationship between the MIDI terminal...

Page 125: ...ations here apply to the CHORD DETECT page in step 4 on page 120 This page lets you select the MIDI channels over which the MIDI data from the external device will be used to detect the Chord Type for Style playback The note on off messages received at the channel s set to ON are recognized as the notes for detecting chords in Style playback The chords to be detected depend on the fingering type T...

Page 126: ... list on the display I DETAIL For setting the detailed parameters on the pages below After making these settings press one of the 7 8 SAVE button to actually save them IP ADDRESS Sets the IP address and other related parameters OTHERS When the instrument is connected to the network with the Infrastructure Mode the current time is shown on the Main display You can set the Time Zone via the B button...

Page 127: ...one of the 7 8 SAVE button to actually save them WIRELESS NETWORK For setting the SSID security password and channel IP ADDRESS For setting the IP address and other related parameters OTHERS For entering the Host name or showing MAC address etc 3 4 MODE Switches to the Infrastructure Mode 5 6 INITIALIZE Initializes the connection setup to the default factory status ...

Page 128: ... can find the instructions CONFIG 1 1 Fade In Out These parameters determine how Style or Song playback is faded in out when using the FADE IN OUT button UTILITY 3 FADE IN TIME Determines the time it takes for the volume to fade in or go from mini mum to maximum range of 0 20 0 seconds 4 FADE OUT TIME Determines the time it takes for the volume to fade out or go from maxi mum to minimum range of 0...

Page 129: ... the metronome sound 2 4 PERCUSSION Selects the percussion sound 5 6 VELOCITY Sets the velocity PSR S975 3 4 PSR S775 4 5 SPEAKER Determines whether or not the sound is output from the speaker of this instrument HEADPHONE SW Speaker sounds normally but is cut off when head phones are connected to the PHONES jack ON Speaker sound is always on even if headphones are connected OFF Speaker sound is of...

Page 130: ...he clock information and the current timestamp date and time is recorded to the files you save to the instrument Once you turn the power off the clock is set to the factory default and will not be updated unless the instrument is connected to the network 5 6 VOICE CATEGORY BUTTON OPTIONS Determines how the Voice Selection display is opened when one of the VOICE buttons is pressed OPEN SELECT Opens...

Page 131: ...rument Before using a USB flash drive be sure to read Connecting USB Devices in the Owner s Manual chapter 10 A B DRIVE LIST Selects the desired drive to be formatted or to be checked for remaining memory F PROPERTY Opens the Property display of the device selected above by the A B buttons You can check the amount of remaining memory on the device NOTE The displayed remaining memory value is an ap...

Page 132: ...ay You can select a picture from among various pictures provided on the PRESET page After selecting press the EXIT button to close the Selection display If you want to use an original picture prepare the desired file a bitmap BMP file no greater than 800 x 480 pixels in the USB flash drive copy it from the USB flash drive to the USER page then select it from the USER page Due to access speed limit...

Page 133: ...is selected a message is displayed according to the content of the file Press the desired button F SYSTEM SETUP FILES Parameters set on the various displays such as the FUNCTION TAB E MENU 1 J UTILITY and MIC GUITAR SETTING display are handled as a single System Setup file Refer to the Parameter Chart in the Data List on the website for details on which parameters belong to System Setup G MIDI SET...

Page 134: ...to the original factory status USER EFFECT Resets the current Effect settings and the following data User Effect types page 109 User Master EQ types page 112 User Master Compressor types page 114 User Microphone Guitar settings page 91 User Vocal Harmony Synth Vocoder types PSR S975 only pages 95 100 MUSIC FINDER Resets the Music Finder data all Records to the original factory settings FILES FOLDE...

Page 135: ... Metronome 129 MIDI setting 120 Modulation 17 Mono 16 Multi Pad Creator 77 Music Finder 81 N Noise Gate 91 NTR Note Transposition Rule 43 NTT Note Transposition Table 43 O One Touch Setting OTS 29 Organ Flutes Voice 20 OTS Link Timing 27 P Pan Vocal Harmony 99 Panpot Mixer 104 Parameter Lock 131 Part EQ 111 Pedal 116 Performance Assistant Technology P A T 57 Pitch 9 106 Pitch Correct Vocal Harmony...

Page 136: ...spose 10 106 Transpose Vocal Harmony 97 98 Tuning 9 106 U USB flash drive 131 V Vibrato 18 Vocal Harmony 93 Vocal Harmony type 95 Voice Set 15 Voice Set Filter 19 Volume Mixer 104 Volume Vocal Harmony 99 W Wireless LAN 126 X XG 5 Y Your Tempo 56 Manual Development Group 2017 Yamaha Corporation Published 12 2017 PO A0 ...

Reviews: