background image

72


PSR-S910/S710 Owner’s Manual

Registr

ation Memor

y – Sa

ving and Recalling Custom P

anel Setups –

6

4

Press one of the REGISTRATION MEMORY [1] – [8] buttons to 
which you wish to memorize the panel setup.

The memorized button becomes red, which indicates the number button 
contains data and its number is selected.

5

Register various panel setups to other buttons by repeating 
steps 1 – 4.

The registered panel setups can be recalled by simply pressing the desired 
number button.

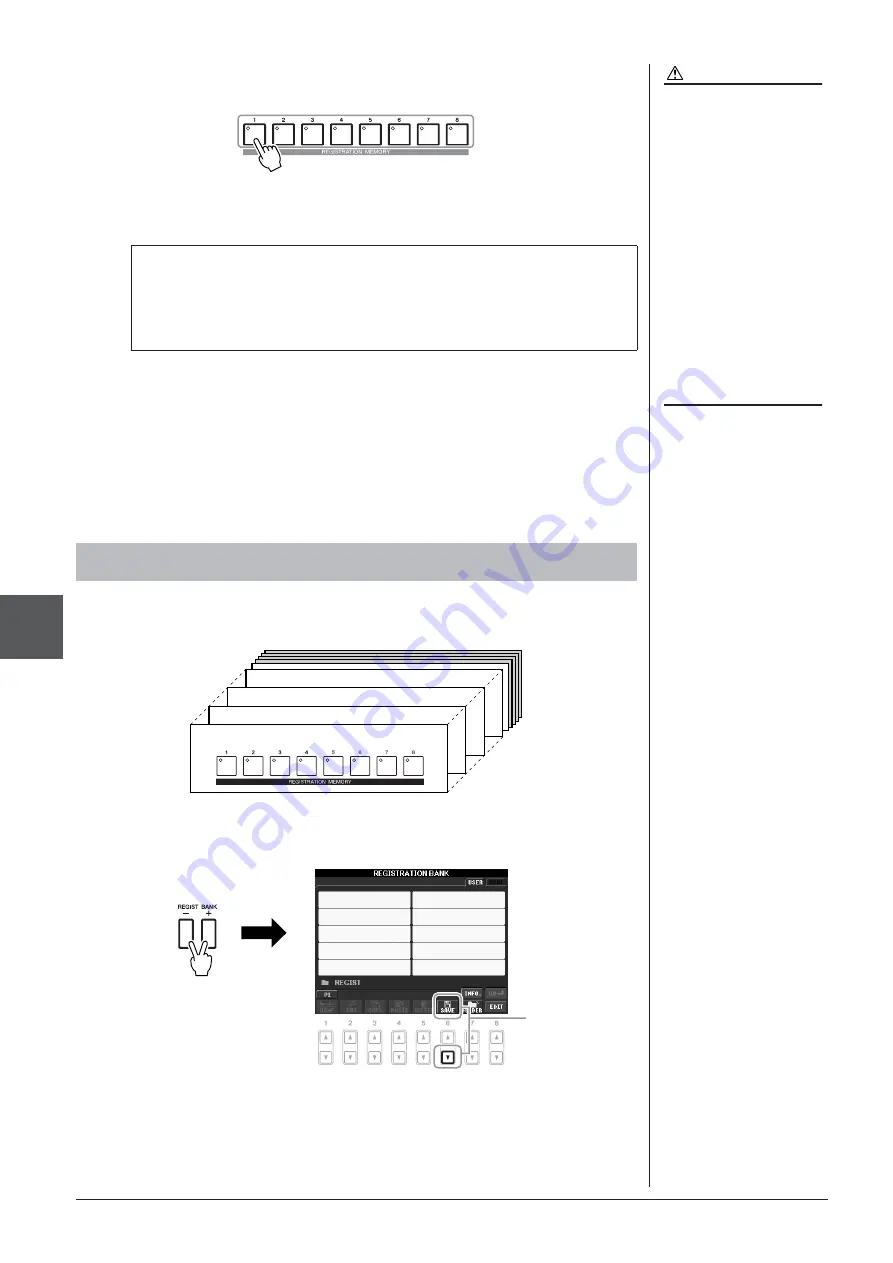
You can save all the eight registered panel setups as a single Registration Memory 
Bank file.

1

Press the REGIST BANK [+] and [-] buttons simultaneously to 
call up the Registration Bank Selection Display.

2

Press the [6

] (SAVE) button to save the Bank file.

For instructions on saving, refer to page 58.

CAUTION

If you select the button whose 
lamp is lit in red or green here, 
the panel setup previously 
memorized to the button will be 
erased and replaced by the new 
settings.

About the lamp status

Red:

 Data registered and currently selected

Green: 

Data registered but not currently selected

Off: 

No data registered

NOTE

The panel setups registered in the 
numbered buttons are preserved even 
when you turn off the power. If you 
want to delete all the eight current 
panel setups, turn the [STANDBY/ON] 
button on while holding the B5 key 
(right-most B key on the keyboard).

Saving the Registration Memory as a Bank file

Bank 01

Bank 02

Bank 03

Bank 04

2

Summary of Contents for PSR-S710

Page 1: ...fully so that you can fully take advantage of the advanced and convenient functions of the instrument We also recommend that you keep this manual in a safe and handy place for future reference Before using the instrument be sure to read PRECAUTIONS on pages 6 7 O w n e r s M a n u a l DIGITAL WORKSTATION ...

Page 2: ...g to how a function or effect works when the unit is operating as designed are not covered by the manufacturer s warranty and are therefore the owners responsibility Please study this manual care fully and consult your dealer before requesting service ENVIRONMENTAL ISSUES Yamaha strives to produce products that are both user safe and environmentally friendly We sincerely believe that our products ...

Page 3: ...d electrical and electronic products should not be mixed with general household waste For proper treatment recovery and recycling of old products please take them to applicable collection points in accordance with your national legislation and the Directives 2002 96 EC By disposing of these products correctly you will help to save valuable resources and prevent any potential negative effects on hu...

Page 4: ...s pop jazz Latin and various other music genres in the world and let the instrument be your backing band Play Along with Song Data Chapter 3 Songs Displaying Music Score page 52 While playing back a Song you can have the music score notation automatically shown on the display an exceptionally convenient tool for learning and practicing pieces Recording Your Performance page 56 The instrument lets ...

Page 5: ...USB Flash Memory Chapter 7 USB Audio Audio files WAV or MP3 stored to USB flash memory can be played back on the instrument Moreover you can record your performance as audio data to a USB flash memory device On the PSR S910 connect a microphone to the instrument and enjoy recording your singing along with the keyboard performance The MP3 format is supported only by the PSR S910 Connect Directly to...

Page 6: ... adaptor plug from the outlet and have the instrument inspected by qualified Yamaha service personnel CAUTION Always follow the basic precautions listed below to avoid the possibility of physical injury to you or others or damage to the instrument or other property These precautions include but are not limited to the following When removing the electric plug from the instrument or an outlet always...

Page 7: ...e this can cause permanent hearing loss If you experience any hearing loss or ringing in the ears consult a physician Saving and backing up your data Edited Songs Styles Voices Multi Pads and MIDI settings are lost when you turn off the power to the instrument Save the data to the USER tab display page 58 USB storage device USB flash memory etc Data in the USER tab display may be lost due to malfu...

Page 8: ...tended The bitmap fonts used in this instrument have been provided by and are the property of Ricoh Co Ltd This product utilizes NF an embedded Internet browser from ACCESS Co Ltd NF may not be separated from this product nor may it be sold lent or transferred in any way Also NF may not be reverse engineered reverse compiled reverse assembled or copied This software includes a module developed by ...

Page 9: ...greater expressive control over Voices and effects and to ensure compat ibility of data well into the future GS was developed by the Roland Corporation In the same way as Yamaha XG GS is a major enhancement of the GM specifically to provide more Voices and Drum kits and their variations as well as greater expressive control over Voices and effects The Yamaha XF format enhances the SMF Standard MID...

Page 10: ...important preset content lists such as Voices Styles Effects as well as MIDI related information MIDI Basics only in English French German and Spanish If you want to know more about MIDI and how to use it refer to this introductory book The illustrations and LCD screens as shown in this manual are for instructional purposes only and may appear somewhat different from those on your instrument The e...

Page 11: ...54 Repeat Playback 55 Recording Your Performance Quick Recording 56 Saving Files 58 File Management 59 4 Multi Pads Adding Musical Phrases to Your Performance 63 Playing the Multi Pads 63 Using the Multi Pad Synchro Start Function 64 Using Chord Match 64 5 Music Finder Calling Up Ideal Setups Voice Style etc for Each Song 65 Selecting the Desired Song from among the Panel Settings 67 Searching the...

Page 12: ...e select a Song and control Song playback 9 STYLE category selection buttons Page 39 These select a Style FADE IN OUT button Page 44 Controls fade in out of the Style Song playback STYLE CONTROL buttons Page 42 These control Style playback TRANSPOSE buttons Page 34 These transpose the pitch in semitone steps METRONOME button Page 56 Turns the metronome sound on or off TAP TEMPO TEMPO buttons Page ...

Page 13: ...hythmic or melodic Multi Pad phrase MUSIC FINDER button Page 65 Searches the appropriate panel settings or desired song PART SELECT buttons Page 32 These select a keyboard part PART ON OFF buttons Page 32 These turn the keyboard part on or off VOICE category selection buttons Page 29 These select a Voice ª ONE TOUCH SETTING buttons Page 45 These call up the appropriate panel settings for the Style...

Page 14: ...OM THE AC POWER OUTLET WHEN THE PSR S910 S710 IS NOT IN USE CAUTION Never interrupt the power sup ply e g unplug the AC adaptor during any PSR S910 S710 record operation Doing so can result in a loss of data CAUTION Even when the switch is in the STANDBY position electric ity is still flowing to the instru ment at a minimum level When not using the instrument for an extended period of time be sure...

Page 15: ...ed to the instrument by inserting it into the slot at the rear of the control panel Air Vents This instrument has special air vents in the top panel see below and rear panel Do not place objects where they might block the air vent since this may prevent adequate ventilation of the internal components and possibly result in the instrument overheating CAUTION Air Vents Air Vents Attaching the Music ...

Page 16: ...le names and character input 1 Call up the operation display FUNCTION J UTILITY TAB E F OWNER 2 Use the 4 5 buttons to select the desired language Using Headphones CAUTION Do not listen with the head phones at high volume for long periods of time Doing so may cause hearing loss Changing the Display Language Standard phone plug NOTE Throughout this manual arrows are used in the instructions indicat...

Page 17: ...fer to page 26 for character entry details Adjusting the Contrast of the Display NOTE Since the color display of the PSR S910 has a high level of visibility no contrast adjustment function is nec essary Entering the Owner Name in the Opening Display NOTE PSR S910 If desired you can also change the background picture in the Main display by pressing the J MAIN PICTURE button in step 2 here Display t...

Page 18: ...he 7 8 SKIP OVERVIEW buttons in the Demo display to call up the specific Demo menu 3 Press one of the A E buttons to show a specific Demo Pressing the J button returns to the display of step 2 The sub menus are shown at the bottom of the display Press one of the 1 8 buttons corresponding to the sub menu 4 Press the EXIT button several times to exit from the Demos Playing the Demos NOTE The demo me...

Page 19: ...le 1 Example 2 Display based Controls A J buttons A E buttons see below F J buttons see below TAB E F buttons page 20 DIRECT ACCESS button page 22 DATA ENTRY dial and ENTER button page 21 1 8 buttons page 20 EXIT button page 22 In the File Selection display page 25 the A J buttons can be used to select the corre sponding respective files The A and B buttons are used to move the cursor up or down T...

Page 20: ...gs up or down correspondingly for functions shown directly above them TAB E F buttons 1 8 buttons If a menu appears in this section of the display use the 1 8 buttons If a menu appears in this section of the display use the 1 8 buttons If list of the menu appears use the 1 8 button to select the desired item If a parameter appears in slider or knob form use the 1 8 button to adjust the value ...

Page 21: ...nveniently use the DATA ENTRY dial in tandem with the 1 8 buttons to adjust parameters indicated in the display This convenient technique also works well with pop up parameters such as Tempo and Transpose Simply press the appropriate button ex TEMPO then rotate the DATA ENTRY dial and press ENTER to close the window DATA ENTRY dial and ENTER button Rotate the DATA ENTRY dial to move the cursor Pre...

Page 22: ...ton 2 Press the button or move the wheel or connected pedal corresponding to the desired setting display to instantly call up that display For example pressing the GUIDE button calls up the display in which the Guide mode can be set Refer to the Data List for a list of the displays that can be called up with the Direct Access function The Data List is available at the Yamaha website See page 10 EX...

Page 23: ...hen the Song containing the chord data is played the current chord name will be displayed 4 Transpose Displays the amount of transposition in semitone units page 34 5 Upper Octave Displays the amount that the octave value is shifted page 34 6 Style name and related information Displays the currently selected Style name time signature and tempo Pressing the E button calls up the Style Selection dis...

Page 24: ...ume balance among the parts by using the 1 7 buttons USB Audio information Displays information for the selected audio file file name time etc While recording a REC indication appears Registration Sequence Appears when the Registration Sequence page 74 is active Split Point Displays the Split Point positions page 32 NOTE If the Volume Balance display is not shown press the EXIT button to show the ...

Page 25: ...umbers P1 P2 are shown below the files Pressing the corresponding button changes the display page When other pages follow the Next button appears and for the previous page the Prev button appears 3 File folder operation menu You can save and manage your data files copy move delete etc from this menu For detailed instructions refer to pages 58 61 File Selection Display Configuration SONG selection ...

Page 26: ... a folder You can also organize your original data in the USER USB display by creat ing several new folders page 59 To close the current folder and call up the next highest level folder press the 8 UP button Example of the PRESET Voice Selection display The PRESET Voice files are categorized and contained in appropriate folders This display shows the Voice files in a folder The next highest level ...

Page 27: ...The ICON display includes several pages Press the TAB E F buttons to select different pages 3 Press the 8 OK button to apply the selected icon While holding the C6 key right most key on the keyboard turn the STANDBY ON button ON This restores the all settings except Internet Settings etc to the factory default You can also restore a specified setting to the factory default value or save load your ...

Page 28: ...ton in this display When the operation is complete the instrument will be restarted automatically Data Backup NOTE Before using a USB storage device be sure to read Connecting a USB Stor age Device on page 94 NOTE Completing the backup restore opera tion may take a few minutes CAUTION Move the Protected Songs which are saved to the USER display before restoring If the Songs are not moved the oper ...

Page 29: ...hand part will not sound 2 Press one of the VOICE category selection buttons to select a Voice category and call up the Voice Selection display The preset Voices are categorized and contained in appropriate folders Voice category selection buttons on the panel correspond to the categories of the preset Voices For example press the STRINGS button to display various strings Voices Playing Preset Voi...

Page 30: ...on display To close the informa tion display press the EXIT button To listen to the demo phrases for each Voice Press the 8 DEMO button to start the Demo for the selected Voice To stop the demo press the 8 button again Recalling your favorite Voices easily The instrument has a huge amount of high quality Voices covering an exceptionally broad range of instrument sounds making it perfect for virtua...

Page 31: ... the A J buttons to select the desired Voice 5 Play the keyboard The notes you play with your left hand sound one Voice LEFT Voice selected above while the notes you play with your right sound a different Voices RIGHT 1 and 2 Voices NOTE You can save the settings to Registra tion Memory See page 71 Quickly selecting Voices for Right 1 and 2 parts You can quickly select the Right 1 and 2 part Voice...

Page 32: ...er the entire keyboard When the LEFT part is on keys lower than F 2 the Split Point are set for playing the LEFT part and those higher than the Split Point are set for playing the RIGHT 1 and 2 parts You can confirm the currently selected part by checking which lamp of the PART SELECT buttons is lit To select the desired keyboard part press the corresponding part button Holding the LEFT part Voice...

Page 33: ...Articulation Voices provide many of same benefits as the MegaVoices but with greater playability and expressive control in real time For example with the Saxophone Voice if you play a C and then a D in a very legato way you will hear the note change seamlessly as though a saxophone player played it in a single breath Similarly with the Concert Guitar Voice the D note would sound as a hammer on wit...

Page 34: ...sed The maximum pitch bend range can be changed on the Mixing Console display MIXING CONSOLE TAB E E E E F F F F TUNE H PITCH BEND RANGE Transposing the Pitch of the Keyboard NOTE The Transpose functions do not affect the Drum Kit or SFX Kit Voices NOTE You can also change the transpose settings in the MIXING CONSOLE display MIXING CONSOLE TAB E E E E F F F F TUNE 1 3 TRANSPOSE Default Pitch setti...

Page 35: ...you play the keyboard SUSTAIN When this Sustain function is on all notes played on the keyboard with right hand part RIGHT 1 and 2 have a longer sustain MONO When this button is on the part s Voice is played monophonically only one note at a time Using the MONO mode lets you play single lead sounds such as brass instruments more realistically It also lets you expressively control the Portamento ef...

Page 36: ...the ACMP button and SYNC START button page 39 and make sure that the RIGHT 1 part is on page 29 3 Play a chord with your left hand to start the Style page 40 and play some notes in the right hand range of the keyboard You can also use the Harmony effect with the Style stopped Simply hold down a chord with your left hand and play a melody with your right Many of the Voices have been automatically s...

Page 37: ...Creating Your Original Organ Flutes Voices NOTE The term footage is a reference to the sound generation of traditional pipe organs in which the sound is produced by pipes of different lengths in feet 3 4 5 6 1 2 NOTE About the VOLUME ATTACK Page and EFFECT EQ Page see the Refer ence Manual on the website 1 A B ORGAN TYPE Specifies the type of organ tone generation to be simulated Sine or Vintage 2...

Page 38: ... other Voices from the Panel Voice Selection display 8 UP 2 P2 Effect related settings Setting the touch sensitivity of the keyboard FUNCTION D CONTROLLER TAB E F KEYBOARD PANEL Selecting the Harmony Echo type FUNCTION H HARMONY ECHO Pitch related settings Fine tuning the pitch of the entire instrument FUNCTION A MASTER TUNE SCALE TUNE TAB E F MASTER TUNE Scale Tuning FUNCTION A MASTER TUNE SCALE ...

Page 39: ...ory selection buttons to call up the Style Selection display 2 Press one of the A J buttons to select the desired Style Pressing one of the 1 4 buttons or pressing the same STYLE button again can call up the other display page 3 Press the ACMP button to turn on the Auto Accompaniment The specific left hand section of the keyboard page 32 becomes the Chord section and chords played in this section ...

Page 40: ...These Styles provide even greater realism and authentic backing by mixing in original chord types and changes as well as special riffs with chord changes with the Main sections These have been programmed to add spice and a professional touch to your performances of certain songs and in certain genres Keep in mind however that the Styles may not necessarily be appropriate or even harmonically corre...

Page 41: ...Following types can be selected for example Single Finger This method lets you easily play chords in the accompaniment range of the keyboard using only one two or three fingers AI Full Keyboard Playing just about anything anywhere on the keyboard using both hands like playing the piano produces appropriate accompaniment You don t have to worry about specifying the chords Depending on the song arra...

Page 42: ...n press the SYNC STOP button then play the keyboard The PSR S910 S710 features three different Intro sections to add an introduction before starting the Style playback After pressing one of the INTRO I III buttons start playback by using the START STOP button or SYNC START but ton When the Intro finishes playing the Style playback automatically shifts to the Main section The PSR S910 S710 features...

Page 43: ...tion Adjusting the Tempo Selected Main section s lamp is lit in red MAIN VARIATION A D buttons Press one of the MAIN VARIATION A D buttons to select the desired Main section the button lights in red Each is an accompaniment pattern of a few measures and it plays indefinitely Pressing the selected MAIN VARIA TION button again plays an appropriate fill in pattern to spice up the rhythm and break the...

Page 44: ...tion is common for Song playback page 49 Calling up the Panel Settings to Match the Style Repertoire Before using the Repertoire function you need to import Music Finder records see instructions on page 65 This produces smooth fade ins and fade outs when starting stopping playback Press the FADE IN OUT button when playback is stopped and press the START STOP button to start playback with a fade in...

Page 45: ...laying the Style 3 As soon as you play a chord with your left hand the selected Style starts Each Style has four One Touch Setting setups Press other ONE TOUCH SETTING 1 4 button to try out other setups Appropriate Panel Settings for the Selected Style One Touch Setting NOTE You can also create your own One Touch Setting setups For details refer to the Reference Manual on the website NOTE You can ...

Page 46: ...elected Style 1 In the Style Selection display press the 7 OTS INFO button to call up the Information display 2 Press the F CLOSE button to close the Information display Confirming the One Touch Setting contents NOTE You can also call up the Information display by pressing the DIRECT ACCESS button then pressing one of the ONE TOUCH SETTING 1 4 buttons 2 1 ...

Page 47: ...ls RHY1 2 Rhythm 1 2 These are the basic parts of the Style containing the drum and percussion rhythm patterns BASS The bass part uses various appropriate instrument sounds to match the Style CHD1 2 Chord 1 2 These are the rhythmic chord backing commonly used with piano or guitar Voices PAD This part is used for sustained instruments such as strings organ choir etc PHR1 2 Phrase1 2 These parts are...

Page 48: ...t the volume for each Style part See page 82 Advanced Features Refer to the Reference Manual on the website Chapter 2 Selecting the Chord Fingering type FUNCTION C STYLE SETTING SPLIT POINT CHORD FINGERING TAB E F CHORD FINGERING Style playback related settings FUNCTION C STYLE SETTING SPLIT POINT CHORD FINGERING TAB E F STYLE SETTING Split Point settings FUNCTION C STYLE SETTING SPLIT POINT CHORD...

Page 49: ...e page 56 for instructions on recording Commercially available Song data SMF Standard MIDI File or ESEQ 1 Press the SONG SELECT button to call up the Song Selection display 2 Press the TAB E E E E F buttons to select the location of the desired Song If you want to playback of Song in the USB storage device connect the USB storage device containing MIDI Song data to the USB TO DEVICE terminal befor...

Page 50: ...STOP button and press the F II PLAY PAUSE button once again Pause Press the F II PLAY PAUSE button Pressing it again resumes Song playback from the current position Queuing the next Song for playback While a Song is playing back you can queue up the next Song for playback This is convenient for chaining it to the next Song smoothly during stage performance Select the Song you want play next in the...

Page 51: ... value Adjusting the Tempo Same procedure as with Style tempo See page 43 Fading In Out Same procedure as with Style See page 44 NOTE Phrase Mark is a pre programmed marker in a certain Song data which specifies a certain location in the Song For Songs containing Phrase Marks You can switch between BAR and PHRASE MARK by pressing the E button For Songs not containing Phrase Marks NOTE You can adju...

Page 52: ...ndicatesYamaha protection formatted Songs These cannot be copied These can be moved saved only to the User drive and USB stor age devices with ID Prot 2 Edit Indicates edited Prot 2 Orig Songs Make sure to save these to the same folder containing the corresponding Prot 2 Orig Song These cannot be copied These can be moved saved only to the User drive and USB storage devices with ID Note for Prot 2...

Page 53: ...position Even if the Song doesn t contain lyrics data you can view the lyrics on the display by loading the text file txt created on a computer via USB storage device This feature enables various useful possibilities such as the showing of lyrics chord names and text notes 1 When the Lyrics display is shown press the 1 TEXT button to display the text 2 Press the 5 6 TEXT FILE button to call up the...

Page 54: ...ncel solo playback press the same button again The Guide function indicates the notes you should play when you should play them and how long you should hold them down You can also practice at your own pace since the accompaniment waits for you to play the notes correctly Here mute the right hand part and try practicing the part 1 Select a Song and call up the Score display page 52 2 Turn the GUIDE...

Page 55: ...e repeated Press the REPEAT button again at the ending point B After an automatic lead in to help guide you into the phrase the range from Point A to Point B is played back repeatedly Other guide functions There are additional functions in the Guide features for practicing the tim ing of playing the keys Any Key mode or for Karaoke FUNCTION B SONG SETTING A B GUIDE MODE For more information refer ...

Page 56: ...n as you play a note on the keyboard start Style playback or start Multi Pad playback Specifying the repeat range while Songs are stopped 1 Press the H FF button to advance to the Point A location 2 Press the REPEAT button to specify Point A 3 Press the H FF button to advance to the Point B location 4 Press the REPEAT button again to specify Point B Recording Your Performance Quick Recording Recor...

Page 57: ...ting the save operation Multi Track Recording A Song consists of 16 separate channels With this method you can record data to each channel independently one by one You can also freely change the channel part assignments with the Multi Track recording The procedure is basically the same as that of RecordingYour Performance on page 56 with the following instructions substituted for step 2 above Whil...

Page 58: ...propriate tab USER or USB to which you want to save the data by using the TAB E E E E F F F F buttons 2 Press the 6 SAVE button to call up the file naming display 3 Enter the file name page 26 Even if you skip this step you can rename the file at any time after saving page 60 4 Press the 8 OK button to save the file The saved file will be automatically located at the appropriate position among the...

Page 59: ... the appropriate tab USER or USB to which you want to save the data by using the TAB E E E E F F F F buttons If you want to create a new folder within the existing folder also select the folder here 2 Press the 7 FOLDER button to call up the naming display for a new folder 3 Input the name of the new folder see page 26 File Management NOTE A new folder cannot be made in the PRESET tab Creating a N...

Page 60: ... cut a file and paste it to another location folder You can also copy a folder but not move it by using the same procedure 1 Call up the display containing the file folder you want to copy 2 Press the 3 COPY button to copy or 2 CUT to move The pop up window for the Copy Cut operation appears at the bottom of the display 3 Press one of the A J buttons corresponding to the desired file folder To can...

Page 61: ...ETE button The pop up window for the Delete operation appears at the bottom of the display 3 Press one of the A J buttons corresponding to the desired file folder To cancel the selection press the same A J button again Press the 6 ALL button to select all files folders indicated on the current display including the other pages To cancel the selection press the 6 ALL OFF button again 4 Press the 7 ...

Page 62: ...TART STOP Song Playback related parameters FUNCTION B SONG SETTING Keyboard and Vocal Practice Using the Guide Function A B GUIDE MODE Playing Backing Parts with the Perfor mance Assistant Technology 8 P A T Creating Editing Songs Song Creator FUNCTION F DIGITAL REC MENU A SONG CREATOR Recording Melodies Step Recording TAB E F 1 16 Recording Chords Step Recording TAB E F CHORD Re Recording a Speci...

Page 63: ...ct the desired bank 2 Press any of the MULTI PAD CONTROL 1 4 buttons to play a Multi Pad phrase The corresponding phrase in this case for Pad 1 starts playing back in its entirety at the currently set tempo You can even play two or more Multi Pads at the same time 3 Press the STOP button to stop playback of the Multi Pad s If you want to stop specific pads simultaneously hold down the STOP button ...

Page 64: ...tart while holding the MULTI PAD CONTROL SELECT or STOP button press one of the 1 4 buttons Pressing the MULTI PAD CONTROL STOP button once cancels Synchro Start of all buttons Many of the Multi Pad phrases are melodic or chordal and you can have these phrases automatically change chords along with the chords you play with your left hand When the ACMP is on or LEFT part is on simply play a chord w...

Page 65: ...tor age Device on page 94 CAUTION Replacing automatically over writes all your records panel settings song data shown in the MUSIC FINDER display Make sure that all important data has been saved to the USER or USB in the File Section display step 4 as described at left Loading panel settings from the website As a factory default some sample records panel settings are provided in the Music Finder B...

Page 66: ...e selected file Press the G YES button at the confirmation prompt 8 Press the F YES button in the message display indicating completion of the replace operation to call up the MUSIC FINDER display By checking the number of records in the MUSIC FINDER display you can confirm the record has been replaced The number of records NOTE For information on registering the Song Audio data to the Music Finde...

Page 67: ... Settings NOTE Refer to page 70 for information on selecting SONG and AUDIO records Sorting the records Press F SORT BY button to sort the records by MUSIC STYLE BEAT and TEMPO Press the G SORT ORDER button to change the order of the records ascending or descending When sorting records by MUSIC you can use the 1 button to skip up or down through the songs alphabetically When sorting records by STY...

Page 68: ...he pop up window to enter the song name To clear the entered Music press the F CLEAR button B KEYWORD Searches by keyword Pressing the B button calls up the pop up window to enter the keyword To clear the entered Keyword press the G CLEAR button C STYLE Searches by Style Pressing the C button calls up the Style Selection display After selecting the desired Style press the EXIT button to return bac...

Page 69: ...ta Audio file in the connected USB storage device 2 Press the A J buttons corresponding to the desired file 3 Press the 6 ADDTO MF button to register the selected data to Music Finder The display automatically changes to the Music Finder Record Edit display 4 Press 8 OK button to start the registration Press the 8 CANCEL button to cancel the registration 5 Check the song data SONG AUDIO is added i...

Page 70: ...om Music Finder NOTE The available contents of the Music Finder Plus service are subject to change Added convenience using the Internet Music Finder This service gives you the capability by connecting the instrument to the Internet of searching for and adding desired panel settings and song data via the Internet to the instrument Let s connect the instrument to the Internet and press the J MUSIC F...

Page 71: ...gle button The registered settings for eight Registration Memory buttons should be saved as a single Bank file 1 Set up the panel controls such as Voice Style effects and so on as desired 2 Press the MEMORY button in the REGISTRATION MEMORY section The display for selecting the items to be registered appears 3 Determine the items you want to register Select the desired item by using the 2 7 button...

Page 72: ...imultaneously to call up the Registration Bank Selection Display 2 Press the 6 SAVE button to save the Bank file For instructions on saving refer to page 58 CAUTION If you select the button whose lamp is lit in red or green here the panel setup previously memorized to the button will be erased and replaced by the new settings About the lamp status Red Data registered and currently selected Green D...

Page 73: ... and the ENTER button to select a Bank 3 Press one of the green lit numbered buttons 1 8 in the Registration Memory section Recalling a Registered Panel Setup NOTE When recalling the setups including Song Style file selection from a USB storage device make sure that the appropriate USB storage device including the registered Song Style is connected into the USB TO DEVICE terminal NOTE Turning the ...

Page 74: ...n for the 5 8 buttons 3 Press the F CLOSE button to close the information display Confirming the Registration Memory Information NOTE You can instantly call up the informa tion display of the currently selected Registration Memory Bank by press ing the DIRECT ACCESS button and one of the REGISTRATION MEMORY 1 8 buttons in sequence 3 2 NOTE If some Voice part is set to off PSR S910 the Voice name f...

Page 75: ...on this instrument File formats that can be played back Connect the USB flash memory device containing the audio files to play back to the USB TO DEVICE terminal 1 Press the USB button to call up the Playback display AUDIO PLAYER display 2 Press the 8 FILE SELECT button to display the audio files saved to the connected USB flash memory 3 Press one of the A J buttons corresponding to the file you w...

Page 76: ...dly Press the 7 REPEAT button then set the REPEAT mode of the audio file by using the 7 buttons To close the setting display press the 8 CLOSE button OFF Plays through the selected file then stops SINGLE Plays through the selected file repeatedly ALL Continues playback through all the files in the folder containing the cur rent file repeatedly RANDOM Randomly and repeatedly plays back all files in...

Page 77: ...ts PSR S910 Input from a microphone guitar or other instrument via the MIC LINE IN jack PSR S910 Input from another audio device such as a CD player MP3 player or the like via the MIC LINE IN jack The recorded data using this function is saved as Stereo WAV data 44 1 kHz sample rate 16 bit resolution 1 Connect the USB flash memory to the USB TO DEVICE terminal 2 Set the desired Voice etc which you...

Page 78: ...on of the USB flash memory as a recording destination On the display of step 4 press the E PROPERTY button to check the number of the USB flash memory device memory size of the device avail able recording space on the device and available time for recording Press the F OK EXIT button to close the PROPERTY display CAUTION Never attempt to disconnect the USB flash memory or turn the power off during...

Page 79: ...the MIXING CONSOLE display 2 Use the TAB E E E E F buttons to call up the desired page For details about each display Page refer to the Reference Manual on the website VOL VOICE Changes the Voice for each part and adjusts panning and volume for each part page 81 Using the Auto Revoice function you can also convert the sound of commercially available XG song to the special sound using this instrume...

Page 80: ...wn one of the A J buttons and use the 1 8 buttons or the DATA ENTRY dial you can instantly set the same value to all other parts To save the PANEL PART display settings Register them to Registration Memory page 71 To save the STYLE PART display settings Save them as Style data 1 Call up the operation display FUNCTION F DIGITAL REC MENU B STYLE CREATOR 2 Press the EXIT button to close the REC CHANN...

Page 81: ...ection display appears 4 Select a Voice Press one of the Voice category selection buttons on the panel then select a Voice by using the A J buttons page 29 5 Press the EXIT button to return to the MIXING CONSOLE display 6 Save your settings step 5 on page 80 Changing Voices and Adjusting Panning Volume for Each Part Changing the Voice for each part 2 2 3 NOTE Some Voices such as Organ Flutes canno...

Page 82: ...dure on page 79 In step 2 select VOL VOICE tab 2 Press the D or I button to select the PANPOT parameter or press the E or J button to select the VOLUME parameter 3 Use the 1 8 buttons to adjust panning volume for the desired part 4 Save your settings step 5 on page 80 Adjusting Panning Volume for each part 3 2 PANPOT VOLUME ...

Page 83: ...en selected 3 Use the 1 8 buttons to adjust the depth of each effect for the desired part 4 Save your settings step 5 on page 80 Applying Effects to Each Part NOTE You can change the effect type by pressing the F TYPE button Refer to the Reference Manual Advanced Features Refer to the Reference Manual on the website Chapter 8 Converting XG Song Voice to this instru ment s Voice Song Auto Revoice M...

Page 84: ...connection you will first need to subscribe to an Internet service or provider Use a computer to connect to the Internet and get online before connecting the instrument since no modem or router settings can be made from the instrument itself The setting procedure differs depending on your connecting environment devices for connection etc For more information refer to the Internet Connection Guide ...

Page 85: ...c interference NOTE Some types of modems require an optional hub network for simulta neously connecting to several devices such as computer musical instru ment etc NOTE When you are using a modem with router connect the instrument to the modem by LAN cable Modem No router capability Router Cable type LAN cable LAN cable Here modem refers to an ADSL modem optical network unit ONU or cable modem LAN...

Page 86: ... can follow links and navigate through the website You can also use the 6 7 8 buttons and the 8 ENTER button instead of the DATA ENTRY dial and ENTER button Use the 1 BACK 2 FORWARD buttons to navigate through previously selected web pages To return to the top page of the special website press the 3 HOME button Press the 5 REFRESH button to reload a web page and press the 6 STOP to cancel loading ...

Page 87: ...et When this message is displayed the web page cannot be seen Icon 1 is displayed Now opening web page The web page is being loaded Icon 2 flashes Web page has been displayed Loading of the web page is completed and the page is displayed completely Icon 2 stops flashing When the displayed web page uses SSL icon 3 is displayed and information is encrypted for communication Strength of the reception...

Page 88: ...ly the L L R jack for connec tion with a monaural device CAUTION When the instrument s sound is output to an external device first turn on the power to the instrument then to the external device Reverse this order when you turn the power off CAUTION Do not route the output from the OUTPUT jacks to the AUX IN jacks If you make this connec tion the signal input at the AUX IN jacks is output from the...

Page 89: ...looking at the television or video monitor for prolonged periods of time since doing so could damage your eyesight Take frequent breaks and focus your eyes on distant objects to avoid eyestrain Screen Out Settings 1 1 2 MONITOR TYPE Selects the desired output monitor type NTSC or PAL to correspond to the standard used by your video equipment 2 3 4 SCREEN CONTENT Determines the contents of the Vide...

Page 90: ...es having a power source turn on the power first Adjust the INPUT VOLUME knob while singing into the microphone Adjust the control while checking the SIGNAL lamp Make sure to adjust the control so the lamp lights in green or orange Make sure that the lamp does not light in red since this indicates that the input level is too high Connecting a Microphone or Guitar NOTE Make sure you have a conventi...

Page 91: ...NG VOCAL HARMONY button to call up the harmony vocals Vocal Harmony Setting display 2 Press the 6 7 buttons to turn the harmony vocals Vocal Harmony on Applying Effects to Your Voice 2 3 TALK Turning TALK on lets you temporarily cancel the microphone effects or vocal harmony This is especially useful when you talk between songs during a performance 4 5 MIC EFFECT Turning MIC EFFECT on applies an e...

Page 92: ... chord data as you sing along with it The harmony is applied to your voice according to the chord NOTE You can adjust the volume balance between the keyboard performance and the microphone by using the BALANCE button page 48 Advanced Features Refer to the Reference Manual on the website Chapter 10 Microphone overall settings MIC SETTING VOCAL HARMONY I MIC SETTING TAB E F OVERALL SETTING Talk sett...

Page 93: ...tart Stop by footswitch Connect a footswitch FC4 or FC5 to one of the FOOT PEDAL jacks To assign the function to the connected pedal select SONG PLAY PAUSE in the operation display FUNCTION D CONTROLLER TAB E F FOOT PEDAL Connecting a Footswitch Foot Controller FOOT PEDAL 1 Switches sustain on or off Use the FC4 or FC5 footswitch FOOT PEDAL 2 PSR S910 Controls the Super Articulation Voices page 33...

Page 94: ...to read data to the instrument they can not be used for saving data The number of USB storage device to be used Up to two USB storage devices can be connected to the USB TO DEVICE terminal If necessary use a USB hub The number of USB storage devices that can be used simulta neously with musical instruments even when a USB hub is used is a maximum of two This instrument can recognize up to four dri...

Page 95: ...e number of the connected devices 4 Press the H FORMAT button to format the device media By using the LAN or USB TO DEVICE terminal you can connect the instrument to the Internet For instructions on connecting refer to page 85 and Internet Connection Guide downloadable from the Yamaha website Formatting a USB Storage Device CAUTION The format operation deletes any previously existing data Make sur...

Page 96: ...O HOST terminal When connecting the computer to the USB TO HOST terminal make sure to observe the following points Failing to do so risks freezing the computer and corrupting or losing the data If the computer or the instrument freezes restart the application software or the computer OS or turn the power to the instrument off then on again CAUTION Use an AB type USB cable of less than about 3 mete...

Page 97: ...ed by the instrument to another MIDI device For detailed information about the instrument s MIDI settings refer to the Reference Manual Connecting External MIDI Devices MIDI IN MIDI OUT MIDI transmit MIDI receive playback MIDI IN MIDI OUT MIDI device NOTE For a general overview of MIDI and how you can effectively use it refer to MIDI Basics downloadable from the Yamaha website Advanced Features Re...

Page 98: ...nd etc CONFIG 2 General settings such as displayed items for Voice Style selection display pop up display time etc SCREEN OUT PSR S910 Monitor type and display content settings which are necessary when connecting a TV monitor page 89 MEDIA Settings related to a connected USB storage device such as formatting page 95 and confirmation of memory size OWNER Settings of Owner name page 17 and Message l...

Page 99: ...d or noisy The volume may be turned up too high Make sure all relevant volume settings are appropriate This may be caused by certain effects or filter resonance settings Check the effect or filter settings and change them accordingly referring to the Reference Manual Not all simultaneously played notes sound You are probably exceeding the maximum polyphony page 104 of the instrument When the maxim...

Page 100: ... the Song data is large about 300 KB or greater the Song cannot be selected because the data is too large to be read by the instrument Song playback does not start The Song has been stopped at the end of the Song data Return to the beginning of the Song by pressing the SONG STOP button In the case a Song to which write protect has been applied Prot 2 Edit is shown at the upper left of the Song nam...

Page 101: ...c of the Style and Song from the VOICE parameter the detailed settings related to the drum voice are reset and in some cases you may be unable to restore the original sound In the case of Song playback you can restore the original sound by returning to the beginning of the Song and playing back from that point In the case of Style play you can restore the original sound by selecting the same Style...

Page 102: ...AL HARMONY display 91 5 PITCH BEND wheel 34 6 MODULATION wheel 35 7 PHONES jack 16 8 SONG SELECT Song Selection display 49 SCORE SCORE display 52 LYRICS TEXT LYRICS or TEXT display 53 REPEAT 55 GUIDE 54 EXTRA TR 54 TR 2 54 TR 1 54 REC CHANNEL ON OFF SONG pop up 56 STOP 50 F II PLAY PAUSE 50 G REW H FF SONG POSITION pop up 51 9 STYLE POP ROCK WORLD Style Selection display PRESET 39 USER Style Selec...

Page 103: ...N OUT PSR S910 89 MEDIA 95 OWNER 16 17 28 SYSTEM RESET 98 USB USB AUDIO PLAYER display 75 INTERNET Special Website only when connected to the Internet 84 REGISTRATION MEMORY REGIST BANK REGISTRATION BANK pop up 73 FREEZE 73 MEMORY REGISTRATION MEMORY CONTENTS display 71 1 8 72 MULTI PAD CONTROL SELECT Multi Pad Selection display 63 1 4 63 STOP 63 MUSIC FINDER MUSIC FINDER display ALL 67 FAVORITE 7...

Page 104: ...oices GM2 GS for GS Song Playback Featured Voices 38 Super Articulation Voices 18 Mega Voices 24 Sweet Voices 46 Cool Voices 29 Live Voices 10 Organ Flutes 15 Mega Voices 23 Sweet Voices 33 Cool Voices 19 Live Voices 10 Organ Flutes Custom Voice Creating Voice Set Yes Compatibility XG Yes XF Yes GS Yes GM Yes GM2 Yes Effects Types Reverb 42 Preset 3User Chorus 71 Preset 3 User DSP DSP 1 271 Preset...

Page 105: ...echnology P A T Yes Demo Demonstration Yes USB Audio Playback wav mp3 wav Recording wav Overall Controls Metronome Yes Tempo Range 5 500 Tap Tempo Transpose 12 0 12 Tuning 414 8 440 466 8 Hz Octave Button Yes Scale Type 9 presets Miscellaneous Direct Access Yes Storage and Connectivity Storage Internal Memory 2 4 MB 1 4 MB External Drives USB Flash Memory USB Hard Disk Drive etc via USB to DEVICE ...

Page 106: ... dial 21 Data List 10 DC IN terminal 14 DELETE 61 DEMO 18 DEMO Voice 30 Dial Data Entry 21 DIRECT ACCESS 22 Drum Voice 33 DSP 36 83 E EFFECT 79 EFFECT EQ 38 ENDING rit 42 ENTER 21 Entering Characters 26 EQ 79 Ethernet Converter 85 EXIT 22 EXTRA TR 54 F Factory Reset 27 FADE IN OUT 44 Fast Forward 51 FAVORITE 70 File 25 File Selection Display 25 Fill in section 43 FILTER 79 Folder 26 FOLDER File Se...

Page 107: ...1 Pause 50 Percussion Voice 33 Performance Assistant 62 PHONES 16 PHR1 2 Phrase1 2 47 Phrase Mark 51 PITCH BEND RANGE 34 Pitch Bend Wheel 34 Pitch setting 34 Powered speaker 88 PRESET 25 Preset Voice 33 PRESETS Organ Flutes 37 Pro 40 Prot 52 Protected Song 52 Q Quick Recording 56 R REC 56 REC MODE Song Creator 62 Record Music Finder 66 RECORD EDIT 70 Recording Audio 77 Recording Song 56 Reference ...

Page 108: ...26 UPPER OCTAVE 34 USB File Selection Display 25 USB Audio 75 USB AUDIO RECORDER 78 USB button 75 USB Storage Device 94 USB TO DEVICE 94 USB TO HOST 96 USB Wireless LAN Adaptor 85 USB MIDI driver 96 USER 25 USER Voice 30 Utility 98 V VARI 36 VERSION 17 VH 9 Vibrato 35 VIBRATO Organ Flutes 37 VIDEO OUT 89 VOCAL HARMONY 91 VOICE 29 Voice Effect 35 VOICE SET 36 38 Voice Type 33 VOL VOICE 79 Volume 48...

Page 109: ... of purchase documents will cause this warranty to be void This warranty covers only the Original Owner and is not transferable In Order to Obtain Warranty Service Warranty service will only be provided for defective products within the Warranted Area Contact your local authorized Yamaha dealer who will advise you of the procedures to be followed If this is not successful contact Yamaha at the add...

Page 110: ...tatements apply ONLY to those products distributed by Yamaha Corporation of America or its subsidiaries IMPORTANT NOTICE FOR THE UNITED KINGDOM Connecting the Plug and Cord IMPORTANT The wires in this mains lead are coloured in accordance with the following code BLUE NEUTRAL BROWN LIVE As the colours of the wires in the mains lead of this apparatus may not correspond with the coloured makings iden...

Page 111: ...en Liaison Office Generatorvej 6A DK 2730 Herlev Denmark Tel 44 92 49 00 FINLAND F Musiikki Oy Kluuvikatu 6 P O Box 260 SF 00101 Helsinki Finland Tel 09 618511 NORWAY Norsk filial av Yamaha Scandinavia AB Grini Næringspark 1 N 1345 Østerås Norway Tel 67 16 77 70 ICELAND Skifan HF Skeifan 17 P O Box 8120 IS 128 Reykjavik Iceland Tel 525 5000 RUSSIA Yamaha Music Russia Office 4015 entrance 2 21 5 Ku...

Page 112: ...sical Instrument Division Yamaha Corporation 2009 Yamaha Corporation WR35340 906MWAPX X 01A0 Printed in China Yamaha Home Keyboards Home Page http music yamaha com homekeyboard Yamaha Manual Library http www yamaha co jp manual ...

Reviews: