background image

About MIDI

PSR-E323/YPT-320   Owner’s Manual

61

Ref

erence

After installing the Musicsoft Downloader appli-
cation on your computer, connect the PSR-E323/
YPT-320 as described below.
A Yamaha UX16 or similar USB-MIDI interface 
(sold separately) will be necessary for MIDI 
connection between the PSR-E323/YPT-320 and 
a USB-equipped computer.
Make sure to purchase a Yamaha UX16 or a 
quality USB-MIDI interface at a musical instru-
ment store, computer store or electrical appli-
ance store.
If you use the UX16 interface, install the driver 
supplied with the interface on your computer.

You can transmit Song files and Style Files from 
your computer to the Flash Memory on your 
instrument. Move the file from the computer to 
“Flash Memory” under “Electronic Musical 
Instruments” via the Musicsoft Downloader. For 
details about how to transmit Song file and Style 
File, refer to the Online help topic “Transferring 
Data Between the Computer and Instrument (for 
unprotected data)” of the Musicsoft Downloader. 

Data that can be loaded to the PSR-
E323/YPT-320 from a computer

• Songs

: 99 Songs max 

(Song numbers 108–)

• Data

: 373 kilobytes

• Data Format : SMF Format 0 and 1
• File

: 09PK3.BUP (Backup file)
: ***.mid (MIDI Song)
: ***.sty (Style File)

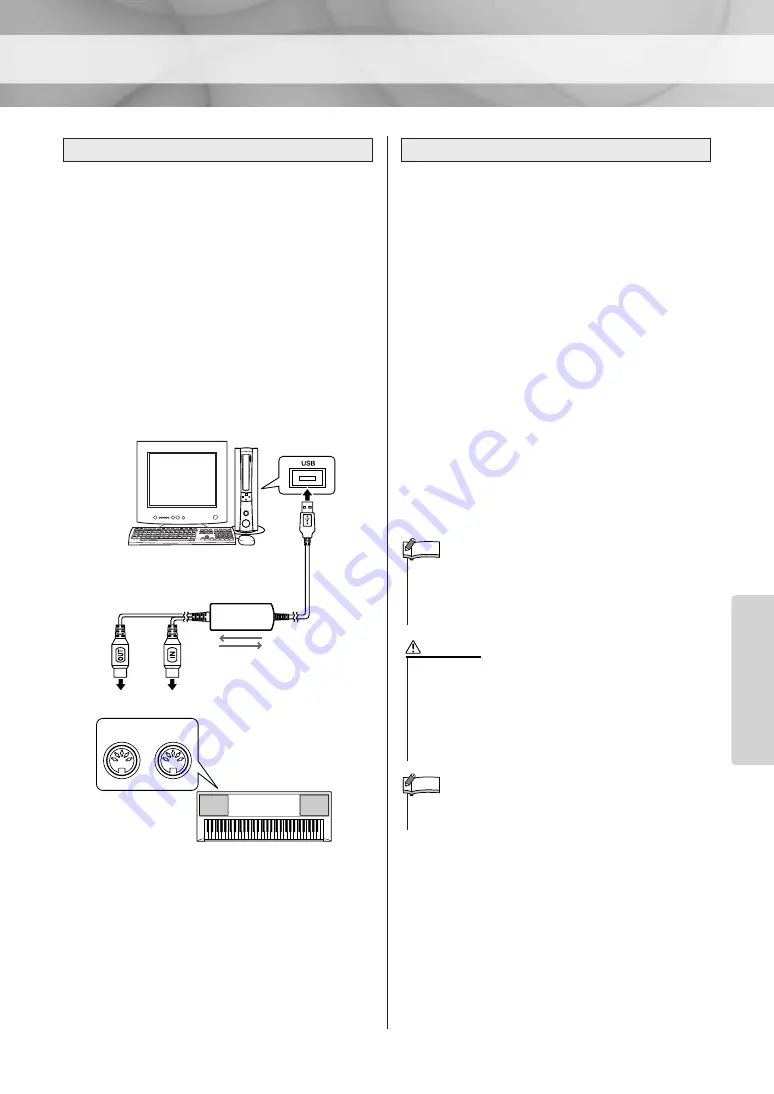
Connecting a personal computer

A USB-MIDI interface 

(such as the Yamaha UX16)

MIDI IN

MIDI OUT

USB

PSR-E323/

YPT-320

(Rear)

Transferring a file from a computer

• The Musicsoft Downloader application may not be able to 

access the instrument in the following cases:

•During Style playback
•During Song playback

NOTE

• Use the power adaptor when transferring data. The data 

can be corrupted if the batteries fail during the transfer.

• Never turn the power off and never plug/unplug the AC 

power adaptor during data transmission. Not only will the 
data fail to be transferred and saved, but operation of the 
flash memory may become unstable and its contents may 
disappear completely when the power is turned on or off.

CAUTION

• Close the window to exit from the Musicsoft Downloader and 

re-enable control of the instrument. 

NOTE

Summary of Contents for PSR-E323

Page 1: ...Setting Up then try out the simple operations in Quick Guide Reference provides detailed descriptions and procedures for getting the most out of the instrument After you ve read the manual keep it safe and handy for future reference Data List The Data List contains MIDI related information The Data List is available for downloading from the Yamaha Manual Library at http www yamaha co jp manual Own...

Page 2: ...oduction methods used to pro duce them meet these goals In keeping with both the let ter and the spirit of the law we want you to be aware of the following Battery Notice This product MAY contain a small non rechargeable bat tery which if applicable is soldered in place The average life span of this type of battery is approximately five years When replacement becomes necessary contact a quali fied...

Page 3: ...sers man ual may cause interference harmful to the operation of other electronic devices Compliance with FCC regula tions does not guarantee that interference will not occur in all installations If this product is found to be the source of interference which can be determined by turning the unit OFF and ON please try to eliminate the problem by using one of the following measures Relocate either t...

Page 4: ... Always make sure all batteries are inserted in conformity with the polarity markings Failure to do so might result in overheating fire or battery fluid leakage Always replace all batteries at the same time Do not use new batteries together with old ones Also do not mix battery types such as alkaline batteries with manganese batteries or batteries from different makers or different types of batter...

Page 5: ...ding but not limited to MIDI data and or audio data is strictly prohibited except for your personal use Trademarks Windows is the registered trademarks of Microsoft Corporation The company names and product names in this Owner s Manual are the trademarks or registered trademarks of their respective companies GM System Level 1 GM System Level 1 is an addition to the MIDI standard which ensures that...

Page 6: ...and much more Play Using the Music Database page 36 Simply selecting your favorite style such as rock or jazz from the Music Database calls up the appro priate Voice and Styles that matches the selected style Practicing Practicing and mastering Songs pages 28 31 35 You can practice the preset Songs using these lesson functions Keys to Success page 28 Listen ing Timing Waiting page 31 and Phrase Re...

Page 7: ...ce 37 Recording to a specified track 38 Initialization 41 Initialization 41 Voice Settings 42 Adding Harmony 42 Adding Reverb 43 Adding Chorus 43 Adding Panel Sustain 44 Touch Response Sensitivity 44 Playing Two Voices Simultaneously Dual 45 Playing Different Voices with the Left and Right Hands Split 46 Setting the Split Point 47 Adjusting the Voice volume 47 Setting the Metronome Beats per Measu...

Page 8: ...ly The use of other adaptors may result in irreparable damage to both the adaptor and the instrument WARNING Unplug the AC Power Adaptor when not using the instrument or during electrical storms CAUTION AC power adaptor AC outlet w e Never connect or disconnect the AC power adaptor when the batteries are installed in the instrument and the power is on Doing so will turn the power off possibly resu...

Page 9: ...t Connecting a footswitch Avoid listening with the headphones at high volume for long periods of time doing so may not only result in ear fatigue it may be damaging to your hearing CAUTION To prevent damage to the speakers set the volume of the external devices at the minimum setting and turn power off the devices before connecting them Failure to observe these precautions may result in electric s...

Page 10: ...N button pages 56 4 DEMO button page 17 5 A B REPEAT button page 51 6 REW button page 17 7 FF button page 17 8 PAUSE button page 17 5 ACMP ON OFF button page 20 6 INTRO ENDING rit button page 23 7 MAIN AUTO FILL button page 23 8 SYNC START button page 19 53 9 START STOP button page 17 0 REC button page 37 1 PORTABLE GRAND button page 13 2 MUSIC DATABASE button page 36 3 REVERB button page 43 4 SPL...

Page 11: ...R E323 YPT 320 Owner s Manual 11 Setting Up GrandPno 001 001 GrandPno 001 001 4 9 0 3 1 u 0 o i 3 4 5 6 7 2 1 2 y 2 1 0 9 Display page 27 Song List page 72 Voice List page 64 Style List page 70 Rear Panel Music Database List page 71 ...

Page 12: ...and piano Voice is automatically selected whenever the power is turned on but you can easily change this guitar drum or any of an extensive range of voices 1 Press the VOICE button The Voice number and name are displayed Try playing a variety of instrument Voices 1 2 Grand Piano Voice GrandPno 001 001 Voice number Voice name Quick Guide ...

Page 13: ...page 64 3 Play the keyboard Try selecting and playing different Voices When you simply want to play a piano Voice all you have to do is press one convenient button Press the PORTABLE GRAND button The Voice Grand Piano will automatically be selected as the Main Voice Playing the Grand Piano Voice Flute 084 The Voice shown here becomes the Main Voice for the instrument ...

Page 14: ...stop the metronome press the METRONOME button again If you want to adjust the metronome tempo press the TEMPO TAP button to call up the Tempo setting in the display then press the button to raise the tempo or press the button to lower it You can also set the tempo using the number buttons on the front panel Using the Metronome Metronome Percussion and drum icons You can set the time signa ture pag...

Page 15: ...ly from the keyboard To check which percussion sounds are assigned to each key when you select Voice number 109 look at the icons printed above the keys You can select and play the desired Drum Kit from 12 preset Drum Kits Voice number 109 121 Details on the instruments and key assignments of each Drum Kit can be found in the Drum Kit List on page 68 Playing the Drum Kit Voice ...

Page 16: ...usic Listening to a Song 1 Press the SONG button The Song number and name are displayed Song number 004 is automatically selected whenever the power is turned ON The songs are organized by category For details see page 72 Select and Listen to a Specific Song 1 3 2 When you want to select the Song number 001 003 use the number buttons 0 9 NOTE Elise 1 004 01 Song number Song name ...

Page 17: ...t forwards the Song if pressed during playback Increases the measure number if pressed while playback is stopped PAUSE button Temporarily stops playback Press this button a second time to resume playback from the point at which it was stopped Using the DEMO button Press the DEMO button to play Songs 001 002 003 in sequence and playback will continue repeatedly starting again from the first Song 00...

Page 18: ...ll learn how to select and play Styles using chords While you play you can automatically add specially created intros and endings as well as variations in the rhythm chord patterns for more dynamic professional sounding performances 1 4 5 2 6 3 Try playing chords with your left hand Play a melody with your right hand Auto Accompani ment range Split Point Before Performance Select the String Ensemb...

Page 19: ...and then register the style data starting with to style num ber 107 Refer to the infor mation on transferring data on page 61 and registering styles on page 55 If the Style File has not been reg istered No Data will be displayed when selecting style number 107 NOTE 8BtModrn 001 001 Style number Style name Since the Pianist category Styles 098 106 have no rhythm parts no sound will be produced if y...

Page 20: ...n the next page for practice purpose For infor mation on how to enter chords see page 24 6 Stop playing Playback will stop as soon as you press the START STOP but ton When auto accompaniment is on The keys to the left of the Split Point 54 F 2 will play only chords This is known as the Auto Accompaniment range If you press the START STOP button while the auto accompaniment is off only the rhythm p...

Page 21: ...PSR E323 YPT 320 Owner s Manual 21 Play with a Style Quick Guide Practice Aura Lee Composer G Poulton Recommended Style 018 Love Song Recommended Voice 047 String Ensemble A C D 7 D E G ...

Page 22: ... slow 1 Press the TEMPO TAP button to call up the Tempo setting in the display after selecting a Style 2 Set the Tempo by using the number buttons 0 9 Changing the tempo of the Style 1 2 Current Tempo value Tempo 070 Press the and buttons simultaneously to instantly reset the value to the default tempo of a Style NOTE ...

Page 23: ...ing the actual Main rhythm When the intro finishes play ing Style playback shifts to the main section Switching Main Patterns There are two variations on the basic pattern A and B These are alternately selected each time the MAIN AUTO FILL button is pressed The main accompaniment pattern plays and repeats indefi nitely until another section s button is pressed Adding a Fill in A Fill in pattern is...

Page 24: ...ke up the chord Understanding the basic structure of chords is very useful once you re familiar with this you ll be quickly and easily play chords by looking at the names that appear above the notation Taking the chord above as an example the lowest note of this triad is called the root note This is the central note sound and it supports or anchors the rest of the notes chord Upper case letters in...

Page 25: ...y the root name only Chords Major Minor Seventh Minor Seventh Major Seventh Easy Chords This method lets you easily play chords in the accompaniment range of the keyboard using only one two or three fingers For root C To play a major chord Press the root note of the chord To play a minor chord Press the root note together with the nearest black key to the left of it To play a seventh chord Press t...

Page 26: ...to access the SONG functions printed above the buttons and press the STYLE but ton to access the STYLE functions printed below Number buttons 0 9 The number buttons can be used to directly enter a Song Style or Voice number or parameter value For numbers that start with one or two zeroes the first zeroes can be omitted buttons Press the button briefly to increase the value by 1 or press the button...

Page 27: ...or when using the Dictionary function Chord Display Measure Keyboard Display 003 Information related to the Song recording tracks is shown here See pages 37 and 51 Lit Track contains data Unlit Track is muted or contains no data Flashing Track is selected as recording track Indicates the beat of the current Style or Song with flashing arrows Song recording track display Beat Display Indicate the o...

Page 28: ...03 can be used with this mode especially the LEARN TO PLAY category Songs 004 019 1 Select a song for your lesson For this example we ll select song 006 Twinkle Twinkle Little Star Basic from the LEARN TO PLAY category For instructions on how to select a Song see page 16 2 Turn Keys to Success on Pressing the KEYS TO SUCCESS button turns the Keys to Success feature on and a Step of the Song is aut...

Page 29: ...u passed The next Step begins automatically In some Steps the lead in may run a little slower than normal because a ritar dando or fermata section is placed before the Step NOTE You can practice the speci fied phrase using the Les son modes 1 Listening 2 Timing or 3 Waiting described on page 31 In these Lesson modes with the Keys to Success func tion however it is not pos sible to pass the Step Wh...

Page 30: ...ing status has been cleared a Cleared message will appear on the display Once the opera tion has been completed no information will appear even when selecting the Song or Step Entering and Clearing the Passing Status Step01 Lr 001 Passed No information Not yet passed Twinkle1 006 001 There are one or more Steps not yet passed in addition to the last Step Only last Step passed All Steps passed othe...

Page 31: ...and learn the melody or rhythm of a selected Song 2 Timing Learn to play the notes at the correct timing along with the Song 3 Waiting Learn to play the correct notes 1 Select the desired Song for your lesson For instructions on how to select a Song see page 16 If you want to practice a Song you ve transferred from a computer select one of the Songs beginning from Song number 108 The instrument in...

Page 32: ... lesson mode Each time the 1 LISTENING 2 TIMING 3 WAITING button is pressed the lesson modes are selected in sequence 1 Listening 2 Timing 3 Waiting Off 1 Listening etc The currently selected lesson mode is shown in the display For this example select 1 Listening Left Right BothHand Both hands lesson Right hand lesson Left hand lesson For songs transferred from a computer the No LPart indication d...

Page 33: ...nd Listen to it carefully and learn it well The notation and key positions of the model melody are shown in the display Lesson 2 Timing will begin as soon as you press the 1 LISTENING 2 TIMING 3 WAITING button TIMING r2 004 2 Timing In this mode try playing the notes with the correct timing Simply concentrate on playing each note in time with the rhythmic accompaniment The correct notes sound even...

Page 34: ...AITING button respectively 5 Stop the Lesson mode You can stop the Lesson mode at any time by pressing the START STOP button When the lesson Song has played all the way through in Lesson mode 2 Timing or 3 Waiting your performance will be evaluated in four levels OK Good Very Good or Excellent OK Good Very0Good Excellent Grade ...

Page 35: ...e subsequent phrases you wish to include in the repeat then press the A B REPEAT button a second time This specifies the last phrase selected as the end phrase point B for Phrase Repeat playback REPEAT will appear on the display and the specified A B section of the Song will now play repeatedly If playback is stopped press the START STOP button to start Stop A B Repeat playback by pressing the PHR...

Page 36: ...A Music Database name will appear in the display 2 Select a Music Database Referring to the Music Database category list printed on the panel select a music database that matches the image of the song you intend to play For example select one from the SWING JAZZ category 047 056 if you want to play jazz 3 Play the chords with your left hand and melody with your right The jazz style will start play...

Page 37: ...egin By playing keys to the left of the Split Point when the Auto Accompa niment is set to on the Style starts sounding and is recorded with your performance When Auto Accompaniment is set to off only your keyboard perfor mance is recorded User 1 rEC 001 Flashes The lowest numbered unrecorded User Song Song numbers 103 107 available for recording is displayed If you want to select the Song you wil...

Page 38: ...bout track recording Never attempt to turn the power off when a Writ ing message is shown in the display Doing so can damage the flash memory and result in a loss of data CAUTION Use the Musicsoft Downloader to backup the User Songs to a computer page 60 NOTE The ACMP ON lights The ACMP ON is unlit Record following the steps in the previous page and your performance will be recorded to Track 1 and...

Page 39: ...companiment is set to off Specifying track recording Keep in mind that both Tracks 1 and 2 will be overwritten with new data if you record without specifying the tracks The both L and R flashes this indicates that you have specified Track 1 when the Auto Accompaniment is on If you want to record your own performance press the TRACK 2 button to stop the L flashing If you want to record a Style pres...

Page 40: ...Delete display appears You can cancel the delete operation by pressing the NO button 3 Press the YES button A confirmation message will appear on the display You can cancel the delete operation by pressing the NO button 4 Press the YES button to delete the Song Writing message will appear while the track is being deleted Deleting User Songs You cannot delete a specific track from a User Song NOTE ...

Page 41: ...ressing the STANDBY ON switch Deleting Files When you execute the Ini tialization backup param eters will be cleared CAUTION Although the above parameters are always backed up and are maintained even when the power is turned off they will be completely erased by the initialization You can save the settings as backup data to your computer by using the Musicsoft Downloader MSD software Refer to the ...

Page 42: ...Volume in the Func tion Settings page 56 Appears when harmony is on ndPno When you press the HARMONY button to turn this feature on the appropriate Harmony type for the currently selected Main Voice is automatically selected NOTE Trio 02 Currently selected Harmony type You can also access the Harmony Type setting display by pressing the FUNCTION button several times Harmony will be turned off if t...

Page 43: ...ge 73 for details You can adjust the Reverb depth in the Func tion Settings page 56 Adding Chorus This effect makes theVoice sound richer warmer and more spacious The best suited Chorus type is automatically selected whenever you select a Voice however you can select any of the avail able types 1 Press the FUNCTION button a number of times until the Chorus appears Chorus appears in the display for...

Page 44: ...hard you play the keys When Touch Response is on you can adjust the sensitivity of the keyboard in response to key board dynamics in three steps Higher values produce greater easier volume variation in response to keyboard dynamics in other words greater sensitivity 1 Press and hold the TOUCH button for longer than a second TouchSns appears in the display for a few seconds followed by the current ...

Page 45: ...e best suited Dual Voice is automatically selected whenever you turn Dual on but you can select any of the available Dual Voices 1 Press and hold the DUAL button for longer than a second D Voice appears in the display for a few seconds then the Dual Voice will appear 2 Select a Dual Voice Select the desired Dual Voice by using the number buttons 0 9 Refer to the Voice List on page 64 Play the Dual...

Page 46: ... the SPLIT button to turn Split off You can select a different Split Voice by follow ing the procedure outlined below 1 Press and hold the SPLIT button for longer than a second S Voice appears in the display for a few seconds then the Split Voice will appear 2 Select a Split Voice Select the desired Split Voice by using the number buttons 0 9 Refer to the Voice List on page 64 Play the Split Voice...

Page 47: ...idually adjusted for the Main Dual and Split Voices 1 Press the FUNCTION button a number of times until the required Voice volume item appears Select M Volume for Main Voice volume D Volume for Dual Voice volume or S Volume for Split Voice volume 2 Set the Voice volume by using the number buttons 0 9 36 48 60 72 84 96 Split Point default setting 54 F 2 Currently selected Split Point Split Point Sp...

Page 48: ...0 through 60 Select 3 for this example 3 Press the FUNCTION button a number of times to select the beat length function TimeSigD The currently selected beat length will be displayed 4 Use the to select the beat length Select the required length for each beat 2 4 8 or 16 half note quarter note eighth note or 16th note Select 4 for this example Setting the Metronome Volume 1 Press the FUNCTION butto...

Page 49: ...natures and to let you easily match the pitch of the keyboard to the range of a singer or other instruments For exam ple if you set the transposition amount to 5 playing key C produces pitch F In this way you can play a song as though it were in C major and the instrument will transpose it to the key of F 1 Press the FUNCTION button a number of times until the Transpos appears 2 Use the number but...

Page 50: ...with a Song or Style can be confusing The One Touch Setting feature automatically selects the most suitable Voice for you when you select a Style or Song Simply select Voice number 000 to activate this feature 1 Press the VOICE button and then select Voice number 000 by using the number buttons 0 9 This turns the One Touch Setting feature on One Touch Setting will be turned off if you select any o...

Page 51: ... the A point then press the A B REPEAT button a second time at the end of the section you want to repeat the B point The specified A B section of the Song will now play repeatedly You can stop repeat playback at any time by pressing the A B REPEAT button An oFF REPEAT message appears on the display The A B REPEAT mode will be canceled and normal playback of the Song will continue Lit track contain...

Page 52: ...ng the TEMPO TAP button just twice Changing the Melody Voice You can change a Song s melody Voice to any other Voice you prefer 1 Select the Song and play it Refer to the section Playing Songs on page 16 2 Select a desired Voice by using the number buttons 0 9 The selected Voice sounds when you play the keyboard If a Song has played through and stopped during this procedure press the START STOP bu...

Page 53: ...e signatures in 4 and 3 times for time signatures in 3 and the selected Style rhythm will begin playing at the tapped tempo The bass and chords will begin playing as soon as you play a chord in the accompaniment range of the keyboard Adjusting the Style Volume This procedure allows you to adjust the balance between Style playback and the notes you play on the keyboard by setting the volume of the ...

Page 54: ...otes you should play for the specified chord root note and chord type are shown in the display both as notation and in the keyboard diagram To call up possible inversions of the chord press the buttons 4 Try playing a chord in the auto accompani ment section of the keyboard checking the indications in the display When you ve played the chord properly a bell sound signals your success and the chord...

Page 55: ...ata between the PSR E323 YPT 320 and a com puter The procedure described below registers a style file that has already been transferred from a com puter to the instrument into style number 107 1 Press the FUNCTION button as many time as necessary to select the style file load func tion StyleReg After about 2 seconds the name of a register able style file will appear in the display If multiple load...

Page 56: ...l 000 127 Determines the volume of the Style Song Volume SongVol 000 127 Determines the volume of the Song Transpose TransPos 12 00 12 Determines the pitch of the instrument by semitone incre ments Tuning Tuning 100 000 100 Sets the pitch of the instrument s sound in 1 cent increments Split Point SplitPnt 000 127 C 2 G8 Determines the highest key for the Split Voice and sets the Split point in oth...

Page 57: ...e HarmVol 000 127 Determines the volume of the Harmony effect when Harmony type 1 5 is selected PC Mode PC0mode OFF PC1 PC2 Optimizes the MIDI settings when you connect to a computer page 59 Local On Off Local ON OFF Determines whether the instrument s keyboard controls the internal tone generator ON or not OFF External Clock ExtClock ON OFF Determines whether the instrument synchronizes to the in...

Page 58: ...ce sold separately will be necessary for MIDI connection between the PSR E323 YPT 320 and a USB equipped computer Make sure to purchase a Yamaha UX16 or a quality USB MIDI interface at a musical instru ment store computer store or electrical appli ance store If you use the UX16 interface install the driver supplied with the interface on your computer Connect the PSR E323 YPT 320 to external equipm...

Page 59: ...ck in the Function Settings page 56 The PC settings instantly reconfigure all impor tant MIDI settings as shown below The selec tions are PC1 PC2 and OFF The chart of PC Settings Set the PC mode to PC2 when using Digital Music Notebook Digital Music Notebook is a major new multimedia plat form for music tuition and performance Visit the website below for more information on the latest ver sion of ...

Page 60: ...n be registered as the 107th style In order to perform the operations described in this section you will need to use a computer con nected to the Internet to download the free Musicsoft Downloader application The SMF Standard MIDI File format is one of the most common and widely compatible sequence formats used for storing sequence data Most commercially available MIDI sequence data is provided in...

Page 61: ...Between the Computer and Instrument for unprotected data of the Musicsoft Downloader Data that can be loaded to the PSR E323 YPT 320 from a computer Songs 99 Songs max Song numbers 108 Data 373 kilobytes Data Format SMF Format 0 and 1 File 09PK3 BUP Backup file mid MIDI Song sty Style File Connecting a personal computer A USB MIDI interface such as the Yamaha UX16 MIDI IN MIDI OUT USB PSR E323 YPT...

Page 62: ...u transmit or receive Keep this in mind when transferring data Do not rename the backup file on the computer If you do so it will not be recognized when transferred to the instrument CAUTION Erasing Transferred Song Data from the PSR E323 YPT 320 Memory To erase all Songs transferred from the computer use flash clear function on page 41 To erase specific Songs transferred from the computer use the...

Page 63: ...key for the cords you are playing Set the Split Point at an appropriate key page 47 Is the ACMP ON indicator showing in the display If it is not showing press the ACMP ON OFF button so that it does show The auto accompaniment will sometimes not change when related chords are played in sequence e g some minor chords followed by the minor seventh Two note fingerings will produce a chord based on the...

Page 64: ...6 2 Organ 021 0 120 20 16 4 Organ 022 0 113 20 Chapel Organ 023 0 112 20 Church Organ 024 0 112 21 Reed Organ ACCORDION 025 0 112 22 Musette Accordion 026 0 113 22 Traditional Accordion 027 0 113 24 Bandoneon 028 0 112 23 Harmonica GUITAR 029 0 112 25 Classical Guitar 030 0 112 26 Folk Guitar 031 0 112 27 Jazz Guitar 032 0 117 28 60 s Clean Guitar 033 0 113 26 12Strings Guitar 034 0 112 28 Clean G...

Page 65: ...am Change 1 128 Voice Name MSB 0 127 LSB 0 127 152 0 1 13 Marimba KSP 153 0 64 13 Sine Marimba 154 0 97 13 Balimba 155 0 98 13 Log Drums 156 0 0 14 Xylophone 157 0 0 15 Tubular Bells 158 0 96 15 Church Bells 159 0 97 15 Carillon 160 0 0 16 Dulcimer 161 0 35 16 Dulcimer 2 162 0 96 16 Cimbalom 163 0 97 16 Santur ORGAN 164 0 0 17 Drawbar Organ 165 0 32 17 Detuned Drawbar Organ 166 0 33 17 60 s Drawba...

Page 66: ... 54 Voice Oohs 281 0 0 55 Synth Voice 282 0 40 55 Synth Voice 2 283 0 41 55 Choral 284 0 64 55 Analog Voice 285 0 0 56 Orchestra Hit 286 0 35 56 Orchestra Hit 2 Voice No Bank Select MIDI Program Change 1 128 Voice Name MSB 0 127 LSB 0 127 287 0 64 56 Impact BRASS 288 0 0 57 Trumpet 289 0 32 57 Warm Trumpet 290 0 0 58 Trombone 291 0 18 58 Trombone 2 292 0 0 59 Tuba 293 0 0 60 Muted Trumpet 294 0 0 ...

Page 67: ...Altair 415 0 98 113 Gamelan Gongs 416 0 99 113 Stereo Gamelan Gongs 417 0 100 113 Rama Cymbal 418 0 0 114 Agogo Voice No Bank Select MIDI Program Change 1 128 Voice Name MSB 0 127 LSB 0 127 419 0 0 115 Steel Drums 420 0 97 115 Glass Percussion 421 0 98 115 Thai Bells 422 0 0 116 Woodblock 423 0 96 116 Castanets 424 0 0 117 Taiko Drum 425 0 96 117 Gran Cassa 426 0 0 118 Melodic Tom 427 0 64 118 Mel...

Page 68: ... 2 SD Room L SD Rock L SD Rock L 51 D 2 39 D 1 Hand Clap 52 E 2 40 E 1 Snare H Hard Snare H Hard 2 SD Room H SD Rock Rim SD Rock H 53 F 2 41 F 1 Floor Tom L Room Tom 1 Rock Tom 1 E Tom 1 54 F 2 42 F 1 1 Hi Hat Closed 55 G 2 43 G 1 Floor Tom H Room Tom 2 Rock Tom 2 E Tom 2 56 G 2 44 G 1 1 Hi Hat Pedal 57 A 2 45 A 1 Low Tom Room Tom 3 Rock Tom 3 E Tom 3 58 A 2 46 A 1 1 Hi Hat Open 59 B 2 47 B 1 Mid ...

Page 69: ...d 4 Cuckoo Clock Analog Tom 3 Analog Tom 3 Jazz Tom 3 Brush Tom 3 Jazz Tom 3 Stream Analog HH Open Analog HH Open 2 Frog Analog Tom 4 Analog Tom 4 Jazz Tom 4 Brush Tom 4 Jazz Tom 4 Rooster Analog Tom 5 Analog Tom 5 Jazz Tom 5 Brush Tom 5 Jazz Tom 5 Dog Analog Cymbal Analog Cymbal Hand Cym L Cat Analog Tom 6 Analog Tom 6 Jazz Tom 6 Brush Tom 6 Jazz Tom 6 Owl Hand Cym Short L Horse Gallop Flute Key ...

Page 70: ...e Four 046 Dixieland 047 Ragtime R B 048 Soul 049 DetroitPop 050 6 8Soul 051 CrocoTwist 052 Rock Roll 053 ComboBoogie 054 6 8Blues Country 055 CountryPop 056 CountrySwing 057 Country2 4 058 Bluegrass Latin 059 BrazilianSamba 060 BossaNova 061 Forro 062 Tijuana 063 Mambo 064 Salsa 065 Beguine 066 Reggae Ballroom 067 VienneseWaltz 068 EnglishWaltz 069 Slowfox 070 Foxtrot 071 Quickstep 072 Tango 073 ...

Page 71: ...CU later 43 HappyDay 44 RisingSn 45 ShookUp 46 TeddyBer SWING JAZZ 47 ChooChoo 48 HighMoon 49 InMood 50 MistySax 51 MoonLit 52 New York 53 SaintMch 54 ShearJz 55 TstHoney 56 USPatrol EASY LISTENING 57 Close2U 58 Entrtain 59 LuvStory 60 MyPrince 61 PupetStr 62 Raindrop 63 R ticGtr 64 SingRain 65 SmallWld 66 SpkSoft 67 StrangeN 68 TimeGoes 69 WhteXmas 70 WishStar 71 WondrWld LATIN 72 BambaLa 73 BeHa...

Page 72: ...ster 029 Bury Me Not on the Lone Prairie Traditional 030 Cielito Lindo Traditional 031 Santa Lucia A Longo 032 If You re Happy and You Know It Traditional 033 Beautiful Dreamer S C Foster 034 Greensleeves Traditional 035 Kalinka Traditional 036 Holdilia Cook Traditional 037 Ring de Banjo S C Foster 038 La Cucaracha Traditional 039 Funiculi Funicula L Denza 040 Largo From the New World A Dvorák 041...

Page 73: ... 12 Trill 1 32 note 13 Tremolo 1 4 note If you keep holding down a single note the note is repeated continuously The repeat speed differs depending on the selected type 14 Tremolo 1 6 note 15 Tremolo 1 8 note 16 Tremolo 1 12 note 17 Tremolo 1 16 note 18 Tremolo 1 24 note 19 Tremolo 1 32 note 20 Echo 1 4 note If you keep holding down a note echo is applied to the note played The echo speed differs ...

Page 74: ...l Sustain Harmony Type Harmony Volume PC mode PC1 PC2 Off Local On Off External Clock Initial Setup Send Time Signature Numerator Denominator Metronome Volume Lesson Track R Lesson Track L Demo Cancel Effects Reverb 9 types Chorus 4 types Harmony 26 types Song 102 Preset Songs 5 User Songs Flash Memory Song Clear Song Volume Music Database 100 Recording Song User Song 5 Songs Recording Tracks 1 2 ...

Page 75: ... Drum Kit List 68 Dual 45 E Ending 23 External Clock 57 59 F FF 17 Flash Memory 61 Footswitch Sustain jack 9 Function 56 Function Setting List 56 57 G Grade 34 H Harmony 42 Harmony Type List 73 Harmony Volume 57 I Initial Send 57 Initialization 41 Intro 23 K Keyboard Display 27 KEYS TO SUCCESS 28 L Left 32 Lesson 28 32 34 Lesson track R L for transferred songs 57 62 Listening 33 Local 57 59 M Main...

Page 76: ...r 62 Section 23 SMF Format 0 60 Song 16 51 Song List 72 Song Volume 52 Split 46 Split Point 46 47 STANDBY ON 9 START STOP 17 Step 28 Style 18 53 Style File 55 61 Style Volume 53 Supplied Accessories 5 74 Sustain Footswitch 9 Sustain Panel 44 Synchro Start 19 53 T Tempo 22 TEMPO TAP 22 Time Signature 48 Timing 33 Touch Response 44 Touch sensitivity 44 Track 27 38 51 Track Rec 38 39 Transfer 60 Tran...

Page 77: ...PSR E323 YPT 320 Owner s Manual 77 ...

Page 78: ...or assistance You may also contactYamaha directly at the address provided below 2 Deliver the unit to be serviced under warranty to the retailer selling the product an authorized service center or to Yamaha with an explanation of the problem Please be prepared to provide proof purchase date sales receipt credit card copy etc when requesting service and or parts under warranty 3 Shipping and or ins...

Page 79: ...en Liaison Office Generatorvej 6A DK 2730 Herlev Denmark Tel 44 92 49 00 FINLAND F Musiikki Oy Kluuvikatu 6 P O Box 260 SF 00101 Helsinki Finland Tel 09 618511 NORWAY Norsk filial av Yamaha Scandinavia AB Grini Næringspark 1 N 1345 Østerås Norway Tel 67 16 77 70 ICELAND Skifan HF Skeifan 17 P O Box 8120 IS 128 Reykjavik Iceland Tel 525 5000 RUSSIA Yamaha Music Russia Office 4015 entrance 2 21 5 Ku...

Page 80: ...sical Instrument Division Yamaha Corporation 2009 Yamaha Corporation WQ39170 XXXPOTYX X 01A0 Printed in China Yamaha Home Keyboards Home Page http music yamaha com homekeyboard Yamaha Manual Library http www yamaha co jp manual ...

Reviews: