background image

14

PSR-E253/YPT-255  Owner’s Manual

Setting Up

Auto Power Off Function

To prevent unnecessary power consumption, this 
instrument features an Auto Power Off function that 
automatically turns the power off if the instrument is 
not operated for a specified period of time. The 
amount of time that will elapse before the power is 
automatically turned off is set by default to 30 minutes. 

To set the time that elapses before Auto 
Power Off is executed:

Press the [FUNCTION] button several times until 
“AutoOff” (Function 022; page 31) appears, then use 
the [+] or [-] button to select the desired value.

Settings:

 OFF, 5, 10, 15, 30, 60, 120 (minutes)

Default value:

 30 (minutes)

To disable the Auto Power Off function: 

Turn off the power, then press the [

] (Standby/On) 

switch to turn on the power while holding down the 
lowest key. The Auto Power Off function also can be 
disabled by selecting Off in Function number 022 
(page 31). 

Setting the Volume

When you start playing, use the [MASTER VOLUME] 
dial to adjust the volume of the entire keyboard 
sound.

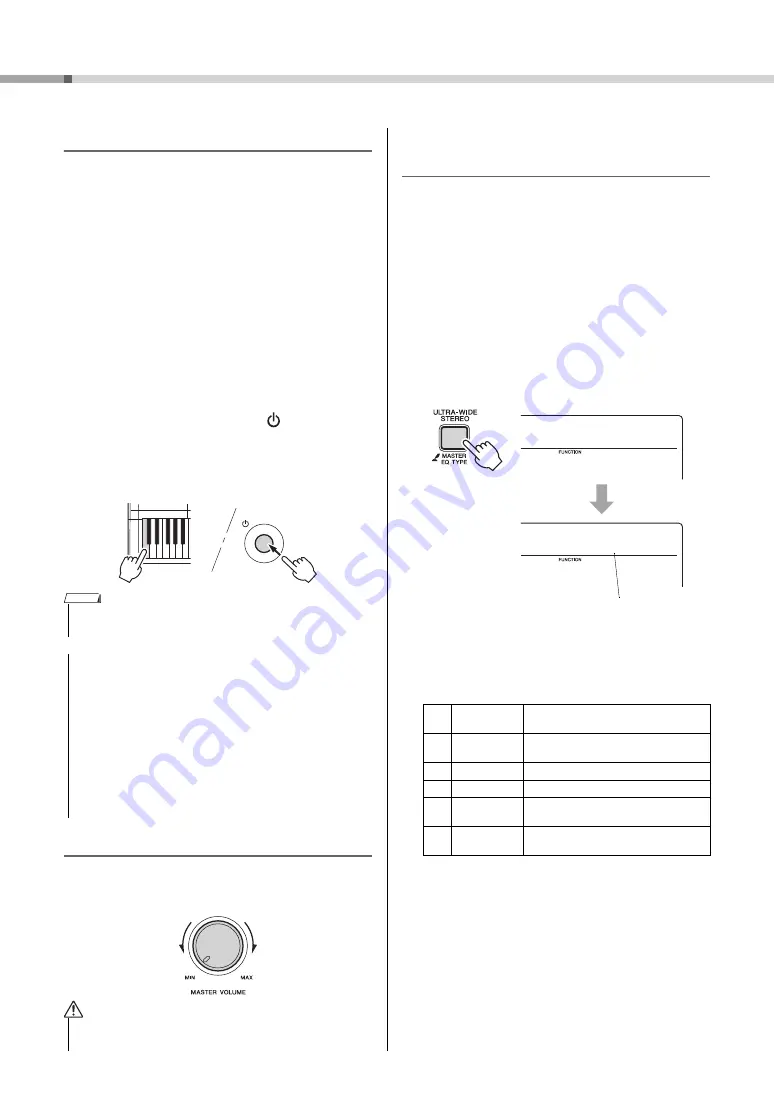
Selecting an EQ Setting for the 
Best Sound

Six different master equalizer (EQ) settings give you 
the best possible sound when listening through differ-
ent reproduction systems—the instrument’s internal 
speakers, headphones, or an external speaker sys-
tem.

1

Hold down the [ULTRA-WIDE STEREO] 
button for longer than a second to call 
up “013 MasterEQ” (Function 013; page 
31).

“MasterEQ” is shown in the display for a few sec-
onds, and the current Master EQ type appears.

2

Use the [+] or [-] button to select the 
desired Master EQ type.

Master EQ types

• Generally, the data and settings are maintained even when the 

power is turned off. For details, see page 32. 

• Depending on the instrument status, the power may not 

turn off automatically, even after the elapse of the specified 
period of time. Always turn off the power manually when 
the instrument is not in use.

• When the instrument is not operated for a specified period 

of time while connected to an external device such as an 
amplifier, speaker or computer, make sure to follow the 
instructions in the Owner’s Manual to turn off the power to 
the instrument and the connected devices, in order to pro-
tect the devices from damage. If you do not want the 
power to turn off automatically when a device is con-
nected, disable Auto Power Off. 

• Do not use this instrument at a high volume level for a long 

period of time, or your hearing may be damaged.

NOTE

NOTICE

CAUTION

1

Speaker

Optimum for listening via the instru-
ment’s built-in speakers.

2

Headphone

Optimum for headphones, or for listen-
ing via external speakers.

3

Boost

Features more powerful sound.

4

Piano

Optimum for piano solo performance.

5

Bright

Lowers the mid range for a brighter 
sound.

6

Mild

Lowers the high range for a softer 
sound.

013

013

MasterEQ

Speaker

1

Current Master 
EQ type

Hold for longer 
than a second.

Summary of Contents for PSR-E253

Page 1: ...EN Owner s Manual DIGITAL KEYBOARD ...

Page 2: ...on or effect works when the unit is operating as designed are not covered by the manufacturer s warranty and are therefore the owners responsibility Please study this manual carefully and consult your dealer before requesting service ENVIRONMENTAL ISSUES Yamaha strives to produce products that are both user safe and envi ronmentally friendly We sincerely believe that our products and the productio...

Page 3: ...use interference harmful to the operation of other electronic devices Compliance with FCC regulations does not guarantee that interference will not occur in all installations If this product is found to be the source of interference which can be deter mined by turning the unit OFF and ON please try to elimi nate the problem by using one of the following measures Relocate either this product or the...

Page 4: ...arly at plugs convenience receptacles and the point where they exit from the apparatus 11 Only use attachments accessories specified by the manufacturer 12 Use only with the cart stand tri pod bracket or table specified by the manufacturer or sold with the apparatus When a cart is used use caution when moving the cart apparatus combination to avoid injury from tip over 13 Unplug this apparatus dur...

Page 5: ...ou can download this Song Book free of charge Yamaha Online Member https member yamaha com myproduct regist You will need the PRODUCT ID on the sheet Online Member Product Registration packaged with this manual in order to fill out the User Registration form Included Accessories Owner s Manual this book AC adaptor 1 Music rest Online Member Product Registration 2 1 May not be included depending on...

Page 6: ...sons Duo mode 22 Playing Songs 23 Listening to a Demo Song 23 Selecting and Playing Back a Song 23 BGM Playback 23 Song Fast Forward Fast Reverse and Pause 24 Changing the Melody Voice 24 A B Repeat 24 Turning Each Part On Off 25 Hearing and Experiencing the Sound of the Chords Chord Study 26 Hear and experience a sound of a single chord 26 Hear and experience basic chord progressions 26 Using the...

Page 7: ...lace the power cord near heat sources such as heaters or radiators Also do not excessively bend or otherwise damage the cord or place heavy objects on it Only use the voltage specified as correct for the instrument The required voltage is printed on the name plate of the instrument Use the specified adaptor page 42 only Using the wrong adaptor can result in damage to the instrument or overheating ...

Page 8: ...follow the basic precautions listed below to avoid the possibility of physical injury to you or others or damage to the instrument or other property These precautions include but are not limited to the following Do not connect the instrument to an electrical outlet using a multiple connector Doing so can result in lower sound quality or possibly cause overheating in the outlet When removing the el...

Page 9: ...se a soft cloth Do not use paint thinners solvents alcohol cleaning fluids or chemical impregnated wiping cloths Saving data Some of the data of this instrument page 32 are retained when the power is turned off However the saved data may be lost due to some failure an operation mistake etc Information About copyrights Copying of the commercially available musical data including but not limited to ...

Page 10: ... YPT 255 Owner s Manual Panel Controls and Terminals Setting Up q w e t r i o 0 y u 1 2 3 4 5 6 7 8 9 1 2 3 4 0 C1 C2 C3 C4 C5 C6 Song List page 39 Style List page 40 Display page 15 Front Panel Voice List page 34 ...

Page 11: ... 18 9 Number buttons 0 9 page 15 0 PORTABLE GRAND button page 16 1 ULTRA WIDE STEREO button page 17 2 SOUND EFFECT button page 16 3 FUNCTION button page 30 4 Drum illustrations for the Drum Kit page 16 Each of these indicates the drum or percussion instrument assigned to the corresponding key for Standard Kit 1 In the Song mode In the Style mode 5 6 7 8 Rear Panel 5 AUX IN jack page 28 6 PHONES OU...

Page 12: ... low for proper operation the volume may be reduced the sound may be distorted and other problems may occur When this happens make sure to replace all batter ies with new ones or already recharged ones Use the specified adaptor page 42 only Using the wrong adaptor can result in damage to the instrument or overheating See For the AC adaptor with a Removable Plug page 46 When setting up the product ...

Page 13: ...ond Failure to set the Battery Type may shorten the amount of the battery life Make sure to set the Battery Type correctly Do not use the instrument device or headphones for a long period of time at a high or uncomfortable volume level since this can cause permanent hearing loss If you experi ence any hearing loss or ringing in the ears consult a phy sician Before connecting the instrument to othe...

Page 14: ...n for longer than a second to call up 013 MasterEQ Function 013 page 31 MasterEQ is shown in the display for a few sec onds and the current Master EQ type appears 2 Use the or button to select the desired Master EQ type Master EQ types Generally the data and settings are maintained even when the power is turned off For details see page 32 Depending on the instrument status the power may not turn o...

Page 15: ...ed by 8va For a few specific chords not all notes may be shown due to space limita tions in the display NOTE Each indication is shown when the corresponding function is turned on Ultra Wide Stereo page 17 Auto Accompaniment page 18 Indicates that a Dual Voice No 309 323 is selected Duo page 22 On Off status Indicates the chord which is played on the Auto Accompaniment range page 18 of the keyboard...

Page 16: ...f Voice Grand Piano For details on the sound effects assigned to each key refer to Drum Kit List Voice No 385 on page 36 When you want to reset various settings to default and simply play a Piano sound press the PORTA BLE GRAND button The Voice 001 Grand Piano will automatically be selected as the Voice Selecting a Voice 001 372 Instrument Voices including sound effects 373 385 Drum Kit Various dr...

Page 17: ...TEREO but ton again to turn it off To select the Ultra Wide Stereo type Press the FUNCTION button several times to call up Wide Function 014 page 31 then use the Number buttons This instrument can apply various Effects as listed below to the instrument s sound Reverb Adds the ambience of a club or concert hall to the sound Although the best suited Reverb type is called up by selecting a Song or St...

Page 18: ... information about chords refer to Chord Types for Style Playback page 20 or use the Chord Dictionary function page 21 5 Press the START STOP button to stop playback You can add intro ending and rhythm variations to Style playback by using Sections For details refer to page 19 Adjusting the Style Volume To adjust the volume balance between Style play back and keyboard you can adjust the Style Volu...

Page 19: ...ecessary The Section will change to Fill in then Main A or B 8 Press the INTRO ENDING rit button The Section switches to the Ending When the Ending is finished Style playback stops automati cally You can have the Ending gradually slow down ritardando by pressing the INTRO END ING rit button again while the Ending is playing back Press the TEMPO TAP button to call up the Tempo value then use the an...

Page 20: ...zed by this instrument nothing is shown on the display In such a case only the rhythm and bass parts will be played Chord Types for Style Playback Major Minor Seventh Minor Seventh Major Seventh C Cm 7 C Cm7 CM7 D Dm 7 D Dm7 DM7 E Em 7 E Em7 EM7 C F Fm 7 F Fm7 FM7 G Gm 7 G Gm7 GM7 A Am 7 A Am7 AM7 B Bm 7 B Bm7 BM7 Easy Chords This method lets you easily play chords in the accompaniment range of th...

Page 21: ...YPE and ROOT The notes you should play for the specified chord root note and chord type are con veniently shown in the display both as notation and in the keyboard diagram To call up possible inversions of the chord press the buttons 3 Following the notation and keyboard diagram in the display try playing a chord in the range to the left of CHORD TYPE When you ve played the chord properly a bell s...

Page 22: ...e Sustain can be applied to the left and right Voice sections in Duo mode just as it normally is by using one of the following methods in the Duo mode like the usual mode Press the foot switch page 13 connected to the SUSTAIN jack Set Sustain Function 012 page 31 to on Style Playback in the Duo mode Although full Style features accompaniment cannot be used in the Duo mode the rhythm part of a Styl...

Page 23: ...n be changed so that for exam ple all internal Songs automatically play back letting you use the instrument as a background music source 1 Hold down the DEMO button for longer than a second DemoGrp Function 019 page 31 is shown in the display for a few seconds followed by the cur rent repeat playback target 2 Use the or button to select a play back group 3 Press the DEMO button to start play back ...

Page 24: ...k press the A B REPEAT button To stop playback press the START STOP but ton Song Fast Forward Fast Reverse and Pause When the A B repeat is specified the Fast Reverse and Fast Forward will only work within the range between A and B REW FF and PAUSE button cannot be used during Song playback by using the DEMO button Changing the Melody Voice Selecting another Song will cancel the changed Melody Voi...

Page 25: ...e corresponding but ton L or R By turning the left and right hand parts on or off dur ing playback you can listen to the Part that is turned on or practice the other part that is turned off on the keyboard Turning Each Part On Off Selecting another Song will cancel the on off status of the Parts 010 FurElise 022 Lit Track con tains data Unlit Track is muted or con tains no data NOTE ...

Page 26: ... to 097 in the CHORD STUDY category by executing Step 1 in Selecting and Playing Back a Song on page 23 2 Press the START STOP button to play back the selected Song 3 Play the keyboard while looking at the notes shown on the display 1 Select a Song from Song numbers 098 to 102 by pressing the buttons 2 Press the START STOP button to play back the selected Song 3 Play the keyboard while looking at ...

Page 27: ... or 3 WAITING but tons to start playback of the Song Les son 4 When Lesson playback reaches to the end check your evaluation Grade on the display 2 Timing and 3 Waiting will evaluate your per formance in four levels After the evaluation display has appeared the lesson will start again from the beginning 5 Stop the Lesson mode You can stop the Lesson mode at any time by pressing the START STOP butt...

Page 28: ... the connected external audio device The sound of the audio device is output through the speakers of this instrument 5 Adjust the volume balance between the external audio device and this instrument If possible adjust the playback level of the external audio device first to achieve optimum balance 6 Play the keyboard along with the sound of the audio device 7 After finishing the performance stop p...

Page 29: ...ttempt to turn the power off or connect or dis connect the AC adaptor Doing so can result in a loss of data When recording capacity becomes full during recording a Mem Full message appears on the display record ing is stopped and the Song select display is shown If you press the START STOP button even if you don t play the keyboard recording starts Limitations while recording The following setting...

Page 30: ... number Function name NOTE To exit the Function settings press one of these buttons SONG VOICE or STYLE Direct numeric entry Increment value by 1 Yes On Press simultaneously to recall the default setting Decrement value by 1 No Off NOTE Function Number Function name Display Range Settings Default Value Descriptions Volume 001 Style Volume StyleVol 000 127 100 Determines the volume of the Style pag...

Page 31: ... is selected the performance sound of the left Voice will sound from the left speaker and the performance sound of the right Voice will sound from the right speaker Metronome page 17 016 Time Signature Numerator TimeSig 00 15 Determines the time signature of the Metronome 017 Metronome Volume MetroVol 000 127 100 Determines the volume of the Metronome Lesson page 27 018 Your Tempo YourTemp ON OFF ...

Page 32: ...e Standby On switch to turn the power on Backup Parameters Backup parameters User Songs page 29 FUNCTION Settings page 30 Tuning Your Tempo Master EQ type Panel Sustain Auto Power Off Battery Type Note that the following situations cannot back up or main tain the settings of the Backup parameters When the AC adaptor is unplugged with the power on even if batteries are installed When the power is t...

Page 33: ...30 Function 001 is set to an appropri ate level Is the Split Point set to an appropriate key for the chords you are playing Set the Split Point to an appropriate key page 30 Function 005 Is the ACMP ON indicator showing in the display If it is not showing press the ACMP ON OFF button so that it does show The Style does not sound as you play a chord The auto accompaniment will sometimes not change ...

Page 34: ...eel Guitar 58 12 string Guitar 59 Jazz Guitar 60 Jazz Amp 61 Jazz Man 62 Clean Guitar 63 Chorus Guitar 64 Funk Guitar 65 Guitar Pinch 66 Muted Guitar 67 Overdriven Guitar 68 Distortion Guitar 69 Feedback Guitar 1 70 Feedback Guitar 2 71 Guitar Feedback 72 Guitar Harmonics 1 73 Guitar Harmonics 2 74 Guitar Harmonics 3 BASS 75 Acoustic Bass 1 76 Acoustic Bass 2 77 Finger Bass 1 78 Finger Bass 2 79 F...

Page 35: ...2 269 Real Tom 270 Rock Tom 271 Electronic Percussion 272 Analog Tom 273 Synth Drum 274 Taiko Drum 275 Gran Cassa 276 Gamelimba 277 Glass Percussion 278 Reverse Cymbal WORLD 279 Banjo 280 Muted Banjo 281 Fiddle 282 Bagpipe 283 Dulcimer 1 284 Dulcimer 2 285 Cimbalom 286 Santur 287 Kanoon 288 Oud 289 Rabab 290 Kalimba 291 Sitar 1 292 Sitar 2 293 Detuned Sitar 294 Tamboura 295 Shehnai 296 Gopichant 2...

Page 36: ...d 1 55 G 2 Floor Tom H Room Tom 2 Rock Tom 2 Electronic Tom 2 Analog Tom 2 56 G 2 Hi Hat Pedal Analog Hi Hat Closed 2 57 A 2 Low Tom Room Tom 3 Rock Tom 3 Electronic Tom 3 Analog Tom 3 58 A 2 Hi Hat Open Analog Hi Hat Open 59 B 2 Mid Tom L Room Tom 4 Rock Tom 4 Electronic Tom 4 Analog Tom 4 60 C 3 Mid Tom H Room Tom 5 Rock Tom 5 Electronic Tom 5 Analog Tom 5 61 C 3 Crash Cymbal 1 Analog Cymbal 62 ...

Page 37: ...Hi Hat Pedal Analog Hi Hat Closed 4 57 A 2 Low Tom Analog Tom 3 Jazz Tom 3 Brush Tom 3 Jazz Tom 3 58 A 2 Hi Hat Open Analog Hi Hat Open 2 59 B 2 Mid Tom L Analog Tom 4 Jazz Tom 4 Brush Tom 4 Jazz Tom 4 60 C 3 Mid Tom H Analog Tom 5 Jazz Tom 5 Brush Tom 5 Jazz Tom 5 61 C 3 Crash Cymbal 1 Analog Cymbal Hand Cymbal L 62 D 3 High Tom Analog Tom 6 Jazz Tom 6 Brush Tom 6 Jazz Tom 6 63 D 3 Ride Cymbal 1 ...

Page 38: ...tion Horse Neigh 65 F 3 Car Tires Squeal Cow 66 F 3 Car Passing Lion 67 G 3 Car Crash Scratch 68 G 3 Siren Yo 69 A 3 Train Go 70 A 3 Jet Plane Get up 71 B 3 Starship Whoow 72 C 4 Burst Huuaah 73 C 4 Roller Coaster 74 D 4 Submarine 75 D 4 76 E 4 77 F 4 78 F 4 79 G 4 80 G 4 Shower Laugh 81 A 4 Thunder Scream 82 A 4 Wind Punch 83 B 4 Stream Heartbeat 84 C 5 Bubble Footsteps Uh Hit 85 C 5 Feed 86 D 5 ...

Page 39: ...8 Song of the Pearl Fisher G Bizet 049 String Quartet No 17 2nd mov Serenade F J Haydn 050 Menuett BWV Anh 115 C Petzold J S Bach 051 Canon J Pachelbel 052 From The Magic Flute W A Mozart 053 Piano Sonate op 27 2 Mondschein L v Beethoven 054 The Surprise Symphony F J Haydn 055 To a Wild Rose E A MacDowell 056 Chanson du Toreador G Bizet 057 O Mio Babbino Caro G Puccini FAVORITE WITH STYLE 058 Bill...

Page 40: ...42 JazzClub 043 Swing1 044 Swing2 045 Five Four 046 Dixieland 047 Ragtime R B 048 Soul 049 DetroitPop 050 6 8Soul 051 CrocoTwist 052 Rock Roll 053 ComboBoogie 054 6 8Blues Country 055 CountryPop 056 CountrySwing 057 Country2 4 058 Bluegrass Latin 059 BrazilianSamba 060 BossaNova 061 Forro 062 Tijuana 063 Mambo 064 Salsa 065 Beguine 066 Reggae Ballroom 067 VienneseWaltz 068 EnglishWaltz 069 Slowfox...

Page 41: ...everb 04 05 Room 1 2 Small room reverb 06 07 Stage 1 2 Reverb for solo instruments 08 09 Plate 1 2 Simulated steel plate reverb 10 Off No effect No Chorus Type Description 01 03 Chorus 1 3 Conventional chorus program with rich warm chorusing 04 05 Flanger 1 2 This produces a rich animated wavering effect in the sound 06 Off No effect ...

Page 42: ...es One Touch Setting OTS Yes Songs Preset Number of Preset Songs 102 including Chord Study 12 Recording Number of Songs 1 Number of Tracks 1 Data Capacity Approx 300 notes Compatible Data Format Original File Format Function Lesson 1 LISTEN LEARN 2 TIMING 3 WAITING A B REPEAT CHORD DICTIONARY Overall Metronome Yes Tempo Range 11 280 Transpose 12 to 0 0 to 12 Tuning 427 0 440 0 453 0 Hz approx 0 2H...

Page 43: ...Grand Piano 16 H Harmony Volume 31 Headphone 13 I Initialization 32 INTRO 19 K Keyboard Display 15 L Lesson 27 M MAIN 19 Master EQ Type 31 Measure 15 Metronome 17 Metronome Volume 17 31 Music Rest 5 13 N Notation 15 O One Touch Setting 16 P Panel Sustain 17 31 Part 25 Pause 24 Phrase Recording 29 Playback 23 Power Requirements 12 R Random 23 Reverb 17 Reverb Level 31 Reverb Type 31 41 rhythm 18 ri...

Page 44: ...pment please contact your dealer or supplier for further information Information on Disposal in other Countries outside the European Union These symbols are only valid in the European Union If you wish to discard these items please contact your local authorities or dealer and ask for the correct method of disposal Note for the battery symbol bottom two symbol examples This symbol might be used in ...

Page 45: ...or forgery of proof of purchase documents will cause this warranty to be void This warranty covers only the Original Owner and is not transferable In Order to Obtain Warranty Service Warranty service will only be provided for defective products within the Warranted Area Contact your local authorized Yamaha dealer who will advise you of the procedures to be followed If this is not successful contac...

Page 46: ...ue vous insérez la fiche Afin d éviter les risques d électrocution courts circuits ou incidents veillez également à ce que l adaptateur secteur et la fiche ne soient pas encrassés par la poussière Asegúrese de mantener el enchufe conectado al adaptador de CA Si se utiliza el enchufe solo se puede producir una descarga eléctrica o un incendio No toque nunca la sección metálica al conectar el enchuf...

Page 47: ...47 PSR E253 YPT 255 Owner s Manual ...

Page 48: ...siikki Oy Kluuvikatu 6 P O Box 260 SF 00101 Helsinki Finland Tel 09 618511 NORWAY Yamaha Music Europe GmbH Germany Norwegian Branch Grini Næringspark 1 N 1361 Østerås Norway Tel 67 16 78 00 ICELAND Skifan HF Skeifan 17 P O Box 8120 IS 128 Reykjavik Iceland Tel 525 5000 RUSSIA Yamaha Music Russia LLC Room 37 bld 7 Kievskaya street Moscow 121059 Russia Tel 495 626 5005 TURKEY CYPRUS Yamaha Music Eur...

Reviews: