background image

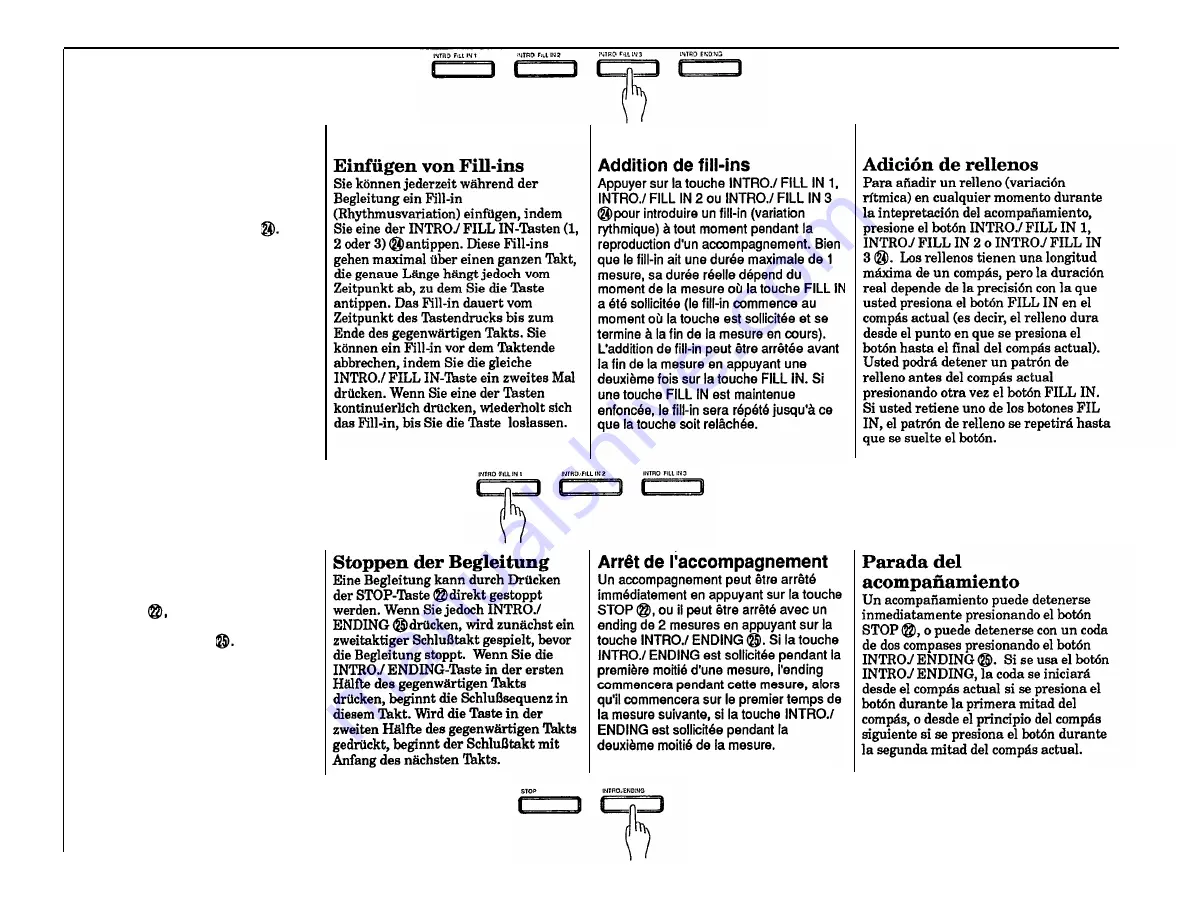
Adding Fill-ins

To add a fill-in (rhythm variation) at any
time while the accompaniment is playing,
press the INTRO./ FILL IN 1, INTRO./ FILL

IN 2 or INTRO./ FILL IN 3 button

The

fill-ins have a maximum length of one

measure, but the actual length depends
on precisely when in the current measure
you press a FILL IN button (i.e. the fill-in
lasts from the point at which the button is
pressed until the end of the current
measure). You can stop a fill-in pattern
before the current measure by pressing

the FILL IN button a second time. If you

hold one of the FILL IN buttons, the fill-in
pattern will repeat until the button is
released.

Stopping the Accompaniment

An accompaniment in progress can be
stopped immediately by pressing the
STOP button

or it can be stopped with

a two-measure ending by pressing the

INTRO./ ENDING button

lf the

INTRO./ ENDING button is used, the

ending will start from the current measure
if the button is pressed during the first half
of the measure, or from the beginning of
the next measure if the button is pressed
during the second half of the current
measure.

25

Summary of Contents for Portatone PSR-48

Page 1: ...YAMAHA AUTHORIZED PRODUCT MANUAL ...

Page 2: ...Owner s Guide Spielanleitung Mode d emploi Manual de1 Propietario ...

Page 3: ...t that incorporates advanced Yamaha digital technology and many versatile features In order to obtain maximum performance and enjoyment from your PortaTone we urge you to read this Owner s Guide thoroughly while trying out the various features described Keep the Owner s Guide in a safe place for later reference 1 ...

Page 4: ...YING VOICES 11 Selecting a Voice 11 Adjusting the Volume 12 Adding Effects 13 Transposition Shifting Pitch in Semitone Steps 16 Tuning Fine Pitch Control 17 The SPLIT Mode Separate Left and Right hand Voices 18 5 USING THE ACCOMPANIMENT SECTION 20 Rhythm Accompaniment 2 0 Selecting an Accompaniment Style 20 Adjusting the Accompaniment Volume 22 Setting the Tempo 22 Starting the Accompaniment 23 St...

Page 5: ...Function 34 The Custom Drummer 35 Creating an Original Rhythm Pattern 35 Playing Back Your Custom Rhythm Pattern 38 7 THE MUSIC PROGRAMMER 38 Recording 39 Recording Accompaniment and Performance Simultaneously 39 Recording the Accompaniment and Performance Separately 41 Playback 42 8 MIDI FUNCTIONS 45 A Brief Introduction to MIDI 45 The PSR 48 MIDI Connectors 45 Simple MIDI Control 46 MIDI Sequenc...

Page 6: ... 1 Open the battery compartment cover located on the instrument s bottom panel 2 Insert the six batteries being careful to follow the polarity markings on the inside of the compartment 3 Replace the compartment cover making sure that it locks firmly in place Caution 1 When the batteries run down replace them with a compete set of six new batteries NEVER mix old and new batteries 2 To prevent possi...

Page 7: ...nd Insert the two pegs protruding from the bottom edge of the music stand into the two holes located at the top of the PSR 48 control panel Taking Care of Your PortaTone Your PortaTone will remain in excellent playing condition if care is taken concerning the following 1 When you use AC power be sure to use the optional AC Power PA 4 PA 40 adaptor Before use read the adaptor instructions carefully...

Page 8: ...d avoid placing anything heavy on it 6 The PortaTone should not be placed in direct sunlight for a long time 7 Do not place the instrument near any heating appliance or leave it inside a car in direct sunlight for any length of time Direct sunshine can raise the interior temperature of a car with closed doors and windows to as high as 80 C Temperatures in excess of 60 C can cause physical and or e...

Page 9: ...ctor page 18 26 and 29 ACCOMPANIMENT PART Buttons page 28 ACCOMPANIMENT STYLE SELECT Buttons page 21 TEMPO Controls page 22 Accompaniment VOLUME Controls page 22 CUSTOM DRUMMER Buttons page 35 SUSTAIN 1 SUSTAIN 2 and ENSEMBLE Effect Buttons page 13 SOLO STYLEPLAY Button page 32 VOICE SELECT Buttons page 11 ...

Page 10: ...TOP Button page 25 SYNCHRO BREAK Button page 34 INTRO FILL IN Buttons page 24 and 25 INTRO ENDING Button page 25 Percussion Pads page 34 Percussion Variation Buttons page 34 PITCH BEND Wheel page 75 Auto Bass Chord Keys page 18 Percussion Accent Key page 37 Percussion CANCEL Key page 37 ACCOMPANIMENT STYLE LIST page 21 VOICE LIST page 11 ACCOMPANIMENT STYLE BEAT TEMPO VOLUME Display page 21 22 23 ...

Page 11: ...EADPHONE jack The HEAD PHONES AUX OUT jack can also be used to deliver the output of the PSR 48 to a keyboard amplifier stereo hi fi system mixing console or tape recorder refer to page 55 Use a relatively low MASTER VOLUME control setting when connecting the PSR 48 to a stereo sound system Use the stereo system s volume control to adjust volume MIDI IN and OUT Connectors The MIDI IN connector rec...

Page 12: ...er is ON 2 Set an Initial Volume Level Slide the MASTER VOLUME control to a position about half way between the MIN and MAX setting You can set this control for the most comfortable volume level after playback begins 3 Press the DEMONSTRATlON Button The demonstration music will begin playing as soon as you press the DEMONSTRATION button The demonstration will play continuously providing samples of...

Page 13: ...IST then enter its number using the numbered VOICE SELECT buttons To select XYLOPHONE number 12 for example first press 1 and then 2 The number 12 should then be displayed on the VOICE display 2 The and buttons in the VOICE SELECT group can be used to increment increase by one or decrement decrease by one the current voice number Press the button briefly to select the voice one number higher than ...

Page 14: ...relation to the accompaniment to be described later Press the button to increase the volume or the button to decrease the volume The selected volume level will be displayed on the VOICE PITCH TRANSPOSE VOLUME display while the volume is being adjusted and for approximately 3 seconds after either VOLUME button is released The volume range is from 1 to 9 with 1 being the lowest volume and 9 the high...

Page 15: ...TAIN 1 or SUSTAIN 2 button once the corresponding indicator will light and totes played on the keyboard will decay gradually after you lift your fingers from the keys Press the SUSTAIN 1 or SUSTAIN 2 button a second time it s indicator will go out to turn the sustain effect off The SUSTAIN 2 button produces a longer sustain effect than the SUSTAIN 1 button although the actual length of the SUSTAIN...

Page 16: ...ly is reduced by half DUAL VOICE The DUAL VOICE feature makes it possible to select and play two different voices simultaneously To activate the DUAL VOICE feature press the DUAL VOICE button the DUAL VOICE button indicator will light When the DUAL VOICE feature is ON the last two voices selected will sound simultaneously For example if you selected PIANO 1 and then HARP the PIANO 1 and HARP voice...

Page 17: ... left of the keyboard offers extra expressive control by allowing you to manually bend raise or lower the pitch of the selected performance voice Rotating the PITCH BEND wheel away from you raises pitch while moving it toward you lowers pitch When released the PITCH BEND wheel automatically returns to the center normal pitch position The total pitch bend range is approximately 200 cents 100 cents ...

Page 18: ...layed on the VOICE PITCH TRANSPOSE VOLUME display while the TRANSPOSE or button is pressed and for approximately 3 seconds after either TRANSPOSE button is released The transposition range is from 6 to 6 with 6 corresponding to downward transposition by 6 semitones and 6 corresponding to upward transposition by 6 semitones see chart below 0 is the normal keyboard pitch value The normal transpose v...

Page 19: ...f tuning will be displayed on the VOICE PITCH TRANSPOSE VOLUME display while the PITCH or button is pressed and for approximately 3 seconds after either PITCH button is released The tuning range is from 16 to 16 with 16 corresponding to downward tuning by approximately 50 cents one quarter tone and 16 corresponding to upward tuning by approximately 50 cents 0 is the normal pitch value at which the...

Page 20: ...elector to the SPLIT position 2 Press the LOWER Button The LOWER button LED will light indicating that is now possible to select a voice for the lower keyboard i e the Auto Bass Chord key section 3 Select the Lower Voice Select the lower voice using the normal voice selection procedure The number of the selected voice will appear on the VOICE display if the DUAL effect is selected you can select t...

Page 21: ... the LOWER button indicator is lit and the volume of the upper voice is controlled by the VOICE VOLUME buttons when the LOWER button indicator is out Use the LOWER button to select the desired mode for volume control In the SPLIT mode the maximum number of notes that can be played simultaneously on the upper keyboard is 4 This number is further reduced however if the ENSEMBLE or DUAL effect is use...

Page 22: ...keyboard Panel Settings Accompaniment Style 35 Big Band 3 Tempo 120 AUTO BASS CHORD Selector SPLIT position Upper Voice 30 Clarinet Lower Voice 67 Slap Bass Melody Bass USING THE ACCOMPANIMENT SECTION Rhythm Accompaniment Selecting an Accompaniment Style The PSR 48 provides two methods of selecting any of its 100 accompaniment styles 20 ...

Page 23: ...current accompaniment style number Press the button briefly to select the accompaniment style one number higher than the current accompaniment style or the button to select the accompaniment style one number lower than the current accompaniment style If you hold the or button down the accompaniment style number will increment or decrement continuously simply release the button when the desired acc...

Page 24: ...e range is from 0 to 9 with 1 being the lowest volume and 9 the highest No accompaniment sound is produced if the volume value is set to 0 The highest volume value can be recalled at any time by pressing both the ACCOMPANIMENT VOLUME ù and ü buttons at the same time the volume is automatically set to 9 whenever the power switch is turned ON Setting the Tempo Press the TEMPO ù button to increase th...

Page 25: ...the normal value for the DISCO style whenever the power switch is turned ON It is also possible to adjust the tempo after starting playback of the accompaniment This allows you to set the optimum tempo by ear Starting the Accompaniment Press the START button to start the selected accompaniment immediately or press the SYNCHRO START button i f you want the accompaniment to start when you play the f...

Page 26: ...RD SINGLE FINGER and FINGERED modes is described on page 26 and 29 A different accompaniment style can be selected at any time while the accompaniment is playing Starting the Accompaniment with an Introduction Any of the PSR 48 accompaniment patterns can be started with a 1 measure introductory pattern by pressing either the INTRO FILL IN 1 INTRO FILL IN 2 or INTRO FILL IN 3 button before pressing...

Page 27: ...l in pattern before the current measure by pressing the FILL IN button a second time If you hold one of the FILL IN buttons the fill in pattern will repeat until the button is released Stopping the Accompaniment An accompaniment in progress can be stopped immediately by pressing the STOP button or it can be stopped with a two measure ending by pressing the INTRO ENDING button lf the INTRO ENDING b...

Page 28: ...jor seventh minor and minor seventh chords by pressing a minimum number of keys in the Auto Bass Chord Keys section of the keyboard The bass and chord accompaniment produced is perfectly matched to the currently selected accompaniment style 1 Select the SINGLE FINGER Mode Slide the AUTO BASS CHORD selector to the SINGLE FINGER position 2 Select an Accompaniment Style Select the desired accompanime...

Page 29: ...nd bass accompaniment to begin If you press a C key for example a C major accompaniment will be played Press another key in the Auto Bass Chord Keys section to select a new chord The key you press will always determine the root of the chord played i e C for a C chord Playing Minor Seventh and minor Seventh Chords in the Single finger Mode For a minor chord press the root key and the first black ke...

Page 30: ...und using the ACCOMPANIMENT VOLUME buttons and the volume of the right hand melody using the VOICE VOLUME buttons The MASTER VOLUME control can be used to set the overall volume level Setting the Tempo Use the TEMPO controls to set the desired accompaniment tempo see Setting the Tempo on page 22 for details Selecting Playback of Specific Parts The ACCOMP PART buttons make it possible to play only ...

Page 31: ...ating your own bass lines on the upper keyboard The FILL IN buttons can be used in the Auto Bass Chord mode to create pattern variations in exactly the same way that they are used with rhythm accompaniment patterns refer to the Adding Fill ins section on page 25 for details Fingered Accompaniment The FINGERED mode is ideal if you already know how to play chords on a keyboard since it allows you to...

Page 32: ...ill be started If you press the START button the rhythm will begin playing immediately without chordal accompaniment 4 Play a Chord on the Auto Bass Chord Keys As soon as you play any chord in the Auto Bass Chord section of the keyboard the PSR 48 will automatically begin to play the chord along with the selected rhythm and an appropriate bass line The accompaniment will continue playing even if y...

Page 33: ...rds the lowest key pressed is assumed to be the root of the chord All other FINGERED mode operations are the same as in the SINGLE FINGER mode Try playing this using the Single Finger Chord mode or Fingered mode Brahms Lullaby Play the shord part on the lower keyboard section and the melody part on the upper keyboard Chords can be played using either the Single Finger or Fingered method Panel Sett...

Page 34: ...keyboard is repeated in the next measure creating a round or call and answer type effect Only a single note can be played at a time on the PSR 48 upper keyboard section when the SOLO STYLEPLAY feature is used 1 Select the Desired Auto Bass Chord Mode Use the Auto Bass Chord selector to select either the SINGLE FINGER or FINGERED mode 2 Turn SOLO STYLEPLAY ON Press the SOLO STYLEPLAY button The SOL...

Page 35: ...SOLO STYLEPLAY OFF if necessary by pressing the SOLO STYLEPLAY button again so that its LED goes out PSR 48 PERCUSSION Manual Percussion with the Percussion Pads The PSR 48 s six percussion pads let you play percussion to accompany other instruments or add original rhythm fills and breaks to your performances The percussion pads can also be played while one of the PSR 48 accompaniments is playing ...

Page 36: ...CCOMPANIMENT VOLUME buttons 34 The Synchro Break Function This function allows you to create your own fill ins using the percussion pads while one of the PSR 48 accompaniment styles is playing When the SYNCHRO BREAK button IS pressed and its LED IS Iit playing on the percussion pads causes the accompaniment rhythm to stop playing so you can create your own fill in The accompaniment rhythm begins p...

Page 37: ...layed at any time just like the presets Creating an Original Rhythm Pattern 1 Select a Suitable Rhythm Begin by selecting on of the preset accompaniment styles that is close to the rhythm you want to create For example select a WALTZ accompaniment style if you want to program a rhythm pattern in 3 4 time You cannot program a 3 4 rhythm when a 4 4 accompaniment style is selected and vice versa The ...

Page 38: ...ant to create a totally new rhythm press the CUSTOM DRUMMER CLEAR button before beginning to program This cancels all the instruments in the original accompaniment leaving only a closed hi hat metronome sound the metronome sound will not be heard when you play back your rhythm The rhythm pattern is two measures long and the pattern will continue to repeat so you can add new instruments during each...

Page 39: ...tern can be accented simply by pressing the accent key the second from highest key on the PSR 48 keyboard with the mark above it at the appropriate time To accent the third beat of the first measure for example simply press the accent key on the third beat of the first measure All instruments on the selected beat will be accented Accents cannot be cancelled individually so it is necessary to cance...

Page 40: ...equired You can record the accompaniment and your own performance separately or at the same time If for example you record the accompaniment first and then record your own performance while listening to playback of the accompaniment you re free to use the entire keyboard for your performance rather than being limited to only the upper keyboard area The MUSIC PROGRAMMER independently records the fo...

Page 41: ... made while recording however will have a large effect on the total capacity Material recorded using the MUSIC PROGRAMMER will be lost as soon as the PSR 48 POWER switch is turned OFF Recording Recording Accompaniment and Performance Simultaneously 1 Select the Desired Accompaniment Style Pick out an accompaniment style that is appropriate for the type of music you want to record 2 Select the SING...

Page 42: ...ns causing both of their LED indicators to light This engages the record ready mode the metronome will sound at the currently selected tempo and recording will begin as soon as you play a note on the keyboard SYNCHRO START type operation 5 Choose an Alternative Start Mode If Necessary If you do not perform this step recording will begin as soon as you play a note or chord on the keyboard At this p...

Page 43: ...automatically if you exceed the PSR 48 s memory capacity this will depend on the complexity of your performance and whether you use accompaniment or not Whenever you record using the MUSIC PROGRAMMER any previously recorded material will be erased lf you make a mistake while recording simply press the SYNCHRO START button and begin again from step 5 above Recording the Accompaniment and Performanc...

Page 44: ...bed above Playback 1 Engage the Start Ready Mode Press both the ORCHESTRA and ACCOMPANIMENT PLAY buttons causing their indicators to flash if you want to play back both the ORCHESTRA and ACCOMPANIMENT parts or press just one of the PLAY buttons if you only want to hear one of the parts for example you could play back only the accompaniment part and play along manually on the keyboard 42 ...

Page 45: ...eir respective volume buttons You can also adjust the tempo and even change accompaniment styles during playback 4 Play Along If You Like Play along on the PSR 48 keyboard if you like 5 Stop Playback Playback will stop automatically when the end of the recorded piece is reached You can also stop playback at any time by pressing the STOP or INTRO ENDING button When playback is stopped the MUSIC PRO...

Page 46: ...he obbligato in ORCHESTRA then play the melody on the keyboard as the ACCOMPANIMENT and ORCHESTRA play back Chords can be played using either the Single Finger or Fingered method Panel Settings Accompaniment Style 34 Big Band 2 Tempo 144 AUTO BASS CHORD Selector SINGLE FINGERED position OFF during playback Upper Voice 39 Trombone 44 ...

Page 47: ...nt that offer far greater versatility and control than is available with isolated instruments The PSR 48 MIDI Connectors The PSR 48 MIDI IN connector receives MIDI data from an external MIDI device which can be used to control the PSR 48 The MIDI OUT connector transmits MIDI data generated by the PSR 48 e g note and velocity data produced by playing the keyboard To connect the PSR 48 MIDI connecto...

Page 48: ... a synthesizer with no keyboard the second keyboard or tone generator will respond precisely to notes played on the original transmitting keyboard The result is that you can effectively play two instruments at once providing thick multi instrument sounds The PSR 48 also transmits program change data when one of its voices is selected Depending on how the receiving device is set up the correspondin...

Page 49: ...described above is used for MIDI sequence recording A MIDI sequence recorder can be used to record MIDI data received from a PSR 48 for example When the recorded data is played back the PSR 48 automatically plays the recorded performance in precise detail Note Always use a high quality MlDl cable to connect MIDI OUT MIDI IN terminals Never use MIDI cables longer then about 15 meters since cables l...

Page 50: ...ICE SELECT button 7 Press VOICE SELECT button 6 Select using the VOICE SELECT buttons 7 LocalcontrolON OFFselection 6 External Internal clock selection Press VOICE SELECT button 5 Select using the VOICE SELECT buttons 5 Program change and control change cancel ON OFF selection Press VOICE SELECT button 4 Select using the VOICE SELECT buttons 2 MIDItransmitchannel selection 3 MIDI receive channel s...

Page 51: ...49 ...

Page 52: ...s used for transmission only The number of notes that can be played simultaneously via external control when the Standard Voice mode is selected 8 melody 7 rhythm 2 3 MIDI Channel Selection The MIDI transmit and receive channels can be set independently The transmit channel is automatically set to channel 1 and the receive channel is automatically set to OMNI OFF channel 1 when the power is initia...

Page 53: ...Transmission Mode is automatically turned OFF 5 Program Change Control Change Cancel ON OFF Selection Normally the PSR 48 will respond to MIDI program change and control change data received from an external keyboard or other MIDI device causing the correspondingly numbered PSR 48 voice to be selected and the corresponding control operations to be performed The PSR 48 will normally also send MIDI ...

Page 54: ...ially turned ON To synchronize playback of an external sequencer or rhythm programmer to the PSR 48 for example set this function to INTERNAL and make sure that the external device is set up to receive EXTERNAL clock data To synchronize the PSR 48 to playback of an external sequencer or rhythm programmer set this function to EXTERNAL NOTE If the clock mode is set to ETERNAL and a MIDI clock signal...

Page 55: ... not play the internal voices but the appropriate MIDI information is still transmitted via the MIDI OUT connector when notes are played on the keyboard At the same time the internal tone generator responds to MIDI information received via the MIDI IN connector This means that while an external MIDI sequence recorder for example plays the PSR 48 s internal voices an external tone generator can be ...

Page 56: ...s priority When the power switch is turned ON the Remote Control Mode is selected and the OMNI OFF receive channel 1 mode is selected lf the Standard Voice Mode is then selected this function is automatically set to channel 16 This function has no effect if the Remote Control Mode is selected MIDI Error Display During MIDI reception if the data cannot be properly transferred or the amount of data ...

Page 57: ...xtra comfortable ear pads Stand L 2 L 4 This lightweight portable stand provides a sturdy convenient support for your PSR 48 Bench BC 6 Stereo Connection Cord PSC 3 Use this cord to connect your PSR 48 to a stereo hi fi system Stereo Conversion Plug PCP 1 Converts stereo pin jacks to a stereo phone plug Some optional accessories may not be available in all areas 55 ...

Page 58: ...ment Styles 00 99 Disco Rock n Roll 1 Rockn Roll 2 RocKn Roll 3 Pop Rock 1 Pop Rock 2 16 Beat 1 16 Seal 2 Rock A Ballad Rock Baroque Christmas Rock Oriental Rock Brass Rock Techno Rock 1 Techno Rock 2 Hard Rock Heavy Metal Speed Metal Fusion 1 Fusion 2 Funk 1 Funk 2 Funk 3 Funk 4 Rap Rhythm Blues 1 Rhythm Blues 2 Slow Blues Gospel Swing Guitar Swing Piano Swing Organ Swing Vibraphone Big Band 1 Bi...

Page 59: ...mpaniment Record button Accompaniment Play Button Voice Pitch Transpose volume Display Accompaniment Style Beat Tempo Volume Display Other Controls Power Switch Master Volume Solo Styleplay Sutton Transpose Pitch MIDI Button Demonstration Auxillary Jacks MIDI OUT IN HEADPHONES AUX OUT DC 9 12V IN Main Amplifier 25W x 2 RMS Speaker 12cm 4 3 4 x 2 Rated Voltage DC 9V six SUM 1 D size R 20 or equival...

Page 60: ... semi 4 7bit resolution Control Change 7 X 64 O O O 4 Volume Sustain Program O 0 99 O 0 99 5 Change True 0 99 System Exclusive X O System Song Pos X X Song Sel X X Common Tune X X System Clock O O Real Time Commands O O Aux Local ON OFF X O All Notes OFF X O 122 125 Mes Active Sense O O sages Reset X X Notes 1 1 127 if standard voice mode is on 2 24 102 if standard voice mode is on 3 v 127 if stan...

Page 61: ...STANDARD VOICE MODE OUTPUT VOICE NUMBER CHART Voice number not enclosed in boxes are common panel and standard voices ...

Page 62: ...STANDARD VOICE MODE INPUT VOICE NUMBER CHART Voice number not enclosed in boxes are common panel and standard voices ...

Page 63: ...l STANDARD VOICE MODE RHYTHM INSTRUMENT CHART Voice numbers not enclosed in boxes are common PSR 48 and standard voices ...

Page 64: ...pplied the interference with this product MUST be used Follow all installation instructions Failure to follow instructions could void your FCC authorization to Utilize power outlets that are on different branch circuit breaker or use this product in the USA fuse circuits or install AC line filters In the case of radio of TV interference relocate reorient the NOTE antenna If the antenna lead in is ...

Page 65: ... a permanent record of your purchase to aid identification in the event of theft Model No PSR 48 Serial No Concerning the Warranty This product was made for international distribution and since the warranty for this type of product varies from marketing area to marketing area please contact the selling agency for information concerning the applicable warranty and or service policies 9004 VJ42690 P...

Page 66: ...YAMAHA Yamaha Corporation of America 6600 Orangethorpe Avenue P O Box 6600 Buena Park CA 90622 6600 ...

Reviews: