background image

P-125  Owner’s Manual

21

Re

fe

re

n

c

e

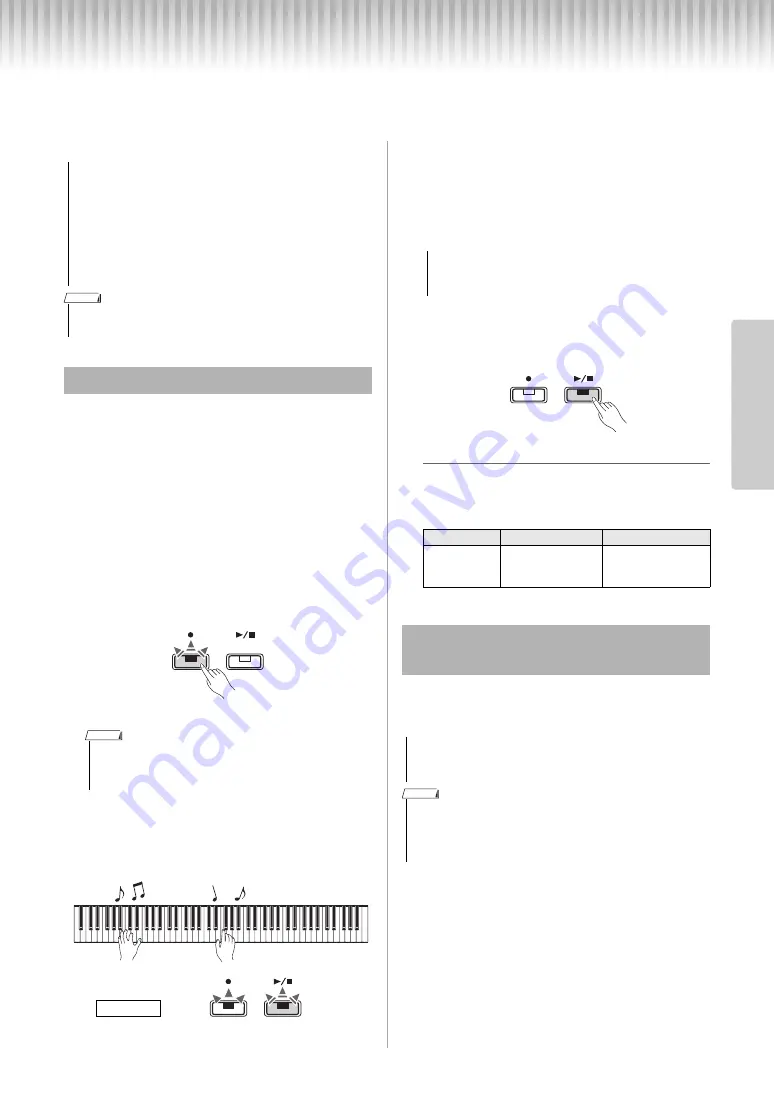
Recording Your Performance

You can record your keyboard performance as a User Song in SMF format. Up to two Parts (L and R) can be 
recorded separately.

You can record a Rhythm with your performance.

1

Before recording, make the settings 
such as Voice, Beat, Tempo and 
Rhythm.

Because some of the settings cannot be changed 
after the Record mode is engaged, make the set-
tings according to your performance preferences.

2

Press the [

] to engage Record Ready 

mode.

The [

] lamp will flash according to the current 

tempo. 

To exit from Record Ready mode, press [

].

3

Play the keyboard or press [

/

] to start 

recording.

You can also start recording by pressing the 
[RHYTHM].

4

Press either [

] or [

/

] to stop 

recording.

The [

] and [

/

] lamps flash, indicating that the 

recorded data is being stored. After the operation 
is completed, the [

] and [

/

] lamps turns off.

5

To hear the recorded Song, press [

/

to start playback.

Press [

/

] again to stop playback.

Part Assignment

When either the Split or Duo is used for recording, 
the data as listed below will be recorded to each 
part.

You can record your performance to the L part (left 
hand part) and R part (right hand part) separately.

1

Before recording, make the settings 
such as Voice, Beat or Rhythm.

2

While holding down [

], press [R] or [L] 

for the part you want to record, to 
engage Record Ready Mode.

To exit from Record Ready mode, press [

].

• Note that the Recording operation replaces already 

recorded data with the newly recorded data, since only 
one User Song is available. To save the recorded data, 
transfer it to a computer as an SMF file. For details, refer to 
“Computer-related Operations” on page 8.

• If the data capacity of the instrument approaches full when 

you engage Record Ready mode, the [

] and [

/

] lamps 

flash quickly for about three seconds. In this case, your 
performance may not be recorded.

• You can record up to 100 KB (or approximately 11,000 notes) on this instru-

ment.

Quick Recording

• You cannot engage Record Ready mode while a Song is playing.

• You can use the Metronome while recording; however, the Metronome 

sound will not be recorded.

NOTICE

NOTE

Flashes

NOTE

Lights up

Flashes

Recording

• Never turn off the power while the recorded data is 

being stored (while the lamps are flashing). Other-
wise, all recorded data will be lost.

L part

R part

When Split or 
Duo is on:

Keyboard perfor-
mance in the left 
hand section

Keyboard perfor-
mance in the right 
hand section

Recording Independently to Two 
Parts

• If you select a Part containing data, the Recording opera-

tion will replace the already-recorded data with the new 
data.

• When you use Split or Duo, use the Quick Recording method. You cannot 

record each part separately.

• Rhythm can only be recorded to a blank Song (both L/R parts are empty). If you 

want to record a Rhythm, make sure to record first to a blank Song.

NOTICE

NOTICE

NOTE

Summary of Contents for P-125

Page 1: ...P 1 2 5 D I G I T A L P I A N O Owner s Manual EN Appendix Introduction Reference Before using the instrument be sure to read PRECAUTIONS on pages 5 6 ...

Page 2: ...2 ...

Page 3: ...aget även om själva apparaten har stängts av ADVARSEL Netspændingen til dette apparat er IKKE afbrudt sålænge netledningen sidder i en stikkontakt som er tændt også selvom der er slukket på apparatets afbryder VAROITUS Laitteen toisiopiiriin kytketty käyttökytkin ei irroita koko laitetta verkosta standby ...

Page 4: ...tion points in accordance with your national legislation By disposing of these products correctly you will help to save valuable resources and prevent any potential negative effects on human health and the environment which could otherwise arise from inappropriate waste handling For more information about collection and recycling of old products please contact your local municipality your waste di...

Page 5: ...instrument Use the specified adaptor page 25 only Using the wrong adaptor can result in damage to the instrument or overheating Check the electric plug periodically and remove any dirt or dust which may have accumulated on it This instrument contains no user serviceable parts Do not open the instrument or attempt to disassemble or modify the internal components in any way If it should appear to be...

Page 6: ...ices below Handling Do not use the instrument in the vicinity of a TV radio stereo equipment mobile phone or other electric devices Otherwise the instrument TV or radio may generate noise When you use the instrument along with an application on your iPad iPhone or iPod touch we recommend that you set Airplane Mode to ON on that device in order to avoid noise caused by communication Do not expose t...

Page 7: ... 18 Using Quick Play 19 Song Playback and Practice of Each Part 19 Adding Accompaniment to Your Performance Rhythm 20 Adjusting the Volume 20 Adjusting the Tempo 20 Recording Your Performance 21 Quick Recording 21 Recording Independently to Two Parts 21 Deleting the User Song 22 Changing the Initial Settings of the Recorded Song 22 Connecting Other Equipment 23 Connecting External Speakers 23 Conn...

Page 8: ...ut what MIDI is and can do To obtain these materials access the Yamaha Down loads website then enter the model name for search ing the desired files The letters at the end of the model name B or WH are color information of the instrument For example B indicates black and WH indicates white Since they simply indicate the color these letters are omitted in this manual While holding down the button s...

Page 9: ...two Voices played simulta neously such as Piano and Organ 0 USB TO HOST terminal page 23 For connecting to a computer or a smart device such as iPhone or iPad 1 SUSTAIN jack page 12 For connecting the included footswitch an optional footswitch and foot pedal 2 PEDAL UNIT jack page 12 For connecting an optional pedal unit 3 AUX OUT R L L R jacks page 23 For connecting external audio equipment 4 DC ...

Page 10: ...o avoid electric shock short circuit or damage also be careful that there is no dust between the AC adaptor and plug When setting up the product make sure that the AC outlet you are using is easily accessible If some trouble or mal function occurs immediately turn the power off and dis connect the plug from the outlet Follow the order shown above in reverse when disconnecting the AC adaptor AC ada...

Page 11: ...connect two pairs of head phones If you are using only one pair insert the plug into either of these jacks Reproducing natural sound distance Stereo phonic Optimizer Default setting on The Stereophonic Optimizer recreate for headphones a natural distance between your ears and the instru ment just as when playing an acoustic piano Stereophonic Optimizer On Off While holding down PIANO press the F3 ...

Page 12: ...amper pedal had been pressed but all subse quently played notes will not be sustained This makes it possible to sustain a chord for example while other notes are played staccato Soft Left Pedal The soft pedal reduces the volume and slightly changes the timbre of notes played while the pedal is pressed The soft pedal will not affect notes that are already playing when it is pressed Using a Pedal Su...

Page 13: ...and Default setting off This function is particularly useful when you want not only notes played very loud but also those played softly to be clearly audible Default setting off Refer to the printing above the keyboard SOUND BOOST OFF ON Selecting a Voice The last selected Voice in the selected group will be called up when the Voice button is pressed This will be reset to the first Voice when you ...

Page 14: ...adjust the balance between two Voices Setting range 6 0 6 Settings below 0 increase the volume of Voice 2 while settings above 0 increase the volume of Voice 1 in relation to the other 3 To exit from Dual simply press any Voice button Layering Two Voices Dual You cannot layer two Voices from the same group Voice 2 F5 Down by 1 octave Voice 1 A5 Down by 1 octave F 5 Default setting different for ea...

Page 15: ... Point 2 One person can play the left section of the keyboard while the other plays the right Sounds played with the left voice are played from the left speaker and sounds played with the right voice are played from the right speaker To select the Voice Refer to step 1 on page 13 To shift the Octave for each section Same as in Dual page 14 To adjust the volume balance between two keyboard sections...

Page 16: ...r example to specify 80 press the relevant G1 8 and A1 0 keys in order A numeric value is read out when a relevant key is pressed Refer to the TEMPO indications 1 to 9 0 printed above these keys Setting range default setting no beat 2 3 4 5 6 Refer to the METRONOME indications to 6 printed above these keys Setting range 1 10 default setting 7 While holding down METRONOME press the F0 key to decrea...

Page 17: ...hat of a concert hall to individual Voices Whenever you select a Voice the most suitable reverb will be automatically set however you can freely set the Reverb Type as desired C2 Recital Hall Simulates the clear reverb sound you would hear in a medium sized concert hall for piano recitals C 2 Concert Hall Simulates the gorgeous reverb sound you would hear in a large concert hall for orchestral per...

Page 18: ...back on this instrument For details on External Songs refer to Connecting to a Computer on page 23 1 While holding down DEMO SONG press the key corresponding to the desired preset Song or External Song to start playback The Preset Songs or External Songs will play back in sequence For details on the key assignments see Quick Operation Guide page 29 To select the previous or next Song during playba...

Page 19: ...urn ing off R for example you can practice the R part while the L part is playing back and vice versa 1 Start playback of the desired Song To start the User Song press To start a Preset Song see page 18 Listening to the 50 Preset Songs or External Songs 2 While holding down press L or R to turn the Part on off 3 Practice the part which is turned off 4 Press DEMO SONG or to stop playback Using Quic...

Page 20: ...ot be played Bass On Off While holding down RHYTHM press C5 Off or C 5 On default setting 4 Press RHYTHM to stop playback The lamp turns off and the keyboard returns to the original status Setting range 1 10 Default setting 7 While holding down RHYTHM press the F0 key to decrease the value by 1 F 0 to reset to the default value or G0 to increase by 1 Refer to the VOLUME indications 1 default 1 pri...

Page 21: ...cord Ready Mode To exit from Record Ready mode press Note that the Recording operation replaces already recorded data with the newly recorded data since only one User Song is available To save the recorded data transfer it to a computer as an SMF file For details refer to Computer related Operations on page 8 If the data capacity of the instrument approaches full when you engage Record Ready mode ...

Page 22: ...ding down press L or R to engage the Record Ready mode The lamp will flash 2 Press to start recording without playing the keyboard 3 Press or to stop recording All data recorded for the selected Part will be deleted and the lamp turns off The following parameter settings of the Song can be changed after the Record operation is completed For individual parts Voice Balance Reverb Depth Damper Reso n...

Page 23: ...the compatible smart devices refer to the following Yamaha web site https www yamaha com kbdapps For instructions on connecting the instrument to a smart device Connection Wizard in Smart Pianist will guide you according to the operating condition and environ ment To start the Connection Wizard tap Menu located at the upper left of the screen to open the Menu display and then tap Instrument Start ...

Page 24: ...can be trans ferred to a computer and saved as a SMF file For details refer to the Computer related Operations on page 8 To initialize the backup data While holding down the highest key turn the power on to initialize the backup data to the factory initial settings Both the and lamps flash indicating that the initialization is being executed After the operation is completed both lamps turn off Use...

Page 25: ... Yamaha dealer Problem Possible Cause and Solution When the instrument is turned on or off a pop ping sound is temporarily produced This is normal and indicates that the instrument is receiving electrical power The instrument does not turn on The instrument has not been plugged in properly Securely connect the AC adaptor to the DC IN jack on the instrument and to the AC outlet page 10 When the ins...

Page 26: ...can be switched by using the left pedal 1 Rock Organ Bright and edgy electric organ sound Good for rock music 2 Organ Principal A typical pipe organ sound 8 feet 4 feet 2 feet Good for sacred music from the Baroque period 3 Organ Tutti This is the organ s full coupler sound often associated with Bach s Toccata and Fugue CLV VIB Harpsichord 8 The definitive instrument for baroque music Authentic ha...

Page 27: ...tronome 16 MIDI Basics 8 MIDI Reference 8 Music Rest 8 O Octave 14 Operation Confirmation Sounds 11 P Part 19 Pedal 12 Pedal Unit 12 Pitch 17 Playback User Song 21 Playback Voice Demo 50 Preset Song 18 Power 10 Practice 19 Q Quick Operation Guide 29 31 Quick Play 19 R Recording 21 Reverb 17 Rhythm 20 28 S Smart device 23 Smart Pianist 23 Soft Left Pedal 12 Songs 18 28 Sostenuto Center Pedal 12 Sou...

Page 28: ... Turkish March W A Mozart 25 C4 Piano Sonate op 13 Pathétique 2nd mov L v Beethoven 26 C 4 Für Elise L v Beethoven 27 D4 Piano Sonate op 27 2 Mondschein 1st mov L v Beethoven 28 D 4 Impromptu op 90 2 F P Schubert 29 E4 Frühlingslied op 62 6 J L F Mendelssohn 30 F4 Fantaisie Impromptu F F Chopin 31 F 4 Etude op 10 3 Chanson de l adieu F F Chopin 32 G4 Etude op 10 12 Revolutionary F F Chopin 33 G 4 ...

Page 29: ...down 1 step up Voice 2 1 step down Voice 2 1 step up Voice 1 1 step down Voice 1 Hard Soft OFF ON Default value Default value Voice 2 Default value Voice 1 Medium Fixed Default depth ON Quick Play Song Data Loaded from the Computer Reverb Type Balance between Voice 1 and Voice 2 Octave Setting Touch Sensitivity Reverb Depth Damper Resonance Stereophonic Optimizer 50 Preset Songs 50 Classical Music...

Page 30: ...up 1 3 5 6 8 0 2 4 No beat 3 5 6 1 step down 1 step up Default tempo Default value 2 4 7 9 10 steps down 10 steps up 1 3 5 6 8 0 16Beat Shuffle2 BossaNova Salsa ChristmasSwing ON Intro ON Ending ON 8BeatBallad FastJazz Swing 8Beat Shuffle1 Shuffle3 Gospel 6 8SlowRock Samba Rumba KidsPop 6 8March Christmas3 4 OFF Intro OFF Ending OFF SlowJazz JazzWaltz 1 step down 1 step up Metronome Volume Voice c...

Page 31: ...FF 1 step up ALL ON OFF 1 step down 1 step up 1 step down OFF OFF AUTO OFF OFF OFF 0 Original pitch 2 4 OFF Disable 440 0Hz Ch 1 Default value OFF Ch 1 Default value Ch 1 2 ON OFF ON ON ON ON ON 4 6 2 1 3 6 Operation Confirmation Sounds Auto Power Off MIDI Receive Channel MIDI Transmit Channel Tuning Transpose IAC Built in Speaker Sound Boost Table EQ Audio Loop Back Aux Out volume Local Control P...

Page 32: ...Memo ...

Page 33: ...Memo ...

Page 34: ......

Page 35: ...85111 NORWAY Yamaha Music Europe GmbH Germany Norwegian Branch Grini Næringspark 1 1332 Østerås Norway Tel 47 6716 7800 ICELAND Hljodfaerahusid Ehf Sidumula 20 IS 108 Reykjavik Iceland Tel 354 525 5050 CYPRUS Nakas Music Cyprus Ltd Nikis Ave 2k 1086 Nicosia Tel 357 22 511080 Major Music Center 21 Ali Riza Ave Ortakoy P O Box 475 Lefkoşa Cyprus Tel 392 227 9213 RUSSIA Yamaha Music Russia LLC Room 3...

Page 36: ...ZY96940 Manual Development Group 2017 Yamaha Corporation Published 11 2017 POTY A0 Printed in China Yamaha Global Site https www yamaha com Yamaha Downloads http download yamaha com ...

Reviews: