background image

Description of the Device

NUAGE FADER Operation Manual

8

Controls and Functions

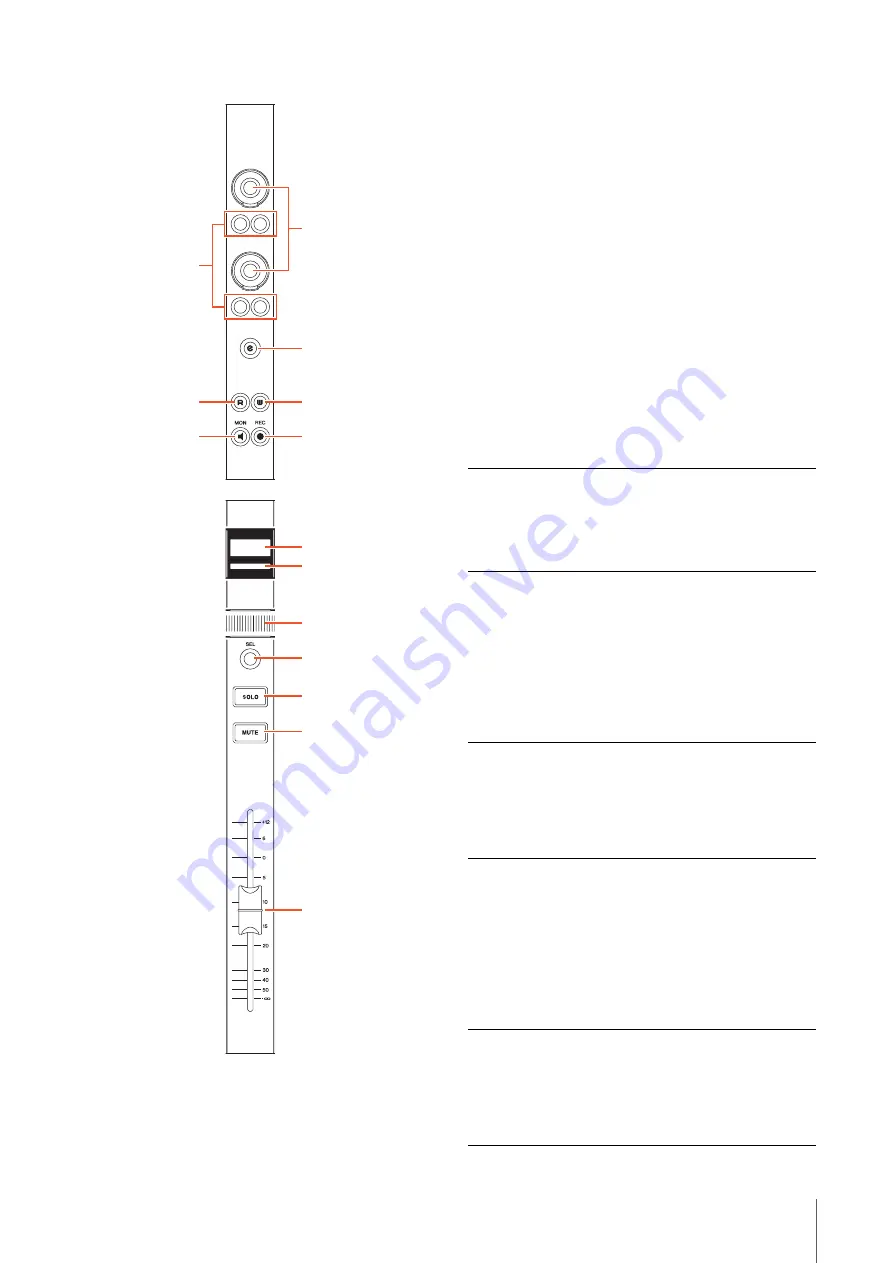
1

[Multi function knob]

Adjusts the various parameters. The color of the LED on 
the [Multi function knob] changes depending on the type 
of the controllable parameter.

2

[Multi function button A]/[Multi function 
button B]

Selects and turns on/off the controllable parameters of the 
[Multi function knobs].

3

[e] (edit) button

The [e] (edit) button is used to activate Channel Setting 
mode in order to edit the channel in question. If the [e] 
buttons for two different channels are pressed at the same 
time, it will be possible to edit both of those channels 
simultaneously. If you again press the [e] button for a 
channel being edited, the “Mixer” will reappear.

When you press [e] button while holding down the 
appropriate button(s) in the “MODIFIER Section” 
(

page 21

), the function changes as follows. 

4

[R]

Turns Read Automation on (lit) and off (dim). If you hold 
down one [R] button and press another, Read Automation 
between the two can be turned on and off.

When you press [R] while holding down the appropriate 
button(s) in the “MODIFIER Section” (

page 21

), the 

function changes as follows. 

5

[W]

Turns Write Automation on (lit) and off (dim). If you hold 
down one [W] button and press another, Write Automation 
between the two can be turned on and off.

When you press [W] while holding down the appropriate 
button(s) in the “MODIFIER Section” (

page 21

), the 

function changes as follows. 

1

3

5

7

8

9

)

!

@

#

$

2

4

6

Modifier button

Function

[SHIFT]

When editing one channel, the display will 
switch to show two channels being edited. 
When editing two channels, the display will 
switch to show only the selected channel.

Modifier button

Function

[SHIFT]

Turns Read Automation on for a number of 
successive channels.

[ALT]

Turns Read Automation on and off for all 
channels.

Modifier button

Function

[SHIFT]

Turns Write Automation on for a number of 
successive channels.

[ALT]

Turns Write Automation on and off for all 
channels.

Summary of Contents for Ncs500-FD

Page 1: ...pdf viewer s search function If you are viewing this manual using Adobe Reader type the term you wish to find into the Find toolbar and then press your computer s Enter key Jumping between pages If using Adobe Reader you can jump forwards and backwards to various pages in this manual This provides a convenient way to return to your original page after clicking a page link Operation Manual EN ...

Page 2: ...e button Labels 25 Pro Tools Control 26 Information The illustrations and LCD screens as shown in this manual are for instructional purposes only and may appear somewhat different from those on your device Windows is a registered trademark of Microsoft Corporation in the United States and other countries Apple Mac and Macintosh are trademarks of Apple Inc registered in the U S and other countries ...

Page 3: ...ures in the following order 1 Click the Devices menu 2 Select the Device Setup option 3 Click the Control Panel button Keyboard Shortcuts Windows modifier key Mac modifier key key shows the shortcut keys For example Ctrl command Z means press Ctrl under Windows or command under Mac then press Z Screens This manual predominantly uses screenshots of Windows However Mac screenshots are used when inst...

Page 4: ...page 5 DAW SELECT Section page 19 UNIT LINK Section page 20 FLIP Section page 20 MODIFIER Section page 21 SECTION CONTROL Section page 14 AUTOMATION Section page 16 WORKSPACE Section page 17 CONTROL ROOM Section page 17 CHANNEL VIEW CONTROL Section page 11 PAGE CONTROL Section page 18 USER ASSIGNABLE Section page 19 ...

Page 5: ... buttons are directly below each Multi function knob These buttons are for turning functions on and off or for selecting the controllable parameters of the Multi function knobs Each channel has two sets of this knob and accompanying buttons You can select the controllable parameters of the Multi function knob with the buttons in the SECTION CONTROL Section page 14 Information on the controllable p...

Page 6: ...ion knobs Pressing one channel s e button activates Channel Setting mode for that channel In such a case all 32 of the Multi function knobs can be used to adjust that channel s parameters Operation Function Touching Highlights the parameter Shows the pop up window Turning Adjusts the parameter Selects the parameter Moves the cursor Pressing Shows the pop up window Sets the selected parameter Opens...

Page 7: ... be controlled by the left bank of 16 knobs and vice versa If you again press the e button for a channel being edited the Mixer will reappear It should be noted that even when Channel Setting mode is active the specific parameters controlled by the individual Multi function knobs can be changed in the SECTION CONTROL section The Touch slider bar is a touch controller for scrolling through the chan...

Page 8: ... Read Automation on lit and off dim If you hold down one R button and press another Read Automation between the two can be turned on and off When you press R while holding down the appropriate button s in the MODIFIER Section page 21 the function changes as follows 5 W Turns Write Automation on lit and off dim If you hold down one W button and press another Write Automation between the two can be ...

Page 9: ...e appropriate button s in the MODIFIER Section page 21 the function changes as follows When you scroll through the channels by using the Touch slider bar you can have the Faders follow the scroll position To turn this function on and off select it from Follow Slider Scroll page 23 in NUAGE FADER Setup SEL Selects the channel If you hold down one SEL button and press another all channels between th...

Page 10: ...ollows When you touch Fader the fader in Mixer will be highlighted Also you can select the channel by touching Fader To turn this function on and off select it from Ch Select page 23 in NUAGE FADER Setup When this function is on and you touch a Fader while holding down the SHIFT button in the MODIFIER Section page 21 the function changes as follows You can turn the motor power of the Fader on and ...

Page 11: ...HANNEL VIEW memory 1 CHANNEL VIEW memory 4 When you simultaneously hold down CTRL page 21 in the MODIFIER section and press any one of the buttons INPUT AUDIO OUTPUT FX GROUP and OTHERS which are for hiding and showing channels by type only the channel type you pressed is shown When you select a channel then press LOCK the selected channel will be moved to the left and entered to the Left Lock are...

Page 12: ... channels However channels hidden by HIDE are not be shown 7 OTHERS Hides dim and shows lit the following channels MIDI channels Instrument channels Rewire channels However channels hidden by HIDE are not shown 8 EVENT ON TR Shows channels which have events on the track 9 EVENT CYCLE Shows channels which have events in the Cycle range PLAYING CH Shows channels which are currently playing SEL CH Sh...

Page 13: ...inuously through the channels hold down However channels in the Left Lock and Right Lock areas cannot be scrolled through BANK Turns bank scroll on lit and off dim When this is turned on you can scroll through the channels in groups of eight by using To scroll continuously through the channels hold down However channels in the Left Lock and Right Lock areas cannot be scrolled through A right The s...

Page 14: ...s active for the CHANNEL STRIP section in question Depending on which controllable parameters are selected in the SECTION CONTROL section the Multi function knob has the following functions When you operate the Multi function knob while holding down the appropriate button s in the MODIFIER Section page 21 the function changes as follows The buttons Sub parameter 1 Sub parameter 8 and are for selec...

Page 15: ...The controllable parameters of the Multi function knobs page 8 in the CHANNEL STRIP section change to FILTER 7 ROUTING Changes the Section view to ROUTING The controllable parameters of the Multi function knobs page 8 in the CHANNEL STRIP section change to Direct Routings When you press the Multi function knob the pop up window for selecting the Direct Routings is shown You can select the paramete...

Page 16: ... B of the Multi function knob for which you want to lock the parameter The parameter is locked To unlock the parameter press Multi function button B again To close the plug in effect window press INSERT DYN Changes the Section view to STRIP The controllable parameters of the Multi function knobs page 8 in the CHANNEL STRIP section change to Strip EQ Changes the Section view to EQ The controllable ...

Page 17: ... LEVEL knob is for adjusting the Control Room level However when PHONES is on you can adjust the Phones level by this knob If you have configured multiple DAW software programs and operate them by selecting the DAW SELECT Section page 19 the DOWN MIX DIM CONTROL ROOM LEVEL knob and PHONES controls will always be applied to the Control Room of DAW A In other words this section is not affected by th...

Page 18: ...NTROL ROOM LEVEL knob PAGE CONTROL Section Overview This section is for operating Page in Mixer The page which displays Mixer information and the page which operates the channel view are displayed on Page Controls and Functions 1 PAGE Selects Page 2 ESC For closing a pop up window 3 ENTER Executes the selected item and turns it on off 4 up left down right Moves the cursor on Page and selects the P...

Page 19: ...figured multiple DAW software programs For details on connecting and settings refer to the NUAGE Workgroup Manager manual page 24 PDF Controls and Functions 1 DAW A DAW C Selects the target DAW software for operation 2 MAIN DISP Shows the Project Window in the secondary Mixer display as well as the main Nuage Master display In order to use this function a KVM switch must be set up and the data to ...

Page 20: ...ns 1 UNIT LINK Turns UNIT LINK on lit and off dim FLIP Section Overview This section is for operating the FLIP function Turning on FLIP KNOB 1 or KNOB 2 lets you use the Fader page 10 in the CHANNEL STRIP section to control the parameters assigned to the Multi function knobs page 8 KNOB 1 represents the upper sixteen Multi function knobs and KNOB 2 represents the lower sixteen Multi function knobs...

Page 21: ...r this button is for the lower sixteen Multi function knobs MODIFIER Section Overview This section is for the modifier buttons The buttons operate the same as Shift Ctrl Command and Alt Option on the computer keyboard Controls and Functions 1 SHIFT Operates the Shift function 2 CTRL Operates the Ctrl Command function 3 ALT Operates the Alt Option function Lamp Description Lit FLIP is on Dim FLIP i...

Page 22: ... turning it on again 3 RS 232C For connection to an RS 232C cable Connect this port to the RS 232C port on the KVM switch When you switch between multiple DAW applications using the DAW SELECT section with KVM switches connected and the data to be sent to them configured in NUAGE Workgroup Manager the display content active keyboard and active mouse will also change accordingly For details refer t...

Page 23: ...sts the brightness of the LED when fully lit The larger the value the brighter the LED 6 OLED Adjusts the brightness of the Channel name display The larger the value the brighter the LED 7 Follow Slider Scroll Turns on and off the function which causes the Fader position to follow scrolling through the channels when you use the Touch slider bar When this function is off the Fader position changes ...

Page 24: ...ws control over devices and DAW software programs as a Workgroup on a Nuage system For details on NUAGE Workgroup Manager refer to the NUAGE Workgroup Manager manual PDF NOTE To open the NUAGE Workgroup Manager manual double click the NUAGE Workgroup Manager icon on the task tray Windows or menu bar Mac for opening the window then click the Manual icon ...

Page 25: ...ar The function allowing the Faders to reflect Touch slider bar actions is turned off Turn on Follow Slider Scroll page 23 in NUAGE FADER Setup Appendix Contents of the Getting Started Manual PRECAUTIONS NOTICE Information Introduction A Message from the Development Team Included Accessories Items to Have Ready How to Read the Manual Setup Overall Process Setting and Connecting Setting up the Powe...

Page 26: ... Mac only using Nuage Fader and Nuage Master devices This application should be installed on the Mac running Pro Tools It can be selected for installation as part of the TOOLS for NUAGE package If necessary download TOOLS for NUAGE from the following web site and use it to install NUAGE PT Bridge http www yamahaproaudio com downloads Setting Pro Tools MIDI Controllers 1 Start up Pro Tools 2 Choose...

Page 27: ...writing R This button is used to turn Automation Read mode on and off Refer to the description of the W button for details regarding its lighting pattern e edit Not applicable Multi function knob upper Multi function button A Multi function button B upper Multi function knob lower This knob is used to set the pan or send level Multi function button A Multi function button B lower Not applicable CH...

Page 28: ...e the Edit window the active window WORKSPACE 3 This button is used to open and close the Transport window Its indicator lights up while the Transport window is open WORKSPACE 4 Not applicable DOWNMIX These controllers are used to operate the DAW A Nuendo 1 DIM CONTROL ROOM LEVEL knob SOLO CLEAR LISTEN METER RESET PHONES PAGE Not applicable ESC ENTER up left down right F1 F3 Not applicable DAW A D...

Page 29: ...C S G Pro Audio Division 2013 Yamaha Corporation 302MW A1 Yamaha Pro Audio Global Web Site http www yamahaproaudio com Yamaha Manual Library http www yamaha co jp manual ...

Reviews: