background image

MOXF6/MOXF8 Owner’s Manual

Quick Guide

36

Recording in the 
Performance mode

While experimenting and playing around with Arpeggios in 

the Performance mode, you may find some rhythm patterns 

and phrases that you like, and you may want to store them 

for future recall. The best and easiest way to capture these is 

to record your keyboard playing to a Song or Pattern.

Song and Pattern

Songs and Patterns are MIDI sequence data consisting of 

up to 16 Tracks.

I

Song

A Song on this instrument is effectively the same as a song 

on a MIDI sequencer, and playback automatically stops at 

the end of the recorded data.

I

Pattern

In this instrument, the term “Pattern” refers to a relatively 

short musical or rhythmic phrase — 1 to 256 measures — 

which is used for looped playback. Therefore, once Pattern 

playback starts, it continues until you press the [

J

] (Stop) 

button.

Recording the melody and 
Arpeggio playback to the Song

When a Song is selected as the destination of Performance 

recording, you can record your keyboard playing with the 

Arpeggio without having to worry about measure limits or 

running out of recording space. It is a good idea, for example, 

to record your keyboard playing, freely calling up various 

Arpeggio types, then editing the Song later as necessary. 

You may even want to keep the recorder ‘running’ as you 

improvise, then listen back later and pick out the best parts 

to create your final Song. Try recording as shown in the 

instructions below.

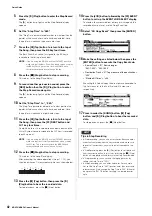
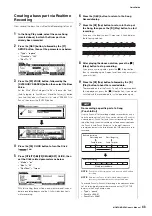
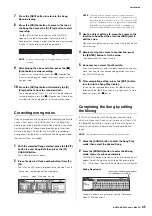
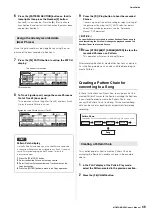
1

In the Performance Play mode, select a Performance 
for recording.

2

Press the ARP [ON/OFF] button so that the lamp 
lights.

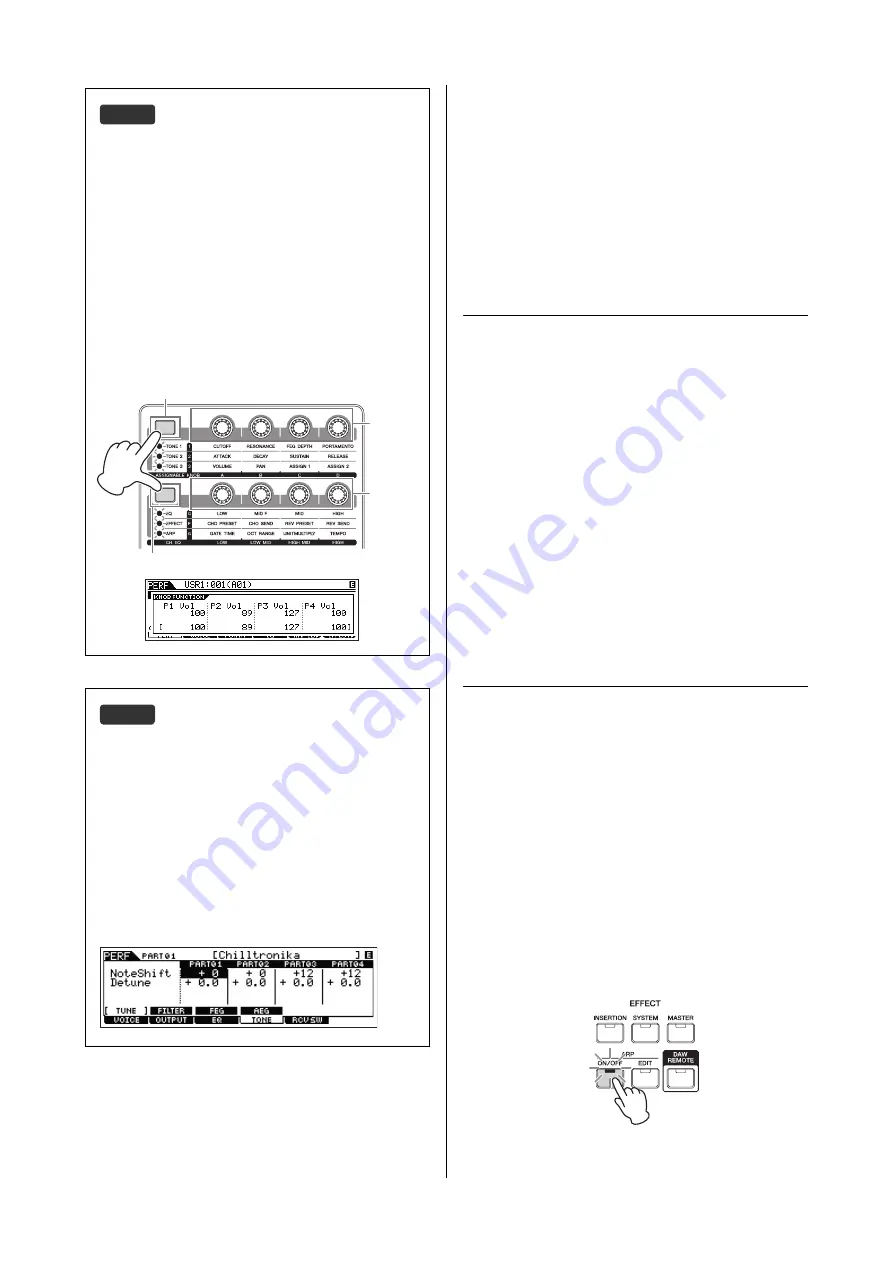
HINT

You can use the following operation to adjust the volume and 

pan settings of Parts 1 – 4:

1

Press the Knob Function 1 button (at the left of Knobs 1 
– 4) and Knob Function 2 button (at the left of Knobs 5 – 
8) simultaneously.

The six lamps light and the KNOB FUNCTION pop-up 
window will appear.

2

Turn the desired Knob to adjust the setting.

Turning one of Knobs 1 – 4 changes the volume of Parts 1 – 
4, respectively.

Turning one of Knobs 5 – 8 changes the pan of Parts 1 – 4, 
respectively.

3

After completing editing, press the [EXIT] button to 
return to the Performance Play display.

HINT

You can use the following operation to adjust the pitch of Parts 
1 – 4:

1

Press the [EDIT] button in the Performance mode.

2

Press the Number [1] – [4] button corresponding to the 
Part you wish to edit.

3

Press the [F4] TONE button.

4

Press the [SF1] TUNE button.

5

Change the NoteShift value to adjust the pitch.

6

After completing editing, press the [EXIT] button to 
return to the Performance Play display.

Volume for 
Parts
1 – 4

Knob Function 1 button

Knob Function 2 button

Pan for 
Parts
1 – 4

Knob 1

Knob 2

Knob 3

Knob 4

Knob 5

Knob 6

Knob 7

Knob 8

Summary of Contents for MOXF6

Page 1: ...Owner s Manual EN...

Page 2: ...l carefully and consult your dealer before requesting service ENVIRONMENTAL ISSUES Yamaha strives to produce products that are both user safe and environ mentally friendly We sincerely believe that ou...

Page 3: ...ipment This symbol on the products packaging and or accompanying documents means that used electrical and electronic products should not be mixed with general household waste For proper treatment reco...

Page 4: ...rom the instrument Then have the device inspected by Yamaha service personnel The power cord or plug becomes frayed or damaged It emits unusual smells or smoke Some object has been dropped into the in...

Page 5: ...against data loss due to media damage we recommend that you save your important data onto two USB flash memory devices external media Information About copyrights Copying of the commercially availabl...

Page 6: ...rum parts and perform with full rhythmic and chordal backing You can also record your performances as a Song or Pattern simply by pressing the REC button from Performance mode and then after recording...

Page 7: ...ttern Loop recording Creating an Arpeggio Storing the Mixing settings as a Mixing Template Remote control assignments File Folder selection in File mode Playing back SMF Standard MIDI file data from U...

Page 8: ...nd refine your song to completion Optional Flash Memory Expansion Module The MOXF provides the option of installing a Flash Memory Expansion Module FL512M FL1024M allowing you to internally store Wave...

Page 9: ...g 36 Recording Arpeggio playback to a Pattern 37 Connecting a microphone or audio equipment 38 Playing the keyboard along with the sound input from the A D INPUT L R jacks 38 Playing the keyboard alon...

Page 10: ...10 MOXF6 MOXF8 Owner s Manual Top Panel MOXF8 MOXF6 Control and Functions 1 A 1 B 1 C0 D0 E0 F0 G0 A0 B0 C1 C2 C3 2 3 4 5 8 9 A B D 7 6 C 1 2 B 3 4 5 9 A D C1 D1 E1 F1 G1 A1 B1 C2 C3 6 78 C...

Page 11: ...MOXF6 MOXF8 Owner s Manual Control and Functions 11 C4 C5 C6 C7 N G H I K L M J R P Q S T E F O N R P G H I K L M S T C4 C5 C6 J E F O Q...

Page 12: ...meter input signal via the A D INPUT L R jacks or output signal via the OUTPUT L MONO R jack 9 LEVEL meter page 39 Indicates the level of the signal specified via the LEVEL meter switch button Knob F...

Page 13: ...e ARP EDIT button again to exit from the Compare status DAW REMOTE button page 55 Turn on this button to enter the Remote mode The Remote mode lets you control DAW software on your computer from the p...

Page 14: ...various parameters K SHIFT button Pressing this button along with another button enables you to execute various commands For details refer to the Shift Function List page 62 L EXIT button The menus a...

Page 15: ...de Refer to the table below Number 1 16 buttons Use of these buttons differs depending on the on off status of the PATTERN SECTION PERFORMANCE CONTROL TRACK MUTE and SOLO buttons Functions of the Numb...

Page 16: ...devices allowing convenient chaining of additional MIDI instruments 5 FOOT SWITCH ASSIGNABLE SUSTAIN jacks For connection of an optional FC3 FC4 FC5 Footswitch to the SUSTAIN jack and a FC4 FC5 Footsw...

Page 17: ...he instrument for a long time make sure you unplug the power adaptor from the wall AC outlet Connecting speakers or headphones Since this instrument has no built in speakers you will need to monitor t...

Page 18: ...u do not want the power to turn off automatically when a device is connected disable Auto Power Off The setting will revert to its default value if not backed up before the power is turned off When Au...

Page 19: ...34 Selecting programs In the default setting the Master mode provides a total of 128 programs each of which includes the mode Voice Performance Song and Pattern and its program number Try out the diff...

Page 20: ...will automatically be executed each time you turn the power on Keep in mind that this also means that your original data in Flash ROM will be erased each time you turn on the power Therefore the check...

Page 21: ...six functions are available and can be called up with the F1 F6 buttons Keep in mind that the available functions differ depending on the selected mode Depending on the currently selected function up...

Page 22: ...actually enter the currently edited name and exit from this status Selecting a note type When the cursor is located on a parameter for which note types are to be set the note icon appears at the lower...

Page 23: ...e lets you record edit and play your own original Songs 5 PATTERN Pattern mode This mode lets you play record edit and play your own original rhythm patterns which can be used to make up a Song 6 MIXI...

Page 24: ...on the MOXF6 MOXF8 to DAW page 54 Using the MOXF6 MOXF8 as a tone generator for DAW playback page 55 Remote controlling the DAW Remote mode page 55 Using the MOXF6 MOXF8 Editor VST as a software synt...

Page 25: ...e desired Voice from various Voice Banks and play it NOTE For details about Voices refer to Basic Structure For a list of the Preset Voices refer to the separate Data List PDF file Selecting a Preset...

Page 26: ...orite Category that lets you collect your most often used and favorite Voices for easy selection This is one more useful way you can quickly select the Voices you need from the huge number available o...

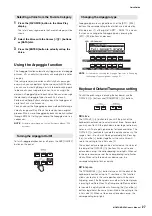
Page 27: ...o type by pressing the SF1 SF6 buttons as desired NOTE For information on setting the Arpeggio Type refer to Changing the Arpeggio Type assignment on page 31 Keyboard Octave Transpose setting To shift...

Page 28: ...ted value previously stored value of the function assigned to the knob Editing a Voice Editing refers to the process of creating a Voice by changing the parameters that make up the Voice This can be d...

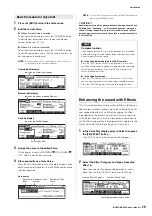
Page 29: ...e Simply changing the Effect type applied to the preset Voice lets you instantly come up with different sounds The instructions below explain how to set the Effect type and the related parameters appl...

Page 30: ...Knobs 5 8 simultaneously The six lamps light and the KNOB FUNCTION pop up window will appear 2 Turn one of the knobs to adjust the Element volume 3 After completing editing press the EXIT button to re...

Page 31: ...tor function which lets you create a new Performance by using favorite Voices you ve found in the Voice mode This function lets you copy parameter settings associated with the Voice such as Effects to...

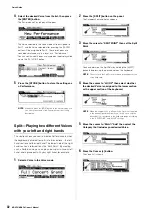
Page 32: ...t hand The lowest note of the right hand section is referred to as the Split Point By creating such a Performance you can play a bass part with your left hand and a piano part with your right hand for...

Page 33: ...ry The Drum Voice is assigned to Part 4 then the Arpeggio is automatically turned on Play the keyboard to trigger the Arpeggio 3 Press the Cursor button The Voice list is shown 4 Select the desired Dr...

Page 34: ...ttons NOTE Parts can be muted also by pressing the MUTE button then the Number 1 4 buttons The Solo function is the opposite of Mute and lets you instantly solo a specific Part and mute all others 1 P...

Page 35: ...indicating that Arpeggio Hold for each Part can be turned on off or on sync off 2 Pressing each of the Number 13 16 buttons toggles the Arpeggio Hold parameter on and off for each Part If any of the 1...

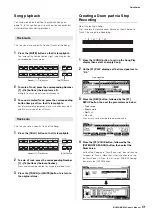
Page 36: ...g later as necessary You may even want to keep the recorder running as you improvise then listen back later and pick out the best parts to create your final Song Try recording as shown in the instruct...

Page 37: ...ess any note to start recording Play the keyboard in time with the metronome You can change the Arpeggio type and settings by pressing any of the SF1 SF6 buttons while recording 6 Press the J Stop but...

Page 38: ...bass or CD player assigned as an Audio Input Part Various parameters such as volume pan and effect can be set to this Part and the sound is output together with the sound of your keyboard performance...

Page 39: ...uch as a synthesizer keyboard CD player set this parameter to line NOTE This setting is available for all modes If necessary press the STORE button to store this with the Utility settings 7 Press the...

Page 40: ...and Pattern See page 36 Track This is a memory location on the sequencer where your musical performances made up of MIDI events are stored The MOXF6 MOXF8 provides 16 Tracks which correspond to the 16...

Page 41: ...the corresponding Number 1 16 buttons the lamp flashes Press another number button to change the soloed Track 3 Press the TRACK or MUTE button to return to the original status Creating a Drum part vi...

Page 42: ...orter keyboard and doesn t have a G 1 key 12 Press the J Stop button to stop recording This returns to the Song Play display After executing the above operations steps 1 12 you should now have a 1 mea...

Page 43: ...ter playing the above notation press the J Stop button to stop recording If you play any wrong notes press the J Stop button then try recording again Repeat as often as necessary until you get it righ...

Page 44: ...VoiceWithARP parameter to off here 6 Press F2 TYPE SF1 ARP1 then assign the Arpeggio Type to the SF1 ARP1 button On this display set the parameters as below Bank Pre Category Seq SubCategory Genrl Ty...

Page 45: ...input the event is indicated by measure beat and clock A quarter note one beat when the time signature is set to 4 4 consists of 480 divisions The length of each note gate time is indicated by Beat a...

Page 46: ...ess the ENTER button to call up the Song Name display then enter the Song name Move the Cursor to the desired position then enter the character by holding the SF6 CHAR button Repeat this operation as...

Page 47: ...thmic variations and easily improvise arrangements such as intro verse chorus verse chorus ending in real time Creating a Pattern Section A by using Arpeggio In addition to creating a Pattern by recor...

Page 48: ...using the Pattern Copy Job with the already recorded User Phrases Creating another Pattern Section B by using already recorded data Here you ll learn how to create a Section B by using recorded data...

Page 49: ...s as desired As in the Song mode you can also use Step Recording to create Patterns Creating a Pattern Chain for converting to a Song In these instructions you ll learn how to assign each of the creat...

Page 50: ...to the tempo column then change the tempo as desired by using the DATA dial or INC DEC buttons Tempo change timing will be recorded in real time to the Tempo Track IWhen you record the Scene Track In...

Page 51: ...n external MIDI device such as a keyboard or sequencer to control the sounds on the MOXF6 MOXF8 Below are several different MIDI connection examples use the one most similar to your intended setup NOT...

Page 52: ...e generator by MIDI channel Using the connection example shown above you can play both instruments and have them separately sound different parts for example having your keyboard performance sound the...

Page 53: ...4 OTHER button to call up the OTHER display Set the MIDI IN OUT parameter to USB 4 Set the input and output settings for audio data and MIDI data as desired to suit your personal preferences These set...

Page 54: ...e MIDI ports are defined as follows Port 1 The tone generator block in this instrument can recognize and use only this port When playing the MOXF6 MOXF8 as a tone generator from the external MIDI inst...

Page 55: ...e balance between the Chorus Reverb and dry sound Insertion effect on off and Arpeggio on off Setting up the DAW software on the computer 1 Set the MIDI output port of the Tracks for playing the MOXF6...

Page 56: ...ONAR 1 Pull down the Options menu and select MIDI Devices to call up the MIDI Devices window 2 Add Yamaha MOXF6 MOXF8 2 to the Input Device then add Yamaha MOXF6 MOXF8 2 to the Output Device 3 Pull do...

Page 57: ...e settings for controlling an external MIDI device by the Master allowing you to change and control the connected external MIDI tone generator in sequence while performing live Registering the Edited...

Page 58: ...all the desired parameters press the STORE button to store your settings as a Master program After completing these settings assign a name to the Master in the F1 Name display of the Master Common Edi...

Page 59: ...nes the settings for the effects applied to the incoming audio signal from the A D INPUT L R jacks in the Voice mode Master Effect Master EQ settings in the Voice mode F2 VOICE SF1 MFX SF2 MEQ Determi...

Page 60: ...then press the ENTER button Move to the desired location in the file name field by using the Cursor buttons and then select the desired characters by using the DATA dial or the INC DEC button to enter...

Page 61: ...ts the USB 1 1 standard you can connect and use a USB 2 0 storage device with the instrument However note that the transfer speed is that of USB 1 1 J Formatting a USB flash memory device When a USB f...

Page 62: ...this operation will call up the F1 COMMON display of Arpeggio Edit Voice Performance Song Pattern mode SHIFT A D INPUT ON OFF In the Voice mode this operation will call up the F3 VCE A D SF1 OUTPUT di...

Page 63: ...been specified in the Song Pattern mode Select the measure again Illegal phrase number An invalid phrase number has been specified in the Pattern mode Select the phrase again Illegal Track number An...

Page 64: ...empted to delete rename or overwrite a read only file Receiving MIDI bulk This instrument is receiving MIDI bulk data Sample is too long The Sample size is too large and the load operation cannot be e...

Page 65: ...rpeggio playback Are the MIDI volume or MIDI expression settings too low when using the external controller Are the effect and filter settings appropriate If you are using the filter try changing the...

Page 66: ...whether or not the Vocoder Effect is selected When Vocoder is selected as the Insertion Effect for the current Voice or for Part 1 of the current Performance Song Pattern the audio signal input from t...

Page 67: ...When the Song Pattern playback produces a wrong pitch is the Note Offset parameter in the Groove display set to a value other than 0 No effect is applied Check the on off status of the EFFECT INSERTI...

Page 68: ...ent sound from the one in the Voice mode This is normal because the Voice sound is determined by the parameter settings in the Performance mode To solve this problem you will need to apply the same pa...

Page 69: ...he setting is changed in the display press the ENTER button and then restart the instrument The sound is not produced properly even when playing back the Song data on the computer or the MIDI instrume...

Page 70: ...dvice Install the optional units carefully as described in the procedure below Improper installation can cause shorts which may result in irreparable damage and pose a fire hazard Do not disassemble m...

Page 71: ...nobs Wheels and Sliders CAUTION Since the instrument particularly the MOXF8 is very heavy this procedure should not be done alone but by two or three people 3 Remove the cover from the bottom With the...

Page 72: ...ss the F6 FLASH button 6 3 Press the SF1 Format button 6 4 Press the ENTER button to execute the Format operation 6 5 Check whether the Total size shown on the display is correct or not Removing the M...

Page 73: ...e Track Pattern 16 Phrase Tracks Pattern Chain Pattern Track Tempo Track Scene Track Songs 64 Songs Mixing Voices 16 Voices per Song Pattern up to 256 Voices Mixing Templates 32 for all Songs and Patt...

Page 74: ...it Indicator 28 Effect 29 59 EFFECT buttons 13 Element Edit 29 ENTER button 14 EXIT button 14 F F1 F6 Function buttons 13 21 Factory Settings 20 FAVORITE button 14 26 Favorite Category 26 File Mode 60...

Page 75: ...p 54 R Realtime Recording 40 43 Record Pattern 47 Record Performance 36 Record Song 41 Remote Control 55 S Save 60 Section 38 Section Length 38 SEQ TRANSPORT button 13 19 SF1 SF6 Sub Function buttons...

Page 76: ...76 MOXF6 MOXF8 Owner s Manual Memo...

Page 77: ...MOXF6 MOXF8 Owner s Manual 77 Memo...

Page 78: ......

Page 79: ...any filial Scandinavia J A Wettergrensgata 1 Box 30053 S 400 43 G teborg Sweden Tel 46 31 89 34 00 DENMARK Yamaha Music Europe GmbH Tyskland filial Denmark Generatorvej 6A DK 2730 Herlev Denmark Tel 4...

Page 80: ...S G Digital Musical Instruments Division 2013 Yamaha Corporation 305MWTY A0 Printed in China ZG45700 Yamaha Web Site English http www yamahasynth com Yamaha Downloads http download yamaha com ZG45700...

Reviews: