File Management (File mode)
MOTIF XF Reference Manual
240
V
oice mode
Song mode
P
a
tter
n mode
Mixing mode
Mast
er mode
Utility mode
F
ile mode
P
erf
or
mance
mode
Sampling
mode 1
Sampling
mode 2
R
e
fe
rence
Follow the instructions below to mount the memory drive of
the computer connected to the network.
1
Connect the MOTIF XF to the network.
Network related parameters can be set in the Network
display (page 221) in the Utility mode.
2
Press the [FILE] button to enter the File mode,
then press the [F2] button to call up the Mount
window.
3
Select a host computer at the Host column (
1
).
If the desired computer name is not shown in the Host
(
1
) parameter, you can call up the Character List by
pressing the [SF5] CHAR button and enter the
computer name manually. For detailed instructions on
naming, refer to “Basic Operation” on page 37.
If you select a computer which has not been accessed
by the MOTIF XF, “Press [ENTER] to access” appears
on the display. When pressing the [ENTER] button, the
display prompts you to enter the password as
illustrated below. Here, enter the User Account of your
computer to the User Name box, enter the password of
your computer to the Password box, then press the
[ENTER] button so that the access between the MOTIF
XF and the computer is established. The shared
directories of the selected computer are listed in the
Sharing Point box (
2
).
n
Once access between the MOTIF XF and the computer
has been established, the shared directories are
automatically listed in the display simply by selecting a
computer from the Host column. If the power is turned off,
the operations for establishing the access (entering the
User Account and Password) are necessary after turning
the power on next time.
n
For details about how to confirm the User Account and
Password of your computer, refer to the owner’s manual of
your computer.
n
When a Password is not assigned to your computer,
simply pressing the [ENTER] button without inputting any
characters establishes the access between the MOTIF XF
and your computer.
4
Mount the desired directories.
In the Sharing Point box (
2
), you can mount the shared
directory by moving the cursor to the desired directory,
then pressing the [ENTER] button. The mount indicator
appears at the left side of the name of the mounted
directory. You can unmount the shared directory by
pressing the [ENTER] button again. The mount
indicator disappears. The mounted directories can be
selected in the File window (page 237).
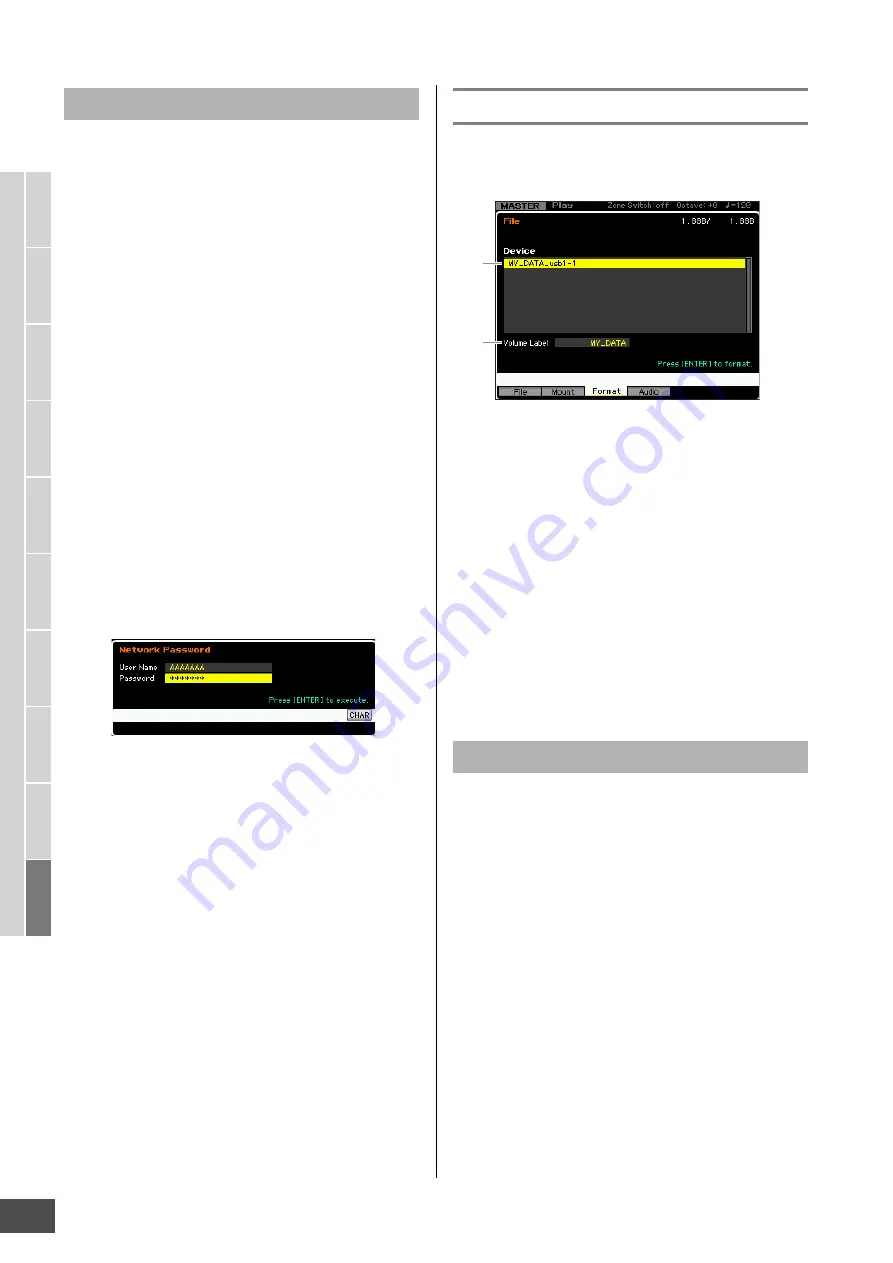
Formatting a Device—[SF3] Format
From this display, you can format memory storage devices
such as a hard disk connected to the USB TO DEVICE
connector.
1
Device
The connected and mounted devices are listed here,
letting you select the device to be formatted. A device that
requires formatting is indicated by “unknown device
(usb***).” The three asterisks (***) in the indication denote
the sequential serial numbers of the connected devices
which need to be formatted. When several partitions are
included in a single device, the partition number is
indicated at the right of the serial number.
2
Volume Label
Determines the Volume Label of the selected device. The
Volume Label is the name assigned to the device. The
Volume Label can contain up to 11 characters. For detailed
instructions on naming, refer to “Basic Operation” on
page 37.
1
Connect the device to be formatted to the USB
TO DEVICE terminal.
2
Select a device to be formatted from the Device
list (
1
).
3
Enter the Volume Label (
2
) as desired.
4
Press the [ENTER] button. (The display
prompts you for confirmation.)
Press the [DEC/NO] button to cancel the Format.
5
Press the [INC/YES] button to execute the
Format operation.
NOTICE
If you format the device, all the previously recorded data will be
deleted. Make sure to check beforehand whether or not the
device contains important data. When checking the contents
of the device in the [F1] File window, keep in mind that some
files (which are not listed on pages 235 and 236) are not shown
on the display of the MOTIF XF, even if the File Type is set to
“all.”
Mount Procedure
Format Procedure
1
2


