8
English
Installing the MY16-mLAN
Here’s how to install the MY16-mLAN in your device. You should also refer to the
owner’s manual of the device into which you’re installing the MY16-mLAN.
Before you begin the installation, carefully read the “PRECAUTIONS” on
page 2.
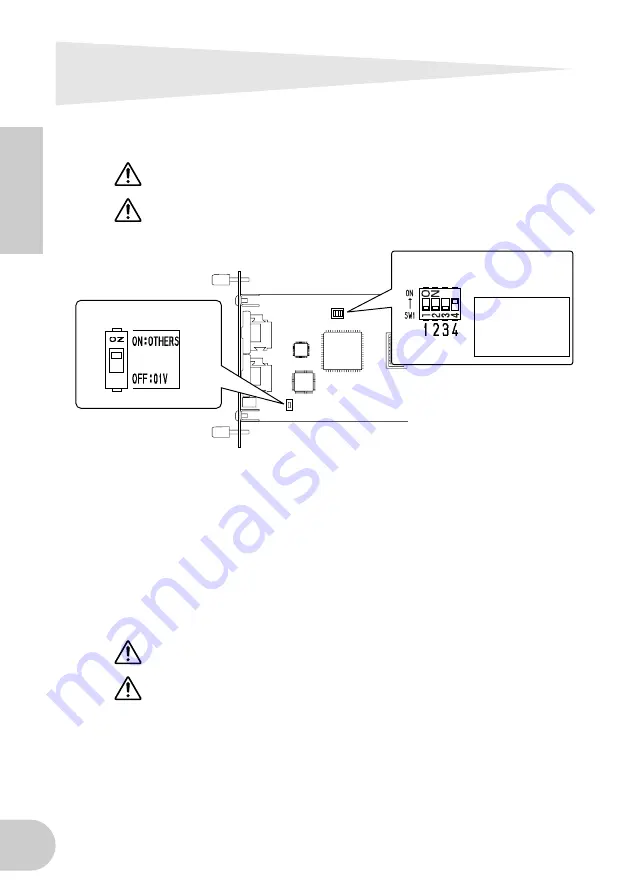
Don’t change the setting of DIP switch SW1. The unit may no longer operate
correctly if you move SW1. If you inadvertently move it, restore the factory set-
tings as described below.
1.
Set the MY16-mLAN’s DIP switch SW2 as appropriate for your device. If
you’re installing the MY16-mLAN in a device other than the 01V, set this
switch to “ON:OTHERS.” If you’re installing the MY16-mLAN in the 01V, set
this switch to “OFF:01V.”
You must set the DIP switch before installing the MY16-mLAN in your device. You
won’t be able to change the DIP switch setting once you’ve installed the MY16-
mLAN. If you need to change the setting, turn off the power of your device,
remove the MY16-mLAN, and then change the setting.
2.
Install the MY16-mLAN in your device. For details, refer to the owner’s man-
ual of the device in which you’re installing it.
Before you install the card, you must power off any peripheral equipment con-
nected to the device in which you’re installing it, and disconnect all cables.
The screws also function as an electrical ground, so be sure to tighten them
securely.
The device in which you’re installing the MY16-mLAN must remain power off
while you install the MY16-mLAN.
3.
Connect the device in which the MY16-mLAN is installed to your mLAN
devices or IEEE1394-compatible computer (page 10).
SW1
SW2
Factory settings:
1–3: OFF
4: ON
A switch is “OFF”
when the white
slider is moved
toward the number.
Summary of Contents for mLAN MY16
Page 21: ...21 English MEMO ...


