background image

Reference

18

MG124CX/MG124C Owner’s Manual

Troubleshooting

*  The MG124CX feature is described first, followed by the MG124C feature in brackets: MG124CX (MG124C).

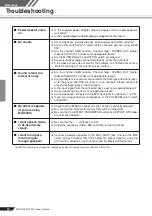
Power doesn’t come 
on.

Is the supplied power adaptor properly plugged into an appropriate AC
wall outlet?

Is the supplied power adaptor properly plugged into the mixer?

No sound.

Are microphones, external devices, and speakers connected correctly?

Are the ON switch and ST switch of the channels you are using turned
ON?

Are the channel GAIN controls, Channel fader, STEREO OUT master
fader and GROUP 1-2 fader set to appropriate levels?

Are the MONITOR switch and 2TR IN switch set properly?

Are your speaker cables connected properly, or are they shorted?

If the above checks do not identify the problem, call Yamaha for service.
(Refer to the page 71 for a list of service centers.)

Sound is faint, dis-
torted, or noisy.

Are the channel GAIN controls, Channel fader, STEREO OUT master
fader and GROUP 1-2 fader set to appropriate levels?

Are two different instruments connected to the XLR-type and phone jacks,
or to the phone and RCA pin jacks on one channel? Please connect to
only one of these jacks on each channel.

Is the input signal from the connected device set to an appropriate level?

Are you applying the effects at an appropriate level?

Are microphones connected to the MIC input jacks on channels 1 to 7/8?

If you are using condenser microphones, is the P48 V switch
turned ON?

No effect is applied. 
(If you are using 
MG124CX)

Check that the EFFECT control on each channel is correctly adjusted.

Be sure that the internal effect unit’s ON switch is turned ON.

Be sure that the EFFECT PARAMETER control and EFFECT RTN fader
are correctly adjusted.

I want spoken words 
to be heard more 
clearly.

Be sure that the 

 switches are ON.

Adjust the equalizers (HIGH, MID and LOW) on each channel.

I want to output a 
monitor signal 
through speakers.

Connect a powered speaker to the AUX (AUX1) jack* and turn the PRE
switch on each channel ON. Then adjust the output signal by using the
AUX (AUX1) controls on each channel and the Master SEND control.

Summary of Contents for MG124C

Page 1: ...e 48 49 Grâce aux effets numériques intégrés la console MG124CX peut proposer de nombreuses variations de sons Funktionen Eingangskanäle Seite 28 Mit bis zu sechs Mikrofon Line Eingängen oder bis zu vier Stereoeingängen können viele Geräte gleichzeitig am MG Mischpult angeschlossen werden Mikrofone Geräte mit Leitungspegel Stereo Synthesizer uvm Kompression Seite 26 Kompression erhöht den Durchsch...

Page 2: ...ng the unit OFF and ON please try to eliminate the problem by using one of the following measures Relocate either this product or the device that is being affected by the interference Utilize power outlets that are on different branch circuit breaker or fuse circuits or install AC line filter s In the case of radio or TV interference relocate reorient the antenna If the antenna lead in is 300 ohm ...

Page 3: ...d for extended periods of time or during electrical storms When removing the electric plug from the device or an outlet always hold the plug itself and not the cord Pulling by the cord can damage it To avoid generating unwanted noise make sure there is 50cm or more between the AC power adaptor and the device Do not cover or wrap the AC power adaptor with a cloth or blanket Before moving the device...

Page 4: ...need to be described for each model the MG124CX feature will be described first followed by the MG124C feature in brackets MG124CX MG124C Illustrations herein are for explanatory purposes only and may not match actual appearance during operation Company names and product names herein are trademarks or registered trademarks of their respective companies Specifications and descriptions in this owner...

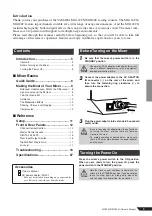
Page 5: ...e features and enjoy trouble free operation for years to come 1 Be sure that the mixer s power switch is in the STANDBY position 2 Connect the power adaptor to the AC ADAPTOR IN connector 1 on the rear of the mixer and then turn the fastening ring clockwise 2 to secure the connection 3 Plug the power adaptor into a standard household power outlet Press the mixer s power switch to the ON position W...

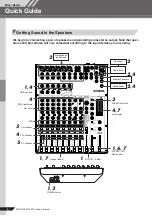
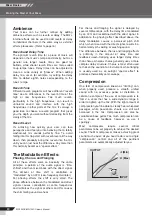
Page 6: ...g to the input devices you are using Getting Sound to the Speakers ON ON ON ON ON ON ON ON ON PAN 1 4 GAIN controls 4 PEAK indicators Equalizer 5 ON switches 4 PFL switches 5 ST switches 1 7 Channel faders 1 GROUP 1 2 fader 1 6 7 STEREO OUT Master fader 4 7 Level meter 3 PHANTOM switch 1 3 POWER switch 2 4 2 4 2 Microphones instruments 2 Monitor Speakers Headphones Power Amp Speakers Mixer Basics ...

Page 7: ...er turn the MG mixer s phantom power switch on before turning on the power to the power amp or pow ered speakers See page 15 for more detail 4 Adjust the channel GAIN controls so that the corresponding peak indica tors flash briefly on the highest peak levels NOTE To use the LEVEL meter to get an accurate reading of the incoming signal level turn the channel PFL switch on Adjust the GAIN controls ...

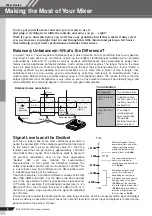
Page 8: ...n be heard is approximately 1 000 000 one million times louder That s too many digits to deal with for practical calculations and so the more appropriate decibel dB unit was created for sound related measurements In this system the difference between the softest and loudest sounds that can be heard is 120 dB This is a non linear scale and a difference of 3 dB actually results in a doubling or halv...

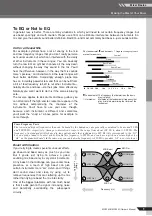
Page 9: ... with Caution If you re trying to create special or unusual effects go ahead and boost away as much as you like But if you re just trying to achieve a good sounding mix boost only in very small increments A tiny boost in the midrange can give vocals more presence or a touch of high boost can give certain instruments more air Listen and if things don t sound clear and clean try using cut to remove ...

Page 10: ... the direct signal The amount of time shift is controlled or modulated by an LFO Low frequency Oscillator For phasing effects the shift is very small The phase difference between the modulated and direct signals causes cancellation at some frequencies and reinforces the signal at others and this causes the shimmering sound we hear For chorus and flanging the signal is delayed by several millisecon...

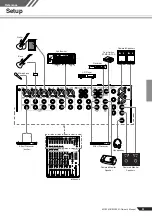
Page 11: ... Reference Setup DI Foot Switch YAMAHA FC5 Recorder Synthesizer CD Player Microphone Powered Speakers Powered Monitor Speakers Bass Headphones Guitar Effect Processor Effect Processor exciter Powered Monitor Speaker MG124CX Reference ...

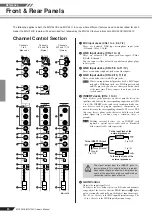
Page 12: ...ks can be used to independently con nect devices such as graphic equalizers compressors or noise filters into the corresponding channels These are TRS tip ring sleeve phone jacks that carry both the send and return signal tip send out ring return in sleeve ground Patching external devices via an INSERT jack requires a special insert cable such as illustrated below insert cable sold separately 6 GA...

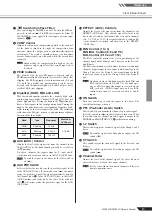
Page 13: ...l immediately prior to the Channel fader I to the AUX AUX1 bus so that AUX AUX1 output is not affected by the fader If the switch is off the mixer sends the post fader signal to the AUX AUX1 bus C EFFECT AUX2 Controls Adjusts the level of the signal sent from the channel to the EFFECT AUX2 bus Note that the signal level sent to the bus is also affected by the Channel fader On stereo channels 5 6 7...

Page 14: ...one jack type output This jack outputs the signals from AUX AUX1 bus You can use this jack for example to connect to an effect unit cue box or other monitoring system EFFECT AUX2 This is an impedance balanced phone jack type output that outputs the signal from the EFFECT AUX2 bus You can use this jack for example to connect to an external effect unit 5 STEREO OUT L R Jacks These jacks deliver the ...

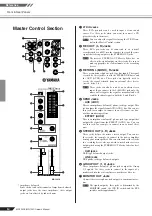
Page 15: ...jack and the MONITOR OUT jacks E 2TR IN 2TR IN Switch If this switch is set to TO MONITOR the signals input via the 2TR IN jacks are sent to the MONITOR OUT jacks the PHONES jack and the level meter If it is set to TO STE REO the signals are sent to the STEREO L R buses 2TR IN control Adjusts the level of the signal sent from the 2TR IN jacks to the STEREO L R buses The following illustration show...

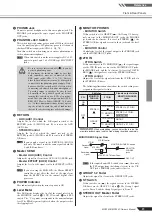
Page 16: ...hes the internal effect on or off The internal effect is applied only if this switch is turned on The switch lights orange when on An optional YAMAHA FC5 foot switch sold separately can be used to toggle the digital effects ON and OFF The ON switch lights and the internal effect unit is active by default when the power is initially turned on 6 PFL Switch Turn this switch on to send the effect sign...

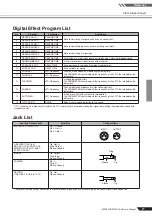
Page 17: ...g applications 10 VOCAL ECHO DELAY TIME Echo suitable for vocals 11 CHORUS 1 LFO Frequency Creates a thick sound by modulating the delay time The PARAMETER control adjusts the frequency of the LFO that modulates the delay time 12 CHORUS 2 LFO Frequency 13 FLANGER LFO Frequency A sweeping pitched effect The PARAMETER control adjusts the frequency of the LFO that modulates the delay time 14 PHASER L...

Page 18: ...OUP 1 2 fader set to appropriate levels Are two different instruments connected to the XLR type and phone jacks or to the phone and RCA pin jacks on one channel Please connect to only one of these jacks on each channel Is the input signal from the connected device set to an appropriate level Are you applying the effects at an appropriate level Are microphones connected to the MIC input jacks on ch...

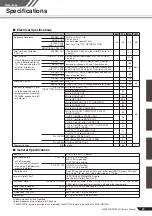
Page 19: ...and controls are maximum when measured PAN BAL panned hard left or hard right Rs 150 Ω INPUT GAIN maximum MIC to CH INSERT OUT 60 dB MIC to STEREO OUT 84 MIC to GROUP OUT MIC to GROUP to ST 94 MIC to REC OUT 62 2 MIC to MONITOR OUT ST TO MONITOR 94 MIC to PHONES OUT 83 MIC to AUX AUX1 SEND PRE 76 MIC to AUX AUX1 SEND POST EFFECT AUX2 SEND 86 CH 5 6 7 8 LINE to STEREO OUT 58 CH 5 6 7 8 LINE to GROU...

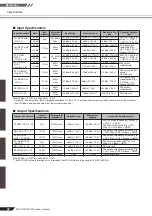
Page 20: ...Ω 600Ω Lines 54 dBu 1 55 mV 34 dBu 15 5 mV 14 dBu 155 mV Phone jack unbalanced 10 dB 10 dBu 245 mV 10 dBu 2 45 V 30 dBu 24 5 V ST CH INPUT CHs 9 10 11 12 10kΩ 600Ω Lines 30 dBu 24 5 mV 10 dBu 245 mV 10 dBu 2 45 V Phone jack unbal anced RCA pin jack CH INSERT IN CHs 1 4 10kΩ 600Ω Lines 20 dBu 77 5 mV 0 dBu 0 775 V 20 dBu 7 75 V TRS phone Jack unbalanced Tip Out Ring In Sleeve GND RETURN L R 10kΩ 60...

Page 21: ...Specifications MG124CX MG124C Owner s Manual 69 Reference Dimensional Diagrams 346 2 436 6 86 1 79 6 2 433 9 Unit mm ...

Page 22: ...1 4dBu CH AUX 1 Nominal 6dB ST CH AUX 1 DSP AUX Nominal 6dB EFFECT RETURN Nominal 10dB ST CH IN 10dBu RETURN 4dBu 2TR IN 10dBV 7 8dBu Clip Level Clip Level Clip Level Clip Level Clip Level Clip Level CH IN LINE Gain Max 34dBu CH IN MIC Gain Max 60dBu ST CH IN LINE Gain Min 10dBu ST CH IN MIC Gain Min 16dBu ST CH IN LINE Gain Max 34dBu ST CH IN MIC Gain Max 60dBu 0dBu 10dBu 20dBu 10dBu 40dBu 30dBu ...

Page 23: ...el 01 64 61 4000 ITALY Yamaha Musica Italia S P A Combo Division Viale Italia 88 20020 Lainate Milano Italy Tel 02 935 771 SPAIN PORTUGAL Yamaha Hazen Música S A Ctra de la Coruna km 17 200 28230 Las Rozas Madrid Spain Tel 91 639 8888 SWEDEN Yamaha Scandinavia AB J A Wettergrens Gata 1 Box 30053 S 400 43 Göteborg Sweden Tel 031 89 34 00 DENMARK YS Copenhagen Liaison Office Generatorvej 6A DK 2730 ...

Page 24: ... web site http www yamahaproaudio com Yamaha Manual Library http www yamaha co jp manual U R G Pro Audio Digital Musical Instrument Division Yamaha Corporation 2006 Yamaha Corporation WH63190 608POAP3 3 01A0 Printed in China ...

Reviews: