background image

Supplementary infomation

169

V

oice mode

P

erf

ormance

mode

Song mode

Utility mode

File mode

Master mode

P

attern mode

Mixing V

oice

mode

Ref

erence

Owner’s Manual

■ 

Supplementary information

Micro Tuning  List

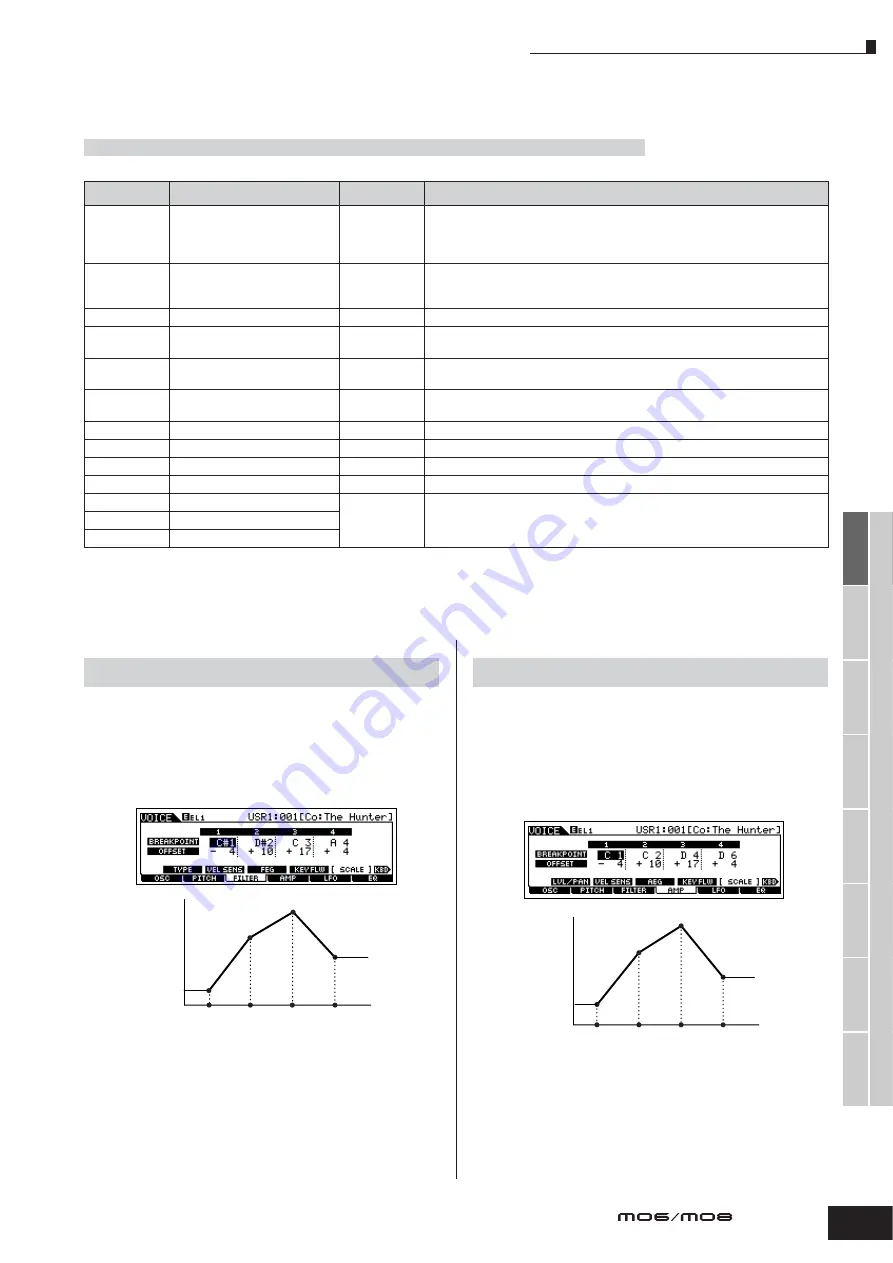
Setting example of Filter Scaling

The best way to understand Filter Scaling is by example. For the 
settings shown in the example display below, the basic Cutoff 
frequency value is 64, and the various Offset values at the 
selected Break point settings change that basic value accordingly. 
The specific changes to the Cutoff frequency are shown in the 
diagram below. The Cutoff frequency changes in a linear fashion 
between successive Break Points as shown. 

Setting example of Amplitude Scaling

The best way to understand Amplitude Scaling is by example. 
For the settings shown in the example display above, the basic 
Amplitude (volume) value for the selected Element is 80, and the 
various Offset values at the selected Break point settings change 
that basic value accordingly. The specific changes to the 
Amplitude are shown in the diagram below. The Amplitude 
changes in a linear fashion between successive Break Points as 
shown. 

[VOICE] 

 [EDIT] 

 [COMMON] 

 [F1] GENERAL 

 [SF2] PLY MODE 

 M.TuningNo./M.TuningRoot (page 153) 

M.TuningNo.

Type

M.TuningRoot

Comments

00

Equal Temp

 (Equal temperament)

--

The “compromise” tuning used for most of the last 200 years of Western music, and 
found on most electronic keyboards. Each half step is exactly 1/12 of an octave, and 
music can be played in any key with identical pitch relationships. However, none of 
the intervals are perfectly in tune.

01

PureMaj

 (Pure major)

C – B

This tuning is designed so that most of the intervals (especially the major thir d and 
perfect fifth) in the major scale are pure. This means that other intervals will be 
correspondingly out of tune. You need to specify the key (C – B) you will be playing in.

02

PureMin

 (Pure minor)

C – B

The same as Pure Major, but designed for the minor scale.

03

Werckmeist

 (Werckmeister)

C – B

Andreas Werckmeiser, a contemporary of Bach, designed this tuning so that 
keyboard instruments could be played in any key. Each key has a unique character. 

04

Kirnberger

C – B

Johann Philipp Kirnberger, an 18th century composer, created this tempered scale 
to allow performances in any key.

05

Vallot&Yng

 (Vallotti & Young)

C – B

Francescatonio Vallotti and Thomas Young (both mid-1700s) devised this adjustment 
to the Pythagorean tuning, in which the first six fifths are lower by the same amount.

06

1/4 Shift

 (1/4 shifted)

--

This is the normal equal tempered scale shifted up 50 cents.

07

1/4 tone


--

Twenty-four equally spaced notes per octave. (Octaves are 24 notes apart.)

08

1/8 tone

--

Forty-eight equally spaced notes per octave. (Octaves are 48 notes apart.)

09

Indian

--

Designed for use Indian music (white keys only). 

10

Arabic 1

C – B

Designed for use Arabic music. 

11

Arabic 2

12

Arabic 3

[VOICE] 

 [EDIT] 

 Element selection 

 [F3] FILTER 

 [SF5] SCALE 

(page 161)

60

74

81

68

C

1

D

2

C3

A4

Cutoff Frequency

Break 
Point 1

Break 
Point 2

Break 
Point 3

Break 
Point 4

Note

[VOICE] 

 [EDIT] 

 Element selection 

 [F4] AMP 

 [SF5] SCALE 

(page 163)

76

90

97

84

C1

C2

C3

C4

Amplitude

Break 
Point 1

Break 
Point 2

Break 
Point 3

Break 
Point 4

Note

Summary of Contents for M06

Page 1: ...OWNER S MANUAL MUSIC PRODUCTION SYNTHESIZER EN ...

Page 2: ... the unit is operating as designed are not covered by the manufacturer s warranty and are therefore the owners responsibility Please study this manual carefully and consult your dealer before requesting service ENVIRONMENTAL ISSUES Yamaha strives to produce products that are both user safe and environmentally friendly We sincerely believe that our products and the production methods used to produc...

Page 3: ...r outlets that are on different branch circuit breaker or fuse circuits or install AC line filter s In the case of radio or TV interference relocate reorient the antenna If the antenna lead in is 300 ohm ribbon lead change the lead in to co axial type cable If these corrective measures do not produce satisfactory results please contact the local retailer authorized to distribute this type of produ...

Page 4: ... becomes frayed or damaged or if there is a sudden loss of sound during use of the instrument or if any unusual smells or smoke should appear to be caused by it immediately turn off the power switch disconnect the adaptor plug from the outlet and have the instrument inspected by qualified Yamaha service personnel CAUTION Always follow the basic precautions listed below to avoid the possibility of ...

Page 5: ...h or uncomfortable volume level since this can cause permanent hearing loss If you experience any hearing loss or ringing in the ears consult a physician Saving and backing up your data DRAM data see page 150 is lost when you turn off the power to the instrument Save the data to a USB storage device Never attempt to turn off the power while data is being written to Flash ROM while an Executing or ...

Page 6: ...hown in this owner s manual are for instructional purposes only and may appear somewhat different from those on your instrument This product incorporates and bundles computer programs and contents in which Yamaha owns copyrights or with respect to which it has license to use others copyrights Such copyrighted materials include without limitation all computer software style files MIDI files WAVE da...

Page 7: ...ving you intuitive control over the patterns as you compose or perform Arpeggios can be triggered not only according to the keys you play but also by how strongly you play them for even greater performance power Page 48 Once you ve collected all the MIDI data and patterns you need for your song use Pattern Chain to arrange the pieces in real time This hands on approach makes it easier than ever to...

Page 8: ... operations in full detail Appendix Page 219 This section contains detailed information on the instrument including the Specifications and an Alert Message List Troubleshooting Page 227 If this instrument does not function as expected or you have some problem with the sound or operation refer to this section before calling your Yamaha dealer or service center Most common problems and their solutio...

Page 9: ...N Song Pattern selection MIXING F3 EFFECT SF1 CONNECT Page 189 Selecting a Master Effect type VOICE UTILITY F3 VOICE SF2 MEF Page 206 PERFORM Performance selection EDIT COMMON F2 OUT MEF SF3 MEF Page 172 SONG or PATTERN Song Pattern selection MIXING EDIT COMMON F2 MEQ MEF SF2 MEF Page 190 Selecting a Master EQ type VOICE UTILITY F3 VOICE SF1 MEQ Page 206 PERFORM Performance selection EDIT COMMON F...

Page 10: ... in the Voice Edit mode Page 53 Creating a Drum Voice in the Voice Edit mode Page 57 Creating a Mixing Voice especially for a Song or Pattern Page 78 Creating a Performance Page 63 Creating a Song Recording your keyboard performance to a Song track Realtime Recording Page 88 Recording over replacing existing material in a Song track Punch in Recording SONG REC F1 SETUP Type punch Page 88 Recording...

Page 11: ...c Overall Changing the octave setting of the keyboard UTILITY F1 GENERAL SF2 KBD Octave Page 29 Shifting the note up or down on the keyboard UTILITY F1 GENERAL SF2 KBD Transpose Page 29 Shifting the note up or down in the tone generator block UTILITY F1 GENERAL SF1 TG NoteShift Page 205 Adjusting the tuning to other instruments UTILITY F1 GENERAL SF1 TG Tune Page 205 In the Voice mode Setting the ...

Page 12: ...NG or PATTERN UTILITY F3 SEQ SF2 FILTER Page 207 Setting the MIDI transmit channel Setting the MIDI transmit channel of the keyboard in the Voice mode Performance mode UTILITY F5 MIDI SF1 CH KBDTransCh Page 209 Setting the MIDI transmit channel and port for each track of a Song Pattern SONG or PATTERN Song Pattern selection F3 TRACK SF1 CHANNEL Page 178 Setting the MIDI transmit channel of Arpeggi...

Page 13: ... Arpeggio feature 48 Using the Controllers on the MO 50 Editing a Program 53 Editing a Voice 53 Editing a Performance 63 Using the Controllers Advanced Course 69 Controllers supported by the MO 69 Creating a Song on the MO 73 Playing the Demo Songs Patterns 73 Creating a Pattern 76 Creating a Song 87 Connecting the MO to external devices 103 Connections 103 Using as a Multi timbral Tone Generator ...

Page 14: ...C4 SET LOCATE CO ASSIGN A PAN CUTOFF SWING LOW ASSIGN B REVERB RESONANCE GATE TIME LOW MID ASSIGN 1 CHORUS ATTACK VELOCITY HIGH MID ASSIGN 2 TEMPO RELEASE UNIT MULTIPLY HIGH DAW REMOTE PAGE SELECT PAN SEND TONE ARP FX MASTER VOLUME ZONE 1 ZONE 2 ZONE 3 ZONE 4 EQ MASTER EFFECT LOCATE REC 1 2 EFFECT BYPASS ASSIGN MEF EFFECT ARPEGGIO SEQ TRANSPORT ARPEGGIO ON OFF F1 SCENE PHONES OUTPUT DIGITAL OUT L ...

Page 15: ...DBY ON C5 C6 COMMON VOICE PERFORM MASTER SONG PATTERN MIXING PRE 1 A PIANO FAVORITES PRE 2 KEYBOARD PRE 3 ORGAN PRE 4 USER 1 BASS USER 2 STRINGS GM BRASS DAW REMOTE CATEGORY SEARCH TRACK SELECT DRUM KITS SOLO SECTION MUTE EDIT COMPARE SCENE STORE SET LOCATE COMMON FILE JOB UTILITY DEMO STORE F1 F2 F3 F4 F5 F6 SF1 SF2 SF3 SF4 SF5 INFORMATION MODE DEC NO INC YES EXIT ENTER EXECUTE GUITAR PLUCKED REE...

Page 16: ...t section of the instrument provides Insertion effects three sets with two effect units per set System effects Reverb and Chorus and Master effects The effects can be applied to the keyboard played voices and to Song Pattern playback These buttons enable you to turn the corresponding Effect blocks as printed on the panel on or off with a single touch n From the following display you can select the...

Page 17: ... Performance Group When the CATEGORY SEARCH button is turned on these buttons can be used to select the desired category printed below each button When the SECTION button is turned on in the Pattern mode these buttons are used to select the desired section Number 1 16 buttons Use of these buttons differs depending on the on off status of the TRACK SELECT and MUTE buttons CATEGORY SEARCH button Pag...

Page 18: ...d via USB The USB TO DEVICE connector is used to connect this instrument to a USB storage device hard disk drive CD ROM drive MO drive flash disk etc via the USB cable This lets you save the data created on this instrument to the external USB storage device and load the data from the external USB storage device to the instrument Save Load operations can be performed in the File mode n For details ...

Page 19: ...nd R jacks Page 20 Line level audio signals are output via these phone jacks For monophonic output use just the L MONO jack 9 PHONES jack Page 20 For connection to a pair of stereo headphones DIGITAL OUT connector Page 103 Use this connector to input or output digital signals over coaxial RCA pin cable The format is S PDIF normally used for CD and DAT players The digital signal output is 44 1kHz 2...

Page 20: ...us electrical shock hazard Connect the adapter to an AC outlet of the specified voltage Even when the STANDBY ON switch is in the STANDBY position a small amount of electricity is still flowing to the unit When you do not plan to use the MO for an extended period of time be sure to unplug the AC power adapter from the AC outlet Connecting the speakers or pair of headphones Since the MO has no buil...

Page 21: ...e way to the minimum Then turn on the every device in your setup in the order of MIDI masters controllers MIDI slaves receivers then audio equipment mixers amplifiers speakers etc When powering down the setup first turn down the volume of each audio device then switch off each device in the reverse order first audio devices then MIDI Now that you ve set up the MO properly you re ready to begin pla...

Page 22: ...condition you can play the keyboard and hear the sounds of the selected program When the instrument is turned on the The Core program is automatically called up Notice the indication Performance USR1 017 B01 at the top right of the display This indicates that Performance 017 in User bank 1 is currently selected A Performance is one of the types of programs of the MO As described below the instrume...

Page 23: ...ceptionally rich and more complex than Voices Note also how many Performances use automatic rhythms and Arpeggios along with keyboard split sounds to let you sound like an entire band all by yourself Here we ve introduced the operations in the Master mode that is called up first when turning the power on The MO has other modes of operation as well In the next section we ll explain about the modes ...

Page 24: ... Voices Performance mode PERFORM button In the Performance mode you can play several Voices together in a layer or play different Voices from separate ranges of the keyboard You can also trigger automatic rhythms and Arpeggios over which you can play melody chord or bass lines of your own Each of these combinations of Voices is called a Performance This mode lets you create richly textured layered...

Page 25: ...ted when you call up the appropriate Master The Master mode can also be used to divide the keyboard into four sections each with its own Voice just as if you were playing four different MIDI keyboards Convenient remote control of your computer software The panel of the MO also serves as a convenient control surface for your computer music system Use the buttons and sliders to control the audio mix...

Page 26: ...ration returns to the original display For Factory Set operations that take longer to process you will see the message Executing or Please Keep Power On during processing Do not switch the power off while this message is on the display Turning the power off in this state results in loss of all user data and may cause the system to freeze This means that this synthesizer may not be able to start up...

Page 27: ...d to the overall operation of the instrument Term Description Page Voice Musical instrument voices 40 Performance A program in which multiple Voices are combined in a layer 44 Song Music data consisting of MIDI events 73 Pattern Rhythm pattern data consisting of MIDI events used for looped playback 73 Master A program which lets you register the settings in each mode Voice Performance Song and Pat...

Page 28: ...enerator parameters in detail SONG MIXING EDIT Song Mixing Job mode Initializing a Song Mixing etc SONG MIXING JOB Song Mixing Store mode Storing a Song Mixing internal memory SONG MIXING STORE Pattern mode Pattern Play mode Playing a Pattern PATTERN Pattern Record mode Recording a Pattern PATTERN REC Pattern Edit mode Editing a Pattern MIDI events PATTERN EDIT Pattern Job mode Converting and tran...

Page 29: ...GENERAL SF2 KBD Octave This setting is available in all modes Transpose setting of the keyboard You can set the amount in semitones by which the range of the keyboard is shifted up or down as well as the octave setting Make sure to execute step 5 The settings made in step 4 will be lost if you turn the power off without executing step 5 Never attempt to turn off the power while data is being writt...

Page 30: ... wise the data will be lost Includes the Mixing settings pages 137 138 Song Mixing Pattern Mixing can be stored as Song Pattern data and as a Mixing Template which are not associated with a specific Song Pattern n For details about the data types you can create on this instrument the internal memory locations to which they are stored and file types when saving the created data to the USB storage d...

Page 31: ...data such as in the Save Load and Delete operations in the File mode do NOT unplug the USB cable do NOT remove the media from the device and do NOT turn the power off to either device Doing so may corrupt the data on either or both devices CAUTION USB connector types There are two different types of USB connectors and the rear panel of the instrument features both Take care not to confuse the two ...

Page 32: ... another instrument with the MO For example you can load Standard MIDI files to the instrument as Song Pattern data or import files created on the MOTIF ES TIP MO MO Saving created data to the USB storage device in the File mode page 211 Computer USB storage device USB TO DEVICE connector Backing up data to a computer and organizing files folders Computer USB storage device Disconnect the USB stor...

Page 33: ...sub functions for these buttons Selecting a Program In order to play the MO you ll need to call up one of its programs i e a Voice Performance Song Pattern or Master These programs can be selected in each Play mode via the same procedure Using the INC YES DEC NO buttons and the data dial The INC YES and DEC NO buttons let you step up or down through the program numbers in any of the Play modes Voi...

Page 34: ...02 G 6 007 A 7 039 C 7 071 E 7 103 G 7 008 A 8 040 C 8 072 E 8 104 G 8 009 A 9 041 C 9 073 E 9 105 G 9 010 A 10 042 C 10 074 E 10 106 G 10 011 A 11 043 C 11 075 E 11 107 G 11 012 A 12 044 C 12 076 E 12 108 G 12 013 A 13 045 C 13 077 E 13 109 G 13 014 A 14 046 C 14 078 E 14 110 G 14 015 A 15 047 C 15 079 E 15 111 G 15 016 A 16 048 C 16 080 E 16 112 G 16 017 B 1 049 D 1 081 F 1 113 H 1 018 B 2 050 D...

Page 35: ...corner indicating that you can call up the Note Type selection window by pressing the INFORMATION button You can specify the note type by pressing the F1 F6 buttons and the SF1 SF5 buttons After selecting one of the note types press the ENTER button to actually enter the selection Press the EXIT button to go back to the original display EXIT ENTER EXECUTE DEC NO INC YES Moving the cursor Use these...

Page 36: ...e current program has been modified but not yet stored If you wish to store your sound obtained by edit operation be sure to store the current program to internal User memory in the Store mode before selecting another program Compare Function This convenient function lets you switch between the edited sound and its original unedited condition allowing you to listen to the difference between the tw...

Page 37: ...ssing the INFORMATION button For example when the Voice mode is active you can quickly check information about which voice bank is selected what Play mode poly or mono is being used which effects are applied and so on For details see page 219 Note Key settings Several parameters let you set a key range for a function for example in setting up a keyboard split by specifying certain note values You ...

Page 38: ... buttons and selecting a character by using the data dial INC YES button and DEC NO button Data types that can be named How to call up the naming display Page Voice VOICE EDIT F1 GENERAL SF1 NAME 153 Performance PERFORM EDIT F1 GENERAL SF1 NAME 172 Song SONG JOB F6 SONG 04 Song Name 189 Pattern PATTERN JOB F6 PATTERN 05 Pattern Name 202 Mixing Template SONG or PATTERN MIXING STORE 192 Mixing Voice...

Page 39: ...TE DEC NO INC YES DEC NO INC YES INFORMATION INFORMATION INFORMATION When the cursor is located at the Name this LIST icon appears and you can call up the Character List display by holding the INFORMATION button Release the INFORMATION button to return back to the original display Select a character for the cursor location on the name Move the cursor to the desired location Perform the operations ...

Page 40: ... only and the contents for example the Voice name here may differ slightly from those on your instrument Playing the MO 1 Press the VOICE button to enter the Voice Play mode PRE 1 PRE 2 PRE 3 PRE 4 USER 1 USER 2 GM Preset Bank Contains the Voices built into this instrument User Bank Contains the voices you ve created in the Voice Edit mode GM Preset Bank Contains the voices allocated according to ...

Page 41: ...ins recommended Voices copied from the Preset Banks If a Voice in a User Bank User Voice is overwritten or replaced that User Voice will be lost When you save an edited Voice be careful not to overwrite any impor tant User Voices PRE 1 PRE 2 PRE 3 PRE 4 USER 1 USER 2 GM Group Voice 3 Select a Normal Voice Group 4 Select a Normal Voice Number 5 Play the keyboard SYN LEAD A B C D E F G H SYN PAD CHO...

Page 42: ...ES and DEC NO buttons or the data dial to select the Category n Some Voices such as User Voices may not be registered to any Category You can search for these Voices by setting the Category to Step through the available Voices by using the data dial You can also use the INC YES and DEC NO buttons or use the Cursor buttons n You can also use the CATEGORY SEARCH button and EXIT button to select the ...

Page 43: ...just a couple of button presses Press the TRACK SELECT button the lamp lights then press the appropriate Number button 1 16 The transmit channel setting is shown at the top right of the display n You can also set the MIDI keyboard transmit channel from the Utility mode UTILITY F5 MIDI SF1 CH KBDTransCh This parameter is available for the Voice mode Performance mode but not for the Song mode Patter...

Page 44: ...lained below n Keep in mind that the example displays shown in this manual are for instruction purposes only and the contents for example the Performance name here may differ slightly from those on your instrument 1 Press the PERFORM button to enter the Performance Play mode VOICE PERFORM MASTER USR1 001 A01 Co Prologue Indicates the Keyboard MIDI transmit channel See page 45 for details Indicates...

Page 45: ...ce Play mode you can change the MIDI transmit channel for the keyboard Press the TRACK SELECT button the lamp lights then press the appropriate Number button 1 16 The transmit channel setting is shown at the top right of the display n You can also set the MIDI keyboard transmit channel from the Utility mode UTILITY F5 MIDI SF1 CH KBDTransCh This parameter is available for the Voice mode Performanc...

Page 46: ...1 as the default Playing several Voices together Layer This calls up a list indicating which Voice is assigned to each Part of the current Performance Since the current Performance has been initialized the only Voice in the Performance is PRE1 Full Grand set to Part 1 6 1 Move the cursor to the Voice Bank or Voice Number of Part 2 6 2 Press the SF1 ADD INT button This enables assignment of the sel...

Page 47: ...ut the Store operation see page 66 n If you are editing a program and you select a different program without storing your edited one all the edits you ve made will be erased In the section above you learned how to assign two Voices to two different Parts Use same procedure to assign Voices to Parts 3 and 4 and create a full orchestral sound or the sound of a 3 or 4 piece band just by using a singl...

Page 48: ...yed back for each Part in the Performance Song or Pattern mode Selecting some programs Voices Performances Songs Patterns automatically turns this lamp on The particular rhythm pattern or phrase that plays depends on the actual notes or chords you play as well as on the selected Arpeggio type For details see page 145 in the Basic Structure section Changing the Arpeggio type during your keyboard pe...

Page 49: ...iting you can have the Arpeggio playback data transmitted as MIDI data This is done by setting the following switch parameters to on Voice Arpeggio Performance Arpeggio Song Pattern Arpeggio TIP Voice mode UTILITY F3 VOICE SF3 ARP CH OutputSwitch Performance mode Performance selection EDIT COMMON F3 ARP SF4 OUT CH OutputSwitch Song mode Pattern mode Song Pattern selection MIXING EDIT COMMON F3 ARP...

Page 50: ... than Pitch Bend can be assigned to the Pitch Bend Wheel in the CTL SET display VOICE EDIT COMMON F4 CTL SET These assignment settings can be stored as a User Voice in the Voice Store mode Even if a different function is assigned to this wheel the Pitch Bend function is available and Pitch Bend messages are still generated when the wheel is used Modulation Wheel Even though the Modulation wheel is...

Page 51: ...Pan stereo position of the Voice Performance Reverb Send Level Chorus Send Level Tempo of the Song Pattern Arpeggio playback When pressing the TONE button TONE button Filter Cutoff Frequency degree of brightness Resonance the level of the signal in the area of the cutoff frequency Attack Time of the sound Release Time of the sound decay time after the key is released When pressing the ARP FX butto...

Page 52: ...y each slider Control slider 1 Control slider 2 Control slider 3 Control slider 4 Voice mode When a Normal Voice is selected Element 1 Volume Element 2 Volume Element 3 Volume Element 4 Volume When a Drum Voice is selected Volume of the entire Voice sound moving any slider produces same volume Performance mode Controls Volume of the assigned Parts see Precautions note below Song mode Pattern mode ...

Page 53: ... at same time or programming them to switch depending on how strongly the keyboard is played helps to create a much more powerful and realistic piano sound n A Drum Voice is made up of different Keys or separate percussion drum sounds that are assigned to individual notes on the keyboard Normal Voice Edit Editing a Program 1 Press the VOICE button to enter the Voice mode then select a Normal Voice...

Page 54: ...Arpeggio type and playback tempo These can be edited in the Common Edit display Enter a name for the Voice from the NAME display COMMON F1 GENERAL SF1 NAME For detailed instructions on naming a Voice refer to page 38 The edited Voice can be stored in the Voice Store mode For details see page 60 3 Call up the Common Edit display or Element Edit display PRE 1 A PIANO FAVORITES PRE 2 KEYBOARD PRE 3 O...

Page 55: ...priate number button 9 12 3 To exit from the Solo function press the MUTE button again TIP TIP TRACK SELECT SOLO MUTE 1 2 3 4 5 6 7 8 9 10 11 12 13 14 15 16 ELEMENT PERF PART ZONE DRUM PERCUSSION SYN PAD CHOIR CHROMATIC PERCUSSION In this example only Element 3 is turned on and can be edited Edit Recall If you are editing a Voice and select a different Voice without storing the one you were editin...

Page 56: ...NCE Boosts or attenuates the level at the area around the Filter cutoff frequency VOICE Voice selection F5 EG RESO Page 152 ATTACK Determines the attack time of the sound For example you can adjust a strings Voice so that the sound gradually swells in volume by setting a slow attack time simply turn this knob to the right VOICE Voice selection F5 EG ATK AEG Page 152 RELEASE Determines the release ...

Page 57: ... the Voice mode then select a Drum Voice to be edited 2 Press the EDIT button to enter the Voice Edit mode 3 Call up the Common Edit display or Key Edit display Key 1 Key 5 Key 10 Key 18 Key 21 Key 73 C0 C1 C6 PRE 1 A PIANO FAVORITES PRE 2 KEYBOARD PRE 3 ORGAN PRE 4 DRUM KITS GUITAR PLUCKED A B C D 1 2 3 4 9 10 11 12 ELEMENT PERF PART ZONE COMMON SYN LEAD SYN COMP SYN PAD CHOIR CHROMATIC PERCUSSIO...

Page 58: ...1 WAVE display 3 Press the key to which you want to assign a sound The drum instrument currently assigned to the pressed key will sound 4 Select the desired Waveform to be assigned Move the cursor to Number and change the value by using the data dial INC YES button and DEC NO button Then press the same key set in step 3 again to confirm the selected instrument sound 5 Create your original drum kit...

Page 59: ... to Hi Hat Close and set it to the same Alternate Group 1 as in step 3 5 Confirm whether the Alternate Group has been set properly Immediately after pressing the Hi Hat Open key press the Hi Hat Close key Pressing the second key should cut off the sound of the first Since the settings above are included in the Drum Voice data store them as a Drum Voice in the Voice Store mode Determining how the D...

Page 60: ...ring a Normal Voice UDR when storing a Drum Voice and the desired Voice number by using the data dial INC YES and DEC NO button When you execute the Store operation the settings for the destination memory will be overwritten Important data should always be backed up to a separate USB storage device The display prompts you for confirmation Press the DEC NO button to cancel the Store operation VOICE...

Page 61: ...38 For information on how to select a folder see page 213 For information on how to create delete a folder and change the folder name see page 211 If you are about to overwrite an existing file the display prompts you for confirmation Press the INC YES button to execute the Save operation to overwrite the existing file or press the DEC NO button to cancel it While the data is being saved loaded ma...

Page 62: ...ure to follow these precautions Do not remove or eject the media from the USB storage device Do not unplug or disconnect the USB storage device Do not turn off the power of the instrument or the relevant devices FILE F3 LOAD 1 Press the FILE button to enter the File mode Then press the F1 CONFIG button and SF1 CURRENT button 2 Press the F3 LOAD button to call up the Load display 3 Select the file ...

Page 63: ...ance Edit mode 3 Call up the Common Edit display or Part Edit display PRE 1 A PIANO FAVORITES PRE 2 KEYBOARD PRE 3 ORGAN PRE 4 DRUM KITS GUITAR PLUCKED A B C D 1 2 3 4 9 10 11 12 ELEMENT PERF PART ZONE COMMON SYN LEAD SYN COMP SYN PAD CHOIR CHROMATIC PERCUSSION While in the Voice Edit mode you can switch between the Common Edit display and the Part Edit display as shown below Indicates a Common Ed...

Page 64: ...of each Part s Voice edited in the Voice Edit mode Arpeggio related parameters Pages 145 173 For each Performance you can set the Arpeggio related parameters such as Arpeggio type and playback tempo These settings can be edited in the Common Edit display Enter a name for the Voice from the NAME display COMMON F1 GENERAL SF1 NAME For detailed instructions on naming a Voice refer to page 38 The edit...

Page 65: ...G CUTOF Page 171 RESONANCE Boosts or attenuates the level at the area around the Filter cutoff frequency PERFORM Performance selection F5 EG RESO Page 171 ATTACK Determines the attack time of the sound For example you can adjust a strings Voice so that the sound gradually swells in volume by setting a slow attack time simply turn this knob to the right PERFORM Performance selection F5 EG ATK AEG P...

Page 66: ...ation After the Performance has been stored a Completed message appears and operation returns to the Performance Play display Never attempt to turn off the power while an Executing or Please keep power on message is shown Turning the power off in this state may cause the system to freeze and prevent normal startup the next time the power is turned on as well as resulting in the loss of all user da...

Page 67: ... only a specific Performance set Type to Performance When Type file type is set to All and the Load operation is executed all data that can be created on the instrument will be loaded This means that any existing data in User memory will automatically be overwritten and lost Make sure to save any important data to a USB storage device before performing the Load operations especially when Type is s...

Page 68: ...ow these precautions Do not remove or eject the media from the USB storage device Do not unplug or disconnect the USB storage device Do not turn off the power of the instrument or the relevant devices 4 Select the file to be loaded When Type is set to Performance When Type is set to Performance you can specify and load a specific Performance from a file with the extension M7A Loading data to this ...

Page 69: ...t is suited for switch type on off controls such as sustain Portamento Switch increment decrement of a Voice or Performance Number starting stopping the Sequencer and holding the Arpeggio on or off Foot Controller An optional Foot Controller such as the FC7 connected to the FOOT CONTROLLER jack on the rear panel can be assigned to control a variety of parameters on the instrument By using a foot c...

Page 70: ...he Control List in the separate Data List booklet 4 Depth Determines the amount by which the parameter selected in Destination can be controlled For negative values the controller operation is reversed n The Controller Set edited in the Voice Edit mode is available when the corresponding Voice is selected in the Performance Song and Pattern n The functions assigned to the Controller by the Control...

Page 71: ...ing of ASSIGN A and B may result in changes to the data of stored User Voices Performances Songs Patterns 1 ASSIGN A ASSIGN B Determines the Control Change numbers generated when controlling the ASSIGN A and B Control sliders 1 and 2 Normally there is no need to change these parameters The conventional parameter assignments as defined in the MIDI standard used for the control numbers are indicated...

Page 72: ...ssages as set here are received from an external device the internal tone generator also responds to those messages as if the controller on the MO itself was used Controller Generated MIDI message Display for setting the Control Change number Aftertouch Channel Aftertouch DnH Pitch Bend wheel Pitch Bend EnH Modulation wheel Control Change BnH 01H ASSIGN A B Control Change BnH UTILITY F4 CTL ASN SF...

Page 73: ...mode then recording a melody in the Song mode Once you see how it s done you can use the same method to create your own music with Patterns and Songs Playing the Demo Songs Patterns The Song and Pattern Demos have been specially programmed so you can hear just how amazing the sounds are and find out just how powerful the instrument really is for music creation performance and production When the D...

Page 74: ...EC NO buttons Next let s play a Demo Pattern 2 Set the LoadType to All 3 Press the ENTER button to load the Demo data 01 Dub nBass Song track number and track mute solo status Track data status Indicates muted track Indicates soloed track page 75 Indicates that the track has no recorded data Indicates a MIDI track containing MIDI sequence data Location settings for the selected Song Measure Beat f...

Page 75: ...e a track The corresponding track is set to mute its lamp goes off and produces no sound When pressing the same number button again the track mute is canceled its lamp lights To turn Mute off press the MUTE button again the lamp goes off To solo a track Simultaneously hold down the MUTE button and press one of the Number buttons 1 to 16 to solo the corresponding track Once you ve selected a track ...

Page 76: ...signed the Voice to each track Select the Empty Pattern Press the TRACK SELECT button so that its lamp lights and select a track Part by pressing the one of the Number buttons 1 to 16 You can now play the Voice of the selected track from the keyboard n You can also select the Part by using the Cursor buttons Turn the TRACK SELECT button off and select the Voice normally in the same way as in Voice...

Page 77: ... settings each designed for a different music category or genre have been programmed and stored as convenient Mixing Templates Each Mixing Template includes the Voices effects pan and other settings suitable for the corresponding music genre Simply dial up the template that comes closest to the type of Song or Pattern you wish to create tweak the settings as desired then start recording n You can ...

Page 78: ...Bank to USER1 or USER2 5 3 Press the ENTER button to execute the Store operation The created Song and Pattern data resides temporarily in DRAM page 150 Because data contained in DRAM is lost when the power is turned off you should always store any data residing in DRAM to a USB storage device before turning off the power Creating a Pattern by Preset Phrases and Arpeggio Naturally you can create ph...

Page 79: ...NE Select a track Indicates the category of the preset Phrases Indicates the Phrase number Select a Preset Phrase Play the Pattern to confirm the assigned Phrase User Phrases In addition to the Preset Phrases you can store MIDI data you ve recorded in the Pattern mode as User Phrases User Phrases have the added benefit of being able to use the sounds of other instruments letting you record bass gu...

Page 80: ... page 82 Loop This function plays back the Pattern repeatedly in a loop If Type is set to overdub and Loop to on you can add separate notes or parts in order For example you could record the parts of a drum kit one by one recording the kick on the first pass a snare on the second a hi hat part on the third and so on This technique is also convenient for adding non note sound shaping data such as t...

Page 81: ...g the user phrase for the guitar part in step 8 Select the phrase number of Part 3 and set it to the same phrase number of the bass phrase of Part 2 Adjust the octave and velocity of the guitar phrase as desired from the F2 NOTE screen of the Pattern Job mode The same User Phrases can be assigned to different Sections within a pattern Keep in mind however that the Section data will automatically b...

Page 82: ...Play button to hear your newly recorded Pattern Copying a User Phrase from another Pattern to the current Pattern The User Phrases that can be assigned with the Patch function are limited to the ones contained in the currently selected Pattern To copy Phrases from other Patterns for use in the current one follow the instructions below 1 In the F4 PATCH display press the SF5 COPY button to call up ...

Page 83: ...J Stop button to stop the recording CAUTION Rehearsing parts before recording To temporarily disengage the record mode and enter the Rehearsal mode simply press the REC button during realtime recording the REC indicator will flash and playback will continue uninterrupted but no data will be recorded This convenient Rehearsal mode lets you easily and temporarily disable recording in order to practi...

Page 84: ...hanged for Section D as well 3 Select a track then adjust the Groove settings Using the Groove settings to change the Pattern data Grid Groove is a playback only feature that processes the recorded data of a Pattern without actually changing it In other words the original data created via the Recording File Loading and Patch functions remains intact If you want to make the Grid Groove settings per...

Page 85: ...mpo while the Chain is playing When the recording track is set to scene press the MUTE button the lamp lights and use the Number buttons 1 16 to turn each track on off as desired during recording 1 In the Pattern Play mode select a Pattern for which data has already been created 2 Press the F6 CHAIN button to call up the Pattern Chain Play display 3 Press the REC button to enter the Pattern Chain ...

Page 86: ...tern Chain 4 Press the EXIT button to return to the Pattern Chain Play display then press the F Play button to hear the edited Pattern Chain 5 Save the created Pattern data to a USB storage device page 98 before turning the power off EDIT Press the F6 button to clear the event at the cursor location Press the F5 button to insert the event to the cursor location Press the F6 button to delete the ev...

Page 87: ...g in DRAM to a USB storage device before turning off the power Creating a Song with Pattern Chain You can easily create the backing parts for your performance and or singing by combining the Patterns you created in the Pattern mode For details see page 84 Song track 1 Song track 2 Song track 3 Song track 4 Song track 5 Song track 6 Song track 7 Song track 8 Song track 9 Song track 10 Song track 11...

Page 88: ...ording ends at this point and normal playback of the recording track starts Press the SF1 COPY LOC to assign the measure numbers registered to the Locations Loc1 and Loc2 to the Punch In and Punch Out points 5 Press the F Play button to start the recording 6 Press the J Stop button to stop recording after the Song playback reaches the Punch Out point 7 Press the F Play button to hear your newly re...

Page 89: ...gistering a Song Scene and Arpeggio type simultaneously to the SF1 SF5 buttons Song Scenes and Arpeggio types can both be registered to the SF1 SF5 buttons when the ARP1 ARP5 menu items are shown at the bottom of the display These settings are stored as Song data Song Scene is a powerful function that allows you to store five different snapshots of important Song related parameters including trans...

Page 90: ...ol change messages The Song Job mode on the other hand provides a comprehensive variety of tools you can use to transform the recorded data such as cleaning up the timing Quantize transposing changing the velocity of notes modifying the length of notes and other useful operations for altering the sound It also includes a variety of convenient operations such as copying or erasing data Most of thes...

Page 91: ...dited use the Solo function page 75 Transforming the recorded data and other operations Song Job mode The Song Job mode has a wide variety of operations for changing and working with Song data Virtually all of the Jobs share the same procedure so we ll explain only one of them here Quantize which lets you clean up the timing of a previously recorded track In the following example this musical pass...

Page 92: ... or when the Song is stopped Two Locations can be assigned Assigning Locations Select the desired measure in the recorded Song for the Location Highlight MEAS and use the INC YES and DEC NO buttons or data dial Then to assign the measure to Location 1 simultaneously hold down the SET LOCATE button and press the G Reverse button To assign Location 2 use the H Forward button Jumping to an assigned L...

Page 93: ...d to the most recent operation Job Edit Record etc n The Undo Redo Job is available also in the Pattern Job mode Editing Mixing parameters to complete a Song in the Mixing mode Mixing Edit mode In this final step other than saving your precious work which we ll cover next you can mix down your tracks with the Song Mixing function adjusting the volume balance and pan setting of all the parts and tw...

Page 94: ...he Common Edit display and the Element Edit display as shown below Indicates a Common Edit display Calling up the Part Edit display Press the desired Part number from the PART 1 16 buttons to call up the Part Edit display Indicates the display for editing Part 1 Common Edit Part 1 Edit n You can mute or solo a Part just as is done with tracks in the Song Play mode or Pattern Play mode Part 2 Edit ...

Page 95: ... 002 003 004 and so on In addition the following parameters can be set in the Song Chain 3 Play the Song Chain Move the cursor to the top of the Song Chain display and press the F Play button to start Song playback When the Song Chain programmed in step 2 reaches to the end playback stops automatically Press the Stop button during playback to stop Song Chain playback n The Song Chain can only be p...

Page 96: ...D RevSend Page 191 CHORUS SONG or PATTERN Song Pattern selection MIXING EDIT Part selection F2 OUTPUT SF2 EF SEND ChoSend Page 191 TEMPO Tempo of the current Song Pattern Page 74 CUTOFF SONG or PATTERN Song Pattern selection MIXING EDIT Part selection F4 TONE SF2 FILTER Cutoff Page 191 RESONANCE SONG or PATTERN Song Pattern selection MIXING EDIT Part selection F4 TONE SF2 FILTER Resonance Page 191...

Page 97: ...L PAN Volume Normal The Arpeggio is played back using only the played note and its octave notes Fixed Playing any note s will trigger the same MIDI sequence data OrgNotes Original Notes Basically same as Fixed with the exception that the Arpeggio playback notes differ according to the played chord TIP TIP Track 1 Track 2 Track 3 Track 4 Track 5 Track 6 Track 7 Track 8 Track 9 Track 10 Track 11 Tra...

Page 98: ... Song Pattern The created Song Pattern data resides on DRAM page 150 Because data contained in DRAM is lost when the power is turned off you should always save any data residing in DRAM to a USB storage device in the File mode before turning off the power Please note that the edited Mixing settings should be stored before saving to a USB storage device n Since the Mixing templates are stored as Sy...

Page 99: ...le type by using the data dial INC YES and DEC NO button You can select one of the following four file types to save the Song or Pattern data Here select All because various kinds of data have been created in order to complete a Song Move the cursor to the file name input location then input a file name For detailed instructions on naming refer to page 38 in the Basic Operation section For informa...

Page 100: ...hese precautions Do not remove or eject the media from the USB storage device Do not unplug or disconnect the USB storage device Do not turn off the power of the instrument or the relevant devices n When loading a SMF Standard MIDI File set the file type to Song or Pattern n Only the sequence track 1 16 and tempo track data of a Song Pattern created in the Song Pattern mode can be saved to a USB s...

Page 101: ...rage device Do not turn off the power of the instrument or the relevant devices 3 Select a file type to be loaded All All data in a file that is saved to the USB storage device as an All type can be loaded and restored to this instrument Voice A specified Voice in a file can be individually selected and loaded to this instrument Performance A specified Performance in a file can be individually sel...

Page 102: ...ve them together in a single folder or in the root directory 2 Enter the Utility mode and call up the Auto Load display UTILITY F1 GENERAL SF4 OTHER 3 Set Auto Load to on and press the SF5 GET button 4 Select the folder saved in step 1 If the device is inserted the multiple medias select the Slot number If the device is divided the multiple partitions select the Partition number 5 Press the STORE ...

Page 103: ...eo image use a pair of powered speakers Connect the powered speakers to the OUTPUT L MONO and R jacks on the rear panel n When using just one powered speaker connect it to the OUTPUT L MONO jack on the rear panel Digital Output The sound output through the OUTPUT jacks by analog can also be output by digital through the DIGITAL OUTPUT jack Using this digital output jack you can record the keyboard...

Page 104: ...annel of the MO For details on setting the MIDI Transmit Channel of the external MIDI instrument refer to the Owner s Manual of the MIDI instrument For details on setting the MIDI Receive Channel of the MO check the following points In the Voice mode Performance mode using the MO as a single timbre tone generator Check the MIDI Basic Receive Channel with the following operation If necessary change...

Page 105: ... the MIDI Transmit Channel for each track of the current Song Pattern with the following operation Change this setting as necessary Alternately you can set the output destination Internal or external MIDI tone generator for each track from the following display In this case you ll need to set the external MIDI tone generator to multi timbral operation and set the MIDI Receive Channel for each part...

Page 106: ...ing the MIDI Sync to MTC in the Utility mode with the following operation n MTC and MMC are available only in the Song mode Synchronizing the MO to the MTC signal from an external MTR After receiving the MTC signal transmitted from the MTR when MTR playback is started the selected Song of the MO will start once the MTC Start Offset time elapses set from the display UTILITY F5 MIDI SF3 SYNC MTC Sta...

Page 107: ... However audio data cannot be transmitted or received via USB on the MO When using a USB connection make sure to set the following parameter to USB n USB cables have different connectors on each end the A type and the B type When connecting this synthesizer to the computer connect the A type to your computer and the B type to the USB TO HOST connector When connecting this synthesizer to the comput...

Page 108: ... sleep standby of the computer Before turning on the power to the instrument connect the computer to the USB TO HOST connector Execute the following before turning the power to the instrument on off or plugging unplugging the USB cable to from the USB TO HOST connector Quit any open applications such as Voice Editor Multi Part Editor and sequencer software Make sure that data is not being transmit...

Page 109: ...he MO actually receives and responds to MIDI data from the computer application sequencer regardless of the Local Control setting on the MO MIDI Echo is a function on sequencers that takes any data received via the MIDI IN and echoes it or sends it as is through the MIDI OUT In some software this function is also called MIDI Thru n For details about MIDI Echo refer to the owner s manual of your pa...

Page 110: ...ormal startup the next time the power is turned on as well as resulting in the loss of all user data Using the sounds of the MO for song playback from a sequencer Set the MIDI port and MIDI channel setting of each track in the sequencer song file as desired MIDI Port settings When you are using the internal tone generator of the MO set the MIDI port of each track of the sequencer to 1 MIDI channel...

Page 111: ...e when you play back tracks on the sequencer the Part whose Receive Channel is same as the sequencer track s Transmit Channel is played If two or more Parts have the same MIDI receive channel value those Parts will play in unison 5 Record your song data to the sequencer song file 6 Play back the sequencer song file using the sounds of the MO 1 2 3 4 5 6 7 8 16 External keyboard External sequencer ...

Page 112: ...ersion information of each program and its system requirements at the website above n You will need the Studio Manager software Version 2 to start each Editor Make sure to download Studio Manager together with the appropriate Editors from the website above Studio Connections Studio Connections is a sophisticated software hardware solution that lets you seamlessly integrate the MO into your compute...

Page 113: ... controlling the Multi Part Editor select general In this case the parameter is set to off because the Multi Part Editor is not used n The general setting is for remote control of the Yamaha software This lets you control the Multi Part Editor in Mode A and control Yamaha sequencer software in Mode B n For details on how to operate the Editor refer to the PDF manual included with the software Wind...

Page 114: ...the Inputs and add YAMAHA USB OUT 0 4 to the Outputs 3 Pull down the Options menu and select Control Surfaces to call up the Control Surface window 4 Click the button select Mackie Control then set the Input Port to YAMAHA USB IN 0 4 and the Output Port to YAMAHA USB OUT 0 4 for example when setting the Port to 4 in step 4 of Setting up for Remote Control Digital Performer 4 52 1 Pull down the Set...

Page 115: ...s as those of the M2 M3 and M4 buttons on the Mackie Control When the Mode is set to D Perf These buttons perform the same functions as those of the OPTION CONTROL and COMMAND buttons on the Mackie Control When the Mode is set to General or Cubase Not used When the Mode is set to Logic The button can be used to switch the whether the track slot number of DAW is displayed on the LCD or not When the...

Page 116: ...track part selected by the cursor The Knobs can also be used but these help you make fine adjustments to the value that are difficult to make with the Knobs When the menu does not appear at the SF4 button The buttons can be used to move the song position in the DAW When the Mode is set to General These buttons are assigned to perform the same functions as the panel buttons on the 01X The correspon...

Page 117: ... off or on mutes unmutes the signal SHIFT ON of each channel in the normal status Turns all the channels with the exception of the Master Channel off or on mutes unmutes the signal ON with the SOLO lamp turned on Turns the Solo function of each channel on or off applies to the Channel Module Software Synthesizer Module SHIFT ON with the SOLO lamp turned on Turns the Solo function of each channel o...

Page 118: ...able when the AUX BUS window is active Knobs 1 8 tweaking Edits the Effect Send Level SHIFT Knobs 1 8 pressing Resets the edited parameter to the default value Button Controller names on 01X Functions Button Controller names on Logic Control Functions In all modes NAME VALUE Changes the indication of the parameter name and its value SHIFT NAME VALUE Changes the meter display mode SEL Selects a cha...

Page 119: ...LUG IN Return to the PLUG IN mode INSTRUMENT mode INSTRUMENT Multi Channel View INSTRUMENT INSTRUMENT Track Parameter View Knobs 1 8 tweaking pressing Turn the knob to select the desired instrument for insertion indication flashes then press the knob to actually enter the selected setting Knobs 1 8 pressing a Knob to which the Instrument is assigned Calls up the parameter page and opens the Editor...

Page 120: ...ANNEL L CHANNEL R BANK L BANK R M1 EDIT NAME VALUE DIAL RESET KN1 4 5 8 OK ENTER NEW AUDIO NEW MIDI FIT TRACK FIT PROJECT M1 CANCEL NEXT WINDOW CLOSE WINDOW KN1 4 5 8 TRACK SAVE UNDO REDO BANK L BANK R M1 AUX MAIN DIAL RESET KN1 4 5 8 F5 F1 F2 F3 F4 M1 F6 F7 F8 KN1 4 5 8 JOG PRM MAKER LOOP SELECT PUNCH M1 LOOP ON OFF HOME DIAL RESET KN1 4 5 8 CURSOR L CURSOR DWN CURSOR UP ZOOM BANK L BANK R M1 CUR...

Page 121: ...ers DYN Knobs 1 8 pressing Resets the edited parameter to the default value center FLIP Switches the functions of the Channel Knobs and the Faders PAN in the PAN mode Turns the Meter on or off ASSIGNMENT FADER BANKS Track Groups Windows PAN SEND PAN SEND TONE ARP FX Dialog Record Transport Project EQ TONE TONE ARP FX ARP FX EQ SENDS I O PAN EQ BANK L BANK R SHIFT PLUG INS DYN DIAL RESET KN1 4 5 8 ...

Page 122: ...sounds of connected MIDI devices all from the MO keyboard by assigning each zone to a different MIDI channel Moreover you can use the Control sliders to tweak the sound of each as desired Selecting a Master The MO features 128 specially programmed Masters Try some of these out now Selecting a Master is done in basically the same way as selecting a Voice Since there is only one bank for Masters you...

Page 123: ...re selecting another Master Playing as a master keyboard In the Master mode you can divide the keyboard into up to four independent areas called Zones Each Zone can have different MIDI channel assignments as well as different functions for the Control sliders This makes it possible to control several parts of the multi timbral tone generator simultaneously by a single keyboard or to control voices...

Page 124: ...dited Master 8 Store the edited Master to internal User memory Determines the mode that is called up when the Master number is selected Set the Zone Switch to on Determines the program number that is called up when the Master is selected EDIT JOB STORE COMPARE PRE 1 A PIANO FAVORITES PRE 2 KEYBOARD PRE 3 ORGAN PRE 4 DRUM KITS GUITAR PLUCKED A B C D 1 2 3 4 9 10 11 12 ELEMENT PERF PART ZONE COMMON ...

Page 125: ... For each Zone set whether or not MIDI data is transmitted to each Part of the internal tone generator MASTER EDIT Zone selection F1 TRANS TGSwitch Determine the note range of each zone MASTER EDIT Zone selection F2 NOTE NoteLimitH MASTER EDIT Zone selection F2 NOTE NoteLimitL MASTER EDIT Zone selection F1 TRANS MIDISwitch Internal tone generator Single Timbre External tone generator Multi timbral...

Page 126: ... been set to 11 Expression In this way you can control the stereo position of each Zone with the appropriate Knob and use the Sliders to adjust the relative volume balance among the Zones ASSIGN A PAN CUTOFF SWING LOW ASSIGN B REVERB RESONANCE GATE TIME LOW MID ASSIGN 1 CHORUS ATTACK VELOCITY HIGH MID ASSIGN 2 TEMPO RELEASE UNIT MULTIPLY HIGH DAW REMOTE PAGE SELECT PAN SEND TONE ARP FX MASTER VOLU...

Page 127: ...tton to call up the Initialize display 3 Uncheckmark the box of All by using the DEC NO button and checkmark the box of Zone 4 Set the Type to Split or Layer When Type is set to Split Set the UpperCh MIDI transmit channel of the upper range LowerCh MIDI transmit channel of the lower range and Split Point which separates the keyboard into the upper range and lower range When Type is set to Layer Se...

Page 128: ...synthesizer s tone generator block produces the sound according to the MIDI messages transmitted from the keyboard and controllers Controllers supported by the MO The controllers you can use on this synthesizer and the reference pages are as follows Controllers with which the MO is equipped Keyboard Initial Touch page 16 Pitch Bend Wheel page 50 Modulation Wheel page 50 Knob page 51 Control slider...

Page 129: ...rs unique to each Element Key and parameters common to all the Elements Keys in the Voice mode page 151 or in the Mixing Voice mode page 203 Performance A program in which multiple Voices parts are combined in a layer or in other configurations is referred to as a Performance Each Performance can contain up to four different Parts Voices Each Performance can be created by editing parameters unique...

Page 130: ...ing guitar Part can be played with just a single Voice using specific velocity values to play the desired sounds n The Keyboard Mega Voice names are indicated as Mega in the display VOICE PATTERN MIXING SONG MIXING PERFORM One Voice Up to four elements Normal Voice Up to 73 keys Drum Voice Common Edit parameters Arpeggio Effects Controller Set etc Element 1 4 or Key C0 C6 n This synthesizer has tw...

Page 131: ...ong 1 16 Parts Pattern 1 16 Parts Song 64 16 Parts Template 1 2 32 Pattern 64 16 Parts PRE 1 A PIANO PRE 1 A PIANO PRE 2 KEYBOARD PRE 3 ORGAN USER 1 BASS USER 1 BASS USER 1 BASS USER 2 STRINGS USER 2 STRINGS GM BRASS GM BRASS Preset 4 128 Voices 1 2 128 PRE 4 GUITAR PLUCKED FAVORITES DRUM KITS FAVORITES DRUM KITS FAVORITES DRUM KITS VOICE PERFORM SONG PATTERN MIXING MIXING Normal Voice Normal Voic...

Page 132: ... case of the Normal Voice you can set the note range for Element the range of notes on the keyboard over which the Element will sound as well as the velocity response the range of note velocities within which the Element will sound For example you could set one Element to sound in an upper range of the keyboard and another Element to sound in a lower range Thus even within the same Voice you can h...

Page 133: ...Resonance parameter to add further character to the sound Band Pass Filter This passes only those a band of signals around the Cutoff frequency The width of this band can be varied Band Elimination Filter This attenuates a band of signals around the Cutoff frequency but passes everything else FEG Filter Envelope Generator Using the FEG you can control the transition in tone from the moment the sou...

Page 134: ...d Performance modes use the following operation in the Utility mode UTILITY F5 MIDI SF1 CH BasicRcvCh Multi timbral Tone Generator Song Pattern mode A MIDI tone generator that simultaneously receives over multiple MIDI channels and plays multiple instrument parts is referred to as a multi timbral tone generator This allows playback of multi channel MIDI song data such as on a MIDI sequencer or com...

Page 135: ... using an external MIDI sequencer or computer to play the instrument make sure to use the Song or Pattern mode n To set the MIDI receive channel for single timbre operation Voice and Performance modes use the following operation in the Utility mode UTILITY MIDI display BasicRcvCh In the Performance mode the instrument recognizes only data over MIDI Port 1 Part structure of the tone generator block...

Page 136: ...e once Pattern playback starts it continues until you press the Stop button This synthesizer features a variety of preset Phrase data that is used as the basic material in making up Patterns Song data structure The following illustration shows the track structure of a Song Songs are created by recording MIDI sequence data to individual tracks and by setting tone generator related parameters in Son...

Page 137: ...allows you to create one Song Chain data Pattern data structure The following illustration shows the track structure of a Pattern Patterns are created by recording MIDI sequence data to individual tracks by assigning Phrases Preset and User which comprise the material for a Pattern to individual tracks and by setting tone generator related parameters in a Pattern Mixing Song 1 Song 22 Song 15 User...

Page 138: ...HAIN EDIT display The created Pattern Chain can be played back when calling up the PATTERN F6 CHAIN display You can also use them when creating Songs based on a certain Pattern since the created Pattern Chain can be converted into a Song from the PATTERN F6 CHAIN EDIT F3 SONG display This synthesizer lets you create one Pattern Chain for each Pattern MIDI tracks MIDI tracks are created by recordin...

Page 139: ...only be used with Realtime recording Punch In Out Song You can use this method when you want to re record only over a specific area of the track You ll need to set the start and end points before re recording In the eight measure example below the third measures through the fifth measure are re recorded n Punch In Out Recording can only be used with Realtime recording n Note that the Punch In Out ...

Page 140: ... A B Insertion effects can be applied individually to each part Insertion effects are mainly used to directly process a single part The depth of the effect is adjusted by setting the dry wet balance Since an Insertion effect can only be applied to one particular part it should be used for sounds you want to drastically change or for sounds that use an effect unintended for other sounds You can als...

Page 141: ...pecified Frequency setting n In addition to the individual gain controls there is also an overall level parameter that attenuates boosts the entire frequency range Part EQ This 3 band EQ is applied to each part of the Performance Song Pattern The high band and low band are the shelving type The middle band is the peaking type n The part EQ is not available in the Voice mode Master EQ Master EQ is ...

Page 142: ...ype Determines the effect type for Insertion A or B Ins EF Connect Insertion Effect Connect Determines the effect routing for Insertion effects A and B The setting changes are shown on the diagram in the display giving you a clear picture of how the signal is routed System effects Reverb effect and Chorus effect Chorus Ctg Chorus Typ Chorus Effect Category Chorus Effect Type Reverb Typ Reverv Effe...

Page 143: ...he Return level and pan position setting for the Chorus Reverb effect Settings 0 127 L63 far left C center R63 far right Chorus to Reverb Determines the Send level of the signal sent from the Chorus Effect to the Reverb Effect Settings 0 127 Reverb Return Chorus Return Master effect 4 Master EQ PERFORM Performance selection EDIT COMMON F2 OUT MEF SF3 MEF Part 1 Part EQ 2 The Insertion connection t...

Page 144: ...n Reverb Pan Determines the Return level and pan position setting for the Chorus Reverb effect Settings 0 127 L63 far left C center R63 far right Chorus to Reverb Determines the Send level of the signal sent from the Chorus Effect to the Reverb Effect Settings 0 127 SONG PATTERN Song Pattern selection MIXING EDIT COMMON F2 MEQ MEF SF2 MEF 1 Select the part to which the Insertion effect is applied ...

Page 145: ... other keyboard voices such as electric piano and clav Orgn Organ Various arpeggio types suited for organ voices GtPl Guitar Plucked Various arpeggio types suited for guitar and harp voices GtKM Guitar Keyboard Mega Voice Various arpeggio types suited for guitar Keyboard Mega voices see note below Bass Bass Various arpeggio types suited for bass or synth bass voices BaKM Bass Keyboard Mega Voice V...

Page 146: ...se arpeggio types are programmed primarily with Control Change and Pitch Bend data They are used to change the tone or pitch of the sound rather than play specific notes In fact some types contain no note data at all When using a type of this category set the KeyMode parameter to direct with the following operations Playback only of the played notes The Arpeggio is played back using only the playe...

Page 147: ...Page 151 MIDI output parameters for Arpeggio playback for all the Voices VOICE UTILITY F3 VOICE SF3 ARP CH Page 206 Arpeggio type parameters called up when selecting a Performance including MIDI output parameters for Arpeggio playback PERFORM Performance selection F6 ARP Page 171 PERFORM Performance selection EDIT COMMON F3 ARP Page 173 Assigning Arpeggio types to the SF1 SF5 buttons for each Perf...

Page 148: ...led by loading them in the File mode Bulk Dump This function lets you save the data in the Edit buffer DRAM or Flash ROM by transmitting it as Bulk data system exclusive message to an external MIDI instrument or sequence software on a computer This can be done with the following operations n Mixing Voice data cannot be transmitted as Bulk data via panel operations n User Arpeggio data and some of ...

Page 149: ... Editor Multi Part Editor MIDI instrument or computer USB storage device 4 3 3 2 Excluding Master and Utility settings Recall Buffer Compare Buffer DRAM Voice Preset Phrase Pattern Preset Arpeggio Demo Preset Data ROM Edit Buffer DRAM User Memory Flash ROM Bulk Dump 1 Store 1 Store 1 Store 1 B u l k D u m p 1 Internal Memory Voice Edit User Voice Normal Drum File extensions W7V and W7E File extens...

Page 150: ...M is lost when the power is turned off Because of this you should always store any data residing in DRAM to the USB storage device before turning off the power Edit Buffer and User Memory The edit buffer is the memory location for edited data of these types Voice Performance Master Song Mixing and Pattern Mixing Data edited in this location will be stored to the User Memory If you select another V...

Page 151: ...d ASSIGN 1 and ASSIGN 2 when the lamps of both the PAN SEND and TONE buttons are turned on The functions are assigned by setting the Voice Edit common parameters with the following operation VOICE EDIT COMMON F4 CTL SET SF1 ARP1 Arpeggio 1 SF5 ARP5 Arpeggio 5 You can register the desired Arpeggio types to these buttons and call them up any time during your keyboard performance For details see page...

Page 152: ...DI SF3 SYNC MIDI Sync is set to MIDI MIDI is displayed here and cannot be set Settings 1 300 VelLimit Velocity Limit Determines the lowest and highest velocity which can trigger the Arpeggio playback The Arpeggio plays when you play notes at velocities within in this range Settings 1 127 n Keys played outside the set limit sound normally without any Arpeggio Switch Determines whether Arpeggio play...

Page 153: ...mally this should be set to 00 Equal temperament however additional tuning systems are available for a variety of tuning applications and effects Settings See the Micro Tuning List on page 169 M TuningRoot Micro Tuning Root Determines the root note of the Micro Tuning set above Settings C B SF3 MEQ OFS Master EQ Offset From this display you can adjust the master global EQ settings for the entire V...

Page 154: ...ming Change Timing Determines the actual timing at which the Arpeggio type is switched when you select another type during Arpeggio playback Settings realtime measure realtime The Arpeggio type is switched immediately when you select another type measure The Arpeggio type is switched at the top of the next measure after you select another type Switch Determines whether Arpeggio is on or off You ca...

Page 155: ...elocityRate Determines how much the Velocity of the Arpeggio playback is offset from the original value For example a setting of 100 means the original values are used Settings below 100 will reduce the velocity of the Arpeggio notes whereas settings above 100 will increase the velocities Settings 0 200 n The Velocity cannot be decreased or increased beyond its normal range of 1 to 127 any values ...

Page 156: ... the beat n The actual length of the note depends on the internal or external MIDI tempo setting KeyOnReset Determines whether or not the LFO is reset each time a note is pressed The following three settings are available Settings off each on 1st on off The LFO cycles freely with no key synchronization Pressing a key starts the LFO wave at whatever phase the LFO happens to be at that point each on...

Page 157: ... Depth Settings 0 127 DptRatio EL1 EL4 Depth Offset Element 1 Element 4 Determines the offset values of the Depth parameter above for the respective Elements Settings 0 127 SF5 USER This menu is available only when the User LFO wave is selected You can create a custom LFO wave consisting of up to sixteen steps Template You can select a pre programmed template for the LFO wave The selected template...

Page 158: ...o the beat 4th x 5 quarter note quintuplets five quarter notes to the beat 4th x 6 quarter note sextuplets six quarter notes to the beat 4th x 7 quarter note septuplets seven quarter notes to the beat 4th x 8 quarter note octuplets eight quarter notes to the beat InsEffectOut Insertion Effect Output Determines which Insertion effect A or B is used to process each individual Element The thru settin...

Page 159: ...ty curves graphically indicated in the display that determine how velocity affects the Pitch EG Depth Settings EGDepth 64 0 63 Settings Curve 0 4 Pitch Determines the velocity sensitivity of the Pitch Extreme values produce greater variation in PEG Depth For positive values the harder you play the keys the greater the change in PEG Depth For negative values the softer you play the keys the greater...

Page 160: ...it is used to adjust the Width of the band Resonance is used to set the amount of Resonance harmonic emphasis applied to the signal at the cutoff frequency This can be used in combination with the cutoff frequency parameter to add further character to the sound The Width parameter is used to adjust the width of the band of signal frequencies passed by the filter with the BPFw Settings 0 127 Distan...

Page 161: ...g will lower the Cutoff frequency for lower notes and raise it for higher notes A negative setting will have the opposite effect Settings 200 0 200 FCenterKey This indicates that the central note for Cutoff Sensitivity above is C3 At C3 the tone remains unchanged For other notes played the Cutoff Frequency varies according to the particular note and the Cutoff Sensitivity setting Keep in mind that...

Page 162: ...EG Level For positive settings the more strongly you play the keyboard the more the volume changes Negative settings do the opposite the more softly you play the more the volume changes The Curve parameter lets you select from five different preset velocity curves graphically indicated in the display that determine how velocity affects the Amplitude EG Settings Level 64 0 63 Curve 0 4 SF3 AEG Ampl...

Page 163: ...cts by applying it to the pitch filter and amplitude parameters Wave Determines the LFO waveform used to vary the sound Settings saw tri squ Speed Determines the speed of the LFO waveform The higher the value the faster the speed Settings 0 63 KeyOnReset Determines whether or not the LFO is reset each time a note is played Settings off on KeyOnDelay Determines the delay time between the moment you...

Page 164: ...alizer which combines separate high and low frequency bands P EQ Parametric EQ The Parametric EQ is used to attenuate or boost signal levels gain around the Frequency This type features 32 different Q settings which determine the frequency band width of the equalizer boost6 boost 6dB boost12 boost 12dB boost18 boost 18dB These can be used to boost the level of the entire signal by 6dB 12dB and 18d...

Page 165: ...page 155 Please note that the Element Switch parameter is not available in Drum Voice Common Edit F6 EFFECT Same as in Normal Voice Common Edit See page 158 The only difference here is that KEY OUT appears in the SF1 CONNECT display instead of EL OUT in Normal Common Effect Key Edit VOICE Drum Voice selection EDIT Key selection F1 OSC Oscillator SF1 WAVE From this display you can select the desire...

Page 166: ...ups can be defined You can also select off here if you wish to allow the simultaneous playback of sounds Settings off 1 127 n This parameter is only available if the Type parameter F1 OSC SF1 WAVE display is set to pre wav F2 PITCH SF1 TUNE From this display you can set various pitch related parameters for the selected key Coarse Determines the pitch of each Drum Key Wave or Normal Voice in semito...

Page 167: ...R63 n This parameter is available when the Type is set to pre wav in the F1 OSC SF1 WAVE display RandomPan Determines the amount by which the sound of the selected Drum key is panned randomly left and right for each note you press The Pan setting above is used as the Center Pan position Settings 0 127 n This parameter is available when the Type is set to pre wav in the F1 OSC SF1 WAVE display SF2 ...

Page 168: ...ted one all the edits you ve made will be erased If this happens you can use Edit Recall to restore the Voice with your latest edits intact F3 COPY From this display you can copy Common and Element Drum Key parameter settings from any Voice to the Voice you are editing This is useful if you are creating a Voice and wish to use some parameter settings from another Voice Data type to be copied Type ...

Page 169: ...ny key with identical pitch relationships However none of the intervals are perfectly in tune 01 PureMaj Pure major C B This tuning is designed so that most of the intervals especially the major third and perfect fifth in the major scale are pure This means that other intervals will be correspondingly out of tune You need to specify the key C B you will be playing in 02 PureMin Pure minor C B The ...

Page 170: ...o allow wider bandwidth settings BPF6 6dB oct Band Pass Filter BEF12 12dB oct Band Elimination Filter BEF6 6dB oct Band Elimination Filter Dual LPF Dual Low Pass Filter Two 12dB oct low pass filters connected in parallel Dual HPF Dual High Pass Filter Two 12dB oct high pass filters connected in parallel Dual BPF Dual Band Pass Filter Two 6dB oct band pass filters connected in parallel Dual BEF Dua...

Page 171: ...t blank SF4 LIMIT L Note Limit Low This sets the lowest note of the range over which the voice of the selected part sounds Simultaneously hold down this button and press the desired key on the keyboard to set the note SF5 LIMIT H Note Limit High This sets the highest note of the range over which the voice of the selected part sounds Simultaneously hold down this button and press the desired key on...

Page 172: ...gs of each Part RevSend Reverb send Determines the Send level of the signal sent from Insertion Effect A B or the bypassed signal to the Reverb effect When the PAN SEND button is turned on you can also adjust this parameter using the Knob Settings 0 127 ChoSend Chorus send Determines the Send level of the signal sent from Insertion Effect A B or the bypassed signal to the Chorus effect When the PA...

Page 173: ...l Change messages over the Control Change number determined in this parameter RB Ribbon Controller The MO does not have a Ribbon Controller However the MO responds as if a Ribbon Controller was used when receiving Control Change messages over the Control Change number determined in this parameter AS1 Assign 1 AS2 Assign 2 Determines the Control Change number generated when you control the ASSGN 1 ...

Page 174: ... within which each Part will respond Each Part will only sound for notes played within its specified velocity range Settings 1 127 n If you specify the maximum value first and the minimum value second for example 93 to 34 then the velocity range covered will be 1 to 34 and 93 to 127 VelLimitL Velocity Limit Low SF4 PORTA Portamento Determines the Portamento parameters for each Part Portamento is u...

Page 175: ...ECT Output Select InsEF Insertion Effect Determines whether the Insertion effects are applied to the output signal from the rear panel or not Settings on off F3 EQ Equalizer From this display you can adjust the EQ settings for each Part Note that two different display types listed below are provided and you can switch between them by pressing the SF5 button Each display type features the same sett...

Page 176: ...Time Determines each parameter of the AEG for each Part For details about AEG see page 134 Settings 64 0 63 n The Sustain and Release parameters are not available for the Drum Voice Parts Decay Decay Time Sustain Sustain Level Release Release Level F5 RCV SW Receive Switch From this display you can set how each individual Part responds to various MIDI data such as Control Change and Program Change...

Page 177: ...an use Edit Recall to restore the Performance with your latest edits intact F3 COPY You can copy Part parameter settings from any Performance to a particular Part of the Performance you are editing This is useful if you are creating a Performance and wish to use some parameter settings from another Performance Data type to be copied Type Part 1 4 Data of the Part Edit parameters of the correspondi...

Page 178: ...ly according to the Song playback You can input the desired measure number directly by using the Number Input window called up via the INFORMATION button SF1 ARP1 Arpeggio 1 SF5 ARP5 Arpeggio 5 You can register the desired Arpeggio types and Song Scenes to these buttons and call them up any time during your keyboard performance Refer to page 89 in the Quick Guide section F2 GROOVE Grid Groove The ...

Page 179: ...from the next chain number by pressing the F Play button end Indicates the end mark of the Song chain data Song Record mode SONG Song selection REC F1 SETUP Type Recording Type Determines the recording method For details on each method refer to page 138 in the Basic Structure section Settings When the RecTrack is set to any of 1 16 replace overdub punch step When the RecTrack is set to tempo repla...

Page 180: ...lowest and highest velocity which can trigger the Arpeggio playback The Arpeggio plays when you play notes at velocities within this range Settings 1 127 Hold Determines whether the Arpeggio playback is held or not When this is set to on the Arpeggio cycles automatically even if you release your fingers from the keys and it continues to cycle until the next key is pressed Settings sync off off on ...

Page 181: ...tered This determines to what position the pointer will advance after a note has been entered Settings 0001 0059 32nd note 16th note triplet 16th note 8th note triplet 8th note 1 4 note triplet 1 4 note half note whole note GateTime Sets the gate time to produce slurs staccato notes etc Gate time refers to the actual length of time the note sounds For the same 1 4 note for example a long gate time...

Page 182: ... strongly the selected note sounds Settings 1 127 PitchBend These are the events that define continuous changes in pitch and these events are generated by Pitch Bend Wheel operation FDATA Determines the Pitch Bend data Settings 8192 8191 ProgramChange These events determine the Voice for the selected track FBANK Determines the Voice bank Settings 000 127 n Bank select MSB and LSB are actually part...

Page 183: ...ange events is handled as one in this display For a complete list of the available RPN and NRPN numbers and their corresponding controls refer to the MIDI Data Format in the separate Data List booklet Exclusive System Exclusive A type of MIDI message used to exchange data unique to a specific model or type of device Unlike other MIDI events these events differ depending on the manufacturer device ...

Page 184: ...ue 1 to 127 When set to off the Set All parameter has no effect When set to a value other than off the Rate and Offset parameters are unavailable and appear as on the display Settings off 0 001 127 Rate Determines the percentage by which the target notes will be shifted from their original velocities Settings below 100 reduce the velocities and settings above 100 increase the velocities proportion...

Page 185: ...sired key Settings C 2 G8 StartVelo Starting Velocity EndVelo Ending Velocity Determines the velocity of the notes in the roll Both the starting and ending velocity values can be specified making it easy to create rolls in which the velocity increases or decreases This lets you create rolls that gradually increase or decrease in volume crescendo decrescendo a technique often used in dance music Se...

Page 186: ...events Settings When TR is set to 01 16 Note Note events PC Program Change PB Pitch Bend CC Control Change CAT Channel Aftertouch PAT Polyphonic Aftertouch EXC System Exclusive All all events When TR is set to TMP Tempo TMP tempo When TR is set to SCN Scene SceneMemory Scene change information TrackMute Track mute setting change information You can also specify the CC No Control Change number 04 E...

Page 187: ...value other than off the Rate and Offset parameters are unavailable and appear as on the display Settings off 000 127 8192 8191 for pitch bend 0 1 300 0 for tempo Rate Determines the percentage by which the target events will be shifted from their original values When the Set All parameter above is set to something other than off this parameter appears as and cannot be changed Settings 000 200 Off...

Page 188: ...ee up the data in track A letting you record new data to it Target tracks for the Mix operation Settings 01 16 04 Clear Track This Job deletes all data of the selected type from the selected track or from all tracks Data type to be cleared Determines the type s of data to be cleared Select the desired type by checkmarking the appropriate box Settings Seq Event all events in the track Grid Groove f...

Page 189: ... 03 Clear Song This Job deletes all data from the selected Song or all Songs including the Mixing Voices 04 Song Name This Job lets you assign a name to the selected Song See Basic Operation on page 38 Song Mixing mode SONG Song selection MIXING F1 VOL PAN From this display you can set the Pan and Volume for each Part track PAN Determines the stereo pan position for each part Settings L63 far left...

Page 190: ...parameters are both set to ON the same Receive Channel is assigned to the Parts 2 When Note Limit settings for the Parts are different and Part Switch is set to ON for the Parts Parts whose ArpSwitch parameter is set to OFF are given different Receive Channel values while other Parts are set to the same channel 3 For those Parts which Part Switch is set to OFF Receive Channel is also set to OFF n ...

Page 191: ...ly ReceiveCh Receive Channel Determines the MIDI receive channel for the selected Part Since MIDI data may be coming from many channels at once you should set this to match the particular channel over which the desired controlling data is being sent Settings 01 16 off SF3 LIMIT From this display you can determine the note range and velocity range for each Part The parameters are the same as in Per...

Page 192: ... Initialize This function lets you reset initialize all Song Mixing parameters to their default settings It also allows you to selectively initialize certain parameters such as Common settings settings for each Part and so on very useful when creating a completely new Song Mixing program from scratch Type of parameter to be initialized GM All Common Common parameter settings for the selected Song ...

Page 193: ... to on and the data after the loop end is deleted If you want to restore the deleted data and return the selected track to off press the SF5 UNDO button The Undo function can only be used on the last Track Loop opera tion If you ve set other tracks to loop the data of those previous tracks cannot be recovered Step Recording examples This section explains how to step record notes using three specif...

Page 194: ...splay settings unchanged for the remaining notes in the measure and press release each key one by one as shown below 4 Follow the instructions below to enter the next dotted half note 5 Enter the last quarter note by pressing and releasing F 6 Move the pointer to the top beginning of the song and press the F Play button to hear the note data you just recorded in steps 1 5 1 Press and release F 2 C...

Page 195: ...ove the pointer to the top beginning of the song and press the F Play button to hear the note data you just recorded in steps 1 7 Press and release F 1 Change this to an eighth note 240 since we ll be entering an eighth note rest 2 Enter the selected rest value eighth note by pressing the F3 button Press and release A Entering a chord In Step recording you can also enter chords Press and hold down...

Page 196: ...eggio types to these buttons and call them up any time during your keyboard performance F2 GROOVE Grid Groove Same as in the Song Play mode See page 178 F3 TRACK SF1 CHANNEL Same as in the Song Play mode See page 178 SF2 OUT SW Output Switch Same as in the Song Play mode See page 179 SF3 TR VCE Track Voice Determines whether the program change data contained in the phrase data is effective or not ...

Page 197: ...ction chain sequence created in the Pattern Record mode and Pattern Edit mode The parameters are the same as in the F1 PLAY display Pattern Chain Record mode PATTERN F6 REC Recording Standby mode You can select one of the following tracks for recording patt Pattern Records section changes during playback tempo Records tempo change information during playback scene Records track mute settings durin...

Page 198: ... track are not available for Patterns Meas Measure Determines the measure from which Pattern recording will be started F2 VOICE From this display you can set Voice related parameters for the selected track The settings made here affect the tone generator parts whose MIDI receive channels match the MIDI transmit channel of the song track The Voice set here becomes the phrase Voice page 79 Parameter...

Page 199: ...ob mode See page 185 06 Glide Same as in the Song Job mode See page 185 07 Create Roll Same as in the Song Job mode See page 185 08 Sort Chord Same as in the Song Job mode See page 185 09 Separate Chord Same as in the Song Job mode See page 185 F3 EVENT Event Job The Event Jobs in the Pattern mode are basically same as in the Song Job mode However unlike in the Song Job mode Pattern Event Jobs are...

Page 200: ... Job copies a selected user phrase into a specified area of a selected song After specifying the source phrase and destination Song track top measure press the ENTER button to execute this Job The Job overwrites any data already existing in the destination track 08 Clear Phrase This Job deletes all data from the selected phrase 09 Phrase Name This Job lets you assign a name of up to eight characte...

Page 201: ...rase will be not created Chain When this box is checkmarked Pattern chain data if included in the source Pattern is copied to the destination Pattern 02 Append Pattern Appends one Pattern to the end of another to create one longer Pattern with all 16 tracks n If the Pattern length becomes greater than 256 measures as a result of the Append Pattern Job an error message will be displayed and the Job...

Page 202: ... for the tone generator as it is played back by the Pattern data As such the Pattern Mixing parameter settings are not recorded to the pattern tracks Mixing operations and parameters are the same as those of the Song Mixing Edit mode See page 190 Parameter settings made in the Pattern Mixing mode and Pattern Mixing Edit mode should be stored to internal memory DRAM as part of the Pattern data In a...

Page 203: ...ern Mixing Part Edit mode are not available in the Mixing Voice Edit mode These parameters are for editing the individual Elements that make up a Normal Voice Mixing Voice Edit mode SONG or PATTERN MIXING F2 VOICE Normal Voice selection F5 VCE ED Common Edit SONG or PATTERN MIXING F2 VOICE Normal Voice selection F5 VCE ED COMMON F1 GENERAL Same as in the Normal Voice Common Edit mode See page 153 ...

Page 204: ...s you ve made will be erased Edits are also erased if the current part to which the edited Mixing Voice is assigned receives a program change from an external MIDI instrument If this happens you can use Edit Recall to restore the Mixing Voice with your latest edits intact by pressing the ENTER button from the F2 RECALL display n Since a Recall Buffer for the Mixing Voice is prepared for each Part ...

Page 205: ...he MIDI messages generated by playing the keyboard Octave Determines the amount in octaves by which the range of the keyboard is shifted up or down This setting can be changed also by pressing any of the OCTAVE buttons on the MO6 Settings 3 0 3 Transpose Determines the amount in semitones by which the range of the keyboard is shifted up or down Settings 11 0 11 n If you transpose beyond the note r...

Page 206: ...s display you can apply five band equalization to all Voices raising or lowering the level of each frequency band LOW LOWMID MID HIGHMID HIGH The parameters are the same as in the Performance Common Edit See page 172 Settings For details about EQ see page 141 SF2 MEF Master Effect From this display you can set the Master Effect related parameters applied to all the Voices The parameters are the sa...

Page 207: ...ith the new Pattern when Patterns are switched Settings on off n The tempo setting data in the Pattern Chain is not affected by this parameter SongEventChase Event Chase allows you to specify which non note data types are properly recognized during fast forward and rewind operations Normally if a Song or Pattern is played back from mid point and or fast forward or rewind are used certain data type...

Page 208: ...the ASSIGN A knob The second Destination Dest determines what parameter or aspect of the sound is affected by the knob Keep in mind that if the same MIDI Control Change messages as set here are received from an external device the internal tone generator also responds to those messages Settings Refer to the separate Data List booklet ASB Assign B Dest Destination Two parameters are available here ...

Page 209: ...e timbre tone generator mode Voice Performance modes Settings 1 16 off n In the multi timbral tone generator mode Song and Pattern modes MIDI data generated by playing the keyboard and its controllers is sent to the internal tone generator and external devices via the MIDI output channel which corresponds to the selected Part number DeviceNo Device Number Determines the device number used by this ...

Page 210: ...mit MTC A device such as the Yamaha AW2400 is necessary in order to use this synthesizer as an MTC master n MMC MIDI Machine Control allows remote control of multitrack recorders MIDI sequencers etc A MMC compatible multitrack recorder for example will automatically respond to start stop fast forward and fast reverse operations performed on the controlling sequencer thus keeping playback of the se...

Page 211: ... Settings all partition1 4 Volume Label Names the Volume Label For instructions on naming refer to page 38 in the Basic Operation section F2 SAVE This operation lets you save files to a USB storage device For instructions on saving files of the various data types refer to the following pages page 60 Voices page 67 Performances page 99 Songs and Patterns TYPE Among the various types of data created...

Page 212: ...the panel is used to call up the contents of the selected folder SF2 SETNAME Copies the file folder name selected in the File Folder selection box into the File name column F6 NEW Creates a new folder within the current folder F5 DELETE From this display you can delete files folders from the selected USB storage device Select the desired file or folder as shown below then press the SF1 EXEC button...

Page 213: ...e USB storage device all the previously recorded data will be deleted 1 Connect a USB storage device to the USB TO DEVICE connector If necessary insert the proper media into the slot of the USB storage device 2 Press the FILE mode to enter the File mode 3 Press the F1 CONFIG button then SF2 FORMAT button to call up the Format display 4 Select the slot and partition to be formatted Specify the slot...

Page 214: ... MO6 MO8 Voice Editor page 112 on your computer TYPE File extension Description All M7A Files of the All type saved to USB storage device can be loaded and restored to the instrument When the box at the left of without System is checkmarked only the Utility mode settings will not be loaded AllVoice W7V Files of the All Voice type saved to USB storage device can be loaded and restored to the instru...

Page 215: ...IGN 1 and ASSIGN 2 when the lamps of both the PAN SEND and TONE buttons are turned on The functions assigned to these knobs depend on the setting of the Voice selected as a Master program SF1 ARP1 Arpeggio 1 SF5 ARP5 Arpeggio 5 You can call up the Arpeggio types by pressing these buttons to which the Arpeggio types are assigned The Arpeggio type assigned to each button depends on the program Voice...

Page 216: ...n partEQ is available MEF Selecting the Master lights the ARP FX and EQ lamps for control over the Master Effects row arpFx Selecting the Master lights the ARP FX lamp for control over the Arpeggio FX row zone Selecting the Master lights no lamp and automatically calls up the Knob Slider functions specifically set for each respective Zone page 126 This is available only when the Zone Switch is set...

Page 217: ...nd external tone generator Slider Determines whether or not to transmit MIDI messages generated by using the Sliders to the internal and external tone generator FC1 Foot Controller1 Determines whether or not to transmit MIDI messages generated by pressing the optional Foot Controller to the internal and external tone generator FS Footswitch Determines whether or not to transmit MIDI messages gener...

Page 218: ...er Types for Initializing All Common Zone F4 BULK Bulk Dump This function lets you send all your edited parameter settings for the currently selected Master to a computer or another MIDI device for data archiving For details page 148 n In order to execute Bulk Dump you ll need to set the correct MIDI Device Number with the following operation UTILITY F5 MIDI SF1 CH DeviceNo Master Store mode MASTE...

Page 219: ...40 Performance mode Bank Indicates the MSB LSB page 224 of the currently selected Performance bank Ins Insertion Indicates the Part number to which the Insertion effect is applied Rev Reverb Cho Chorus Indicates the currently selected effect type for each effect block page 140 Song mode Song Play mode Indicates the amount of currently unused available memory DRAM for song recording Song Mixing mod...

Page 220: ...fied in the Auto Load function Quick Setup Indicates the parameter values settings before and after the Quick Setup function is used For details on Quick Setup see page 208 File mode USB Free Indicates the amount of currently available unused memory of the connected USB storage device Slot Volume Label Indicates the slot number and volume label of USB storage device s directory used in the File mo...

Page 221: ... the Pattern mode Select the phrase again Illegal track number An invalid track number has been specified in the Song Pattern mode Select the track again Incompatible USB device A USB device which cannot be used with the MO has been connected to the USB TO DEVICE connector Meter mismatch In the Pattern Job mode the meter time signature of the destination Pattern is different from the meter of the ...

Page 222: ...e Arpeggio data the amount of different notes in the data to be converted has exceeded sixteen Transmitting MIDI bulk The MO is transmitting MIDI bulk data Unknown file format File format is not recognized USB connection terminated Press ENTER A break in the connection with the USB storage device has occurred because of an abnormal electric current Disconnect the USB storage device from the USB TO...

Page 223: ...g instrument sends MIDI data on a specific MIDI channel MIDI Transmit Channel via a single MIDI cable to the receiving instrument If the receiving instrument s MIDI channel MIDI Receive Channel matches the Transmit Channel the receiving instrument will sound according to the data sent by the transmitting instrument For information on how to set the MIDI transmit channel and the MIDI receive channe...

Page 224: ...225 Parameter value is determined by combining the MSB and LSB Main Volume Control 007 Messages which control the volume of each Part Setting the value to 127 produces maximum volume and 0 results in volume off Pan Control 010 Messages which control the stereo panning position of each Part for stereo output Setting the value to 127 positions the sound to the far right and 0 positions the sound to ...

Page 225: ...se Data Increment Decrement to set the value of the specified parameter Note that once the RPN has been set for a channel subsequent data entry will be recognized as the same RPN s value change Therefore after you use the RPN you should set a Null 7FH 7FH value to avoid unexpected results The following RPN numbers can be received Channel Mode Messages The following Channel Mode Messages can be rec...

Page 226: ...he Volume MSB will be effective for the System Parameter F0 7F 7F 04 01 ll mm F7 Hexadecimal mm MSB appropriate volume value ll LSB ignored System Realtime Messages These messages control the sequencer that is to say Song and Pattern Active Sensing FEH Once FEH Active Sensing has been received if no MIDI data is subsequently received for longer than an interval of approximately 300 msec the MO wil...

Page 227: ...lement switch note limit velocity limit parameters set appropriately When the Performance Song Pattern produces no sound has a Voice been assigned to each Part When the Song Pattern produces no sound are the output port channel of each track in the Song Pattern Play mode and the receive port channel of each Part in the Mixing set appropriately UTILITY F5 MIDI SF2 SWITCH Local Ctrl page 209 VOICE E...

Page 228: ...0 Is the Note Shift parameter set at a value other than 0 When the voice produces a wrong pitch is the appropriate tuning system selected from Micro Tuning parameter When the voice produces a wrong pitch is the LFO Pitch Modulation Depth set too high SONG PATTERN F2 GROOVE VELO OFST pages 178 196 SONG PATTERN UTILITY F3 SEQ SF1 CLICK Mode page 206 VOICE EDIT COMMON F6 EFFECT page 158 PERFORM EDIT ...

Page 229: ...attern mode check whether the Arpeggio Switch parameter for each Part is set properly or not Is the MIDI sync parameter set to internal using internal clock Cannot stop the Arpeggio When Arpeggio playback does not stop even if you release the key set the Arpeggio Hold parameter to off The Song Pattern cannot be started even when pressing the F Play button Does the selected Song or Pattern phrase a...

Page 230: ...t connected to this instrument Make sure to set this instrument to the Song mode or Pattern mode To play back multiple channels simultaneously Song mode or Pattern mode must be selected MIDI bulk data transmission reception does not work properly Is Bulk data receive protection enabled Turn the Receive Bulk parameter to on When receiving recorded data with the internal Bulk Dump function the devic...

Page 231: ...de Pattern track Tempo track Scene track Song Mode 16 sequence tracks Loop on off can be set for each track Tempo track Scene track Patterns 64 patterns x 16 sections Measures 256 maximum Phrases Preset Phrases 687 phrases User Phrases 256 per pattern Songs 64 songs Mixing voices 16 per pattern 256 maximum Mixing templates 32 Arpeggio Preset x 1787 types User x 256 types MIDI Sync MIDI transmit re...

Page 232: ...horus Typ 142 ChoSend Chorus Send 154 166 172 175 CLEAR 196 Clear Pattern 202 Clear Phrase 200 Clear Song 189 Clear Track 188 201 CLICK 80 180 206 CLOCK SFT Clock Shift 178 ClockOut 210 Coarse 159 Common Edit 53 63 94 Compare 36 Computer 107 CONFIG 211 Continue FBH 226 Contrast control 21 Control Change 182 224 Control Change Number 72 Control slider 52 Controller 128 Controller Set 70 COPY 168 17...

Page 233: ...end Insertion Reverb Send 165 INT SW Internal Switch 179 Interval 197 J JOB button 24 K KBD Keyboard 205 KBDTransCh Keyboard Transmit Channel 209 KEY FLW Key Follow 159 162 KeyAsgnMode Key Assign Mode 153 Keyboard 16 Keyboard Mega Voice 130 KeyMode 154 KeyOnDelay 158 163 KeyOnReset 156 163 Kirnberger 169 KN CS Knob Control Slider 217 Knob 51 56 65 96 Knob Slider 216 KnobAssign 154 L L RGain 206 La...

Page 234: ...nce Play mode 44 171 Performance Store mode 177 PF COPY Performance Copy 192 PgmChange Program Change 209 Phase 157 PHONES 19 PHRASE 138 179 PHRASE Phrase Job 199 Phrase Name 200 Phrase Voice 79 PITCH 132 159 166 Pitch Bend 182 226 Pitch Bend wheel 50 PitchSens Pitch Sensitivity 159 PLAY FX 155 PMod Pitch Modulation Depth 163 Pointer 181 Poly 225 PolyAfterTouch Polyphonic Aftertouch 182 Polyphonic...

Page 235: ...enerator 129 TR LOOP Track Loop 179 TR SEL Track Select 182 TR VCE Track Voice 196 TRACK 196 TRACK Track Job 188 200 TRACK SELECT button 17 Trans 74 TRANS Transmit 216 Trans Transpose 178 196 TransCh Transmit Channel 216 Transmit Channel 43 45 104 TransmitCh Transmit Channel 173 180 206 Transpose 29 185 205 216 triangle wave 163 Troubleshooting 227 TUNE 159 176 191 205 TX SW Transmit Switch 217 TY...

Page 236: ...236 Owner s Manual Memo ...

Page 237: ...237 Owner s Manual Memo ...

Page 238: ...238 Owner s Manual Memo ...

Page 239: ...47 Skiathou Street 112 55 Athens Greece Tel 01 228 2160 SWEDEN Yamaha Scandinavia AB J A Wettergrens Gata 1 Box 30053 S 400 43 Göteborg Sweden Tel 031 89 34 00 DENMARK YS Copenhagen Liaison Office Generatorvej 6A DK 2730 Herlev Denmark Tel 44 92 49 00 FINLAND F Musiikki Oy Kluuvikatu 6 P O Box 260 SF 00101 Helsinki Finland Tel 09 618511 NORWAY Norsk filial av Yamaha Scandinavia AB Grini Næringspar...

Page 240: ...Yamaha Corporation 2005 Yamaha Corporation WF68510 510MWCP58 2 01A0 Printed in Japan Yamaha Web Site English only http www yamahasynth com Yamaha Manual Library http www yamaha co jp manual This document is printed on chlorine free ECF paper with soy ink ...

Reviews: