REAR BRAKE
4-59
• Never use solvents on internal brake com-
ponents as they will cause the brake caliper
piston dust seal and brake caliper piston
seal to swell and distort.
• Whenever a brake caliper is disassembled,
replace the brake caliper piston dust seal
and brake caliper piston seal.
EAS22670
INSTALLING THE REAR BRAKE CALIPER
1. Install:
• Rear brake caliper assembly
(temporarily)
• Rear wheel axle
• Brake torque rod
• Rear wheel axle nut
TIP
• Do not install the brake pads, brake pad shims,
and brake pad springs.
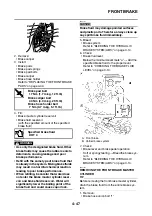
• Align the slot “a” of the rear wheel sensor hous-
ing “1” with the projection “b” of the rear brake
caliper bracket “2”, and then assemble them.
• After assembling the rear wheel sensor hous-
ing and the rear brake caliper bracket, make
sure that the projection “c” on the housing is
aligned with the projection “d” on the bracket.
NOTICE
ECA14470
Make sure there are no foreign materials in
the wheel hub. Foreign materials cause dam-
age to the inner sensor rotor and wheel sen-
sor.
WARNING
EWA13500
Make sure the brake hose is routed properly.
2. Tighten:
• Brake torque rod nuts
• Rear wheel axle nut
• Rear wheel axle pinch bolt
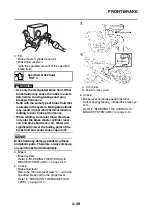
3. Install:
• Copper washers
• Brake hose (proportioning valve to rear brake
caliper) “1”
• Brake hose union bolt “2”
WARNING
EWA1MC1014
Proper brake hose routing is essential to in-
sure safe vehicle operation. Refer to “CABLE
ROUTING” on page 2-47.
NOTICE
EC3P61044
When installing the brake hose onto the
brake caliper, make sure the brake pipe “a”
touches the projection “b” on the brake cali-
per.
Specified brake fluid
DOT 4
T
R
.
.
Brake torque rod nut
30 Nm (3.0 m·kg, 22 ft·lb)
Rear wheel axle nut
125 Nm (12.5 m·kg, 90 ft·lb)
Rear wheel axle pinch bolt
23 Nm (2.3 m·kg, 17 ft·lb)
T
R
.
.
Brake hose union bolt
30 Nm (3.0 m·kg, 22 ft·lb)
New
1
2
a
b
Summary of Contents for FJR1300A(D)
Page 1: ...2013 SERVICE MANUAL FJR1300A D 1MC 28197 E0 ...
Page 6: ......
Page 8: ......
Page 70: ...SPECIAL TOOLS 1 61 ...
Page 101: ...LUBRICATION POINTS AND LUBRICANT TYPES 2 30 ...
Page 104: ...LUBRICATION SYSTEM CHART AND DIAGRAMS 2 33 EAS20410 LUBRICATION DIAGRAMS 5 6 7 1 2 3 4 ...
Page 106: ...LUBRICATION SYSTEM CHART AND DIAGRAMS 2 35 1 3 2 ...
Page 107: ...LUBRICATION SYSTEM CHART AND DIAGRAMS 2 36 1 Main axle 2 Drive axle 3 Oil delivery pipe 1 ...
Page 108: ...LUBRICATION SYSTEM CHART AND DIAGRAMS 2 37 6 5 4 3 2 1 ...
Page 110: ...LUBRICATION SYSTEM CHART AND DIAGRAMS 2 39 1 2 3 4 5 6 7 8 9 ...
Page 112: ...LUBRICATION SYSTEM CHART AND DIAGRAMS 2 41 4 5 3 2 1 9 8 6 7 ...
Page 116: ...COOLING SYSTEM DIAGRAMS 2 45 7 1 2 3 4 5 5 8 9 6 8 9 10 11 12 ...
Page 124: ...CABLE ROUTING 2 53 Horn and radiator left side view A B 1 1 2 3 4 5 5 6 C 7 7 8 ...
Page 132: ...CABLE ROUTING 2 61 Rear fender top view 1 2 3 B C A B ...
Page 138: ...CABLE ROUTING 2 67 ...
Page 141: ......
Page 377: ...MIDDLE GEAR 5 76 Middle driven pinion gear shim Thickness mm 0 10 0 15 0 20 0 30 0 40 0 50 ...
Page 428: ...WATER PUMP 6 15 ...
Page 455: ...IGNITION SYSTEM 8 6 ...
Page 461: ...ELECTRIC STARTING SYSTEM 8 12 ...
Page 465: ...CHARGING SYSTEM 8 16 ...
Page 477: ...SIGNALING SYSTEM 8 28 ...
Page 533: ...FUEL INJECTION SYSTEM 8 84 ...
Page 551: ...CRUISE CONTROL SYSTEM 8 102 ...
Page 555: ...FUEL PUMP SYSTEM 8 106 ...
Page 563: ...ACCESSORY BOX SYSTEM 8 114 ...
Page 573: ...IMMOBILIZER SYSTEM 8 124 ...
Page 577: ...ABS ANTI LOCK BRAKE SYSTEM 8 128 ...
Page 616: ...ELECTRICAL COMPONENTS 8 167 7 1 3 2 18 21 20 19 9 11 12 13 14 15 16 17 6 8 4 5 10 ...
Page 658: ......
Page 659: ......
Page 660: ......


