224
Chapter 19—Pro Tools Remote Layer
DM2000 Version 2—Owner’s Manual
Control Surface Operation with the Pro Tools Remote Layer
This section explains the operation of the DM2000 control surface when the Pro Tools
Remote Layer is selected. DM2000 buttons and controls are referred to by the names
printed on the DM2000 with the name of the corresponding Pro Tools function in paren-
thesis. For example, “Press the MATRIX SELECT [MATRIX 1] (DEFAULT) button.” In key-
board shortcuts, the Pro Tools function names are left out for simplification.
Display
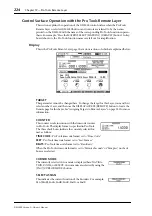
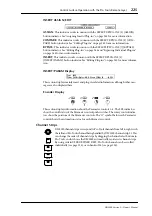
This is the Pro Tools Remote Layer page, the various sections of which are explained below.
TARGET
This parameter cannot be changed here. To change the target for this Layer, you must first
select another Layer, and then use the DISPLAY ACCESS [REMOTE] button to locate the
Remote page for this Layer. See “Assigning Targets to Remote Layers” on page 253 for more
information.
COUNTER
This counter works in unison with the timecode counter
in Pro Tools. The display format is specified in Pro Tools.
The three check boxes indicate the currently selected for-
mat, as follows:
TIME CODE:
Pro Tools timecode format set to “Time Code.”
FEET:
Pro Tools timecode format set to “Feet:Frames.”
BEATS:
Pro Tools timecode format set to “Bars:Beats.”
When the Pro Tools timecode format is set to “Minutes:Seconds” or “Samples,” no check
boxes are selected.
CURSOR MODE
The currently selected Cursor mode is displayed here: NAVIGA-
TION, ZOOM, or SELECT. Cursor modes are selected by using the
[INC] (CURSOR MODE) button.
SELECT ASSIGN
This indicates the current function of the Encoders. For example,
Pan (PanR), SndA, SndB, SndC, SndD, or SndE.

