background image

4


Accessory CD-ROM for Windows Installation Guide

English

Software Installation

• • • • • • • • • • • • • • • • • • • • • • • • • • • • • • • • • • • • • • • • • • • • • • • • • • • • • • • 


USB-MIDI Driver


To operate the instrument from your computer via USB, you’ll 
need to install the appropriate driver software.


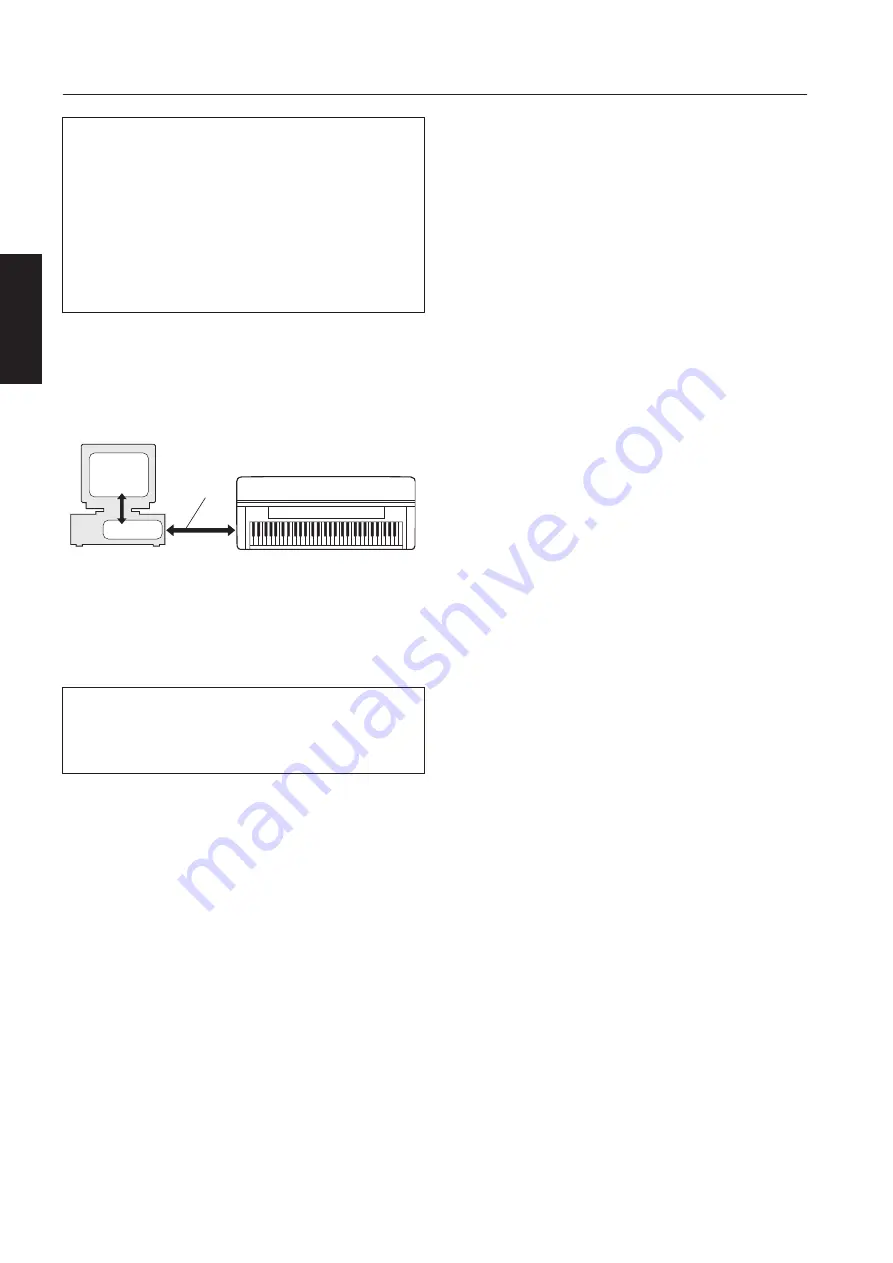
The USB-MIDI driver is software that transfers MIDI data back and 
forth between sequence software and the instrument via a USB cable.


For Windows XP: See the column at right.
For Windows 2000: See page 5.
For Windows Vista: See page 5.

n


See the Yamaha Download page at the following URL for up-to-date 
news on USB-MIDI driver:


http://music.yamaha.com/download/


Installing the driver on Windows XP

1

Start the computer and use the “Administrator” account 
to log on to Windows XP.

2

Select [Start] 

 [Control Panel]. 

If the control panel appears as “Pick a category”, click 
“Switch to Classic View” in the upper left of the window. 
All control panels and icons will be displayed.

3

Go to [System] 

 [Hardware] 

 [Driver Signing 

Options] and check the radio button to the left of 
“Ignore” and click [OK].

4

Click the [OK] button to close System Properties, and 
then click “X” in the upper right of the window to close 
the Control Panel.

5

Insert the included CD-ROM into the CD-ROM drive.

The Start window will appear automatically.

6

First, make sure the POWER switch on the instrument is set 
to OFF, then use a USB cable to connect the USB connector of 
the computer to the USB TO HOST connector of the 
instrument. When the instrument is turned on, the computer 
automatically displays the “Found New Hardware Wizard.”

If the Wizard window is not displayed automatically, refer to 
“Troubleshooting.”

If the system displays “Found New Hardware” in the lower right 
corner, wait until “Found New Hardware Wizard” is displayed. (The 
Wizard window may take a while to display on some computers.)

If the Wizard window prompts you to specify whether or not 
to connect to Windows Update, select the radio button for 
“No, not this time,” then click [Next].

7

Check the radio button to the left of “Install the 
software automatically (Recommended).” Click [Next]. 
The system starts the installation.

n

If during the installation the system displays “...has not passed 
Windows Logo testing to verify its compatibility with Windows 
XP,” click [Continue Anyway].

8

When the installation is complete, the system displays 
“Completing the Found New Hardware Wizard.” Click [Finish].

(The Wizard window may take a while to display on some computers.)

9

Restart the computer.

If the system displays “Found New Hardware” in the lower right 
corner, wait until “System Settings Change” is displayed. (The 
Wizard window may take a while to display on some computers.)

n

This Wizard window will not appear when using Windows XP 
Professional x64 Edition. There is no need to restart the computer.

)

When using Windows XP Professional x64 Edition, the 
Support Module must be installed.

After installing the USB-MIDI drivers for all the connected 
USB devices, select “My Computer” from the Start menu. 
Right-click the CD-ROM icon and select “Open” from the pop-
up menu. Select “USBdrvVista_” 

 “XPx64SupportModule” 

 “Setup.exe” and launch “Setup.exe.” Follow the on-screen 

directions.

n

Once the Support Module is installed, this step is not necessary, 
even if you’ve connected a new USB device or updated the USB-
MIDI driver. 

The USB-MIDI driver installation is complete.

Uninstall (Removing the installed application)

To remove any installed application software:
Select [START] 

 [Settings] 

 [Control Panel] 

 [Add/

Remove Programs] 

 [Install/Uninstall], then select the 

application to be removed and click [Add/Remove...].
Follow the on-screen instructions to uninstall the 
application.

n

The button names or menus may differ depending on the 
computer OS.

n

For instructions on uninstalling the USB-MIDI driver, refer to 
“How can I remove the driver?” in the “Troubleshooting” 
section (page 7).

Check the drive name of the CD-ROM drive you will be using 
(D:, E:, Q:, etc.) The drive name is displayed beside the CD-
ROM icon in your “My Computer” folder. The root directory 
of the CD-ROM drive will be D:\ , E:\ , or Q:\ , respectively.

Computer

MIDI instrument (Clavinova, etc.)

USB cable

Driver

Sequence

Software

Summary of Contents for CVP-403PE

Page 1: ...sowie jede Änderung der technischen Daten und Funktionen werden separat bekanntgegeben REMARQUES PARTICULIERES Les droits d auteurs copyright de ce logiciel et de ce manuel d installation appartiennent exclusivement à Yamaha Corporation L usage de ce logiciel et de ce manuel est défini par l accord de licence auquel l acheteur déclare souscrire sans réserve lorsqu il ouvre le sceau de l emballage ...

Page 2: ...nts to make sure that the software will run on your computer page 3 2 Insert the included CD ROM into the CD ROM drive The Start window should appear automatically Users of Windows Vista will need to click Start exe to open the Start window after inserting the CD ROM 3 Connect the instrument to the computer Refer to the Owner s Manual of the instrument 4 Install the USB MIDI driver to the computer...

Page 3: ...usic Notebook Available at Yamaha website Digital Music Notebook is a combination music learning program and online service that makes it easy and fun to practice and master your favorite songs Digital Music Notebook can be downloaded from the Internet Digital Music Notebook Flash Demo DMN_FlashDemo Full motion demo software which introduces all features of the Digital Music Notebook from within t...

Page 4: ...button to the left of Install the software automatically Recommended Click Next The system starts the installation n If during the installation the system displays has not passed Windows Logo testing to verify its compatibility with Windows XP click Continue Anyway 8 When the installation is complete the system displays Completing the Found New Hardware Wizard Click Finish The Wizard window may ta...

Page 5: ...When the installation is complete the system displays Completing the Found New Hardware Wizard Click Finish The Wizard window may take a while to display on some computers 9 Restart the computer The USB MIDI driver installation is complete Installing the driver on Windows Vista 1 Start the computer and use the Administrator account to log on to Windows Vista 2 Insert the included CD ROM into the C...

Page 6: ... Click DIGITAL MUSIC NOTEBOOK on the Start window The page which explains the details about Digital Music Notebook is displayed on the window 3 Click Digital Music Notebook Download button at the bottom of the window 4 Automatically jump at the site of Digital Music Notebook Follow the on screen instructions to download the application IMPORTANT Credit card settlement is required to purchase Digit...

Page 7: ...trument from your computer via USB the instrument does not operate correctly or no sound is heard Did you install the driver page 4 Is the USB cable connected correctly Are the volume settings of the instrument playback device and application program set to the appropriate levels Have you selected an appropriate port in the sequence software On the Clavinova check whether the Piano Lock is engaged...

Page 8: ...e die mitgelieferte CD ROM in das CD ROM Laufwerk ein Das Startfenster sollte automatisch erscheinen Anwender von Windows Vista müssen nach dem Einlegen der CD ROM auf Start exe klicken um das Startfenster zu öffnen 3 Schließen Sie das Instrument an den Computer an Lesen Sie hierzu die Bedienungsanleitung des Instruments 4 Installieren Sie den USB MIDI Treiber auf dem Computer Seite 4 5 Installier...

Page 9: ...aha Website Digital Music Notebook Digitales Notenheft ist eine Kombination aus einem Musik Lernprogramm und einem Online Service mit dem Sie Ihre Lieblings Songs einfach und mit Freude üben und erlernen können Digital Music Notebook kann auch aus dem Internet heruntergeladen werden Flash Demo für Digital Music Notebook DMN_FlashDemo Animierte Demo Software die innerhalb des Programms alle Funktio...

Page 10: ...ers mit der Buchse USB TO HOST am Instrument zu verbinden Wenn das Instrument eingeschaltet wird wird auf dem Computer automatisch der Assistent für das Suchen neuer Hardware angezeigt Wenn das Assistentenfenster nicht automatisch erscheint lesen Sie weiter bei Fehlerbehebung Wenn das System Neue Hardware gefunden in der unteren rechten Ecke anzeigt warten Sie bis das entsprechende Assistentenfens...

Page 11: ...ich beendet wurde erscheint das Fenster Fertig stellen des Assistenten Klicken Sie auf Fertig stellen Bei einigen Computern kann es eine Weile dauern bis das Assistentenfenster erscheint 9 Starten Sie den Computer neu Die Installation des USB MIDI Treibers ist abgeschlossen Installieren des Treibers unter Windows Vista 1 Starten Sie den Computer und melden Sie sich mit dem Zugang Administrator bei...

Page 12: ... Bildschirm wird die Seite angezeigt auf der die Einzelheiten zu Digital Music Notebook erläutert werden 3 Klicken Sie im unteren Fensterbereich auf die Schaltfläche Digital Music Notebook Download 4 Automatischer Sprung auf die Website des Digital Music Notebook Folgen Sie den Anweisungen auf dem Bildschirm um das Programm herunterzuladen WICHTIG Um Inhalte für Digital Music Notebook kaufen zu kö...

Page 13: ...m Computer aus über USB bedient wird funktioniert es nicht richtig oder erzeugt keinen Ton Wurde der Treiber installiert Seite 4 Ist das USB Kabel richtig angeschlossen Sind die Lautstärkeeinstellungen des Instruments des Wiedergabegeräts und der Anwendungssoftware auf geeignete Werte gestellt Wurde im Sequenzerprogramm der richtige Port ausgewählt Überprüfen Sie ob die Klavier Verriegelungsfunkti...

Page 14: ...n d être certain de pouvoir utiliser le logiciel sur votre ordinateur page 3 2 Insérez le CD ROM inclus dans le lecteur de CD ROM La fenêtre de démarrage apparaît automatiquement Les utilisateurs de Windows Vista doivent cliquer sur Start exe pour ouvrir la fenêtre de démarrage après l insertion du CD ROM 3 Connectez l instrument à l ordinateur Consultez le mode d emploi de l instrument 4 Installe...

Page 15: ...ble sur le site Web de Yamaha Digital Music Notebook combine un programme d apprentissage de la musique et un service en ligne qui rend la pratique et la maîtrise de vos morceaux préférés à la fois simples et amusantes Vous pouvez télécharger Digital Music Notebook à partir d Internet Digital Music Notebook Flash Demo DMN_FlashDemo Logiciel de démonstration complet qui présente toutes les fonction...

Page 16: ...ment est réglé sur OFF et raccordez le connecteur USB de l ordinateur au connecteur USB TO HOST de l instrument à l aide d un câble USB Lorsque l instrument est sous tension l ordinateur affiche automatiquement l Assistant Ajout de nouveau matériel détecté Si la fenêtre de l Assistant n apparaît pas automatiquement reportez vous à la section Résolution des problèmes Si le système affiche Nouveau m...

Page 17: ...stant Ajout de nouveau matériel détecté Cliquez sur Terminer Sur certains ordinateurs l affichage de la fenêtre de l Assistant peut prendre un certain temps 9 Redémarrez l ordinateur L installation du pilote USB MIDI est terminée Installation du pilote sous Windows Vista 1 Démarrez l ordinateur et utilisez le compte Administrateur pour ouvrir une session Windows Vista 2 Insérez le CD ROM fourni da...

Page 18: ...uez sur DIGITAL MUSIC NOTEBOOK La page d information de Digital Music Notebook s affiche 3 Cliquez sur le bouton Digital Music Notebook Download Télécharger Digital Music Notebook en bas de la fenêtre 4 Vous accédez automatique au site de Digital Music Notebook Suivez les instructions à l écran pour télécharger l application IMPORTANT Une carte de crédit est requise pour l achat du logiciel Digita...

Page 19: ...USB il ne fonctionne pas correctement ou aucun son n est audible Avez vous installé le pilote page 4 Le câble USB est il raccordé correctement Les volumes de l instrument du périphérique de reproduction et du programme d application sont ils réglés sur des niveaux appropriés Avez vous sélectionné un port approprié dans le logiciel séquenceur Sur le Clavinova vérifiez si la fonction Piano Lock Verr...

Page 20: ...ra asegurarse de que el software funcionará en su ordenador página 3 2 Inserte el CD ROM en la unidad de CD ROM La ventana Inicio debe aparecer de forma automática Los usuarios de Windows Vista tendrán que hacer clic en Start exe para abrir la ventana Inicio después de insertar el CD ROM 3 Conecte el instrumento al ordenador Consulte el manual de instrucciones del instrumento 4 Instale el controla...

Page 21: ...gital Music Notebook disponible en el sitio Web de Yamaha Digital Music Notebook es la combinación de un programa de aprendizaje musical y de servicios en línea para que practicar y dominar las canciones preferidas sea fácil y divertido Digital Music Notebook puede descargarse de Internet Demostración rápida de Digital Music Notebook DMN_FlashDemo Software de demostración con vídeo en movimiento q...

Page 22: ...l instrumento está en la posición OFF y a continuación utilice el USB para conectar el USB TO HOST del ordenador al conector USB del instrumento Cuando se encienda el instrumento el ordenador mostrará automáticamente el Asistente para hardware nuevo encontrado Si no aparece automáticamente la ventana del asistente consulte el apartado de solución de problemas Si el sistema muestra el mensaje Hardw...

Page 23: ...alación el sistema mostrará el asistente Finalización del Asistente para hardware nuevo encontrado Haga clic en Finalizar En algunos ordenadores la ventana del asistente puede tardar un poco en aparecer 9 Reinicie el equipo La instalación del controlador USB MIDI ha finalizado Instalación del controlador en un sistema con Windows Vista 1 Inicie el ordenador y utilice la cuenta de Administrador par...

Page 24: ...C NOTEBOOK En la ventana aparecerá la página en la que se explican los detalles sobre Digital Music Notebook 3 En la parte inferior de la ventana haga clic en el botón Digital Music Notebook Download 4 Se accederá automáticamente al sitio del Digital Music Notebook Siga las instrucciones de la pantalla para descargar la aplicación IMPORTANTE Para adquirir el contenido de Digital Music Notebook es ...

Page 25: ...ordenador a través de USB el instrumento no funciona correctamente o no se oye ningún sonido Ha instalado el controlador página 4 Está conectado correctamente el cable USB Está ajustado al nivel correcto el volumen del instrumento del dispositivo de reproducción y del programa de aplicación Ha seleccionado un puerto adecuado en el software de secuencia En el Clavinova compruebe si la función Piano...

Page 26: ...ective media if it is returned to Yamaha or an authorized Yamaha dealer within fourteen days with a copy of the receipt Yamaha is not responsible for replacing media damaged by accident abuse or misapplication TO THE FULLEST EXTENT PERMITTED BY LAW YAMAHA EXPRESSLY DISCLAIMS ANY IMPLIED WARRANTIES ON THE TANGIBLE MEDIA INCLUDING THE IMPLIED WARRANTIES OF MERCHANTABILITY AND FITNESS FOR A PARTICULA...

Page 27: ...ler von Yamaha innerhalb von vierzehn Tagen zusammen mit einer Kopie des Kaufbelegs Lieferscheins Yamaha ist nicht zum Ersatz von Medien verpflichtet die durch Unfälle Misbrauch oder fehlerhafte Anwendung beschädigt wurden YAMAHA SCHLIESST UNTER MAXIMALER AUSSCHÖPFUNG DES GELTENDEN RECHTS AUSDRÜCKLICH JEGLICHE STILLSCHWEIGENDEN GARANTIEN AUF PHYSIKALISCHE MEDIEN AUS EINSCHLIESSLICH STILLSCHWEIGEND...

Page 28: ...amaha agréé dans un délai de quatorze jours avec une copie du reçu Yamaha n est pas tenu de remplacer un support endommagé à la suite d un accident d un usage abusif ou d une utilisation incorrecte DANS TOUTE LA MESURE PERMISE PAR LA LEGISLATION EN VIGUEUR YAMAHA EXCLUT EXPRESSEMENT TOUTE RESPONSABILITE IMPLICITE LIEE AU SUPPORT PERCEPTIBLE Y COMPRIS TOUTE GARANTIE IMPLICITE DE QUALITE MARCHANDE E...

Page 29: ... la sustitución del soporte defectuoso si se devuelve a Yamaha o a un distribuidor autorizado de Yamaha dentro del período de catorce días con una copia del recibo Yamaha no se hará responsable de sustituir el soporte si se ha dañado por accidente abuso o mal uso EN LA MEDIDA PERMITIDA POR LA LEY APLICABLE YAMAHA DENIEGA EXPRESAMENTE TODAS LAS GARANTÍAS IMPLÍCITAS CON RESPECTO AL SOPORTE MATERIAL ...

Page 30: ...MEMO English ...

Page 31: ...MEMO ...

Page 32: ...U R G Pro Audio Digital Musical Instrument Division Yamaha Corporation 2007 Yamaha Corporation Printed in Indonesia WH88060 802CRZC 01B0 ...

Reviews: