background image

CVP-509/505/503/501 Owner’s Manual

35

P

erf

or

m the piano songs b

y

 Cla

vino

v

a

1

1

4

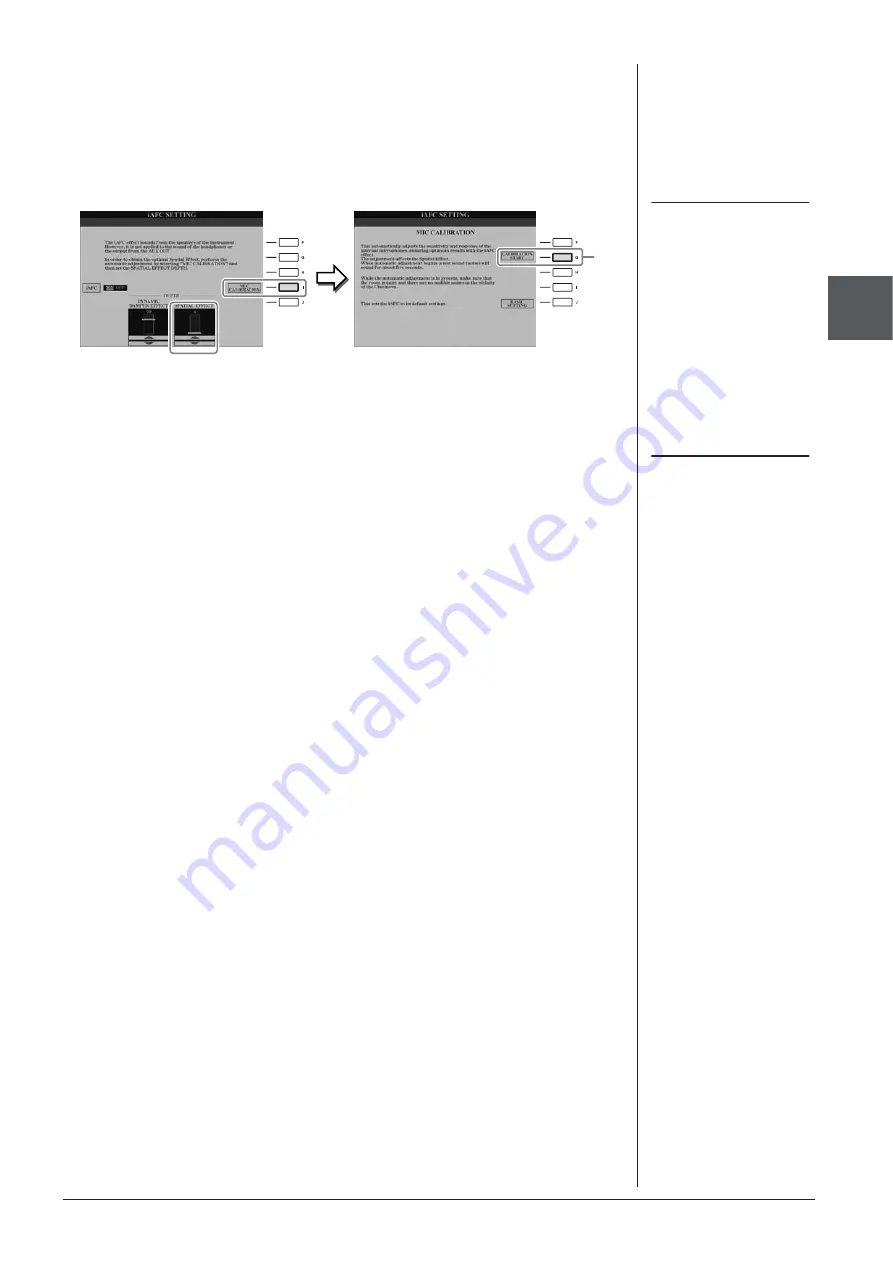
If you’ve set the depth of SPATIAL EFFECT to a value other than 

0, press the [I] (MIC CALIBRATION) button to call up the 

calibration display.

The MIC CALIBRATION display appears. In this display, you can adjust the 
sensitivity and response of iAFC so that the optimal iAFC effect will be 
obtained. 

5

Press the [G] (CALIBRATION START) button to begin 

calibration.

When automatic adjust begins, a test sound (noise) will sound for about five 
seconds. While automatic adjustment is being performed, do not make audible 
noises in the vicinity of the Clavinova.

NOTE

If you are using headphones, discon-
nect the headphones before adjusting 
iAFC calibration.

5

NOTE

If desired, you can restore the default 
calibration setting by pressing the [J] 
(BASIC SETTING) button in step 4. 

Summary of Contents for CLAVINOVA CVP-501

Page 1: ...usic yamaha com homekeyboard Yamaha Manual Library http www yamaha co jp manual IMPORTANT Check your power supply Make sure that your local AC mains voltage matches the voltage specified on the name p...

Page 2: ...ironmentally friendly We sincerely believe that our products and the pro duction methods used to produce them meet these goals In keeping with both the letter and the spirit of the law we want you to...

Page 3: ...ombination to avoid injury from tip over 13 Unplug this apparatus during lightning storms or when unused for long periods of time 14 Refer all servicing to qualified service personnel Servicing is req...

Page 4: ...g repeated plays of the same note perfectly articulated even when playing at high speed or with partial key release The Acoustic Ambience of a Grand Piano with the iAFC Feature only CVP 509 page 34 By...

Page 5: ...the convenient Music Finder function you can call up the ideal panel settings including the most suitable Voice Style effects etc for each song By registering the Song audio data saved in various plac...

Page 6: ...inspected by qualified Yamaha service personnel CAUTION Always follow the basic precautions listed below to avoid the possibility of physical injury to you or others or damage to the instrument or ot...

Page 7: ...switches or connectors Do not use the instrument device or headphones for a long period of time at a high or uncomfortable volume level since this can cause permanent hearing loss If you experience a...

Page 8: ...ith the device in advance As a result this device may not play them back precisely as their producers or com posers originally intended The bitmap fonts used in this instrument have been provided by a...

Page 9: ...over Voices and effects and to ensure compat ibility of data well into the future GS was developed by the Roland Corporation In the same way as Yamaha XG GS is a major enhancement of the GM specifica...

Page 10: ...etail in order to use the Internet Direct Connection function MIDI Basics only in English French German and Spanish If you want to know more about MIDI and how to use it refer to this introductory boo...

Page 11: ...hannels On Off 64 One handed Practice with the Guide Lamps 64 Repeat Playback 65 Recording Your Performance Quick Recording 66 Saving Files 68 File Management 69 5 Music Finder Calling Up Ideal Setups...

Page 12: ...n or off LCD and related controls Page 20 USB button Page 26 83 Loads certain data to the USB storage device and allows you to record your performance to the USB storage device in audio format FUNCTIO...

Page 13: ...B6 C7 CVP 509 505 CVP 503 501 Music rest Page 15 I O connectors Page 99 Guide lamps Page 64 Music rest Page 15 Pedals Page 32 Key cover Page 14 Key cover Page 14 I O connectors Page 99 Power switch Pa...

Page 14: ...r closing it Do not release it until it is fully opened or closed Be careful to avoid catching fingers yours or others especially children s between the cover and the unit CAUTION Do not place objects...

Page 15: ...ff electricity is still flowing to the instrument at the minimum level When you are not using the instrument for a long time make sure you unplug the power cable from the wall AC outlet Using the Musi...

Page 16: ...tereo headphones can be connected If you are using only one pair of headphones you can plug them into either of these jacks A headphone hanger is included in the instrument package so that you can han...

Page 17: ...ust the contrast of the display by turning the LCD CONTRAST knob located to the left of the display Changing the Display Language NOTE Throughout this manual arrows are used in the instructions indica...

Page 18: ...e features and functions as well as sound demonstrations 1 Press the DEMO button to start the Demos Overview Demo will play back continuously calling up the various displays in sequence Showing the Ow...

Page 19: ...to show a specific Demo Pressing the E button returns to the display of step 2 The sub menus are shown at the bottom of the display Press one of the 1 8 buttons corresponding to the sub menu 4 Press t...

Page 20: ...le 1 Example 2 Display based Controls A J buttons A E buttons see below F J buttons see below TAB E F buttons page 21 DIRECT ACCESS button page 23 DATA ENTRY dial and ENTER button page 22 1 8 buttons...

Page 21: ...ngs up or down correspondingly for functions shown directly above them TAB E F buttons 1 8 buttons If a menu appears in this section of the display use the 1 8 buttons If a menu appears in this sectio...

Page 22: ...ters indicated in the display This convenient technique also works well with pop up parameters such as Tempo and Transpose Simply press the appropriate button ex TEMPO then rotate the DATA ENTRY dial...

Page 23: ...onal button press 1 Press the DIRECT ACCESS button A message appears in the display prompting you to press the appropriate button 2 Press the button or pedal corresponding to the desired setting displ...

Page 24: ...s played the current chord name will be displayed 4 Song name and related information Displays the currently selected Song name time signature and tempo Pressing the I button CVP 509 505 503 or one of...

Page 25: ...yback 9 USB Audio information CVP 509 505 503 Displays information for the selected audio file file name time etc While recording a REC indication appears Registration Sequence Appears when the Regist...

Page 26: ...t can be selected on this display are shown If more than 10 files exist the page numbers P1 P2 are shown below the files Pressing the corresponding button changes the display page When other pages fol...

Page 27: ...highest level folder In the PRESET display several data files are contained together in a folder You can also organize your original data in the USER USB display by creat ing several new folders page...

Page 28: ...utton To change the converted kanji back to hiragana press the 7 DELETE button To clear the reversed area at once press the 8 CANCEL button Selecting custom icons for files shown at left of file name...

Page 29: ...torage device To restore the data press the E RESTORE button in this display When the operation is complete the instrument will be restarted automatically Restoring the Factory programmed Settings NOT...

Page 30: ...ess the piano shaped PIANO RESET button The convenient Piano Lock function lets you lock the piano so that you don t inadvertently change the settings by pressing another button on the panel Once lock...

Page 31: ...res strong playing to produce high volume Best for players with a heavy touch HARD 1 Requires moderately strong playing for high volume NORMAL Standard touch response SOFT 1 Produces high volume with...

Page 32: ...09 505 CVP 503 501 Right Pedal Center Pedal Left Pedal Right Pedal Center Pedal Left Pedal NOTE Half pedal While playing the piano with Sustain and you want to slightly mute the sustained sound releas...

Page 33: ...e tempo Pressing and holding either button lets you continuously increase or decrease the value You can also use the DATA ENTRY dial to adjust the value To reset the tempo press the TEMPO buttons simu...

Page 34: ...technology to ensure stability against acoustic feed back 3 4 DYNAMIC DAMPER EFFECT This simulates the sustain sound that occurs when you press the damper pedal of a grand piano The micro phone is not...

Page 35: ...of iAFC so that the optimal iAFC effect will be obtained 5 Press the G CALIBRATION START button to begin calibration When automatic adjust begins a test sound noise will sound for about five seconds W...

Page 36: ...coustic piano the instrument does not need to be tuned It always stays perfectly in tune Transporting If you move to another location you can transport the instrument along with other belongings You c...

Page 37: ...off the right hand part will not sound 2 Press one of the VOICE category selection buttons to select a Voice category and call up the Voice Selection display The preset Voices are categorized and cont...

Page 38: ...d Voice by pressing the 7 INFO button Some Voices do not have the infor mation display To close the informa tion display press the EXIT button NOTE The Voice type and its defining char acteristics are...

Page 39: ...LEFT part NOTE To change the Split Point press FUNCTION C STYLE SETTING SPLIT POINT CHORD FINGERING TAB E E E E F F F F SPLIT POINT For more information refer to the Reference Manual on the website Ke...

Page 40: ...between notes This is often reflected in specific performance techniques such as staccato legato and slur Two types of Voices Super Articulation SA Voices and Super Articulation 2 SA2 Voices enable y...

Page 41: ...ormance however these effects may not be completely reproduced when you play back a Song which has been recorded using SA2 Voices AEM Technology When you play the piano pressing a C key produces a def...

Page 42: ...e settings in the MIXING CONSOLE display MIXING CONSOLE TAB E E E E F F F F TUNE 1 3 TRANSPOSE NOTE Hz Hertz This unit of measurement refers to the frequency of a sound and represents the number of ti...

Page 43: ...board while pressing a pedal changes the nature of Voice For example in the case of the nylon guitar Voice pressing the corresponding pedal lets you play harmonics for the guitar Voice Releasing the p...

Page 44: ...cessor effect system which can add extraordinary depth and expression to your sound 1 Call up the operation display DIRECT ACCESS EXIT 2 Select the desired part for which you want to add effects 3 Pre...

Page 45: ...Hold is ON an H indication appears in the Main display 2 3 MONO POLY This determines whether the part sVoice is played monophonically only one note at a time or poly phonically Using the MONO mode let...

Page 46: ...buttons Creating Your Original Organ Flutes Voices NOTE The term footage is a reference to the sound generation of traditional pipe organs in which the sound is produced by pipes of different lengths...

Page 47: ...ference Manual on the website Chapter 2 Selecting GM XG or other Voices from the Panel Voice Selection display 8 UP 2 P2 Selecting the Harmony Echo type VOICE EFFECT J TYPE SELECT Pitch related settin...

Page 48: ...playing by yourself Rhythm is one of the most important parts of a Style Try to play the melody along with just the rhythm You can sound different rhythms for each Style Keep in mind however that not...

Page 49: ...on of the keyboard page 39 becomes the Chord section and chords played in this section are automatically detected and used as a basis for fully automatic accompaniment with the selected Style 3 Press...

Page 50: ...be appropriate or even harmonically correct for all songs and for all chord playing In some cases for example playing a simple major triad for a country song may result in a jazzy seventh chord or pl...

Page 51: ...ollowing types can be selected for example Single Finger This method lets you easily play chords in the accompaniment range of the keyboard using only one two or three fingers AI Full Keyboard Playing...

Page 52: ...NC STOP button then play the keyboard The instrument features three different Intro sections to add an introduction before starting the Style playback After pressing one of the INTRO I III buttons sta...

Page 53: ...tomatically plays fill in section Adjusting the Tempo Selected Main section s lamp is lit in red MAIN VARIATION A D buttons Press one of the MAIN VARIATION A D buttons to select the desired Main secti...

Page 54: ...opriate panel settings matching the selected Style will be shown in the display 3 Use the 2 3 buttons to select the desired panel setting Calling up the Panel Settings to Match the Style Repertoire Be...

Page 55: ...t playing the Style 3 As soon as you play a chord with your left hand the selected Style starts Each Style has four One Touch Setting setups Press other ONE TOUCH SETTING 1 4 button to try out other s...

Page 56: ...y selected Style 1 In the Style Selection display press the 7 OTS INFO button to call up the Information display 2 Press the F CLOSE button to close the Information display Confirming the One Touch Se...

Page 57: ...ts On Off and Changing Voices Style channels RHY1 2 Rhythm 1 2 These are the basic parts of the Style containing the drum and percussion rhythm patterns BASS The bass part uses various appropriate ins...

Page 58: ...xing Console display you can adjust the volume for each Style part See page 91 Advanced Features Refer to the Reference Manual on the website Chapter 3 Selecting the Chord Fingering type FUNCTION C ST...

Page 59: ...Standard MIDI File or ESEQ 1 Press the SONG SELECT button to call up the Song Selection display 2 Press the TAB E E E E F buttons to select the location of the desired Song If you want to playback of...

Page 60: ...G STOP button and press the PLAY PAUSE button once again Pause Press the PLAY PAUSE button Pressing it again resumes Song playback from the current position Queuing the next Song for playback While a...

Page 61: ...k See page 42 Restrictions for protected Songs Commercially available Song data may be copy protected to prevent illegal copying or accidental erasure They are marked by the indications at the upper l...

Page 62: ...starting playback the ball bounces along through the score indicating the current position You can change the displayed notation style by using the 1 8 buttons For details refer to the Reference manua...

Page 63: ...Even if the Song doesn t contain lyrics data you can view the lyrics on the display by loading the text file txt created on a computer via USB storage device This feature enables various useful possib...

Page 64: ...and how long you should hold them down You can also practice at your own pace since the accompaniment waits for you to play the notes correctly Here mute the right hand part and try practicing the pa...

Page 65: ...the REPEAT button to turn off Repeat playback Other guide functions There are additional functions in the Guide features for practicing the tim ing of playing the keys Any Key mode or for Karaoke FUNC...

Page 66: ...tart recording Recording begins automatically as soon as you play a note on the keyboard or start Style playback 4 Press the SONG STOP button to stop recording A message prompting you to save the reco...

Page 67: ...to each channel independently one by one You can also freely change the channel part assignments with the Multi Track recording The procedure is basically the same as that of Recording Your Performanc...

Page 68: ...appropriate tab USER or USB to which you want to save the data by using the TAB E E E E F F F F buttons 2 Press the 6 SAVE button to call up the file naming display 3 Enter the file name page 27 Even...

Page 69: ...ct the appropriate tab USER or USB to which you want to save the data by using the TAB E E E E F F F F buttons If you want to create a new folder within the existing folder also select the folder here...

Page 70: ...The renamed file folder appears on the display at the appropriate position among the files in alphabetical order This operation lets you copy or cut a file and paste it to another location folder You...

Page 71: ...alphabetical order This operation lets you delete a file folder 1 Call up the display containing the file folder you want to delete 2 Press the 5 DELETE button The pop up window for the Delete operat...

Page 72: ...USE STYLE CONTROL START STOP Song Playback related parameters FUNCTION B SONG SETTING Keyboard and Vocal Practice Using the Guide Function A B GUIDE MODE Playing Backing Parts with the Perfor mance As...

Page 73: ...Stor age Device on page 106 CAUTION Replacing automatically over writes all your records panel settings song data shown in the MUSIC FINDER display Make sure that all important data has been saved to...

Page 74: ...cted file Press the G YES button at the confirmation prompt 8 Press the F YES button in the message display indicating completion of the replace operation to call up the MUSIC FINDER display By checki...

Page 75: ...records Press F SORT BY button to sort the records by MUSIC STYLE BEAT and TEMPO Press the G SORT ORDER button to change the order of the records ascending or descending When sorting records by MUSIC...

Page 76: ...STYLE Blank BEAT ANY TEMPO A MUSIC Searches by song name Pressing the A button calls up the pop up window to enter the song name To clear the entered Music press the F CLEAR button B KEYWORD Searches...

Page 77: ...button to call up the Playback display AUDIO PLAYER display 1 2 Press the 8 FILE SELECT button to display the song data Audio file in the connected USB storage device 2 Press the A J buttons correspo...

Page 78: ...he USB TO DEVICE terminal beforehand Recalling the registered song data from Music Finder NOTE The available contents of the Music Finder Plus service are subject to change Added convenience using the...

Page 79: ...Memory buttons should be saved as a single Bank file 1 Set up the panel controls such as Voice Style effects and so on as desired Refer to the separate Data List for a list of parameters that can be r...

Page 80: ...save the Bank file For instructions on saving refer to page 68 CAUTION If you select the button whose lamp is lit in red or green here the panel setup previously memorized to the button will be erase...

Page 81: ...desired Bank 2 Press the 7 INFO button to call up the information display By using the TAB E F buttons you can switch between the two information display pages information for the Registration Memory...

Page 82: ...ups 6 Advanced Features Refer to the Reference Manual on the website Chapter 6 Disabling recall of specific items FUNCTION E REGIST SEQUENCE FREEZE VOICE SET TAB E F FREEZE Calling up Registration Mem...

Page 83: ...audio files from USB flash memory on this instrument File formats that can be played back Connect the USB flash memory device containing the audio files to play back to the USB TO DEVICE terminal 1 Pr...

Page 84: ...A J buttons corresponding to the file you want to listen to 4 Press the EXIT button to return to the Playback display AUDIO PLAYER display 5 Press the 2 F II button to play back CAUTION Never attempt...

Page 85: ...io file by using the 7 buttons To close the setting display press the 8 CLOSE button OFF Plays through the selected file then stops SINGLE Plays through the selected file repeatedly ALL Continues play...

Page 86: ...resolution 1 Connect the USB flash memory to the USB TO DEVICE terminal 2 Set the desired Voice etc which you want to use for your performance For information setting the Voice see page 37 for setting...

Page 87: ...of the USB flash memory device memory size of the device avail able recording space on the device and available time for recording Press the F OK EXIT button to close the PROPERTY display CAUTION Neve...

Page 88: ...ils about each display Page refer to the Reference Manual on the website VOL VOICE Changes the Voice for each part and adjusts panning and volume for each part page 90 Using the Auto Revoice function...

Page 89: ...for sav ing your data then save it page 68 To save the SONG CH 1 8 9 16 display settings First register the edited settings as part of the Song data SETUP then save the Song 1 Call up the operation di...

Page 90: ...Selection display appears 4 Select a Voice Press one of the Voice category selection buttons on the panel then select a Voice by using the A J buttons page 37 5 Press the EXIT button to return to the...

Page 91: ...rocedure on page 88 In step 2 select VOL VOICE tab 2 Press the D or I button to select the PANPOT parameter or press the E or J button to select the VOLUME parameter 3 Use the 1 8 buttons to adjust pa...

Page 92: ...ce of playing in a concert hall or jazz club CHORUS Produces a rich fat sound as if several parts are being played simultaneously DSP By default the most appropriate effect for the selected Voice has...

Page 93: ...eates a more powerful more consistently high level sound Select the CMP tab in step 2 on page 88 Adjusting the Overall Volume Using the Master Compressor CVP 501 CVP 503 CVP 505 CVP 509 Editing Master...

Page 94: ...the 8 OK button 5 Press the EXIT button to return to the previous display The saved Compressor type is shown in the TYPE selection at the bottom left of the MASTER COMPRESSOR display and can be select...

Page 95: ...via a router or a modem equipped with a router To use the Internet connection you will first need to subscribe to an Internet service or provider Use a computer to connect to the Internet and get onl...

Page 96: ...omagnetic interference NOTE Some types of modems require an optional hub network for simulta neously connecting to several devices such as computer musical instru ment etc NOTE When you are using a mo...

Page 97: ...the website You can also use the 6 7 8 buttons and the 8 ENTER button instead of the DATA ENTRY dial and ENTER button Use the 1 BACK 2 FORWARD buttons to navigate through previously selected web pages...

Page 98: ...et When this message is displayed the web page cannot be seen Icon 1 is displayed Now opening web page The web page is being loaded Icon 2 flashes Web page has been displayed Loading of the web page i...

Page 99: ...electronic components turn off the power of all the components Also before turning any components on or off make sure to set all volume levels to minimum 0 Otherwise electrical shock or damage to the...

Page 100: ...instrument then to the external device Reverse this order when you turn the power off CAUTION Do not route the output from the AUX OUT jacks to the AUX IN jacks If you make this connec tion the signa...

Page 101: ...ION Avoid looking at the televisionor video monitor for prolonged period of time since doing so could damage your eye sight Take frequent breaks and focus your eyes on distant objects to avoid eyestra...

Page 102: ...rst Adjust the INPUT VOLUME knob while singing into the microphone Adjust the control while checking the SIGNAL and OVER lamps The SIGNAL lamp lights to indicate that an audio signal is being received...

Page 103: ...up the operation display FUNCTION G MIC SETTING VOCAL HARMONY 2 Press the 6 7 buttons to turn the harmony vocals Vocal Harmony on Applying Effects to Your Voice 2 3 TALK Turning TALK on lets you temp...

Page 104: ...ata as you sing along with it The harmony is applied to your voice according to the chord NOTE You can adjust the volume balance between the keyboard performance and the microphone in the Balance disp...

Page 105: ...Connect the FC7 foot controller to the AUX PEDAL terminal With the initial factory settings no special setup is necessary Example 2 Controlling Song Start Stop by footswitch Connect a footswitch FC4 o...

Page 106: ...note that the transfer speed is that of USB 1 1 Using USB Storage Devices By connecting the instrument to a USB storage device you can save data you ve created to the connected device as well as read...

Page 107: ...of the connected devices 4 Press the H FORMAT button to format the device media By using the LAN or USB TO DEVICE terminal you can connect the instrument to the Internet For instructions on connecting...

Page 108: ...sing the USB TO HOST terminal When connecting the computer to the USB TO HOST terminal make sure to observe the following points Failing to do so risks freezing the computer and corrupting or losing t...

Page 109: ...MIDI THRU Simply relays the MIDI messages received at MIDI IN For detailed information about the instrument s MIDI settings refer to the Reference Manual Connecting External MIDI Devices CVP 503 501 C...

Page 110: ...ound Tap Tempo sound etc CONFIG 2 General settings such as speaker output pop up display time etc SCREEN OUT CVP 509 505 Monitor type and display content settings which are necessary when connecting a...

Page 111: ...the wall 3 Raise A from the backside and lean A against the wall with the keyboard side on the bottom Have a Phillips head screwdriver of the appropriate size ready B C E G F F A A D Main unit Front...

Page 112: ...screw holes do not align loosen the other screws and adjust the position of D 6 Raise A to the standing position Use the front legs as support to raise A 7 Install F B B A A B Attach the parts pressi...

Page 113: ...side facing front toward the keyboard side If the plug will not go in easily do not force it Double check the orientation of the plug then try again 2 Align the pedal cord into the groove on the rear...

Page 114: ...o D and E 2 Attach the top of B to D and E by finger tightening the thin screws 4 x 12mm 3 While pushing the lower part of D and E from outside secure the bottom ends of B using two tapping screws 4 x...

Page 115: ...RNING An improper voltage setting can cause serious damage to the instrument or result in improper operation A A 1 Insert the pedal cord plug to the pedal connector from the front 3 Use a vinyl tie to...

Page 116: ...htening the long screws 6 x 20 mm 3 Attach B Depending on the model of digital piano you purchased the surface color of one side of the rear panel may be different from the other side In this case pos...

Page 117: ...he Clavinova clear of doors and other movable fix tures Move the Clavinova to an appropriate location Does the Clavinova make a rattling noise when you shake it Tighten all screws Does the pedal box r...

Page 118: ...ent see Optional Accessories page 127 1 Remove the three backing papers from the adhesive tape in the case and fit the floppy disk drive into the case 2 Fold the USB cable inside the case as shown 3 A...

Page 119: ...remove the floppy disk or turn off the instrument itself while the disk is being accessed Doing so may result not only in loss of data on the disk but also damage to the floppy disk drive Be sure to...

Page 120: ...the speaker setting is set to ON page 110 For details refer to the Reference Manual on the website The sound is distorted or noisy The volume may be turned up too high Make sure all relevant volume s...

Page 121: ...case a Song to which write protect has been applied Prot 2 Edit is shown at the upper left of the Song name the original file may not be in the same folder It cannot be played back unless the origina...

Page 122: ...playing back from that point In the case of Style play you can restore the original sound by selecting the same Style again Microphone Vocal Harmony CVP 509 505 503 The microphone input signal cannot...

Page 123: ...ontrol 15 3 MIC SIGNAL OVER lamp 102 4 DEMO DEMO display 18 5 METRONOME ON OFF 33 6 TRANSPOSE TRANSPOSE pop up 42 7 TAP TEMPO 53 TEMPO TEMPO pop up 53 8 STYLE CONTROL POP ROCK PIANIST Style Selection...

Page 124: ...F RIGHT1 RIGHT2 LEFT 39 INTERNET Clavinova Special Website only when connected to the internet 95 SONG CONTROL SONG SELECT Song Selection display 59 REC CHANNEL ON OFF pop up 66 STOP 60 PLAY PAUSE 60...

Page 125: ...kg 167lbs 9oz 78kg 171lbs 15oz 71kg 156lbs 8oz 73kg 160lbs 15oz 58kg 127lbs 14oz 60kg 132lbs 4oz Control Interface Keyboard Number of Keys 88 Type Natural Wood NW Keyboard with Synthetic Ivory Keytops...

Page 126: ...r DSP 2 4 128 Preset 10 User iAFC Yes Master Compressor 5 Preset 5 User Master EQ 5 Preset 2 User Part EQ 27 Parts Part Dual Layers Right Parts 1 2 Yes Split Right Left Parts Yes Accompany Style Relat...

Page 127: ...ccess Yes Storage and Connectivity Storage Internal Memory about 3 2 MB about 2 4 MB about 1 4 MB External Drives Optional USB Storage Devices USB Flash Memory etc Floppy Disk Drive Connectivity Headp...

Page 128: ...HORUS 92 CMP 93 Computer 108 CONFIG 1 110 CONFIG 2 110 Connection 99 Contrast 17 COPY 70 CUT 70 D Damper Pedal 32 DATA ENTRY dial 22 DELETE 71 DEMO 18 DEMO Voice 38 Dial Data Entry 22 DIRECT ACCESS 23...

Page 129: ...AN TYPE 45 46 OTS INFO 56 OTS LINK 55 Output jack 100 OVER lamp 102 OWNER 17 18 29 Owner Name 18 P P A T 72 PAD 57 Panel Button Chart 123 PANPOT 91 PARAMETER 58 PART ON OFF 39 PASTE 71 Pause 60 Pedal...

Page 130: ...AB 21 TALK 103 TAP TEMPO 53 TEMPO 53 Tempo 33 Text 63 THRESHOLD OFFSET 93 Touch response 31 Touch sensitivity 31 TRACK 1 R 64 TRACK 2 L 64 TRANSPOSE 42 TRANSPOSE ASSIGN 47 Troubleshooting 120 TUNE 88...

Page 131: ...Administered by Cherry Lane Music Publishing Company Inc and Chrysalis Music International Copyright Secured All Rights Reserved Chim Chim Cher ee from Walt Disney s MARY POPPINS Words and Music by Ri...

Page 132: ...Reserved Moon River from the Paramount Picture BREAKFAST AT TIFFANY S Words by Johnny Mercer Music by Henry Mancini Copyright 1961 Renewed 1989 by Famous Music Corporation International Copyright Sec...

Page 133: ...E C Music Ltd and Blue Sky Rider Songs All Rights for E C Music Ltd Administered by Unichappell Music Inc All Rights for Blue Sky Rider Songs Administered by Irving Music Inc International Copyright S...

Page 134: ...134 CVP 509 505 503 501 Owner s Manual...

Page 135: ...CVP 509 505 503 501 Owner s Manual 135...

Page 136: ...these corrective measures do not produce satisfactory results please contact the local retailer authorized to distribute this type of product If you can not locate the appropriate retailer please cont...

Page 137: ...S Copenhagen Liaison Office Generatorvej 6A DK 2730 Herlev Denmark Tel 44 92 49 00 FINLAND F Musiikki Oy Kluuvikatu 6 P O Box 260 SF 00101 Helsinki Finland Tel 09 618511 NORWAY Norsk filial av Yamaha...

Page 138: ...usic yamaha com homekeyboard Yamaha Manual Library http www yamaha co jp manual IMPORTANT Check your power supply Make sure that your local AC mains voltage matches the voltage specified on the name p...

Reviews: