background image

7

Z

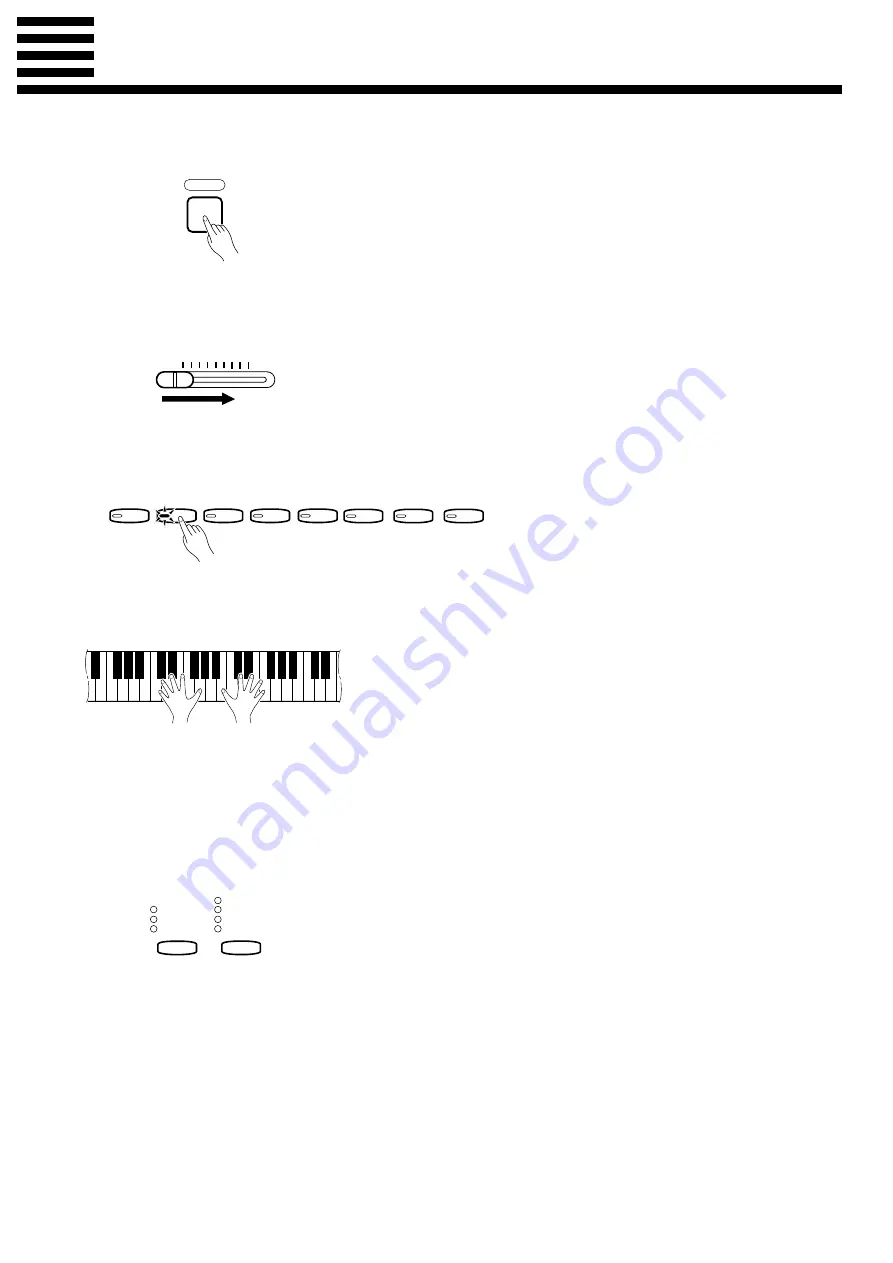
Turn Power On

After making sure that the Clavinova’s AC plug is properly inserted into

a convenient AC wall outlet, press the [POWER] switch located to the left
of the keyboard to turn the power ON.

When the power is turned ON, the [PIANO 1] voice selector LED will

light (the PIANO 1 voice is automatically selected whenever the power is
turned ON).

Initially set the [MASTER VOLUME] control about half way between

the “MIN” and “MAX” settings. Then, when you start playing, re-adjust the
[MASTER VOLUME] control for the most comfortable listening level.

Select the desired voice by pressing one of the voice selectors.

The Clavinova also offers keyboard touch response, so the volume and

timbre of notes played can be controlled according to how “hard” you play
the keys. The amount of variation available depends on the selected voice.

You can also change the overall tone or add reverb and/or effects as de-

sired by using the [REVERB] and [BRILLIANCE] buttons (see page 10
for [BRILLIANCE] button operation, “Reverb” on page 11).

X

Set the Volume

C

Select a Voice

V

Play

B

Adjust Tone & Add Effects
As Required

Selecting & Playing Voices

POWER

MASTER VOLUME

MIN

MAX

REVERB

ROOM
HALL 1
HALL 2
COSMIC

BRILLIANCE

MELLOW
NORMAL
BRIGHT

PIANO 1

PIANO 2

CLAVINOVA

TONE

E. PIANO 

HARPSI-

CHORD

STRINGS

VIBES

ORGAN

Summary of Contents for Clavinova CLP-156

Page 1: ...fresh sound for new musical expression Damper pedal includes natural resonance effect for the piano voices simulating the string and sound board resonance of acoustic pianos Metronome feature with var...

Page 2: ...but floppy disks into the disk drive Other objects may cause damage to the disk drive or floppy disk Use only double sided double density 2DD 3 5 inch floppy disks with the Clavinova Write protect tab...

Page 3: ...Erasing a Single Track 20 If You Record Without First Inserting a Disk 20 Playback 20 Utility Functions 21 Utility 1 Individual key Tuning 21 To Lower the Pitch of a Single Key 21 To Raise the Pitch...

Page 4: ...lavinova raise the music stand built into its top panel by lifting the rear edge of the music stand then flip down the music stand braces and engage them with the corresponding recesses The music stan...

Page 5: ...he current tempo in quarter note beats per minute When the met ronome recording or playback is in operation it dis plays the current measure number It also displays the selected song number when a dis...

Page 6: ...eft and right channel signals are combined and deliv ered via the L L R jack so you don t lose any of the Clavinova s sound The Internal Amplifier Speaker System The CLP 156 features a powerful stereo...

Page 7: ...level Select the desired voice by pressing one of the voice selectors The Clavinova also offers keyboard touch response so the volume and timbre of notes played can be controlled according to how hard...

Page 8: ...u press the voice selector of the demo that is currently playing Press the DEMO button when you want to stop demo playback and return to the normal play mode ZEngage the Demo Mode Selecting Playing Vo...

Page 9: ...ns the first time either button is pressed the current balance appears on the TEMPO display then pressing the t button increases the volume of the left voice in relation to the right while the s butto...

Page 10: ...tone of the selected voice BRIGHT This setting creates a brighter sharper tone MELLOW The MELLOW setting produces a rounder softer tone Memorizing the Brilliance Setting Press the C7 key while holding...

Page 11: ...se settings are not memorized as described above they are retained in memory only until the Clavinova is turned off Memorizing the Reverb Type Depth Settings C7 REVERB ROOM HALL 1 HALL 2 COSMIC The de...

Page 12: ...played notes will not be sustained This makes it possible to sustain a chord for example while other notes are played staccato The damper pedal functions in the same way as a damper pedal on an acous...

Page 13: ...ansposition or use the TEMPO s and t buttons to set the re quired transposition value The 0 default setting can be instantly re called by simultaneously pressing the TEMPO s and t buttons CRelease the...

Page 14: ...also be used to tune up while the A 1 and A 1 keys are held XRelease the A 1 and A 1 keys ZTo restore the default pitch A3 440 Hz hold the A 1 A 1 and B 1 keys simultaneously and press any key between...

Page 15: ...ding the METRONOME button as follows METRONOME The Metronome Metronome Volume METRONOME TEMPO 8 Metronome Time Signature Tempo Control The tempo of the Metronome as well as the song recording and play...

Page 16: ...back and repeat either in sequence or in random order when ALL is selected depending on the setting of the All song Random Repeat function page 28 Start playback of the selected song by pressing the...

Page 17: ...ill include data for more tracks than the two available on the CLP 156 Only track 1 and track 2 data will be played by the CLP 156 while the data for other tracks will be transmitted via the CLP 156 M...

Page 18: ...nd f buttons to select the song number you want to record to NOTE When a song number is selected the 1 R and 2 L track button indicators will light green if the corresponding tracks already contain pe...

Page 19: ...utton and adjust the tempo and volume as described on page 15 The metronome sound will not be recorded Recording will begin automatically as soon as you play a note on the key board or press the PLAY...

Page 20: ...utton If no previous data exists in the specified song number cPy will appear on the display and the data in the CLP 156 memory will be copied to the disk If the specified song number already contains...

Page 21: ...O button d will appear on the TEMPO display While still holding the MIDI TRANSPOSE button press the desired key as many times as necessary to lower its pitch by the required amount each press lowers p...

Page 22: ...power has not been off for longer than about a week To keep the memo rized settings for longer periods turn the power on briefly at least once a week Complete tunings can also be saved to and loaded...

Page 23: ...e exited when the data has been saved Individual key tuning data saved as described above is not erased by the Song Delete function described on page 26 Further the individual key tuning data will onl...

Page 24: ...NSPOSE tun Lod V Execute the Load Individual Key Tuning Function PLAY REC MIDI TRANSPOSE Lod End Insert a new blank disk Make sure that the disk s write protect tab is set to the write position tab cl...

Page 25: ...ns to select the song number you wish to copy to i e the destination song number c 1 through c60 If you select a song number that already contains data that data will be overwritten by the new song da...

Page 26: ...e display Use the TEMPO and buttons to select the song number you wish to delete NOTE You can cancel the delete function before actually starting the delete opera tion next step by pressing either the...

Page 27: ...lues will appear on the display as long as the MIDI TRANSPOSE button is held NOTE The disk playback track selection settings are cancelled as soon as you remove the floppy disk from the disk drive MID...

Page 28: ...disks X Select the Convert to SMF Function SONG f r MIDI TRANSPOSE E 5 C Execute the Convert to SMF Function PLAY REC MIDI TRANSPOSE 1 Utility 9 All song Random Repeat When the repeat playback functi...

Page 29: ...o the chart below SONG f r MIDI TRANSPOSE SF 1 X Select the Voice Mode SF 2 TEMPO MIDI TRANSPOSE SF 1 GM Assignment When a Standard MIDI File is playback on the CLP 156 the closest possible voices to...

Page 30: ...to MIDI IN terminals Never use MIDI cables longer than about 15 feet since cables longer than this can pick up noise which can cause data errors MIDI Messages Transmitted Received by the Clavinova Not...

Page 31: ...selected channel number is shown on the TEMPO display the OMNI ON receive mode is indicated by ALL on the display CRelease the MIDI TRANSPOSE button Keys C1 through D 2 on the keyboard are used to set...

Page 32: ...pressed you have turned program change reception transmission OFF If the PIANO 2 LED is not lit when the PIANO 2 voice selector is pressed you have turned pro gram change reception transmission ON CR...

Page 33: ...E PIANO voice selector If the E PIANO LED is lit when the E PIANO voice selector is pressed you have turned the Multi Timbre mode ON If the E PIANO LED is not lit when the E PIANO voice selector is pr...

Page 34: ...in the previous section To assign the right hand section to external tone generator control while playing the Clavinova voices with the left hand press the VIBES voice selector instead of the HARPSIC...

Page 35: ...LP 156 Refer to the notes on pages 19 and 27 For format Pro protected dEr disk error no no disk no data Options BC 8 Bench A comfortable bench styled to match your Yamaha Clavinova HPE 160 Stereo Head...

Page 36: ...e pedal box on top of the brackets attached to the side panels D and attach using the four 6 x 18 millimeter round head screws 2 two screws on each side Make sure the pedals extend in the same directi...

Page 37: ...d into the corresponding connectors in the main unit The plug only goes in one way the lug on the connector should face the rear of the unit as shown in the illustration so don t try to force it in th...

Page 38: ...2 7DH Name Data Send occurs when this data received 2 Clavinova MIDI Format Data format F0H 43H 73H 38H yy F7H 43H Yamaha ID 73H Clavinova ID 38H CLP 156 ID yy Substatus 1 NOTE ON OFF Data format 9nH...

Page 39: ...h Data vv 40H 0 vv 41H 1 vv 3FH 1 When cc 58 Brilliance or 59 Reverb Clavinova common ID 01H is recognized in addition to 38H 4 Absolute Tempo Data format F0H 43H 73H xx 11H 1nH cc dd F7H 43H Yamaha I...

Page 40: ...40 MIDI Implementation Chart Not available...

Page 41: ...R OTHER CONTROLS MASTER VOLUME MIDI TRANSPOSE METRONOME TEMPO s t TEMPO Display DEMO JACKS CONNECTORS PHONES x 2 AUX OUT R L L R AUX IN R L MIDI IN OUT THRU INPUT OUTPUT AUX OUT Output impedance 600 L...

Page 42: ...cord of your purchase CAUTION RISK OF ELECTRIC SHOCK DO NOT OPEN CAUTION TO REDUCE THE RISK OF ELECTRIC SHOCK DO NOT REMOVE COVER OR BACK NO USER SERVICEABLE PARTS INSIDE REFER SERVICING TO QUALIFIED...

Page 43: ...egisters and other devices that produce heat should be avoided 8 This product was NOT designed for use in wet damp loca tions and should not be used near water or exposed to rain Exam ples of wet damp...

Page 44: ...results please contact the local retailer authorized to distribute this type of product If you can not locate the appropriate retailer please contact Yamaha Corporation of America Electronic Service...

Page 45: ...M D G EMI Division Yamaha Corporation 1994 VS94350 412POCP5 2 01A0 Printed in Japan...

Reviews: