background image

Selecting and Playing Voices

CLP-380 Owner’s Manual

29

Basic Operation

4.

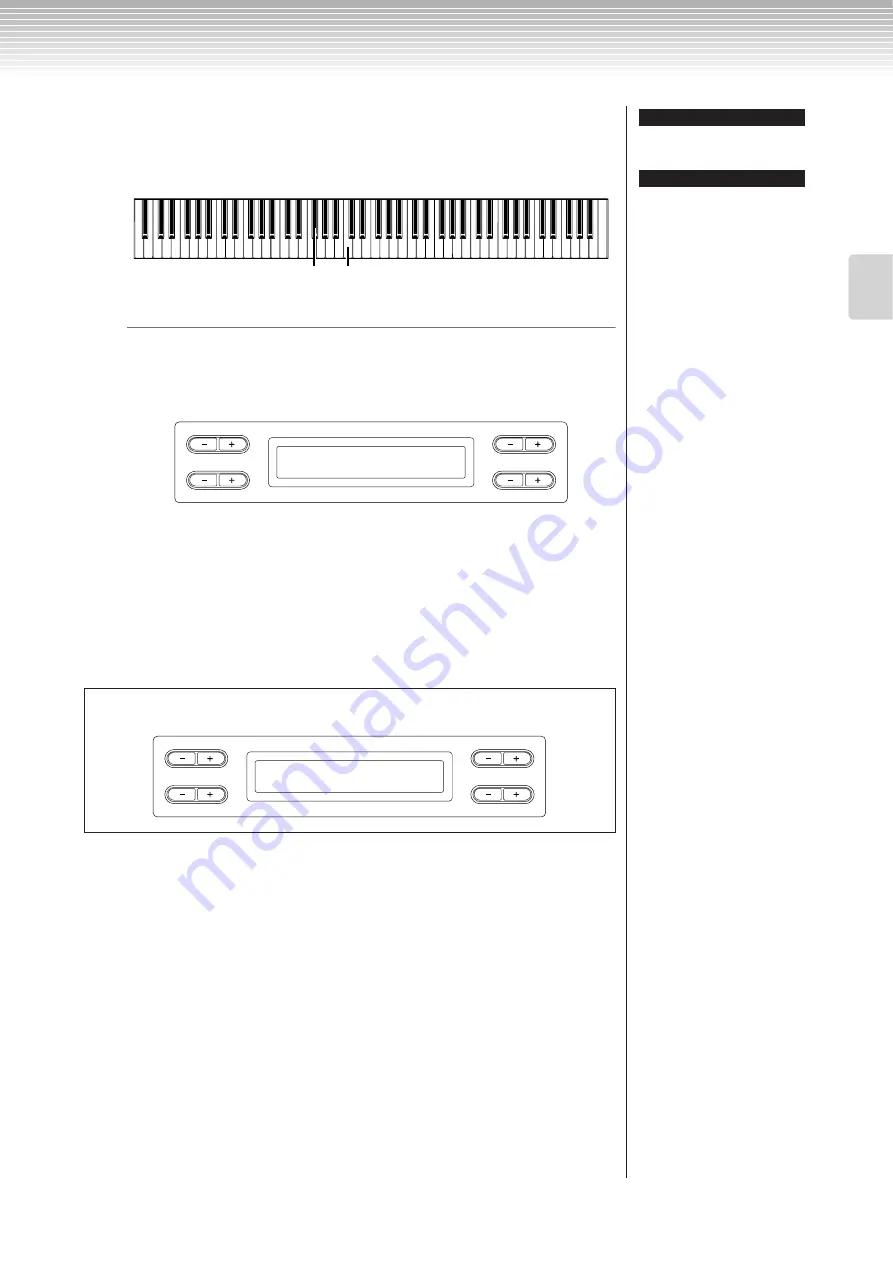
Specify the split point (the border between the right- and 
left-hand range).

The normal setting of the split point is “F

#

2.”

To change the split point setting:

Hold down the [SPLIT] button, then use the D [–][+] buttons to specify the split 
point.
(Optional) Press and hold down the [SPLIT] button and play the key you wish to 
assign as the split point.

Release the [SPLIT] button to return to the main screen.

5.

Exit Split mode and return to normal play mode.

Press the [SPLIT] button.

A specified “split point” key is 
included in the left-hand range.

The split point can also be set by 
the [FUNCTION] parameter 
[SplitPoint] (page 96).

TIP

TIP

You can use Dual (

see page 27

) in each area (right-hand and left-hand) of Split mode.

F

#

2

Center “C”

B

D

NO

YES

A

C

SplitPoint

F#2

B

D

NO

YES

A

C

GrandPiano1    Harpsi.8'
Vibraphone      WoodBass

Summary of Contents for CLAVINOVA C L P - 3 8

Page 1: ...panel of the main keyboard unit near the power cord Make sure that the voltage selector is set for the voltage in your area The voltage selector is set at 240V when the unit is initially shipped To change the setting use a minus screwdriver to rotate the selector dial so that the correct voltage appears next to the pointer on the panel For information on assembling the keyboard stand refer to the ...

Page 2: ... We sincerely believe that our products and the pro duction methods used to produce them meet these goals In keeping with both the letter and the spirit of the law we want you to be aware of the following Battery Notice This product MAY contain a small non rechargeable battery which if applicable is soldered in place The average life span of this type of battery is approx imately five years When r...

Page 3: ...nd a third grounding prong The wide blade or the third prong are provided for your safety If the provided plug does not fit into your outlet consult an electrician for replacement of the obsolete outlet 10 Protect the power cord from being walked on or pinched particularly at plugs convenience receptacles and the point where they exit from the apparatus 11 Only use attachments accessories specifie...

Page 4: ...alified Yamaha service personnel CAUTION Always follow the basic precautions listed below to avoid the possibility of physical injury to you or others or damage to the instrument or other property These precautions include but are not limited to the following When removing the electric plug from the instrument or an outlet always hold the plug itself and not the cord Pulling by the cord can damage...

Page 5: ...eight on or place heavy objects on the instrument and do not use excessive force on the buttons switches or connectors Do not use the instrument device or headphones for a long period of time at a high or uncomfortable volume level since this can cause permanent hearing loss If you experience any hearing loss or ringing in the ears consult a physician Do not place the bench in an unstable position...

Page 6: ... in this product Copyright 1986 2008 ACCESS CO LTD AVE SSL an encryption module technology by ACCESS Co Ltd is installed in this product Copyright 1997 2008 ACCESS CO LTD Trademarks Windows is the registered trademark of Microsoft Corporation All other trademarks are the property of their respective holders Tuning Unlike an acoustic piano the Clavinova does not need to be tuned It always stays per...

Page 7: ...gital filter technology to the recorded audio samples The GRAND PIANO 1 Voice in particular features completely new samples recorded from a full size concert grand piano Each sampled note has been adjusted and processed meticulously to ensure the very best sound with instantaneous attack and expressive response This special Voice features three velocity switched samples Dynamic Sampling Sustain Sa...

Page 8: ...CE REVERB CHORUS 25 Combining two voices Dual mode 27 Splitting the keyboard range and playing two different voices Split mode 28 Using the metronome 30 Recording Your Performance 31 Recording a New Song 31 Recording a performance without specifying the recording part 32 Recording a performance of several different parts 35 Other recording techniques 36 Handling files such as deleting song files F...

Page 9: ...l computer 75 Detailed Settings 77 Detailed Settings 77 Parameter List 77 Making detailed settings 80 Detailed settings for recording and playback FILE SONG SETTING 82 Detailed settings for the metronome METRONOME SETTING 85 Detailed settings for the voices VOICE SETTING 86 Detailed settings for iAFC iAFC SETTING 92 Other settings FUNCTION 94 Message List 104 Questions about Operations and Functio...

Page 10: ...anel Controls and Terminals AC IN USB TO DEVICE SELECT 240 127 110 220 8 º 5 7 2 3 4 9 6 1 ª Top panel Jacks Terminals Make sure when using the jacks and terminals to carefully check the names as printed on the panel before making connections ...

Page 11: ...ll sound deeper more resonant and more similar to the sound of an actual acoustic instrument You can turn the iAFC function on or off or make detailed settings for the iAFC FUNCTION button pages 79 94 This lets you make detailed settings such as adjusting the keyboard touch making fine adjustments to the pitch or MIDI settings USB TO DEVICE terminals page 72 For connecting the instrument to a USB ...

Page 12: ...LECT button a song name is shown on the display After pressing a button check the display for the indication Selecting items parameters with the buttons on the side of the display Each function may have many items or parameters from which you can choose To select an item or parameter press one of the A D buttons Each parameter in the display corresponds to the A D button next to it To reset the va...

Page 13: ...r right of the display press the B YES B NO button to execute or cancel the operation Press the EXIT button to exit from a function The EXIT button is the means to leave a function After you ve used a function and want to exit from it press the EXIT button B D NO YES A C Save Overwrite M 001 NewSong001 MID YES execute NO cancel CONTRAST B D NO YES EXIT EXIT button ...

Page 14: ...try to use the music rest in a half raised position When lowering the music rest do not release your hands from the music rest until it is all the way down These braces are for holding the pages of music books in place About the key cover CAUTION Hold the cover with both hands when opening or closing it Do not release it until it is fully opened or closed Be careful to avoid catching fingers yours...

Page 15: ...ome areas a plug adaptor may be provided to match the pin configuration of the AC wall outlets in your area Do NOT modify the plug pro vided with the CLP 380 If the plug will not fit the outlet have a proper outlet installed by a qualified electrician 2 Turn on the power to the Clavinova Press the POWER switch located on the right of the keyboard to turn the power on The screen located in the cent...

Page 16: ...ng included two screws 4 10mm as shown in the illustration CAUTION Do not hang anything other than the headphones on the hanger Otherwise the Clavinova or the hanger may be damaged The CLP 380 features an iAFC Instrumental Active Field Control effect This produces sound from the speaker located on the rear of the Clavinova enhancing the reverberation and spaciousness of the sound In order to take ...

Page 17: ... in succession 3 Select a tune and start playback Press the voice group button for the demo song that you want to hear The indicator of the voice group button you pressed will light and the demo song will begin playing Subsequently the demo songs will play back consecutively from the upper left voice group button until you stop the playback 4 Stop the playback and exit from demo mode Press the DEM...

Page 18: ...ut the sampling technology and iAFC demo by turning iAFC on off The demo songs are assigned to the voice group buttons as follows Sampling technology iAFC demo Voice group buttons Piano demo Stereo Piano Stereo Sampling GRAND PIANO 1 Mono Piano Mono Sampling GRAND PIANO 2 Sustain Sustain Sampling With E PIANO1 Without E PIANO 2 KeyOff Key off Sampling With HARPSICHORD Without E CLAVICHORD StringRe...

Page 19: ...n 1 1 Press the SONG SELECT button 1 2 Use the A buttons to select the PRESET song type PRESET Stands for Preset song memory This memory contains 50 piano preset songs 2 Select the desired song Press the C buttons to select the desired piano song from P 001 to P 050 Playing the 50 piano preset songs 1 1 1 2 3 2 4 5 TEMPO DOWN UP button Song On the Clavinova performance data is called a Song This i...

Page 20: ...on during playback to start playback from the next song Press the STOP button or simultaneously press the B NO YES buttons during playback or while playback is stopped in the middle of the song to locate the top of the song 5 Return to the default screen Press the EXIT button NewSong is a blank song provided for you to record your performance page 31 You can repeatedly play back a single song or s...

Page 21: ...rt playback and playing Press the PLAY PAUSE button to start playback Play the part you just turned off Starting playback automatically as you start playing the keyboard Sync Start You can cause playback to begin when you play the keyboard Sync Start Hold down the STOP button and press the PLAY PAUSE button The PLAY PAUSE indicator will blink and the Clavinova will wait for Sync Start Now when you...

Page 22: ... practicing and play it Press the PLAY PAUSE button to start playback 2 Specify the repeat range Press the REPEAT button at the starting point A of the range to be repeated Press the REPEAT button again at the ending point B After an automatic lead in to help guide you into the phrase the range from point A to point B is played back repeatedly 3 Cancel the specified range and return to the normal ...

Page 23: ...cs of each preset voice You can control the loudness of a voice by how hard you play the keyboard although different playing styles touch sensitivities have little or no effect with the sound of certain musical instruments Refer to Preset Voice List on page 114 TERMINOLOGY TIP TIP TIP Voice group Voice name Voice group Voice name GRANDPIANO1 GrandPiano1 CHURCHORGAN PipeOrganPrincipal MellowPiano P...

Page 24: ...es this pedal turns vibrato on and off or toggles the speed of vibrato See page 98 Using the pedals If the damper pedal doesn t work or notes are sustained even when the pedal is not pressed make sure that the pedal cord is properly plugged into the PEDAL jack on the unit see step 6 on page 119 Also make sure that the RPedalFunc parameter in the FUNCTION menu is set to ON see page 96 Half pedal Wh...

Page 25: ...W BRIGHT button B D NO YES A C Brilliance Normal You can press BRILLIANCE MELLOW BRIGHT buttons and then use D buttons to select the desired tonality Normal setting Normal Normal setting The Normal setting refers to the default setting factory setting obtained when you first turn on the power to the Clavinova If you select Bright1 Bright2 or Bright3 as the type of brilliance the volume level will ...

Page 26: ...ING menu see page 89 The CHORUS ON OFF button setting on the panel is temporary That is if you select another voice the chorus setting for the previous voice is cancelled The Chorus On Off parameter setting is saved for each voice That is if you select a given voice the chorus setting is automatically turned on or off according to the saved chorus setting You can select a reverb type via the Rever...

Page 27: ...are called voice 2 3 Exit Dual mode and return to normal play mode Press any voice group button Dual mode using voices in the same voice group Procedure 1 Select a voice group In normal play mode press the desired voice group button 2 Select a voice Use the A buttons to select a voice Combining two voices Dual mode 1 3 2 3 1 4 2 2 The numbers on the upper row indicate the steps in Dual mode using ...

Page 28: ...the right hand Refer to Voice Combination Examples Dual and Split on page 116 for examples of effective voice combinations Procedure 1 Enter Split mode Press the SPLIT button 2 Select a voice for the right hand Use the voice group buttons and the A buttons to select the voice for the right hand area 3 Select a voice for the left hand Hold down the SPLIT button and press a voice group button to sel...

Page 29: ...own the SPLIT button and play the key you wish to assign as the split point Release the SPLIT button to return to the main screen 5 Exit Split mode and return to normal play mode Press the SPLIT button A specified split point key is included in the left hand range The split point can also be set by the FUNCTION parameter SplitPoint page 96 TIP TIP You can use Dual see page 27 in each area right ha...

Page 30: ...minute 5 500 use the TEMPO DOWN UP or the D buttons To reset the tempo to the normal default setting press the DOWN and UP buttons or the D and buttons simultaneously Press the EXIT button to return to the normal screen 2 Stop the metronome Press the METRONOME ON OFF button Using the metronome 1 2 TEMPO DOWN UP buttons The default tempo is 120 If a song has been selected the song tempo is used TIP...

Page 31: ...ording several different parts to multiple parts You can select whichever way best suits your purpose Recording a performance without specifying the recording part page 32 This convenient and simple recording method lets you quickly record your performance without specifying the recording parts useful for example in recording solo piano pieces In this way the performance is automatically recorded ...

Page 32: ...T button once to return to the NewSong screen 3 Engage the record mode Press the REC button The REC and RIGHT indicators flash in red To stop recording press the REC button again or press the STOP button Set the tempo if necessary If this record standby screen does not appear press the SONG SELECT button once Recording a performance without specifying the recording part 1 3 2 4 5 B D NO YES A C BA...

Page 33: ...and the Clavinova locates the top of the song To stop playback in the middle of a song press the STOP button You can also pause playback by pressing the PLAY PAUSE button Re recording a song partially This section explains how to record part of a song again Procedure 1 Select a recording method 1 1 Press the FILE SONG SETTING button 1 2 Press the A buttons to display RecStart or RecEnd B D NO YES ...

Page 34: ...played press the SONG SELECT button once 3 Select a voice or voices for recording if necessary Repeat Step 2 on page 32 if you wish to change the previous settings 4 Engage record mode Press the REC button To stop recording press the REC button again or press the STOP button After pressing the REC button again or the STOP button when RecStart is set to Normal page 34 Overwrite is shown in the disp...

Page 35: ...cators flash in red To stop recording press the REC button again or press the STOP button Set the tempo if necessary If this record standby screen does not appear press the SONG SELECT button once If you don t want to hear the right left part while you record press the RIGHT LEFT button so that its indicator is turned off 3 Start and stop recording Recording begins automatically as soon as you pla...

Page 36: ...ons To select a song from commercially available music data or from already recorded data press the A buttons to display MEMORY or USB1 in the Song Select screen and press the C buttons To continue recording follow the procedure described in Recording a performance without specifying the recording part from pages 32 to 34 When you record over a preset song the song is automatically saved to Storag...

Page 37: ...s complete press the SONG SELECT button once to return to the song select screen 4 Press and hold down the REC button and select the part to change The indicator for the selected part lights up in red Change the tempo setting now if necessary At this point do not play the keyboard or press the PLAY PAUSE button Otherwise recording will start erasing the recorded data 5 Press the STOP or REC button...

Page 38: ...g see page 36 the existing data will be erased Proceed with caution In the following example RIGHT LEFT and EXTRA PARTS n have been selected for recording Note Part n Part 3 Part 16 If n 1 n 2 and n 3 exceed 16 Parts 1 2 and 3 are used Some commercially available music data contains extremely high volumes When using such data please adjust the song balance TIP SONG BALANCE SONG KEYBOARD The song p...

Page 39: ...the power to the Clavinova songs saved in Preset song memory and Storage memory are not erased On the other hand songs in Current memory are lost However recorded songs are automatically saved to Storage memory from Current memory In this manual a song located in a song recorded in Current memory is referred to as a Current song a song in Storage memory is a Memory song and a song on a USB storage...

Page 40: ...er Piano Soft songs in the Storage memory MS Ms Yamaha protection formatted songs in the Storage memory USB storage device U1 External song U1P External songs such as Disk Orchestra Collection DOC songs or Disklavier Piano Soft songs in a USB storage device U1S U1s Yamaha protection formatted songs in a USB storage device Limitation of file operations Ø Yes No 1 Only to Storage memory 2 Only MP so...

Page 41: ...y the desired item 4 Set the parameter or execute the command Use the B NO YES C D buttons For more information regarding this procedure refer to the corresponding section below 5 Close the File Song Setting menu Press the EXIT button Basic file operation 2 3 5 1 3 4 4 4 The and indicators may be displayed in the lower right of the screen In this case you can use the D button to open the folder Pr...

Page 42: ...press the D buttons simultaneously You can use up to 46 one byte or 23 two byte characters for a song name If the name is longer than the screen use the C buttons to move the cursor and scroll the name 4 3 Execute the operation Press the B YES button located next to Execute Follow the instructions on screen The song is automatically numbered Saving recorded songs to a USB storage device Save B D N...

Page 43: ... 001 NewSong001 Do not turn off the power or eject the media while Executing is shown in the display CAUTION After you delete a song the Clavinova automatically updates the song numbers When you delete a folder all files within that folder will be deleted TIP TIP The and indicators may be displayed in the lower right of the screen In this case you can use the D button to open the folder Press the ...

Page 44: ... A C Copy Execute U1 001 NewaSong001 Please note that the copy features are intended for your personal use only Root The highest level of a hierarchical structure This indicates an area which does not belong to a folder TIP TERMINOLOGY Copy operation You can copy files to other memory location File A File A File B File B Storage memory Can be copied Can be copied USB storage device You can copy fi...

Page 45: ...older 4 2 Press the B YES button located next to Execute Follow the instructions on screen The folder is created in the root directory in the USB1 indicated by U1 in this display device Moving files Move B D NO YES A C Move Execute U1 001 NewSong001 Preset songs and some protected songs cannot be moved You cannot move a folder The and indicators may be displayed in the lower right of the screen In...

Page 46: ...matically be opened when you insert the media Procedure See page 41 for information on basic operations The following is a detailed procedure for step 4 4 Use D button to select ON or OFF Formatting a USB storage device Format B D NO YES A C Format Execute USB1 Do not turn off the power or eject the media while Executing is shown in the display CAUTION Automatically selecting a song in storage med...

Page 47: ...s International To input katakana change this setting to Japanese Procedure See page 41 for information on basic operations The following is a detailed procedure for step 4 4 Use D button to select International or Japanese Options International Japanese Character list International Japanese Changing the type of characters on screen CharacterCode B D NO YES A C CharacterCode Japanese ...

Page 48: ... memory This memory contains recorded songs or copied songs MEMORY is not displayed when this memory does not contain any songs USB1 Stands for USB storage device This device contains commercially available song data etc USB1 is not displayed when the USB storage device is not connected to the instrument When several USB storage devices are recognized to the instrument numbers are added after USB ...

Page 49: ...BALANCE slider See page 38 Press the SONG SELECT button to return to the song select screen Adjusting the tempo You can use the TEMPO DOWN UP buttons to adjust the playback tempo as required before or during playback The default tempo the song s original tempo is set when you press the DOWN and UP buttons simultaneously Press the SONG SELECT button to return to the song select screen 4 Stop playba...

Page 50: ... other XG compatible instruments See the separate Data List for the XG voice list Floppy disk format 3 5 inch 2DD disks in the MS DOS 720KB format 3 5 inch 2HD disks in the MS DOS 1 44MB format Refer to Data Compatibility on page 112 for more information on formats Turning part playback on and off You can practice a part or phrase using the SongRepeat page 82 and PhraseMark page 82 parameters in t...

Page 51: ...a router To use the Internet connection you will first need to subscribe to an Internet service or provider Procedure 1 Select the connection environment of your computer from the following Connecting the Instrument to the Internet Due to EU regulations users within Europe should use an STP shielded twisted pair cable to prevent electromagnetic interference CAUTION Use a computer to connect to the...

Page 52: ...gs see Listening to the Songs on Internet on page 70 Using a Wireless LAN Using a Wireless Game Adaptor using DHCP 2 Connect the devices according to the example First turn the power of the instrument off then connect the wireless game adaptor to the LAN port on the instrument and finally turn the power on again Modem No router capability Router Cable type LAN cable LAN cable LAN port Here modem r...

Page 53: ... the Internet Settings settings concerning the access point on page 54 Making the Internet settings might take some time Modem Access point LAN port Here modem refers to an ADSL modem optical network unit ONU or cable modem Wireless game adaptor For an illustration of the location of the LAN port see Panel Controls and Terminals page 10 For a list of wireless game adaptors whose compatibility has ...

Page 54: ...ou select an encrypted access point key icon appears Procedure 1 Call up the Internet Settings screen Hold down the FILE SONG SETTING button and press the REC button About the Internet Settings settings concerning the access point You do not need to make Internet settings here if you are using a cable connection using DHCP a wireless LAN using a wireless game adaptor using DHCP or a cable connecti...

Page 55: ...t to encrypt the access point change this in the settings of the access point side With key icon The display for inputting the WEP key is called up in step 4 4 Input the WEP key 4 1 Press the B YES button to display the WEP Key Input screen If no signal from the access point is received the access point cannot be displayed TIP B D NO YES A C Wireless Execute NetworkSearch B D NO YES A C Wireless S...

Page 56: ...cter Move the cursor to the character you want to delete and press the D buttons simultaneously WEP key character list 4 4 Set the WEP key input by using the B YES button When you set the WEP key input the characters are shown as 4 5 Actually enter the WEP key input by using the B YES button B D NO YES A C Wireless Input WEPkey abcde _ Cursor To cancel the WEP key input press the B NO button and r...

Page 57: ... USB storage device be sure to read the section Precautions when using the USB TO DEVICE terminal on page 122 2 Connect the devices according to the example For information on connecting the devices refer to the website http music yamaha com idc 3 Connect the instrument to the Internet You ll need to make Internet settings on the instrument explained in the section About the Internet Settings belo...

Page 58: ...g the Internet Setting File Procedure 1 Create the Internet Setting File You need to create the Internet setting file on the special Yamaha webpage using your computer For information about how to create the file read the instructions on the Yamaha webpage http music yamaha com idc About the Internet Settings You do not need to make Internet settings here if you are using a cable connection using ...

Page 59: ...ding Press the B YES button to call up the confirmation message Sure To proceed press the B YES button again An Executing message appears and data loading starts When loading is complete a Completed message appears for three seconds followed by the Check the Connection screen Please proceed to Checking the Connection on page 60 To cancel the loading press the B NO button instead of the B YES butto...

Page 60: ...the Internet Settings screen Press the B NO B YES or EXIT button 7 Return to the default screen Press the EXIT button You can play back songs from the Internet For instructions on playing back songs see Listening to the Songs on Internet on page 70 B D NO YES A C ConfigFile Execute ConnectTest B D NO YES A C ConnectSucceeded OK Check the Connection screen ...

Page 61: ... YES button The connection information is not displayed depending on the state of the connection and is indicated as NoInfo Calling Up the Connection Information 1 1 1 2 1 1 2 B D NO YES A C Wireless Execute NetworkSearch B D NO YES A C ConnectInf Execute Display Connection Information screen B D NO YES A C ConnectInf Execute Display Device OK Port If the connection information extends beyond what...

Page 62: ... the B YES button Overwriting the Connection Information A Overwrite message will appear on the display if a USB storage device contains a file with the same name as the one you exported before To overwrite press the B YES button again An Executing message appears and the Clavinova overwrites the data When overwriting is complete a Completed message appears for three seconds before returning to th...

Page 63: ...actory programmed settings Yamaha recommends you that you back up your Internet settings before restoring See Backing up the Clavinova s internal data FullBackup on page 103 for details Internet Normal Default Settings List B D NO YES A C ConnectInf Overwrite Export B D NO YES A C ConnectInf Completed Export Restoring the Internet Settings to Normal Default Settings B D NO YES A C FactorySet Execu...

Page 64: ...wireless LAN adaptor whose compatibility has not been confirmed The instrument could not be successfully connected to the Internet Confirm whether the connection is correct by referring to Connecting the Instrument to the Internet on page 51 For detailed information on the error refer to the Error Code List IDC on page 66 The connection test of the instrument to the Internet has succeeded An error...

Page 65: ...age 66 This message appears if the wireless network has not been found Please check that the power of the access point is turned on and that the settings of the device are correct Set the instrument within reach of the signal from the access point The signal will not be received if the distance from the access point is too great or there is an obstacle blocking reception Message Meaning WirelessNe...

Page 66: ...nection Check that all settings for the wireless LAN are correct Make sure that the power of the router is turned on Also confirm that the router settings allows the use of DHCP Try turning on the power of the router once again 1410 1415 Connection to the special website has failed Make sure that the power of the router is turned on Also confirm that the router settings are correct When using a fi...

Page 67: ...allows high speed data transfer among computers mobile phones and other devices IP address A string of numbers assigned to each computer connected to a network and indicating the device s location on the network LAN Short for Local Area Network this is a data transfer network that connects a group of computers at a single location such as an office or home by means of a special cable Link Location...

Page 68: ... to specific websites and pages on the Internet A complete URL usually starts with the characters http Web page Refers to each individual page that makes up a website WEP Short for Wired Equivalent Privacy a security protocol for wireless networks WEP protects communication contents from being intercepted Wireless LAN A LAN connection that allows data transfer through a wireless cable free connect...

Page 69: ...inal page 123 The instrument cannot connect to the Internet using a static IP address proxy server The necessary Internet settings have not been made Make Internet settings on the instrument as explained in the section About the Internet Settings on page 58 The instrument cannot connect to the Internet using a wireless LAN The access point is set to conceal the SSID Temporarily remove the setting ...

Page 70: ... page 51 Procedure 1 Display the Song Select screen 1 1 Make sure that the instrument is connected to the Internet then press the SONG SELECT button 1 2 Use the A buttons to select INTERNET The folder name in the Internet is displayed on the screen Internet The Internet can be used by the instrument to play back a wide range of songs song data in various musical genres Change the Clavinova s chara...

Page 71: ...B repeat page 22 become effective only after you play back the song once TIP B D NO YES A C INTERNET BAR001 I 001 xxxxxxxxxxxxxx Song name If the song name extends beyond what can be displayed in the screen you can press the D button to move toward the right in steps of one character Press the D button to move back to the left in steps of one character You can play the keyboard along with the Inte...

Page 72: ...ons on off To select the function that will be controlled use the FUNCTION parameter AuxPedalFunc page 97 The PLAY PAUSE function can also be assigned to a foot switch page 98 Connectors USB TO DEVICE SELECT 1 2 4 7 5 6 3 1 On the left of the panel At front There are two different types of USB terminals on the instrument USB TO DEVICE and USB TO HOST Take care not to confuse the two terminals and ...

Page 73: ...e speakers and the headphones changes automatically to the appropriate settings according to how the instrument is being used see chart below The Clavinova s MASTER VOLUME dial setting affects the input signal from the AUX IN jacks but the REVERB CHORUS and BRILLIANCE MELLOW BRIGHT page 25 settings do not If you connect the Clavinova to a monaural device use only the AUX IN L L R jack Use audio ca...

Page 74: ...elect a USB storage device with the A buttons to engage the Song Selection mode or press the FILE SONG SETTING button to engage the File Song Setting mode If you try to engage these modes before connecting the USB storage device press the EXIT button to exit the mode and re engage the mode Connecting to a USB storage device Backing up your data to a computer Backing up the instrument data to a com...

Page 75: ...nova and your computer you must disconnect the cable from the USB TO HOST terminal The Clavinova may not operate correctly if a cable is left connected Copying files from a computer hard disk to a USB storage device Files contained on the hard disk of a computer can be transferred to the instrument by first copying them to the storage media then connecting inserting the media to the instrument Not...

Page 76: ... or losing the data If the computer or the instrument freezes restart the application software or the computer OS or turn the power to the instrument off then on again CAUTION Use an AB type USB cable of less than about 3 meters Before connecting the computer to the USB TO HOST terminal exit from any power saving mode of the computer such as suspended sleep standby Before turning on the power to t...

Page 77: ...e MakeDir 45 Formatting a USB storage device Format 46 Automatically selecting a song in storage media SongAutoOpen 46 Changing the type of characters on screen CharacterCode 47 Playing back a song all songs repeatedly SongRepeat 82 Playing back the phrase specified by the phrase number PhraseMark 82 Correcting note timing Quantize 83 Specifying whether playback starts immediately along with the f...

Page 78: ...ne vibrato effect on off VibeRotorOnOff RotorOnOff 89 Setting the rotation speed of the rotary speaker RotarySpeed Rot Speed 90 Adjusting the depth of the DSP effect DSPDepth 90 Adjusting the brightness of the sound Brightness 90 Adjusting the resonance effect HarmonicContent Harmonic 90 Adjusting the low range frequency of the equalizer EQ LowFreq EQ L Freq 90 Adjusting the low range gain amount ...

Page 79: ...lType 98 Setting the point at which the damper pedal starts to affect the sound HalfPedalPoint 98 Adjusting the depth of the Soft pedal SoftPedalDepth 98 Setting the depth of string resonance StringResonanceDepth 99 Setting the depth of sustain sampling for the damper pedal SustainSamplingDepth 99 Specifying the volume of the key off sound KeyOffSamplingDepth 99 Setting the range of pitch bend Pit...

Page 80: ...uttons to select or set the option To restore the normal parameter value press the and buttons simultaneously 4 Write execute or save the data There are two ways to respond to the messages If Execute or Start appears Press the B YES button to display confirmation Sure To proceed press the B YES button again The Clavinova displays Executing and writes the data When the operation is complete it disp...

Page 81: ...ss the B YES button to execute the setting The Clavinova displays Executing and saves the data When the operation is complete it displays Completed for three seconds then returns to the previous screen 5 Close the setting menu Press the EXIT button B D NO YES A C Main Set Octave 0 ...

Page 82: ...the device which contains the previously selected song is the destination device If you select a song from an ensemble collection disk such as the Disk Orchestra Collection or one of the XG for Piano disks you can specify phrase numbers in the score to play back from the score from the mark point or to play back the phrase repeatedly If you start playing back a song with Repeat On selected the cou...

Page 83: ...s selected notes will be moved toward the specified quantization beats according to the specified percentage Applying less than 100 quantization lets you preserve some of the human feel in the recording Setting range 0 100 This parameter enables you to specify whether a song that starts from the middle of a bar or a song with a silence prior to the first note should be played from the first note o...

Page 84: ...o in this instrument channel means the same as part Even channels that contain no data are displayed When you clear all channels using the ALL parameter you can overwrite the song In this case the file which contains song settings with no channel data is saved Auditioning the channels ChannelListen B D NO YES A C ChannelListen Start Ch1 Playback continues as long as you press and hold down this bu...

Page 85: ...ee the procedure on page 80 Setting range BellOff Click standard metronome sound EnglishVoice Click and 1 2 3 4 in English GermanVoice Click and 1 2 3 4 in German JapaneseVoice Click and 1 2 3 4 in Japanese FrenchVoice Click and 1 2 3 4 in French SpanishVoice Click and 1 2 3 4 in Spanish BellOn Click and bell To mute the beat count select BellOff METRONOME SETTING button Setting the metronome time...

Page 86: ...ice referring to the section Selecting and Playing Voices on page 23 2 Access the Voice Setting menu Press the VOICE SETTING button to access the Voice Setting menu 3 Press the A buttons to select the part for which you wish to change the voice The range of the displayed part varies depending on the selected voice Main MAIN voices displayed with a single voice or in Split mode Main Layer MAIN Voic...

Page 87: ...on page 80 Setting range 20 20 Positive settings will raise the pitch of the first sound and lower the pitch of the second sound Negative settings will do the opposite In Dual mode parameters with the mark are set for Voice 1 and Voice 2 individually Parameter names enclosed in parentheses are displayed in Dual mode Setting the octave Octave Setting the volume level Volume B D NO YES A C Main Set ...

Page 88: ...27 You cannot set this parameter for the voice parts Left and Left Layer See the procedure on page 80 Setting range Chorus Adds a rich spacious sound Celeste Adds swell and a spacious sound Flanger Adds swell effects of an ascending or descending jet plane See the procedure on page 80 In Dual mode Setting range 0 127 Setting the reverb type ReverbType Setting the reverb depth ReverbSend TIP B D NO...

Page 89: ... The phase changes periodically swelling the sound AutoWah The center frequency of the wah filter changes periodically SoundBoard Simulates the reverberation of a piano soundboard Off No effect Rotor The rotating portion of an electrical device etc This will be displayed only if VibeRotor is selected for the DSP Type parameter explained above This sets the speed of the vibrato effect that is appli...

Page 90: ...nge 64 63 Resonance can produce a distinctive peaky tone making the sound brighter and harder Equalizer An audio equalizer divides the frequency spectrum into multiple regions and enables the user to adjust the relative amplitude of each region See the procedure on page 80 Setting range 32 Hz 2 0 kHz Setting the rotation speed of the rotary speaker RotarySpeed Rot Speed Adjusting the depth of the ...

Page 91: ...yboard the normal setting for these voices is 127 See the setting range below See the procedure on page 80 In Dual mode Setting range 0 softest 64 largest changes in the level 127 loudest and fixed Adjusting the low range gain amount of boost cut of the equalizer EQ LowGain Adjusting the high range frequency of the equalizer EQ HighFreq EQ H Freq Adjusting the high range gain amount of boost cut o...

Page 92: ... iAFC effect cannot be obtained if this speaker is blocked iAFC uses Yamaha s EMR Electronic Microphone Rotator technology to ensure stability against acoustic feedback See the procedure on page 80 Setting range On Off Dynamic Damper Effect is one type of the iAFC effect Dynamic Damper Effect simulates the sustain sound that occurs when you press the damper pedal of a grand piano The internal micr...

Page 93: ... to simulate the spatial characteristics of performing together on stage See the procedure on page 80 Setting range 0 127 This automatically adjusts the sensitivity and response of iAFC so that the optimal iAFC effect will be obtained When automatic adjust begins a test sound noise will sound for about five seconds While automatic adjustment is being performed do not make audible noises in the vic...

Page 94: ... for Master The sound of the entire instrument the manually played sound and the song playback Keyboard The manually played sound Song The song playback Setting range 12 1 octave 0 normal pitch 12 1 octave You can specify a touch response how the sound responds to the way you play the keys See the procedure on page 80 Setting range Light With a soft touch the Clavinova produces a loud sound The vo...

Page 95: ...scale PureMajor PureMinor Based on natural overtones three major chords using these scales produce a beautiful pure sound Pythagorean This scale designed by Pythagoras a Greek philosopher is based on the interval of a perfect 5th The 3rd produces swells but the 4th and 5th are beautiful and suitable for some leads MeanTone This scale is an improvement of the Pythagorean in that the swell of the 3r...

Page 96: ...me you press the pedal VibeRotor Switch the vibraphone vibrato on off switch on off each time you press the pedal Normal setting SustainCont See the procedure on page 80 Setting range Same as Setting the right pedal function above except for the following parameters SustainCont Expression PitchBend Up PitchBend Down Normal Setting Sostenuto See the procedure on page 80 Setting range Same as Settin...

Page 97: ... determine whether the center pedal function set on page 96 will affect that part or not See the procedure on page 80 Setting for Main MLayer MainLayer Left LLayer LeftLayer Setting range On Off Normal Setting Different for each voice This turns the left pedal function on or off for the relevant voice part In other words you can select the desired voice part Main MainLayer Left LeftLayer and deter...

Page 98: ...Use this parameter to reverse this mechanism See the procedure on page 80 Setting range Make Break Here you can specify the point to which you must depress the pedal right and AUX before the assigned effect begins to be applied This setting applies only to the SustainCont effect page 96 that is assigned to the right or AUX pedal Setting range 2 effective with the shallowest press 0 2 effective wit...

Page 99: ...in semitone steps You can set the pedal function page 96 to specify whether the pitch will be raised or lowered See the procedure on page 80 Setting range 0 12 Pressing the pedal will raise lower the pitch by 12 semitones 1 octave Normal setting 2 This setting lets you switch the speaker on off See the procedure on page 80 Setting range Normal HeadphoneSW The speaker will sound only if headphones ...

Page 100: ...ova produces the sound from its tone generator when you play the keyboard In Local Control Off state the keyboard and the tone generator are cut off from each other This means that even if you play the keyboard the Clavinova will not produce the sound Instead the keyboard data can be transmitted via MIDI to a connected MIDI device which can produce the sound The Local Control Off setting is useful...

Page 101: ...alTime SysEx System Exclusive Setting range On Off Normal setting On for all types of data You can transmit the panel data such as voice selection to a connected sequencer Before you record performance data to a sequencer it is useful if you first send and record at the beginning of the performance data the panel setup data for your performance during playback See the procedure on page 80 Selectin...

Page 102: ... reset the Clavinova to its normal factory default settings The CharacterCode parameter setting page 47 does not change The MemoryBackup parameter setting On Off left column is reset to the normal setting You can specify whether the memory songs are erased or kept See the procedure on page 80 Do not turn off the power during factory set Doing so could result in damage to the data Selecting for Mem...

Page 103: ...mplete the backup Do not turn off the power during full backup Doing so could result in damage to the data Protected songs indicated by MS Ms in the display cannot be saved Move the songs to the USB storage device before executing Full Backup If you do not move the protected songs and keep the data only in the internal memory the data will be deleted when you load the backup settings to the instru...

Page 104: ...ration When calibrating a test tone will sound from the instrument This message confirms that the operation has been cancelled This message appears when you do the following operation to a protected song Overwrite protected songs cannot be overwritten Save with a new name protected songs cannot be used with Save as function Delete this message confirms that the protected song will be deleted Renam...

Page 105: ...pplication on your computer are functioning correctly When using the CLP 380 by itself This message may appear if a cable is left connected to the USB TO HOST terminal of the CLP 380 In this case turn off the power of the CLP 380 disconnect the cable and then turn on the power again If the cable is left connected the CLP 380 may not function correctly This message will appear when the power is tur...

Page 106: ...rite save copy or delete data on a protected drive media Set protect to off and try again If you still see this message the disk is internally protected such as commercially available music data You cannot write or copy to such a disk This message appears when a protected song and the drive are not compatible Use a drive whose compatibility has been confirmed by Yamaha page 122 You tried to copy o...

Page 107: ...s message prompts you to start the operation To start press the B YES button Press the EXIT button to cancel the operation This message prompts you to confirm the execution Press the B YES button to continue Press the B NO button to cancel This message appears when the number of files and folders exceeds the system limit The maximum number of files folders which can be stored in a folder is 250 Tr...

Page 108: ...empo changes when the recording part is selected and a red part indicator is flashing The same trick applies to editing the tempo after recording Performance in Dual or Split mode is not recorded Part data is lost unexpectedly For Dual or Split mode recording the recording part for the second voice that is the voice for the left hand part is automatically assigned page 27 Therefore if the part alr...

Page 109: ...ILE SONG SETTING menu to change the setting However if the song was recorded on another instrument changing the CharacterCode parameter setting may not resolve the problem What is the difference between TouchSense and TouchResponse MIDI data TouchSense determines the manner and degree to which the volume level changes in response to your touch on the keyboard The MIDI note on velocity data is not ...

Page 110: ...he keyboard to increase the keyboard volume Headphones are connected only if the Speaker setting is Normal HeadphoneSW page 99 Disconnect the headphone plug Speaker setting is off Set Speaker to Normal or ON page 99 Local Control is turned off Set Local Control ON page 100 Expression is assigned to the right pedal or the AUX pedal Assign any function other than Expression to the pedal The keyboard...

Page 111: ...rage device press the EXIT button to exit the mode and re engage the mode If the device is still not recognized it may not be supported by Yamaha Only use devices supported by Yamaha page 122 The USB storage device has hung up stopped The USB storage device is not compatible with the instrument Only use devices whose compatibility has been confirmed by Yamaha page 122 The USB storage device does n...

Page 112: ... 380 is compatible with both Format 0 and Format 1 Performance data recorded on the CLP 380 is saved in the SMF format 0 ESEQ This sequence format is compatible with many of Yamaha s MIDI devices including the Clavinova series instruments This is a common format used with various Yamaha software Voice Allocation Format With MIDI voices are assigned to specific numbers called program numbers The nu...

Page 113: ...s well as greater expressive control over voices and effects Even if the devices and data used satisfy all the conditions above the data may still not be completely compatible depending on the specifications of the devices and particular data recording methods Disk format It is necessary to first configure the floppy disk to the system of the device being used This operation is called formatting T...

Page 114: ...ed by synthesizers in popular music It also goes well with the acoustic piano sound E PIANO2 E Piano2 The sound of an electric piano using hammer struck metallic tines Soft tone when played lightly and an aggressive tone when played hard Vintage E Piano A different type of electric piano sound Widely used in rock and popular music HARPSI CHORD Harpsichord8 The sound of the instrument frequently us...

Page 115: ...trings sound Suitable for sustained parts in the background of an ensemble SlowStrings The sound of a string ensemble with a slow attack Suitable for use in Dual mode with GRAND PIANO or E PIANO CHOIR Choir A big spacious choir voice Perfect for creating rich harmonies in slow pieces SlowChoir The sound of a choir with a slow attack Suitable for use in Dual mode with GRAND PIANO or E PIANO Scat Yo...

Page 116: ...r Bass Cymbal This is recommended for light Jazz music The damper pedal is effective on the voice assigned to the right hand range MAIN LEFT Celesta Choir This is suitable for a peaceful somewhat cute song MAIN LEFT Choir GrandPiano1 Play these voices elegantly along with piano arpeggio Playing the Choir voice in chords would be more effective MAIN LEFT Scat WoodBass This combination features a co...

Page 117: ...ng assembly of each unit To disassemble reverse the assembly sequence given below Remove all parts from the box Confirm that all parts shown in the illustration are provided Have a Phillips head screwdriver of the appropriate size ready A B C D E F Connector panel AC IN Styrofoam pads Take out the styrofoam pads and place A on top of the pads Position the styrofoam pads to protect the connector pa...

Page 118: ...crews Insert two screws into the smaller holes on the brackets 2 4 Temporarily secure with 4 x 14mm thin screws Insert four screws into the smaller holes on the brackets 3 Lay A into position Align the screw threads on the bottom of A with the screw threads of E and F while gently lowering A into position E D F 1 2 1 1 F E B D CAUTION Fingers can become pinched between the main unit and the rear o...

Page 119: ...porarily fastened in step 2 4 above assembly B 5 Connect the speaker cord 5 1 Remove the twist tie attaching the speaker cord 5 2 Insert the speaker cord plug into the connector so that the tab extends toward the front when viewed from the rear 6 Connect the pedal cord 6 1 Insert the pedal cord plug into the PEDAL connector 6 2 Attach the cord holders to the instrument then clip the cord into the ...

Page 120: ...C 7 1 7 2 7 3 240 127 110 220 For models that feature a voltage selector Set the voltage selector to an appropriate voltage Voltage Selector Before connecting the AC power cord check the setting of the voltage selector which is provided in some areas To set the selector for 110V 127V 220V or 240V main voltages use a minus screwdriver to rotate the selector dial so that the correct voltage for your...

Page 121: ...nserted securely into the socket Check the connection If the main unit creaks or is otherwise unsteady when you play on the keyboard refer to the assembly diagrams and retighten all screws CAUTION When moving the instrument after assembly always hold instrument by the lower surface in the front of the main unit and by the handles in the rear panel Do not hold the key cover Improper handling can re...

Page 122: ...a computer keyboard or mouse cannot be used Connecting USB device When connecting a USB device to the USB TO DEVICE terminal make sure that the connector on the device is appropriate and that it is connected in the proper direction CAUTION When connecting a USB device to the USB TO DEVICE terminal on the top panel remove it before closing the key cover If the key cover is closed with the USB devic...

Page 123: ...trument can recognize up to four drives in one USB storage device Formatting USB storage media When a USB storage device is connected or media is inserted a message may appear prompting you to format the device media If so execute the Format operation page 46 CAUTION The format operation overwrites any previously existing data Make sure that the media you are formatting does not contain important ...

Page 124: ... of data If a floppy disk is inserted while the power is on the disk is automatically accessed since the instrument checks whether the disk has data CAUTION Do not remove the floppy disk or turn off the instrument itself while the disk is being accessed Doing so may result not only in loss of data on the disk but also damage to the floppy disk drive Be sure to remove the floppy disk from the disk ...

Page 125: ...e adhesive tape in the case and fit the floppy disk drive into the case 2 Fold the USB cable inside the case as shown 3 Attach the drive and case assembly to the left underside of the instrument using the included four screws 4mm x 10mm 4 Connect the USB cable to the USB TO DEVICE terminal Have a Phillips head screwdriver of the appropriate size ready Insert the drive to the case with the side hav...

Page 126: ...ch A comfortable bench styled to match your Yamaha Clavinova HPE 160 Stereo Headphones High performance lightweight dynamic headphones with extra soft ear pads UD FD01 USB FDD Unit Floppy disk drive for connecting to the instrument and saving loading data ...

Page 127: ...ast Yes Language English Japanese Panel Language English Cabinet Key Cover Key Cover Style Sliding Music Rest Yes Music Clips Yes Voices Tone Generation Tone Generation Technology AWM Dynamic Stereo Sampling Number of Dynamic Levels 5 Stereo Sustain Samples Yes Key off Samples Yes String Resonance Yes Polyphony Number of Polyphony Max 128 Preset Number of Voices 38 480 XG 12 Drum Kits Compatibilit...

Page 128: ...vity Storage Floppy Disk Drive Optional Internal Memory 1 47MB External Drives USB Storage Device Optional Connectors Headphones x 2 MIDI IN OUT THRU AUX IN L L R R AUX OUT L L R R AUX PEDAL Yes USB TO DEVICE x 2 selectable USB TO HOST Yes LAN Yes Amplifiers and Speakers Amplifiers 35W x 2 20W x 2 20W x 2 12W x 2 Speakers 16cm x 2 2 5cm DOME x 2 8cm x 4 Tri Amp System Yes Service Internet Direct C...

Page 129: ...es Dual mode 27 Connection computer 75 Other Components 72 Speaker 73 USB TO HOST 76 CONTRAST knob 15 CONTRAST 15 Copy 44 Current memory 39 Current song 39 D Damper right pedal 24 Data Compatibility 112 Data type 50 Default Normal setting 25 Delete 43 DEMO button 17 Demonstration tunes 17 Detailed Settings 77 Function 94 iAFC 92 Metronome 85 recording and playback 82 voices 86 display 12 Display c...

Page 130: ...4 N New Song 31 Normal setting 25 O Other settings 94 P P 40 Parameter List 77 Pedal Function Auxiliary 97 Center 96 Left 96 Right 96 Pedals 24 Personal computer 75 PHONES jacks 16 PhraseMark 82 PLAY PAUSE 50 Piano Preset Songs 20 Recorded Songs and Music Data 49 PLAY PAUSE button 20 49 Playback 50 Piano Preset Songs 20 Demo Songs 17 Recorded Songs and Music Data 49 Playing back repeatedly song 82...

Page 131: ...Splitting the keyboard range and playing two different voices 28 STOP 50 Piano Preset Songs 20 Recorded Songs and Music Data 49 STOP button 20 49 Storage memory 39 StringResonance 99 SustainSampling 99 Sync Start 50 preset songs 21 Recorded Songs and Music Data 49 T TEMPO 50 Piano Preset Songs 20 metronome 30 Recorded Songs and Music Data 49 TEMPO UP DOWN buttons 30 Terminals MIDI IN OUT THRU 72 7...

Page 132: ...CLP 380 Owner s Manual 132 Memo ...

Page 133: ...CLP 380 Owner s Manual 133 Memo ...

Page 134: ...a If the antenna lead in is 300 ohm ribbon lead change the lead in to co axial type cable If these corrective measures do not produce satisfactory results please contact the local retailer authorized to distribute this type of product If you can not locate the appropriate retailer please con tact Yamaha Corporation of America Electronic Service Division 6600 Orangethorpe Ave Buena Park CA90620 The...

Page 135: ...en Liaison Office Generatorvej 6A DK 2730 Herlev Denmark Tel 44 92 49 00 FINLAND F Musiikki Oy Kluuvikatu 6 P O Box 260 SF 00101 Helsinki Finland Tel 09 618511 NORWAY Norsk filial av Yamaha Scandinavia AB Grini Næringspark 1 N 1345 Østerås Norway Tel 67 16 77 70 ICELAND Skifan HF Skeifan 17 P O Box 8120 IS 128 Reykjavik Iceland Tel 525 5000 RUSSIA Yamaha Music Russia Office 4015 entrance 2 21 5 Ku...

Page 136: ...ital Musical Instrument Division Yamaha Corporation 2008 Yamaha Corporation WM91210 903MWAP3 2 05D0 Printed in China Clavinova Web site http music yamaha com homekeyboard Yamaha Manual Library http www yamaha co jp manual ...

Reviews: