background image

AW1600  Owner’s Manual

Adjusting the position of a locate point or marker

7

Va
rious types of pla

ybac

k

68

Here’s how you can adjust the position of a previously-registered locate point or marker.

1

In the Work Navigate section, repeatedly 
press the [SONG] key or hold down the 
[SONG] key and use the CURSOR [

]/[

keys to access the POINT page.

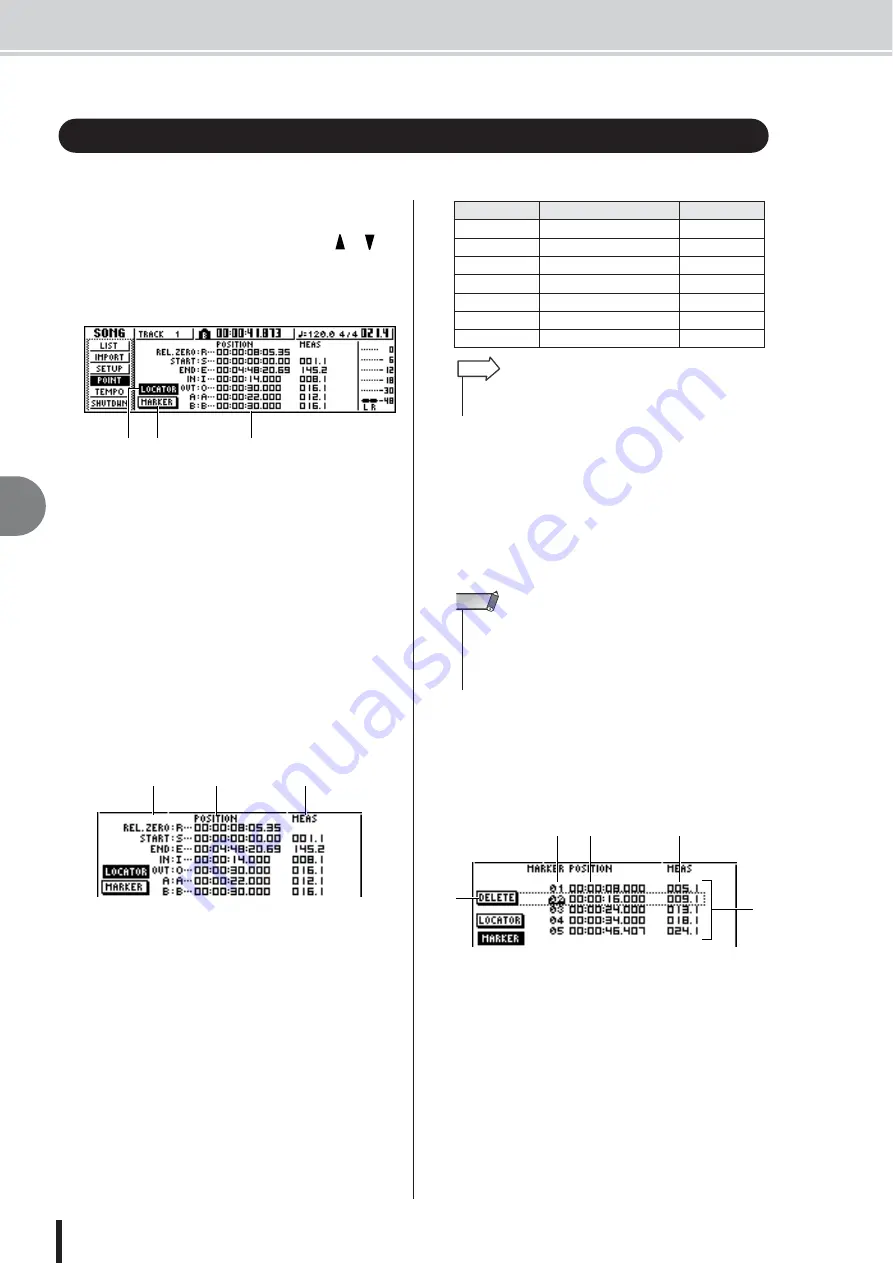
In the POINT page you can adjust the time location of 
each locate point and marker.

1

LOCATOR button

B

MARKER button

These buttons select whether the screen will show 
locate points or markers. The button that is currently 
turned on will be highlighted.

C

Locator point/marker display area

This area shows a list of the locate points or markers, 
depending on whether you have selected the LOCA-
TOR button or the MARKER button.

2

If you want to adjust the position of a locate 
point, make sure that the LOCATE button is 
turned on (highlighted) in the display.

When the LOCATOR button is on, the POINT page 
will display the positions of each locate point.

1

Locate points

Shows the type of locate point and its abbreviation.

B

POSITION

Shows the position of each locate point as time code or 
the counter display format.

C

MEAS

Shows the position of each locate point as measures/
beats. This value is calculated according to the tempo 
and time signature of the tempo map (

 p. 149).

The format in which the position is displayed will 
depend on the locate point. The following table shows 
the display format for each locate point.

3

Move the cursor to the locate point value 
that you want to adjust, and turn the [DATA/
JOG] dial to change the value.

Only in the case of the Start point, a “Change START 
Position?” popup window will ask you for confirma-
tion when you attempt to change the value. Move the 
cursor to the OK button and press the [ENTER] key, 
and then change the value.

4

To adjust the location of a marker, move the 
cursor to the MARKER button in the display 
and press the [ENTER] key.

When the MARKER button is on, the POINT page 
will list the markers that have been registered.

1

List

Lists the markers that have been registered. The line 
that is enclosed by a dotted frame is selected for oper-
ations.

B

MARKER

These are the marker numbers 01–99.

C

POSITION

Shows the position of each marker, in the counter dis-
play format.

Adjusting the position of a locate point or marker

2

3

1

1

2

3

Locate point

POSITION field

MEAS field

REL.ZERO

Time code

START

Time code

Measure/beat

END

Time code

Measure/beat

IN

Counter display format

Measure/beat

OUT

Counter display format

Measure/beat

A

Counter display format

Measure/beat

B

Counter display format

Measure/beat

• If a locate point has not been registered, the numerical field 

will indicate “--.”

HINT

• Changing the Start point will mean that locations already 

recorded in a track will move relative to the measure lines 
defined by the tempo map. Please be aware of this if you are 
using measure display for the metronome or for the quick loop 
sampler.

NOTE

2

3

4

5

1

Summary of Contents for AW 1600

Page 1: ...Owner s Manual EN ...

Page 2: ... fuse circuits or install AC line filter s In the case of radio or TV interference relocate reorient the antenna If the antenna lead in is 300 ohm ribbon lead change the lead in to co axial type cable If these corrective measures do not produce satisfactory results please contact the local retailer authorized to dis tribute this type of product If you can not locate the appropriate retailer please...

Page 3: ...fied Yamaha service personnel If this device or the AC power adaptor should be dropped or damaged immediately turn off the power switch disconnect the electric plug from the outlet and have the device inspected by qualified Yamaha service personnel CAUTION Always follow the basic precautions listed below to avoid the possibility of physical injury to you or others or damage to the device or other ...

Page 4: ...f FIRST for the same reason Do not insert your fingers or hands in any gaps or openings on the device vents disc slots etc Avoid inserting or dropping foreign objects paper plastic metal etc into any gaps or openings on the device vents disc slots etc If this happens turn off the power immediately and unplug the power cord from the AC outlet Then have the device inspected by qualified Yamaha servi...

Page 5: ...e center to the outside of the disk with a soft damp cloth then gently wipe off remaining moisture in the same way with a clean dry cloth Do not write on the disc or affix labels to it Do not wipe the disc with chemicals or detergents Do not bend or drop the disc Caution for Laser Laser properties of the Drive Laser Class Class 1 HHS and IEC 825 1 Wavelength for CD 784 nm for DVD 662 nm Handling t...

Page 6: ...copyrighted music and other sound products While certain reproduction and use of reproduced materials are permitted under applicable laws such reproduction and use without license may constitute copyright infringe ment and other violation of laws Since violation of such laws can have serious consequences you may wish to consult a legal expert about your planned use of this product This product inc...

Page 7: ...x balance and pan 57 Overdubbing 58 Punch in out 59 Manual punch in out 59 Auto punch in out 59 Using the Undo List 61 Switching virtual tracks 62 Saving the current song 63 Loading an existing song 64 7 Various types of playback 65 Using the locator 65 Using markers 67 Adjusting the position of a locate point or marker 68 Erasing a locate point or marker 69 Repeatedly playing a specific region th...

Page 8: ...name 145 Editing various settings for the song 146 Copying or deleting a song 147 Optimizing a song 148 Creating a tempo map 149 Importing data from an existing song 151 Backing up songs and sample libraries 152 Restoring songs or sample libraries 154 Exchanging Song Data With Other AW series Audio Workstations 155 14 MIDI and utility functions 157 What you can do using MIDI 157 Basic MIDI Setting...

Page 9: ...welve Tone Sys tems Inc ProTools is a trademark or registered trademark of Avid Technology Inc and affiliated companies Other company names and product names in this docu ment are the trademarks or registered trademarks of their respective owners http www yamahasynth com http www yamaha co jp manual english Produced data can be lost due to breakdown or mistaken operation We recommend that you stor...

Page 10: ...into the eject hole and push gen tly However pressing the eject switch will not eject the disc when the AW1600 is in the following states so do not use this method in such cases When the AW1600 s power is STANDBY When the disc is being accessed data is being read written or erased While in CD PLAY mode About the built in CD RW drive Even if a CD RW drive is operating normally it may fail a read or...

Page 11: ...rocedure 1 In the Work Navigate section located in the upper left of the top panel press the SONG key several times to access the fol lowing SHUTDOWN page 2 Press the ENTER key located in the mid dle right of the top panel A popup window will ask you whether you want to save the current song 3 Using the CURSOR keys located in the upper right of the top panel move the cursor the blinking area in th...

Page 12: ...AW1600 Owner s Manual 1 Before you start 12 ...

Page 13: ... to tracks switch the monitor signal and record with effects EQ and dynamics processing applied Four band EQ and dynamics processors on each channel Four band full parametric EQ and dynamics processing is provided on virtually every channel You can recall the desired preset from the library and use the panel knobs and keys to quickly adjust the settings Two high quality multi effect units are buil...

Page 14: ... functions are also pro vided The AW1600 also has a metronome that follows the tempo map Sound Clip function The Sound Clip function lets you record and play back an input signal without affecting the recorder tracks You can use this as a sketch for your ideas for a song or arrange ment Vocal Editing with Pitch Fix A Pitch Fix function is provided to allow precise adjust ment of the pitch of a voc...

Page 15: ...oints and the A B points and you can use the keys of the Locate section to move instantly to these points Independently of the locate points you can assign mark ers at desired locations within a song so that you will be able to find these locations quickly The AW1600 lets you set up to ninety nine markers 1 99 By using the keys of the Locate section you can move instantly to the previous or next m...

Page 16: ... track input channels and send them to recorder track inputs In the Quick Loop Sampler section you can assign stereo waveforms to the four pads and strike the pads to play them back These stereo waveforms are called samples The memories to which the samples are assigned are called sample banks and each pad provides four sample banks A D The AW1600 can realtime record and play back your strikes on ...

Page 17: ...erate C MONITOR PHONES knob This knob adjusts the level of the signal that is output from the MONITOR OUT jacks and the PHONES jack Parts of the AW1600 and what they do Top panel Locate section P 20 Transport section P 21 Data entry control section P 20 Selected Channel section P 19 Input output section P 17 Work Navigate section P 18 Quick Navigate section P 18 Display P 18 Mixer section P 19 Qui...

Page 18: ...TOR key This key accesses the MONITOR screen where you can quickly select the signal to be monitored or switch the stereo track playback on off This is a backlit liquid crystal display that indicates the current operating status or the settings of the various parameters The screens that are displayed will depend on the front panel keys and knobs that are operated 1 Access indicator This indicator ...

Page 19: ...l You can press this knob to access the DYN screen where you can adjust all of the dynamics settings C EFFECT 1 knob D EFFECT 2 knob Turning these knobs will adjust the amount of signal that is sent from the currently selected channel to the internal effects 1 and 2 i e effect send levels 1 and 2 You can press these knobs to access the EFF1 or EFF2 screens where you can adjust the parameters of th...

Page 20: ...e recording C REPEAT key This key switches the A B repeat function on off letting you repeatedly play a specified region D MARK SEARCH keys These keys search for markers placed within the song E IN OUT keys These keys specify the points at which auto punch in out recording will begin the In point and end the Out point These keys can also be used as locate keys to move directly to the In point or O...

Page 21: ...S phone plug type connectors Nominal input sensitiv ity can be adjusted from 46 dBu to 4 dBu Just about any type of balanced source can be connected here microphones direct boxes or the output from equipment with balanced line level outputs Unbalanced lines with standard phone plug connectors can be directly connected to the TRS inputs Connector wiring is as shown below B MIC LINE INPUT jack 8 Hi ...

Page 22: ...onnector to the computer before you power on the AW1600 Execute the following before turning the power to the AW1600 on off connecting disconnecting the USB cable or turning the USB Storage mode on off Close all application programs If the USB Storage mode is off make sure that data is not being transmitted from the AW1600 If the USB Storage mode is engaged make sure that reading and writing files...

Page 23: ... disc tray B Eject hole This hole allows you to open the disc tray manually C Access indicator This indicator will light while the CD inserted in the drive is being accessed When switching the power of the AW1600 between ON and STANDBY you must follow the Turning the power on off p 11 procedures described NOTE Use only the included AC adaptor PA 300 for this unit Using other types may be a fire an...

Page 24: ...n the main screen Cursor The blinking frame within the display is called the cursor When an object in the screen is enclosed by the cursor that object is selected for operations Buttons Buttons in the display are used to switch a parameter on off to select one of multiple choices or to exe cute a specific function A button that is currently on will be dis played in black with white text A button t...

Page 25: ...tems and functions 1 Text input box This box lets you input characters numerals and symbols When you save the data for the first time the box will con tain a default name You can input a scene library name or song name of up to twelve characters B Text palette This displays the characters numerals and symbols that can be input in the text input box C CANCEL button If you move the cursor to this bu...

Page 26: ...nges the depth of dynamics processing Turn the EFFECT 1 knob This adjusts the level of the signal that is sent from that channel to internal effect 1 If the stereo output channel is selected this adjusts the return level from internal effect 1 Turn the EFFECT 2 knob This adjusts the level of the signal that is sent from that channel to internal effect 2 If the stereo output channel is selected thi...

Page 27: ...to the input output jacks of the AW1600 B The AW1600 itself C The monitor system connected to the output jacks of the AW1600 After the opening screen the following screen will appear When you turn on the power of the AW1600 the last used song will be loaded automatically When you turn on the power of the AW1600 with the factory settings a blank song will be loaded so you can start recording immedi...

Page 28: ...is called the current song B SORT field These three buttons let you select how the songs in the list will be sorted Choose the NAME button sort alphabetically OLD button sort by save date or SIZE button sort by size 3 Turn the DATA JOG dial to select the song The_Only_One 4 Move the cursor to the LOAD button in the screen and press the ENTER key A popup window like the following will appear This w...

Page 29: ...OR PHONES knob and the volume of your monitor system are turned down 3 Press the PLAY key The demo song will begin playing and the level of each track channel will be displayed in the METER page of the VIEW screen 4 To adjust the monitor level appropriately use the AW1600 s MONITOR PHONES knob and the volume control of your moni tor system 5 To stop the song press the STOP key Playing the demo son...

Page 30: ...nt from the STE REO AUX OUT jacks or the MONITOR OUT jacks Signal flow during song playback Track channels 1 8 and 9 10 15 16 are directly controlled by the faders and TRACK SELECT keys of the panel Here s how you can adjust the mix level of each track channel and switch it on off while the song plays back Mixing the demo song Track 1 Track 2 Track 3 Track 4 Track 5 Track 6 Track 7 Track 8 Track 9...

Page 31: ... change as follows and track channels 1 and 3 will be muted At this time TRACK SEL keys 1 and 3 will go dark The graphic in the display will also indicate this 6 To cancel the muted state press the same TRACK SEL key you pressed in step 5 to make the indicator light green 7 If you want to monitor the playback of just a specific track access the MONITOR screen SOLO page by either repeatedly pressin...

Page 32: ... the other TRACK SEL keys and INPUT SEL keys will go dark 9 To cancel soloing press the currently selected TRACK SEL key lit orange once again Only one channel can be soloed at a time NOTE While playing the demo song the level or the on off status of a channel you adjusted manually may return to its previous setting This is because the Scene function has switched the state of the mixer settings an...

Page 33: ...c direct box or a guitar bass preamp that has a balanced output jack MIC LINE INPUT TRS phone jacks 1 8 These are TRS type balanced input jacks Use a 1 4 TRS phone female XLR cable to connect your mic direct box or a guitar bass preamp that has a balanced output jack Alternatively you can use a 1 4 phone 1 4 phone cable to connect an instrument with unbalanced output such as a synthesizer or rhyth...

Page 34: ...3 While you watch the level meter in the popup window produce sound on your instrument and turn the GAIN knob to adjust the input level As you turn the GAIN knob toward the right the level meter in the popup window will move more widely However you will not yet hear anything from your monitor system For the best audio quality adjust the level as high as possible without allowing the meter to clip ...

Page 35: ... the signal will be sent immediately before the stereo output channel fader EQ and dynamics cannot be applied to the playback of a sound clip Signal flow when using a sound clip Recording playing a sound clip REC SONG SCENE MUSIC PRODUCTION SYNTHESIZER Integrated Sampling Sequencer Real time External Control Surface Modular Synthesis Plug in System Mixer section Stereo bus Input channels Stereo ou...

Page 36: ...parate from the counter of a conventional song 5 Play your instrument in time with the metro nome 6 To stop recording press the STOP key The display will show S and E symbols to indicate the start point and end point Recording a sound clip 1 4 2 3 5 Recording and playback in the Recorder section cannot be performed while the CLIP screen is displayed NOTE The time signature of the metronome is dete...

Page 37: ...t which you began recording If the CLIP button is on this returns to the Start point REW key Rewinds the current location toward the beginning You will stop when you reach the location at which you began recording or the Start point FF key Fast forwards the current location You will stop when you reach the location at which you stopped recording or the End point STOP key Stops playback recording r...

Page 38: ...AW1600 Owner s Manual 38 4 Recording to a sound clip ...

Page 39: ... a popup window will appear allowing you to specify the items whose settings will be carried over from the current song You may choose one or more of the following items if desired SCENE button Scene memories LIBRARY button EQ dynamics effects and channel libraries TEMPO button Tempo map For example if you have saved effect settings in a library for the current song and would like to use these set...

Page 40: ...s as the number of input channels you use However this method has the advantage that you will be free to adjust the volume pan stereo position and tone of each instrument after it has been recorded If you move the cursor to the CANCEL button instead of the OK button and press the ENTER key you will return to the SONG screen LIST page without creating a new song You may also edit the song name late...

Page 41: ...to decide on the final volume pan and tone of each instrument at the time of recording You will not be able to adjust these independently after recording Bus recording Track 1 Track 2 Track 3 Track 4 Track 5 Track 6 Track 7 Track 8 L R bus Synthesizer rhythm machine Mixer section Input channels Stereo output channel MIC LINE INPUT jacks Recorder section The way in which you assign the input signal...

Page 42: ...his button and press the ENTER key input channels 1 8 will be connected to tracks 1 8 D 9 16 button If you move the cursor to this button and press the ENTER key input channels 1 8 will be connected to tracks 9 16 E SAFE button If you move the cursor to this button and press the ENTER key all connections will be cancelled 4 Press the INPUT SEL key for the input channel to which your instrument mic...

Page 43: ...lly being recorded and also lets you adjust the volume and tone of the monitor signal without affect ing the signal that is being recorded If the track channel fader for the recording destination track is set to the 0 dB position the monitor level dur ing recording will be the same as the playback level after recording You can also select a track by moving the cursor to the symbol of the desired t...

Page 44: ...L key for the corre sponding track channel and turn the PAN BAL knob of the Selected Channel section Track 1 Track 2 Track 3 Track 4 Track 5 Track 6 Track 7 Track 8 Mixer section Track channels Stereo output channel Recorder section from the input channels Stereo bus The pan setting of an input channel will have no effect if that input channel is assigned to a track by direct recording NOTE ...

Page 45: ... of the screen You can use this to adjust the master level of the L R bus 4 Press the INPUT SEL key for the input channel to which you connected your instrument or mic The current setting INPUT SEL key will light orange and that input channel will be selected for operations In the screen the symbol for the corresponding input channel will be highlighted and a line will appear indicating that this ...

Page 46: ...hannels to the L R bus 12To adjust the volume balance of each input channel repeatedly press the VIEW key in the Selected Channel section to access the FADER page When you want to set the volume balance of the input channels it is convenient to use the FADER page of the VIEW screen Here you can adjust the on off status and input levels for the input channels pad channels and track channels all in ...

Page 47: ...ss the SONG key or hold down the SONG key and use the CURSOR keys to access the TEMPO page The TEMPO page lets you create a tempo map that specifies the tempo and time signature of the song The tempo and time signature that you specify here will be the basis for the measure beat display counter the internal metronome and the MIDI clock messages generated by the AW1600 1 Tempo map events These are ...

Page 48: ...to the metronome knob and turn the DATA JOG dial to adjust the met ronome volume level 4 To stop recording press the STOP key I In point and O Out point symbols will appear in the track view of the VIEW page indicating the loca tion of the most recent recording operation The UNDO REDO key of the data entry control sec tion will light This indicates that you can press the UNDO REDO key to execute t...

Page 49: ...ACK y x x odd number y even number Copy the settings of input track channel y to x and pair them RESET BOTH Initialize both input track channels and pair them CANCEL Cancel pairing When input channels are paired all mix parameters other than the GAIN knob and phase pan settings will be linked When track channels are paired all mix parameters other than the phase pan settings will be paired Oper at...

Page 50: ...ll scroll upward or downward B RECALL button Move the cursor to this button and press the ENTER key to load the currently selected data C EXIT button Move the cursor to this button and press the ENTER key to close the popup window 4 Turn the DATA JOG dial to select the desired input library data The input library data is organized into the following categories 5 Select the desired data and press t...

Page 51: ...rary that you selected Turning the EFFECT 1 knob Adjusts the balance of direct sound and pro cessed sound for internal effect 1 Turning the EFFECT 2 knob Adjusts the balance of direct sound and pro cessed sound for internal effect 2 8 In the same way select input library set tings for the other input channels However a maximum of two input channels can use the internal effects at the same time Inp...

Page 52: ...a C EXIT button Move the cursor to this button and press the ENTER key to close the popup window 3 Turn the DATA JOG dial to select the library that you want to use and press the ENTER key A popup window will ask you to confirm the library recall operation 4 Move the cursor to the OK button and press the ENTER key The selected library will be loaded 5 Move the cursor to the EXIT button and press t...

Page 53: ...utton and press the ENTER key to close the popup window 3 Turn the DATA JOG dial to select the library that you want to use and press the ENTER key A popup window will ask you to confirm the library recall operation 4 Move the cursor to the OK button and press the ENTER key The selected dynamics library will be loaded 5 Move the cursor to the EXIT button and press the ENTER key 6 If you want to ad...

Page 54: ...AW1600 Owner s Manual 54 5 Track recording ...

Page 55: ...ram below shows the signal flow when you play back tracks 1 4 and overdub track 5 In this example the signal that is input from MIC LINE INPUT jack 1 is routed through recorder track 5 and sent to track channel 5 This signal is then sent to the stereo bus mixed with the play back sound of track channels 1 4 and output from the STEREO AUX OUT jacks and the MONI TOR OUT jacks PHONES jack Signal flow...

Page 56: ...u want to use a library The corresponding input channel will be selected for operations 2 In the Selected Channel section press down the EQ knob and turn it When you turn the EQ knob to left or right while pressing it the LIBRARY page of the EQ screen will appear 3 Turn the DATA JOG dial to select an EQ library Then move the cursor to the RECALL button and press the ENTER key The selected library ...

Page 57: ... channel for the recording destination track will send the input signal to the stereo bus while recording or stopped and will send the track playback signal to the stereo bus during playback This means that in order to monitor the input signal you must stop the recorder 4 Press the TRACK SEL key for the record ing destination track channel and use the PAN BAL knob of the Selected Channel section t...

Page 58: ...ill begin sounding and the counter display will advance 4 While monitoring the previously recorded tracks play the instrument that you want to overdub 5 To stop recording press the STOP key The UNDO REDO key in the data entry control section will light 6 To listen to the recorded performance from the beginning press the RTZ key to return the counter display to zero and press the PLAY key 7 If you ...

Page 59: ...ot be able to monitor the input signal 5 At the point where you want to begin recording hold down the PLAY key and press the REC key or press the foot switch once again and begin playing your instrument The recording destination track will switch from play back to recording punch in The recording source INPUT SEL key and the recording destination TRACK SEL key will light red and the signal of the ...

Page 60: ...n you reach the auto punch in point the REC key will light and recording will begin punch in C When you reach the auto punch out point the REC key will go dark recording will stop and you will return to playback mode punch out D When you reach the post roll point you will return to the pre roll point and stop 9 To check the newly recorded content press the AUTO PUNCH key to make it go dark and the...

Page 61: ...edit ing operation The current song is now in the state of the step that is highlighted The step enclosed by a dotted frame indicates the step to which the Undo function will return the song 2 Turn the DATA JOG dial to select a step number 3 Move the cursor to the OK button and press the ENTER key The current song will revert to the state of the step you selected 4 Move the cursor to the EXIT butt...

Page 62: ...symbol Of the virtual tracks that are currently not selected those that have been recorded are indicated by and those that have not yet been recorded are indicated as 2 Use the CURSOR keys to select the virtual track number that you want to assign to the desired track 3 Press the ENTER key The symbol will be displayed at the position of the newly selected virtual track This virtual track will now ...

Page 63: ... button When you move the cursor to this button and press the ENTER key the current song will be saved 2 Move the cursor to the SAVE button and press the ENTER key A popup window will ask you to confirm that you want to save the current song 3 To save the song move the cursor to the OK button and press the ENTER key If you move the cursor to the CANCEL button instead of the OK button and press the...

Page 64: ...TA JOG dial to select a song 3 Move the cursor to the LOAD button in the screen and press the ENTER key A popup window will ask you whether you want to save the current song 4 Move the cursor to either YES if you want to save the current song or NO if you do not want to save the current song and press the ENTER key The song you selected will be loaded Loading an existing song If you select NO all ...

Page 65: ... If you select SEC or T C as the counter display format the Start point will be the basis the zero point of the time and time code that are displayed This means that if you change the Start point the display will change as follows depending on the counter display format Relative zero point This locate point stores the relative zero position When you press the RTZ key in the transport section you w...

Page 66: ... song will move to that location and an icon will appear at the left side of the counter to indicate the currently selected locate point This icon will remain visible until you play or rewind fast forward past the previous or next locate point or marker location Locate points that you register are displayed in the TRACK screen VIEW page or PAD page as shown below In point A point Relative Zero poi...

Page 67: ...r press the key to locate to the next marker The song will move to that location and an icon will appear at the left of the counter to indicate the cur rently selected marker number This icon will remain visible until you play or rewind fast forward past the previous or next locate point or marker location Markers that you register are displayed in the TRACK screen VIEW page or PAD page as shown b...

Page 68: ...n the locate point The following table shows the display format for each locate point 3 Move the cursor to the locate point value that you want to adjust and turn the DATA JOG dial to change the value Only in the case of the Start point a Change START Position popup window will ask you for confirma tion when you attempt to change the value Move the cursor to the OK button and press the ENTER key a...

Page 69: ...That locate point will be erased and a message of LOCATE POINT ERASED will be displayed for a time You can erase a marker in one of two ways using key operations or in the screen To erase a marker using key operations locate to the marker that you want to erase Then hold down the CAN CEL key of the Locate section and press the MARK key The corresponding marker will be erased and a mes sage of MARK...

Page 70: ...B Repeat function will remain turned on When the A B Repeat function is on pressing the PLAY key will immediately resume repeat play back regardless of the current position 5 To cancel repeat playback press the REPEAT key The REPEAT key will go dark and the A B Repeat function will be cancelled If you cancel the A B Repeat function during repeat playback normal play back will occur from that point...

Page 71: ...he playback duration or the playback mode repeatedly press the Work Navigate section UTILITY key or hold down the UTILITY key and use the CURSOR keys to access the PRE FER page of the UTILITY screen 1 NUDGE MODE Specifies the region of sound before or after the cur rent location that will be played by the Nudge func tion B NUDGE TIME Specifies the duration of the region that will be played by the ...

Page 72: ...lue of this field indicates the level range of the waveform dis played in the WAVE DISPLAY popup window If you select 0 dB the top and bottom edges of the screen will correspond to the maximum level E LISTEN button If you move the cursor to this button and press the ENTER key the waveform in the display area of the WAVE DISPLAY popup window will be played once During playback the vertical line poi...

Page 73: ...d only and can not be used to store your own settings Sample library Sets of samples can be loaded from this library into the Quick Loop Sampler Channel library Major mix parameters can be loaded from this library into a channel On the AW1600 settings for the mix parame ters of all channels and the effect parameters etc can be stored in internal memory as a scene with the name you specify When you...

Page 74: ... scene to which you want to store the data Regardless of where the cursor is located turning the DATA JOG dial will scroll the list 3 Move the cursor to the STORE button and press the ENTER key The TITLE EDIT popup window will appear allowing you to assign a name to the data 4 Assign a name to the data as desired Then move the cursor to the OK button and press the ENTER key For details on how to a...

Page 75: ...d library or scene memory The illustration below shows an example of when you have selected the LIBRARY page of the EQ screen 2 Turn the DATA JOG dial to scroll the list so that the library data or scene you want to delete is enclosed by the dotted frame 3 Move the cursor to the CLEAR button and press the ENTER key A popup window will appear asking you to confirm the Delete operation 4 To execute ...

Page 76: ...osed by the dotted frame 3 Move the cursor to the TITLE button and press the ENTER key The TITLE EDIT popup window will appear 4 Assign a name to the data Then move the cursor to the OK button and press the ENTER key For details on assigning a name p 25 The edited name will be finalized Naming library or scene data The input library and mastering library and the EQ dynamics or effect libraries acc...

Page 77: ...ific input channel If effects 1 and 2 are already inserted into specific input channels 3 Move the cursor to the EFF1 or EFF2 button and press the ENTER key The corresponding internal effect will be inserted into the input channel and the INPUT LIBRARY popup window will appear 1 EXIT button Closes the popup window and returns to the previous INPUT SETTING popup window From this library you can rec...

Page 78: ...p window To do so move the cursor to the EFF1 or EFF2 button in the window and press the ENTER key This library contains settings used to apply EQ and dynamics processing to the stereo output channel during mixdown It contains EQ and dynamics settings suitable for processing the final mix All library numbers 00 13 are read only and 00 is data for initializing the stereo out put channel 1 Repeatedl...

Page 79: ...ns the following parameters Channel on off Attenuator EQ on off EQ parameter settings Dynamics processor on off Dynamics processor parameter settings Fader position Aux buses 1 2 pre fader post fader setting Send levels to Aux buses 1 2 Effect buses 1 2 pre fader post fader setting Send levels to effect buses 1 2 Repeatedly press the Selected Channel section VIEW key or hold down the VIEW key and ...

Page 80: ...Track channel 1 8 and 9 10 15 16 faders B ENABLE DISABLE button This button switches Fader Recall Safe between ENABLE and DISABLE states Move the cursor to this button and press the ENTER key to switch the display between ENABLE and DISABLE C CH RECALL SAFE Selects the channel s for which Recall Safe will be enabled Mix parameters of the selected channel s will not change even when another scene i...

Page 81: ...ng The contents of the stereo track can be used without further processing as material to create an audio CD The diagram below shows the signal flow during mix down The playback of each track is sent to the stereo bus passes through the stereo output channel and is recorded on the stereo track At this time you also add the signals from pad channels 1 4 and input channels 1 8 Signal flow during mix...

Page 82: ...ion is one or two vacant tracks This diagram shows an example in which the track 1 8 signals are bounced to tracks 9 10 After bouncing you can switch the virtual tracks for tracks 1 8 and use these tracks to record other instrumental performances Signal flow during bouncing The Pitch Fix function can be used to edit and correct the pitch and other properties of vocal tracks Pitch Fix is dif ferent...

Page 83: ...d channels 1 4 TRACK 1 16 Track channels 1 16 3 Use the INPUT SEL keys TRACK SEL keys and pad keys 1 4 to select the chan nels that you want to send to the stereo bus The screen will change as follows each time you press a key or pad repeatedly 4 If you want to use the mastering library move the cursor to the LIBRARY button and press the ENTER key The MASTERING LIBRARY popup window will appear Tur...

Page 84: ...y back the song raise the track channel faders to an appropriate level If necessary adjust the EQ and dynamics of each track channel You can adjust the track channel EQ dynamics in a similar way as for the input channels press a TRACK SEL key to select a track channel and use the Selected Channel section EQ knob and DYN knob 1 2 3 Track channels 9 10 15 16 and pad channels 1 4 always function as p...

Page 85: ...section via send return Here s how to load an effect library into internal effect 1 and adjust the level effect send level of the signal that is sent from each channel via effect bus 1 to internal effect 1 1 Repeatedly press the EFFECT 1 knob or hold down the EFFECT 1 knob and use the CURSOR keys to access the LIBRARY page of the EFF1 screen 2 Select the effect library that you want to use and loa...

Page 86: ...an temporarily switch the PEAK button off This setting is shared with the METER page of the VIEW screen B PRE POST button This selects whether the level meters of the BUS page will indicate the pre fader level PRE or the post fader level POST This setting is independent from the METER page of the VIEW screen C AUX D EFF E BUS Use these faders to adjust the master levels of AUX buses 1 2 effect bus...

Page 87: ... this area markers and the presence or absence of track data are displayed graphically D PRE POST buttons These buttons select whether the level meter in the ST TRACK page will indicate the pre fader level PRE or the post fader level POST This setting is shared with the BUS page of the VIEW screen E Level meter This indicates the output level of the stereo track 6 Switch the ST TRACK ON OFF button...

Page 88: ... a vocal track p 89 3 In the upper TRACK area select a bounce source track move the cursor to the symbol for that track and press the ENTER key Each time you press the ENTER key the screen will change as fol lows 4 Select other bounce source tracks in the same way 5 Use the TRACK SEL keys to select a bounce destination track The TRACK SEL key will blink red indicates that the corresponding track i...

Page 89: ... up the Auto Punch in out function can be found in steps 1 through 7 under Auto punch in out on page 59 2 In the Quick Navigate section repeatedly press the RECORD key or hold down the RECORD key and use the CURSOR keys to access the BOUNCE page of the RECORD screen If you select an unpaired track the pan of the track channel will be at the center position If you select paired tracks the pan of ad...

Page 90: ...the pitch by speci fying a scale from the keyboard on the display F TYPE Sets this to an appropriate value to maximize the accu racy of the pitch change of the original signal Gener ally this should be set to Normal however for low vocals set this to Male and for high vocals set it to Female G DETECT This determines the time resolution for pitch change The shorter the setting the more quickly the ...

Page 91: ...you want to create a chorus part set the CTRL parameter to NOTE 11When the end of the song is reached stop the song and press the RTZ key to rewind 12Move the cursor to the EXIT button and press ENTER A popup window will appear asking you to confirm that it s OK to exit from the PITCH FIX mode 13To return to the BOUNCE page move the cursor to the OK button and press the ENTER key The PITCH FIX mod...

Page 92: ...d turn the DATA JOG dial to adjust the pan setting 5 In the Selected Channel section repeatedly press the VIEW key or hold down the VIEW key and use the CURSOR keys to access the FADER page of the VIEW screen In the FADER page of the VIEW screen you can use on screen faders to adjust the faders input level of each channel 1 ON OFF buttons These buttons switch each channel on off B Faders These fad...

Page 93: ...want to see all mix parameters for a certain channel in a single screen To do this repeatedly press the Selected Channel section VIEW key or hold down the VIEW key and use the CURSOR keys to access the CH VIEW page of the VIEW screen Some items can also be edited from this page The display in the CH VIEW page will change depending on the currently selected channel shown in the upper left of the sc...

Page 94: ...rs EQ dynamics pan etc of a chan nel can be reset to their default settings in a single opera tion This function lets you start mixdown or bounce operations with the track channels zeroed and provides an easy way to reset the levels back to the nominal setting if you can no longer hear any sound 1 In the Quick Navigate section repeatedly press the MONITOR key or hold down the MONITOR key and use t...

Page 95: ...range of 18 0 dB to 18 0 dB 4 Move the cursor to the parameter that you want to edit and use the DATA JOG dial to adjust the value 5 To switch the LOW band type move the cur sor to the LOW band Q knob and turn the DATA JOG dial toward the left With the default EQ settings the LOW band is a shelv ing type The value field for the Q knob will indicate L SHL If you turn the Q knob toward the left the ...

Page 96: ...UX2 The signal immediately before the master send level of the AUX 2 bus E GR Gain Reduction Indicates the amount of gain reduction produced by the dynamics processor in a range of 18 dB to 0 dB F Output meter Indicates the level of the signal after it has passed through the dynamics processor G Parameters Here you can edit the parameters of the dynamics pro cessor The type of parameters and their...

Page 97: ...esses the return signal can also be edited in this page As an example here s how you can edit the settings of internal effect 1 internally connected via send return 1 For internal effect 1 recall an effect library that uses the desired effect type You cannot change the effect type e g reverb delay in the EDIT page You must first recall library settings that use the desired type 2 In the Selected C...

Page 98: ... tion via send return you can repeatedly press the CURSOR key to access the mix parameters of the return channel The following pages are the same for all effect types 1 EFF2SEND Adjusts the level at which the signal is sent from the return channel to the other internal effect B AUX1SEND C AUX2SEND These adjust the send level of the signal that is sent from the return channel to AUX buses 1 2 D EFF...

Page 99: ...nsert an effect into a track channel or pad chan nel As an example here s how to insert internal effect 1 into a track channel for use during mixdown or bouncing 1 In the Selected Channel section repeatedly press the EFFECT 1 knob or hold down the EFFECT 1 knob and use the CURSOR keys to access the SEND page of the EFF1 screen 2 Move the cursor to the EFF INSERT field of the track channel into whi...

Page 100: ...you insert an internal effect into a channel the SEND page of the EFF1 screen will no longer show return channel pages 1 4 To adjust the balance between the original sound and the effect sound use the MIX BAL parameter that is shown in the last parameter page NOTE You can also insert an effect by using the effect insert field in the CH VIEW page of the VIEW screen p 94 HINT ...

Page 101: ... can be written is approximately 74 minutes for 650 MB media or approximately 80 minutes for 700 MB media The CD RW drive of the AW1600 can use two types of media CD R which lets you record and add data and CD RW which lets you erase previously recorded data and rewrite it Each type of media has the following characteristics CD R You can write data to this media and add additional data later You c...

Page 102: ...stop until all data has been written there will be no gap between the tracks When using Disc At Once to write a CD you can use the start point end point and markers that were assigned within the AW1600 song to divide a single continuous song into multiple tracks for writing For example this is convenient when you have recorded a live performance as a single song and want to assign track numbers wh...

Page 103: ...u can select either x8 eight times as fast as audio playback or x4 four times as fast as audio playback Normally you should use x8 and drop down to x4 if errors occur during writing 3 Use the TEST button and WRITE button to select the writing operation s The TEST button and WRITE button specify whether a writing test and or the actual writing operation will be performed The combination of buttons ...

Page 104: ...n the drive move the cursor to the TRACK AT ONCE button and press the ENTER key A display like the following will appear 1 Song list This is a list of the songs containing stereo tracks that will be written to the CD R RW media The line enclosed by a dotted frame is currently selected for operations If no songs have been registered this will indicate NO TRACK If audio data has already been written...

Page 105: ...d press the ENTER key This completes the writing process When you turn the DATA JOG dial you will see only songs for which the current stereo track contains data Songs with a stereo track shorter than four seconds will not be displayed NOTE When you move the cursor to the NEW button and press the ENTER key a new song will be added at the end of the existing songs By using the INS button instead of...

Page 106: ...perations If no songs have been registered this will indicate NO TRACK B MARKER button For each stereo track this enables or disables the markers that have been set within that song When you move the cursor to this button and press the ENTER key the start pint end point and markers within the currently selected stereo track will be enabled A flag icon will appear at the left of the list If markers...

Page 107: ... CAN CEL button and press the ENTER key to exit the writing process When you turn the DATA JOG dial you will see only songs for which the current stereo track contains data Songs with a stereo track shorter than four seconds will not be displayed NOTE Markers can be enabled disabled independently for each song When you use markers to divide a stereo track the location of the divisions will be spec...

Page 108: ...the content that has been written to that CD R RW media Already recorded tracks will be dis played as EXIST 4 Move the cursor to the FINALIZE button and press the ENTER key A popup window will ask you to confirm the finalize operation 5 To finalize the disc move the cursor to the OK button and press the ENTER key If you decide not to finalize the disc move the cursor to the CANCEL button and press...

Page 109: ...ethod it will take only a short time to erase the CD RW media PERFECTLY button All data written to the CD RW media will be erased completely Since this method erases all data from the media it will take a longer time than SIMPLY Move the cursor to the desired button and press the ENTER key A popup window will ask you to con firm the erasure If you turn on the SIMPLY button If you turn on the PERFE...

Page 110: ... on and the CD track data will be read 4 To play the CD tracks press the PLAY key To stop press the STOP key During playback the audio output of the CD RW drive will be sent directly to the stereo output channel Use the STEREO fader to adjust the volume When the CD Play function is on the keys of the transport section will have the following functions 5 To exit the CD Play function move the cur so...

Page 111: ...When you strike a pad 1 4 the assigned sample will be sent via pad channel 1 4 to the stereo bus For each pad channel you can adjust the EQ dynamics and effects 1 2 send levels just as you can for the track channels or input channels Signal flow when using the Quick Loop Sampler You can load samples into the pads from the sample library a library for the Quick Loop Sampler load a por tion of an au...

Page 112: ...yback timing of each segment according to the tempo of the song By using the Slice function you can change only the tempo of a phrase without affecting its pitch For example a sampled drum pattern can be played back at the tempo specified by the song s tempo map For details on using the Slice function p 124 Pad lit Pad dark Pad lit Pad dark Pad lit Pad dark Pad lit Pad dark Original sample ONE SHO...

Page 113: ...dited G PROTECT button Move the cursor to this button and press the ENTER key to switch the Protect setting on off for the library selected in the list A lock icon will be displayed to indicate a library that is protected and it will not be possible to edit or delete this library H NEW button This button creates a new library on the hard disk 2 Move the cursor into the list and turn the DATA JOG d...

Page 114: ...ys when you press it However if no sample is assigned nothing will play and the pad will not light You can either assign a sample to the pad or switch the sample bank If the pad lights when you strike a pad but you hear no sound access the METER page of the VIEW screen and check whether the meter of the corresponding pad channel P1 P4 is moving p 93 If the meter moves when you strike a pad make su...

Page 115: ...ltime 7 To stop recording press the STOP key The recorder will stop 8 To play back the events that were recorded on the pad tracks move the cursor to the track status button and press the ENTER key several times to switch the display to 9 Locate to the point from which you want to start playing back and press the PLAY key The pad track s will play back in synchronization with the recorder If you w...

Page 116: ...ave the following meanings Measure in which a pad event is already recorded Measure in which a pad event has been recorded via grid recording Blank Measure in which no pad event is recorded 3 To enter a pad event move the cursor to the measure on the grid for which you want to enter the event then press the appropriate pad will appear on the grid at the corresponding mea sure and pad track 4 Press...

Page 117: ...d the AW1600 will begin reading the CD that is inserted in the CD RW drive Depending on the source from which data is read the screen will change as follows When importing from an audio CD CD Extra 1 From CD TRACK Specifies the number 01 99 of the audio track that will be imported from the source CD B From Start Specifies the starting location of the data that will be imported in units of minutes ...

Page 118: ...reen and press the ENTER key 6 If you are importing from an audio CD or CD Extra use the From Start From End fields to specify the region that you want to import 7 Use the To PAD and To BANK fields to spec ify the pad sample bank into which the data will be imported 8 When you have finished specifying the data to be imported move the cursor to the EXEC button and press the ENTER key A popup window...

Page 119: ...the From Start and From End fields and turn the DATA JOG dial to specify the start and end of the region that will be imported The units by which you specify the location will depend on the current counter display method For details on the counter display refer to page 146 6 Move the cursor to theTo PAD andTo BANK fields and turn the DATA JOG dial to specify the pad number and sample bank into whi...

Page 120: ...b folders within the Transport folder can also be used For details see Transferring WAV Files To and From a Computer on page 137 3 Use the To PAD and To BANK fields to spec ify the pad sample bank into which the data will be imported 4 When you have finished specifying the data to be imported move the cursor to the EXEC button and press the ENTER key A popup window will appear asking you to confir...

Page 121: ... is assigned to the currently selected sample bank C NAME button Opens the TITLE EDIT popup window where you can edit the name of the sample 2 Move the cursor to the Bank field and turn the DATA JOG dial to select the sample bank whose name you want to edit The sample name is displayed at the right 3 Move the cursor to the NAME button and press the ENTER key The TITLE EDIT popup window will appear...

Page 122: ... from the left edge of the screen to the right edge will corre spond to one second If you select SAMPLE the dis play will be at maximum magnification and each pixel in the horizontal direction will correspond to one sample 1 44 100 second F AMP Specifies the range of levels that will be displayed for the waveform If you select 0 dB the top and bottom edges of the screen will be the maximum level G...

Page 123: ...ecify how the sample assigned to the pad will play back ONE SHOT The playback region of the sam ple will be played only once LOOP The playback region will be played repeatedly B Trigger Gate Selects one of the following two types of operation for when the pad is pressed GATE The sample will play only while you hold down the pad TRIGGER The sample will play to the end when you press the pad once 3 ...

Page 124: ...select one of the following as the slice setting OFF The Slice function will not be used 8 The playback region of the sample will be divided into eight equal seg ments 12 The playback region of the sample will be divided into twelve equal seg ments 16 The playback region of the sample will be divided into sixteen equal segments 4 Move the cursor to the MONITOR TEMPO field and turn the DATA JOG dia...

Page 125: ... result if there is too great a difference between the tempo of the sample and the tempo of the current song 6 Repeatedly press the TRACK key or hold down the TRACK key and use the CUR SOR keys to access the VIEW page of the TRACK screen 7 Play back the song and press the pad for which you turned the Slice function on The phrase of the sample assigned to the pad will play in synchronization with t...

Page 126: ... Erases the specified sample H EXTRACT button Discards the unused portions before the start point and after the end point of the specified sample 2 Move the cursor to the PAD BANK fields and turn the DATA JOG dial to select the pad and sample bank The procedure after this point will depend on the function that you want to execute 1 To erase the entire selected sample move the cursor to the ERASE b...

Page 127: ...n of a specific track For example this provides a convenient way to erase a few wrong notes from a perfor mance or to eliminate noise that occurred while an instru ment was not playing B Change the structure of the tracks You can use the EXCHANGE command to exchange an entire track with another track By using this command you can bring tracks of widely separated track numbers closer to each other ...

Page 128: ...the one shown below will appear if you choose the ERASE com mand After you choose an editing command the next step is to specify the track s that will be edited 3 To select the track for editing move the cur sor to the TR Track field in the lower left of the EDIT screen and turn the DATA JOG dial For any command the TR Track field will appear in the lower left of the screen allowing you to select ...

Page 129: ...8 Move the cursor to the OK button to exe cute the command or move the cursor to the CANCEL button to cancel without exe cuting Then press the ENTER key Specify the editing region Start parameter beginning of the region to be edited End parameter end of the region to be edited If you move the cursor to the Start or End parameter and press the ENTER key the current counter location will be input Al...

Page 130: ...SE Start End If you select the pad track of a pad that is set to one shot mode all pad events whose attack falls within the Start End region will be erased NOTE Parameter Range Explanation 1 TR 1 16 A single audio track 7 2 15 16 A pair of adjacent odd numbered even numbered audio tracks ST The stereo track PAD A single pad track ALL Tracks 1 16 Pad tracks 1 4 2 V TR 1 1 2 V TR can be selected onl...

Page 131: ...w ing the location of the Start parameter will be moved backward to make room For an audio track For a pad track loop For a pad track one shot The parameters are the same as for the ERASE command However instead of 5 End use 5 Size to specify the region that will be inserted DELETE 5 4 1 23 DELETE Start End 1 2 3 4 5 6 7 8 1 2 3 7 8 DELETE End Start DELETE Start End If you select the pad track of ...

Page 132: ...dd numbered even numbered audio tracks ST The stereo track PAD A single pad track ALL OVER Tracks 1 16 Pad tracks 1 4 overwrite onto the copy destina tion ALL INS Tracks 1 16 Pad tracks 1 4 insert into the copy destination 2 From V TR 1 1 2 From V TR and 9 To V TR can be selected only if From TR 1 16 1 2 15 16 or ST 1 8 Copy source virtual track number 3 From PAD 2 2 3 From PAD and J To PAD can be...

Page 133: ...e fixed and cannot be modified In this state if you use the counter display format field to specify the From Start and From End locations and execute the copy the location you specified in the measure display format field will be aligned with the copy destination To Start setting When measure lock on 4 The possible choices for 8 To TR copy destination track will depend on your selection for 1 From...

Page 134: ...lphanumeric characters Exchange destination virtual track name display only EXCHANGE 4 6 5 1 2 3 EXCHANGE From Track To Track From Track To Track 1 2 3 4 5 6 A B C D E F 1 2 3 4 5 6 A B C D E F Parameter list The track names will not be exchanged NOTE Parameter Range Explanation 1 From TR 1 16 A single audio track 1 2 15 16 A pair of adjacent odd numbered even numbered audio tracks ST The stereo t...

Page 135: ...e track to the end of the last region on the track and sections of the track that contained no regions are replaced with audio silence Parameter Range Explanation 1 From TR 1 16 A single audio track 1 2 15 16 A pair of adjacent odd numbered even numbered audio tracks ST The stereo track 2 From V TR 1 8 Virtual track number 3 From Start Specify a point Beginning of the edited region 4 From End Spec...

Page 136: ...Song Folder Organiza tion on page 144 for information on how the folders are organized The WAV files corresponding to the audio tracks you want to transfer to a computer must first be exported to the Transport folder on the internal hard disk drive Once these files have been transferred to the computer they can be edited using appropriate waveform editing software or imported into a DAW applicatio...

Page 137: ...B cable and copy the WAV files that have been exported to the Transport folder to the computer or copy files from the computer to the Transport folder It is also possible to directly access and edit audio data using waveform editing software and backup complete songs to the computer 1 Make sure that your computer meets the following requirements OS Windows XP Professional Home Edition SP1 or highe...

Page 138: ...all AW1600 windows In the case of Windows XP Click the Safely Remove Hardware icon in the task bar and remove the corresponding two USB mass storage devices In the case of Mac OSX Drag the AW1600 1 and AW1600 2 icons from the desktop to the trash If the windows shown above do not appear choose to display the AW1600 1 and AW1600 2 drives from the Windows Start My Computer menu NOTE If the icons are...

Page 139: ...r the WAV file selected for importing is monaural M or stereo S This field is for display only and cannot be changed C Size Indicates the playback length in msec of the WAV file selected for importing This field is for display only and cannot be changed D LISTEN button You can move the cursor to this button and press the ENTER key to repeatedly hear the currently selected WAV file E To TR Selects ...

Page 140: ... p 6 and if you accept these terms move the cursor to the OK button and press the ENTER key The button display will change from OFF to ON and digital recording and importing from a CD will be enabled 4 Insert a CD into the CD RW drive You can import data from the following types of media Audio data CD DA Audio CD CD Extra only the first session of CD DA Mixed Mode CD only CD DA data of the second ...

Page 141: ...ction of the button displayed here will change depending on the item that is selected by the From WAVE file parameter If a WAV file is selected The LISTEN button will be displayed allowing you to hear the WAV file repeatedly If a folder in the same level is selected The ENTER button will be displayed allowing you to move into that folder If the next higher folder is selected The UP button will be ...

Page 142: ...NTER key A popup window will ask you to confirm the opera tion 11To execute the import operation move the cursor to the OK button and press the ENTER key Importing will begin If you move the cursor to the CANCEL button and press the ENTER key import ing will be cancelled Even after you press the ENTER key you can press the UNDO REDO key to return to the state prior to importing as long as you have...

Page 143: ...he audio data TheAW1600 allows the bit depth of individual songs to be set to either 16 or 24 bits 24 bit songs are capable of pro viding higher audio quality than 16 bit songs but the fol lowing limitations on the number of simultaneous record playback tracks apply For mixdown the number of simultaneous record tracks is two and the number of simultaneous playback tracks is 16 for 16 bit songs or ...

Page 144: ...ngs Library settings excluding the sample library REMOTE screen settings Pad track event data Audio Folder The following song audio data is saved in WAV file for mat File names are automatically created in the order of recording as in 0 WAV 1 WAV 2 WAV etc 24 bit song data is saved as 32 bit WAV files 16 2 stereo track audio x 8 virtual tracks Quick loop sampler sample data Sound clip audio data A...

Page 145: ...the NAME button and press the ENTER key The TITLE EDIT popup window will appear allowing you to edit the song name 4 Input the new name Then move the cursor to the OK button and press the ENTER key The new name will be applied and the popup window will close For details on inputting a name p 25 For 24 bit songs the audio data contained in the Audio folders is stored in 32 bit WAV format If your wa...

Page 146: ... location in hours minutes seconds milliseconds with the Start point as 0 T C Display the current location in time code hours minutes seconds frames with the Start point as 0 REMAIN When this button is on the remaining recordable time with the selected num ber of recording tracks will be displayed instead of the current location 5 To change the time code frame rate move the cursor to one of the bu...

Page 147: ...n and press the ENTER key the copy operation will be cancelled 4 Following step 3 move the cursor to the DELETE button and press the ENTER key A popup window will ask you to confirm the delete operation 5 To delete the song move the cursor to the OK button and press the ENTER key The song you selected in step 3 will be deleted and you will return to step 2 If you move the cursor to the CANCEL butt...

Page 148: ... 3 Move the cursor to the OPTIMZ button and press the ENTER key A popup window will ask you to confirm the optimize operation 4 To execute the optimize operation move the cursor to the OK button and press the ENTER key The undo redo audio data and unused sample data of the song you selected in step 2 will be deleted and you will return to step 1 If you decide not to execute the optimize operation ...

Page 149: ...is button and pressing the ENTER key you can move the song to the location of the tempo map event currently selected in the list C DELETE button To delete the tempo map event currently selected in the list move the cursor to this button and press the ENTER key D INSERT button To insert a blank event at the step preceding the tempo map event currently selected in the list move the cur sor to this b...

Page 150: ...from the tempo map However you cannot delete the event that is located at the beginning of the song 1 Access the TEMPO page and scroll the list to select the tempo map event that you want to delete 2 Move the cursor to the DELETE button and press the ENTER key The selected event will be deleted Event Range Content METER 1 4 to 8 4 Specifies the time signature of the song TEMPO 30 0 to 250 0 Specif...

Page 151: ... the song you have selected as the import source 4 Move the cursor to either the LIBRARY SCENE or TEMPO MAP button and press the ENTER key A popup window will ask you to confirm the import operation 5 To execute the import move the cursor to the OK button and press the ENTER key Importing will begin When the data has been imported you will return to the screen of step 2 4 Move the cursor to the TR...

Page 152: ... and use the CURSOR keys to access the BACKUP page In this page you can back up songs or sample libraries from the internal hard disk to CD R RW media This page contains the following items 1 List This area lists the songs or sample libraries that are saved on the hard disk The symbols at the right of the list indicate whether an item of data has been selected or disabled for backup B PAD button W...

Page 153: ...e progress When the backup has been completed you will return to step 3 If the backup data does not fit on a single volume of media a message of Number Ejected Media Insert Blank Media will appear and the media will be ejected Insert a new volume of media Then move the cursor to the OK button and press the ENTER key If you turn on the NAME or OLD button the data in the list will be sorted alphabet...

Page 154: ... You can use this button to select all the data that appears in the list If you turn this button on and then turn the ENABLE DISABLE button on all data dis played in the list will be selected for restore D ENABLE DISABLE button Selects whether an item of data will be selected for restore ENABLE or not selected DISABLE E SYSTEM button Selects the system data AW1600 settings you make in the UTILITY ...

Page 155: ...ion press the CD key The CD screen will appear 3 Repeatedly press the CD key or hold down the CD key and use the CURSOR keys to access the RESTORE page 4 Make sure that the cursor is located at the READ CD INFO button and press the ENTER key Data will be read from the inserted CD R RW media When the data has been read a screen like the follow ing will appear When a song or sample library with the ...

Page 156: ...s songs that you want to restore 8 To execute the restore operation move the cursor to the EXECUTE button and press the ENTER key The restore operation will begin While the song data is being loaded a popup window will indicate the progress The list will show all the songs that were backed up to CD R RW media but you can execute the restore operation only for 44 1 kHz 16 bit songs NOTE When a song...

Page 157: ...ssages program changes or control changes can be transmitted to an external device If you record these messages on a MIDI sequencer that is synchronized to the AW1600 song these scene recall operations or realtime mix parameter operations can be reproduced whenever you want Example of recording playing scene selections and mix parameter operations on a MIDI sequencer computer MIDI Remote MIDI Remo...

Page 158: ...via USB output port 2 and MIDI messages received via USB connector input port 2 are retransmitted via the MIDI OUT THRU connector USB 1 USB 2 MIDI messages received via the USB con nector input port 1 are retransmitted via USB output port 2 and MIDI messages received via USB connector input port 2 are retrans mitted via the USB connector output port 1 No THRU settings In the MIDI 2 page of the UTI...

Page 159: ...eliable 1 This setting allows more tolerance of MTC instability than the 0 setting 2 This setting allows the maximum tolerance Use this setting if the MTC master is an external MIDI device that has significant instability F OFST Offset When using the AW1600 as an MTC slave this parameter shifts the absolute time within the AW1600 forward or backward relative to the incoming MTC The range is 24 00 ...

Page 160: ...or received 1 Control changes will be transmitted and received on MIDI channels 1 16 MIDI channels 1 16 will correspond to AW1600 track channels 1 16 2 Control changes will be transmitted and received only on the MIDI channel that is selected in the MIDI CH field This mapping is compatible with the other AW series 3 This is the same as 2 in that control changes of only one MIDI channel are receive...

Page 161: ... CHANNEL PAD 4 56 NO ASSIGN 57 NO ASSIGN 58 NO ASSIGN 59 NO ASSIGN 60 NO ASSIGN 61 NO ASSIGN 62 NO ASSIGN 63 ON MASTER STEREO OUT 64 PAN CHANNEL INPUT 1 65 PAN CHANNEL INPUT 2 66 PAN CHANNEL INPUT 3 67 PAN CHANNEL INPUT 4 68 PAN CHANNEL INPUT 5 69 PAN CHANNEL INPUT 6 70 PAN CHANNEL INPUT 7 71 PAN CHANNEL INPUT 8 72 PAN CHANNEL PAD 1 L 73 PAN CHANNEL PAD 1 R 74 PAN CHANNEL PAD 2 L 75 PAN CHANNEL PA...

Page 162: ...55 ON CHANNEL TRACK 15 56 ON CHANNEL TRACK 16 57 NO ASSIGN 58 NO ASSIGN 59 NO ASSIGN 60 NO ASSIGN 61 NO ASSIGN 62 NO ASSIGN 63 ON MASTER STEREO OUT 64 PAN CHANNEL TRACK 1 65 PAN CHANNEL TRACK 2 66 PAN CHANNEL TRACK 3 67 PAN CHANNEL TRACK 4 68 PAN CHANNEL TRACK 5 69 PAN CHANNEL TRACK 6 70 PAN CHANNEL TRACK 7 71 PAN CHANNEL TRACK 8 72 PAN CHANNEL TRACK 9 73 PAN CHANNEL TRACK 10 74 PAN CHANNEL TRACK ...

Page 163: ...ify that a MIDI message with a fixed value is transmitted only when you press the TRACK SEL key to turn it on lit For example if you assign program change 1 the program change of that number will be transmitted each time you turn on the TRACK SEL key The PRESET page of the REMOTE screen provides ten different MIDI Remote presets These presets have been created with specific devices and computer se...

Page 164: ...changes CC 07 05 Volume Use this preset to control the volume of an external tone generator TRACK SEL key operations will transmit Volume control change messages CC 07 When you turn a TRACK SEL key off dark volume 0 will be transmitted When you turn a TRACK SEL key on lit green the volume value corresponding to the fader position will be transmitted When a TRACK SEL key is on operating the fader w...

Page 165: ...while using the MIDI Remote function B Selected channel Indicates the name of the channel that is currently selected for operations C Fader TRACK SEL key function name Displays the name that is assigned to the currently dis played fader or TRACK SEL key D NAME button Edits the name that is assigned to the fader TRACK SEL key Move the cursor to the button and press the ENTER key and the TITLE EDIT ...

Page 166: ...nly Indicates the on off status of the TRACK SEL key The byte you specify as SW will be transmitted as 7F hexadecimal when the key is turned on or 00 hexadecimal when the key is turned off FAD Indicates the current position of the fader If the message is assigned to a fader the byte you specify as FAD will be transmit ted as a value of 00 7F hexadecimal corresponding to the fader position when you...

Page 167: ...mmediately be sent to the specified bus Use the 3 6 buttons to specify the bus to which the signal will be sent B LEVEL knob Adjusts the output level of the oscillator C AUX 1 2 buttons Send the oscillator output to AUX buses 1 2 D EFF 1 2 buttons Send the oscillator output to effect buses 1 2 E BUS L R button Sends the oscillator output to the L R bus F ST L R button Sends the oscillator output t...

Page 168: ...rting of digital audio data will be enabled D VARI PITCH ON OFF button Selects whether the sampling frequency will be adjustable Vari pitch function when DIGITAL IN PATCH is set to DISABLE If you turn this button on vari pitch will be enabled and you can use the VARI PITCH knob to adjust the sampling frequency E VARI PITCH knob Adjusts the sampling frequency of the current song in a range of 5 97 ...

Page 169: ... scene library B RECALL CONFIRM ON OFF button Specifies whether a popup window will ask you to confirm the operation when you recall a scene or library C D OUT COPYRIGHT ON OFF button Specifies whether SCMS Serial Copy Management Sys tem copy protect flags will be written into the digital sig nal that is output from the DIGITAL STEREO OUT jack Protect is enabled if the button is on and disabled if...

Page 170: ...will be played repeatedly by the Nudge function The nudge time can be set in a range of 25 800 ms in 1 ms millisecond steps H SOUND CLIP TIME Selects the recording time for the Sound Clip function This can be set in a range of 30 sec 180 sec in 30 sec second steps I PREROLL TIME Specifies the duration preroll time that will be played back before the punch in point when you use Auto Punch in This c...

Page 171: ...etails on the device numbers that your work station synth can use refer to its owner s manual 5 In the Work Navigate section use the SONG key to access the SETUP page of the SONG screen and select a frame rate in the TIME CODE BASE area 6 Set your workstation synth to function as MMC master and MTC slave and set its MMC device number and MTC frame rate to the same settings as the AW1600 For detail...

Page 172: ...er to record ready mode For details on how to make these settings refer to the manual for your workstation synth 5 Play back the AW1600 song from the begin ning When the AW1600 begins playing it will transmit a Start message and MIDI Clock messages to the sequencer and the sequencer will begin running in synchronization with the AW1600 6 Operate the AW1600 s mix parameters such as fader and pan Th...

Page 173: ...assign the desired scenes to other program change numbers 1 Connect the AW1600 and your workstation synth as shown in the diagram below 2 In the Work Navigate section use the UTIL ITY key to access the MIDI 2 page of the UTILITY screen 3 Set the PGM CHG MODE field to RX With this setting the AW1600 will receive program changes 4 Move the cursor to RX in the MIDI CH area and select the MIDI channel...

Page 174: ...keys will corre spond The buttons in the CH area select the combination of MIDI channels that are assigned to the faders and TRACK SEL keys For the combination of MIDI channels used when each button is on refer to MIDI and utility functions p 157 5 Operate the faders and TRACK SEL keys of the AW1600 The messages assigned to the faders and TRACK SEL keys will be transmitted from the MIDI OUT THRU c...

Page 175: ...location from which the signal is sent from each channel to AUX bus 1 Move the cursor to the desired channel and press the ENTER key to switch between the following two settings PRE pre fader The signal immediately before the fader will be sent POST post fader The signal immediately after the fader will be sent C AUX2 knobs Adjust the send level of the signals that are sent from each channel to AU...

Page 176: ...desired return to step 5 and readjust the send level to AUX bus 1 for each track channel If you want to adjust the AUX bus 1 master level use the BUS page of the VIEW screen or the AUX OUT page of the PAN screen 10In the MIXDOWN page of the RECORD screen switch the REC button on and per form the mixdown Track 1 Track 2 Track 3 Track 4 Track 5 Track 6 Track 7 Track 8 Mixer section Stereo bus Input ...

Page 177: ... MIXDOWN page of the RECORD screen and select the channels that you want to send to the stereo bus 4 Raise the STEREO fader to the 0 dB posi tion and while you play back the song adjust the level pan EQ and dynamics for each track channel If desired you can also use the mastering library 5 When you have finished adjusting the sound and the levels put your digital recorder in record mode then play ...

Page 178: ...diagram below connect your digital recorder to the AW1600 3 Use the UTILITY key to access the D IN HDD page of the UTILITY screen 4 Move the cursor to the DIGITAL REC ON OFF button and press the ENTER key A message will ask you to confirm your observance of copyright laws If you accept the conditions described in Copyright Notice p 6 move the cursor to the OK button and press the ENTER key The DIG...

Page 179: ...late Natural sounding overdrive that simulates overdriving a combo amp 21 Smooth Lead AmpSimulate Smooth distortion lead with a smooth playing feel 22 Crunch Box AmpSimulate Crunch sound with a nice amount of distortion usable for anything from backing to lead 23 Double Drive Dist Delay Heavy distortion with doubling 24 Comp Driver AmpSimulate Overdrive with compressor to bring out the nuances of ...

Page 180: ...atly changing the origi nal nuances dynamics Ideal for songs in which the low and mid ranges are important and that emphasize the rhythm 05 LO FI Limiter that produces a lo fi character 06 DARK SOFT Soft limiter that produces the slightly flattened feel characteristic of the 60 s and 70 s Ideal for Beatles type rock of the 60 s and 70 s or more recently for a Vincent Gallo feel 07 DARK HARD Hard l...

Page 181: ...This is a variation on program 020 You can also use it for the electric gut guitar 022 A G Arpeg 1 Corrects arpeggio technique of an acoustic guitar 023 A G Arpeg 2 This is a variation on program 022 024 BrassSection Use with trumpets trombones or sax With one instrument adjust the HIGH or H MID frequency 025 Male Vocal 1 Use as a template for male vocal Adjust the HIGH or H MID setting according ...

Page 182: ...a 5 1 ratio a 10 dB change in input level above the threshold results in a 2 dB change in out put level Attack controls how soon the signal is compressed once the compressor has been triggered With a fast attack time the signal is compressed almost immediately With a slow attack time the initial transient of a sound passes through unaffected Out Gain sets the compressor s output signal level Compr...

Page 183: ... and CompanderS CPS parameters Threshold determines the level of input signal required to trigger the compander Signals above the threshold pass through unaffected Signals at and below the threshold level are attenuated by the amount specified using the Ratio parameter The trigger signal is deter mined using the KEYIN SOURCE parameter Ratio controls the amount of companding the change in output si...

Page 184: ...ed abruptly the sudden cutoff can sound odd For ducking a setting of 70 dB causes the signal to be virtually cutoff At a setting of 30 dB the signal is ducked by 30 dB At a setting of 0 dB the duck has no effect Attack determines how fast the gate opens when the signal exceeds the threshold level Slow attack times can be used to remove the initial transient edge of percussive sounds Too slow an at...

Page 185: ...P 020 Strings3 CMP Compressor suitable for strings Numbers 19 and 20 can also be used on low range instruments cello contrabass 021 BrassSection CMP Compressor intended for brass sounds with fast and strong attack 022 Syn Pad CMP This has a restraining effect on sounds that tend to become diffuse For example this is ideal for some rich sounding synth pads that conversely lack definition 023 Sampli...

Page 186: ...REO DELAY Stereo delay with independent left and right 10 Mod delay MOD DELAY Mono delay with modulation 11 Delay LCR DELAY LCR Three tap delay L C R 12 Echo ECHO Stereo delay with additional parameters for more detailed control The signal can be fed back from left to right and right to left No Title Type Description 13 Chorus CHORUS Three phase stereo chorus 14 Flange FLANGE The well known flangi...

Page 187: ...S Reverb and chorus in parallel 30 Rev Chorus REV CHORUS Reverb and chorus in series 31 Rev Flange REV FLANGE Reverb and flanger in parallel 32 Rev Flange REV FLANGE Reverb and flanger in series 33 Rev Sympho REV SYMPHO Reverb and symphonic in parallel 34 Rev Sympho REV SYMPHO Reverb and symphonic in series 35 Rev Pan REV PAN Reverb and auto pan in parallel 36 Delay ER DELAY ER Delay and early ref...

Page 188: ...y reflection simulation ROOMSIZE 0 1 20 0 Reflection spacing LIVENESS 0 10 Early reflections decay characteristics 0 dead 10 live INI DLY 0 0 500 0 ms Initial delay before reverb begins DIFF 0 10 Reverb diffusion left right reverb spread DENSITY 0 100 Reverb density ER NUM 1 19 Number of early reflections FB GAIN 99 to 99 Feedback gain HI RATIO 0 1 1 0 High frequency feedback ratio HPF Thru 21 2 H...

Page 189: ...AL 0 100 Mix balance of the effects and dry sounds Parameter Range Description DELAY 0 0 2725 0 ms Delay time FB GAIN 99 to 99 Feedback gain plus values for normal phase feedback minus values for reverse phase feedback HI RATIO 0 1 1 0 High frequency feedback ratio FREQ 0 05 40 00 Hz Modulation speed DEPTH 0 100 Modulation depth WAVE Sine Tri Modulation waveform HPF Thru 21 2 Hz 8 0 kHz High pass ...

Page 190: ...cription FREQ 0 05 40 00 Hz Modulation speed PM DEP 0 100 Pitch modulation depth AM DEP 0 100 Amp modulation depth MOD DLY 0 0 500 0 ms Modulation delay time WAVE Sine Tri Modulation waveform LSH F 21 2 8 00 k Hz Low shelving filter frequency LSH G 12 to 12 dB Low shelving filter gain EQ F 100 8 00 k Hz Parametric equalizer center frequency EQ G 12 to 12 dB Parametric equalizer gain EQ Q 10 0 10 P...

Page 191: ...rmal phase feedback minus values for reverse phase feedback OFFSET 0 100 Lowest phase shifted frequency offset STAGE 2 4 6 8 10 12 14 16 Number of phase shift stages LSH F 21 2 8 00 k Hz Low shelving filter frequency LSH G 12 to 12 dB Low shelving filter gain HSH F 50 0 16 0 k Hz High shelving filter frequency HSH G 12 to 12 dB High shelving filter gain MIX BAL 0 100 Mix balance of the effects and...

Page 192: ... pitch shift FINE 1 50 to 50 cents Channel 1 pitch shift fine PAN 1 L16 1 C R1 16 Channel 1 panpot DELAY 1 0 0 1000 0 ms Channel 1 delay time FB G 1 99 to 99 Channel 1 feedback gain plus values for normal phase feedback minus values for reverse phase feedback LEVEL 1 100 to 100 Channel 1 level plus values for normal phase minus values for reverse phase PITCH 2 24 to 24 semitones Channel 2 pitch sh...

Page 193: ...100 Mix balance of the effects and dry sounds Parameter Range Description DST TYPE DST1 DST2 OVD1 OVD2 CRUNCH Distortion type DST distortion OVD overdrive DRIVE 0 100 Distortion drive MASTER 0 100 Master volume TONE 10 to 10 Tone N GATE 0 20 Noise reduction MIX BAL 0 100 Mix balance of the effects and dry sounds Parameter Range Description AMP TYPE STK M1 STK M2 THRASH MIDBST CMB PG CMB VR CMB DX ...

Page 194: ...2 8 00 k Hz Low shelving filter frequency LSH G 12 to 12 dB Low shelving filter gain EQ F 100 8 00 k Hz Parametric equalizer center frequency EQ G 12 to 12 dB Parametric equalizer gain EQ Q 10 0 10 Parametric equalizer band width HSH F 50 0 16 0 k Hz High shelving filter frequency HSH G 12 to 12 dB High shelving filter gain MIX BAL 0 100 Mix balance of the effects and dry sounds Parameter Range De...

Page 195: ...00 Reverb density HPF Thru 21 2 Hz 8 0 kHz High pass filter cutoff frequency LPF 50 Hz 16 0 kHz Thru Low pass filter cutoff frequency FREQ 0 05 40 00 Hz Modulation speed PM DEP 0 100 Pitch modulation depth AM DEP 0 100 Amp modulation depth MOD DLY 0 0 500 0 ms Modulation delay time WAVE Sine Tri Modulation waveform REV BAL 0 100 Reverb and chorused reverb balance 0 chorused reverb 100 reverb MIX B...

Page 196: ...HI RATIO 0 1 1 0 High frequency reverb time ratio DIFF 0 10 Reverb diffusion left right reverb spreed DENSITY 0 100 Reverb density HPF Thru 21 2 Hz 8 0 kHz High pass filter cutoff frequency LPF 50 Hz 16 0 kHz Thru Low pass filter cutoff frequency FREQ 0 05 40 00 Hz Modulation speed DEPTH 0 100 Modulation depth MOD DLY 0 0 500 0 ms Modulation delay time WAVE Sine Tri Modulation waveform REV SYM 0 1...

Page 197: ...er Range Description DELAY L 0 0 1000 0 ms Left channel delay time DELAY R 0 0 1000 0 ms Right channel delay time FB DLY 0 0 1000 0 ms Feedback delay time FB GAIN 99 to 99 Feedback gain plus values for normal phase feedback minus values for reverse phase feedback HI RATIO 0 1 1 0 High frequency feedback ratio TYPE S Hall L Hall Random Revers Plate Spring Type of early reflection simulation ROOMSIZ...

Page 198: ...GAIN 99 to 99 Feedback gain plus values for normal phase feedback minus values for reverse phase feedback DELAY HI 0 1 1 0 Delay high frequency feedback ratio REV TIME 0 3 99 9 s Reverb time INI DLY 0 0 500 0 ms Initial delay before reverb begins REV HI 0 1 1 0 High frequency reverb time ratio DIFF 0 10 Reverb diffusion left right reverb spreed DENSITY 0 100 Reverb density HPF Thru 21 2 Hz 8 0 kHz...

Page 199: ... 100 Modulation depth DLY BAL 0 100 Distortion and delay balance 0 distortion 100 delayed distortion MIX BAL 0 100 Mix balance of the effects and dry sounds Parameter Range Description TYPE 1 HPF LPF BPF Filter 1 type low pass high pass band pass TYPE 2 HPF LPF BPF Filter 2 type low pass high pass band pass TYPE 3 HPF LPF BPF Filter 3 type low pass high pass band pass FREQ 1 28 Hz 16 0 kHz Filter ...

Page 200: ...6Hip L L L L L L O O 102OldSkool2 L L L L L L L L 106BreakRock L L L L L L L L 106HipFunk L L L L L L O O 106OldSkool L L L L L L O O 108Funk1 L L L L L L O O 108Funk2 L L L L L L O O 110Med8 L L L L L L O O 110NJS L L L L L L O O 114Simple16 L L L L L L O O 118LoudFunk L L L L L L O O 120Normal16 L L L L L L O O 120Normal8 L L L L L L O O 120NormShffl L L L L L L O O 125Simple8 L L L L L L O O 12...

Page 201: ...O O O Female_Wet O O O O O O O O Fire L L L L Guns O O O O O O O O Hit_Swish O O O O O O O O Human_Action O O O O O O O O Jungle_Amb L L L L Laser_Buzz O O O O O O O O Male_Dry O O O O O O O O Night_Amb O O L L L L Other_Rides O O O O O O O O Punch_Swish O O O O O O O O Rain1 L L L L Rain2 L L L O River L L L L L L L L Robot_Voice O O O O O O O O Scratch1 O O O O O O O O Scratch2 O O O O O O O O S...

Page 202: ...ted to both the MIC LINE INPUT 8 XLR TRS connector and the HI Z connector Is the GAIN knob set to an appropriate level Is the input channel fader raised Is it turned on The input channel may have been set to DIGITAL IN When recording is the recording destination track fader which adjusts the monitor level raised If you are recording the sound of that input channel will not be heard during playback...

Page 203: ...n in the display In the UTILITY screen PREFER page is FADER FLIP set appropriately When the power is turned on FADER FLIP will be set to TRACK The fader may be set to PRE FADE in AUX Pairing was specified but the signal is mon aural Is the odd numbered channel panned far left and the even numbered channel panned far right Pairing was specified but the signal phase does not match Even when channels...

Page 204: ...s turned off the sample will play only for the length of a measure The display indicates MEMORY FULL and you can t import Access the SAMPLE screen MEMORY page and check the amount of used memory Execute ERASE or EXTRACT to increase the amount of free memory WAV files to be imported are not displayed Have you copied WAV files with a different bit depth from the song 16 bit WAV files will not be dis...

Page 205: ...CD RW media to be played back the player must support CD RW Contact the manufacturer of the player regarding CD RW support The sound skips while playing an audio CD that you created Depending on the CD R media you use there may be dif ferences in the quality of the completed CD The computer doesn t recognize the AW1600 hard disk Is the USB cable properly connected Is your computer running the appr...

Page 206: ...oint has been set MARK POINT ERASED The mark has been erased MARK POINT SET The mark has been set MEMORY FULL There is no more free space in sampling pad memory MIDI IN DATA FRAMING ERROR Invalid MIDI data may have been received MIDI IN DATA OVERRUN Invalid MIDI data may have been received MIDI RX BUFFER FULL Receiving more MIDI data than it can handle MIDI TX BUFFER FULL Attempting to transmit mo...

Page 207: ...Full No more songs can be created or restored since this would exceed the maximum number of files File Size Exceeds Limit The file is too large to be saved HD Full The internal hard disk is full and can accept no more data HD Status is Out Of Range The hard disk reliability status the number of past errors has exceeded the threshold Back up your data and have the hard disk replaced as soon as poss...

Page 208: ... allowable tracks has been exceeded Track Not Recorded The track you selected does not contain any recorded data Wav File Link Error Delete Wrong Data A portion of the song data is corrupt Erase the corrupt data If you move the cursor to the OK button and press the ENTER key the corrupt portion of the song will be erased If you move the cursor to the CANCEL button and press the ENTER key another s...

Page 209: ... Classic View in the upper left of the win dow All control panels and icons will be displayed 3 Go to System Hardware Driver signa tures Driver signature options select Ignore Install software without asking for confirmation and then click OK 4 Click OK to close the System Properties window and then click the Close button to close the Control Panel window 5 Insert the included CD ROM into the CD R...

Page 210: ...Driver Installer window is displayed 5 Click Continue The Select a Destination is displayed 6 Select a destination for the driver installation then click Continue The message Installing this software requires 100MB of disk space may appear However the actual required free disk space is 2MB 7 A window opens displaying the message Click install to perform a basic installation of this software Click ...

Page 211: ...ALL button and press the ENTER key 7 Move the cursor to the DISABLE button and press the ENTER key The DISPLAY button will change to ENABLE and all symbols at the right of the list will change to This selects all songs and sample libraries 8 Move the cursor to the EXECUTE button and press the ENTER key 9 A popup window will ask you for confirma tion so move the cursor to the OK button or CANCEL bu...

Page 212: ...ons menu Preferences Key Commands 3 The Key Commands window will open In the menu bar select Options Import Key Commands 4 A dialog box will appear Select the Logic preference file Logic32 prf from the included CD ROM and click the Open button When you import the file the following settings will be made Please note that all the previously specified key com mands will be initialized If you do not w...

Page 213: ...ference file Logic Preferences from the included CD ROM and click the Open but ton When you import the file the following settings will be made Please note that all the previously specified key com mands will be initialized If you do not want to change your existing user key command settings you can manu ally make the MIDI channel and CC settings shown above If you changed the track structure from...

Page 214: ...gs 1 In the menu bar select Setup Peripherals 2 The Peripherals window will open Click the MIDI Controllers button In the MIDI Controllers window make the following settings In the Receive From field and the Send To field specify the MIDI device you are using This completes preparations for using the AW1600 s MIDI Remote function to control the Pro Tools software Type Receive From Send To ch s 1 C...

Page 215: ...AVE the internal recorder will operate in synchronization with MTC messages received from the MIDI IN connector 1 8 Realtime control of parameters Control changes can be used to send receive internal parameters in realtime 1 9 MIDI Remote The faders SEL keys and RTZ FF REW STOP PLAY REC keys can be used to control an external MIDI device In PRESET mode operating the above controllers will transmit...

Page 216: ...he MIDI Tx Ch and MIDI Rx Ch settings For modes 2 and 3 reception will occur regardless of MIDI channel if MIDI Rx Ch is set to ALL Transmission If Control Change Mode is TX or TX RX control change messages will be transmitted on the MIDI Tx Ch channel when you operate a parameter The control value is converted into a parameter value according to the following equation S total number of steps in t...

Page 217: ...AY Reception If the AW1600 is operating as an MMC Slave the transport will begin playback when this message is received with a matching device number or a device number of 7F 5 13 1 3 MMC DEFERRED PLAY Transmission This message is transmitted with a device number of 7F when the PLAY key is pressed Reception If the AW1600 is operating as an MMC Slave the transport will begin playback when this mess...

Page 218: ...ceived if the AW1600 is operating as an MMC Slave and the device number matches The transport will locate to the time code position specified within the command data STATUS 11110000 F0 System Exclusive Message ID No 01111111 7F Real Time System Exclusive Device ID 0ddddddd dd Destination 00 7E 7F all call Command 00000110 06 Machine Control Command mcc sub id 00000101 05 Rewind MCS EOX 11110111 F7...

Page 219: ...e Cntrl 33 34 o o Assignable Cntrl 41 56 o o Assignable Cntrl Control 63 79 o o Assignable Cntrl 91 93 o o Assignable Cntrl Change 102 117 o o Assignable Cntrl Prog o 0 127 o 0 127 Assignable Change True System Exclusive o o 1 Song Pos o x 2 Common Song Sel x x Tune x x System Clock o x 2 Real Time Commands o x 2 All Sound Off x x Aux Reset All Cntrls x x Local ON OFF x x Mes All Notes OFF x x sag...

Page 220: ... OUT 2 CH stereo x 1 DIGITAL STEREO OUT 2 CH coaxial stereo x 1 Mixer Input Section Total 36 CH MIC LINE INPUT 8 CH Internal Effect Return 4 CH stereo x 2 Track 16 CH Quick Loop Sampler 8 CH stereo x 4 Internal Effect Section 2 Built in Multi Effect Processors Master Section Total 8 Bus BUS 2 CH AUX 2 CH STEREO 2 CH stereo x 1 EFFECT 2 CH Built in Hard Disk Drive 40 GB 3 5 IDE Maximum Number of So...

Page 221: ...xing Functions Input Channels INPUT 1 8 Track 1 16 PAD 1 4 Attenuation Phase Normal Reverse Equalizer 4 Band PEQ Dynamics Pan Bus Assign STEREO BUS AUX EFF Internal Effect Return Channels Equalizer 4 Band PEQ Pan Bus Assign STEREO AUX Master Channels STEREO L R Attenuation Equalizer 4 Band PEQ Dynamics Balance BUS L R AUX 1 2 EFF 1 2 Recorder Section Overview Recording Resolution 16 bit 24 bit Sam...

Page 222: ...ange or modify products or specifications at any time without prior notice Since specifications equipment or options may not be the same in every locale please check with yourYamaha dealer For European models Purchaser User Information specified in EN55103 1 and EN55103 2 Inrush Current 13A Conforms to Environments E1 E2 E3 and E4 Dimensions 5 107 341 349 455 98 Unit mm ...

Page 223: ...ject hole 23 Eject switch 23 Handling 10 media 101 Methods 102 Track At Once 102 Using 10 CD RW MEDIA ERASE 103 CH RECALL SAFE 80 Channel library 79 Recall 79 Compander 183 COMPARE button 103 Compressor 182 Connect external devices 27 Connecting instrument or mic 33 Connecting the AC adaptor 11 DC IN connector 23 control change 160 controlling a tone generator module 174 Copyright 9 Notice 6 Count...

Page 224: ... MIX button 110 INPUT LEVEL knob 34 Input library 50 77 library list 179 INPUT LIBRARY popup window 77 INPUT SEL key 17 INPUT SETTING popup window 34 77 Inputting text 25 internal effect 50 85 EFF 85 PRE POST 85 J JOG ON key 20 71 L LATCH button 166 LEARN button 166 Level meter 34 93 PRE POST buttons 93 library 73 Basic operation 74 Channel library 79 Delete 75 Details 77 Dynamics library 57 78 Ef...

Page 225: ...TLY button 109 PHANTOM 48V switch 22 PHASE 84 PHONES jack 21 ping pong recording 81 88 Pitch Fix 89 PLAY key 21 playback 65 A B Repeat 70 popup window INPUT LIBRARY popup window 77 INPUT SETTING popup window 77 POSITION 68 POSTROLL TIME 170 POWER switch 23 PRECAUTIONS 3 PREROLL TIME 170 program change 160 PROTECT button 146 Punch in out 59 Q Quick loop sampler 14 111 an audio CD 117 computer 120 D...

Page 226: ...utput section 17 Locate section 20 Mixer section 19 Quick Loop Sampler section 18 Selected Channel section 19 Transport section 21 Work Navigate section 18 Track At Once 102 Writing 104 Track editing 127 Basic procedure 128 TRACK field 48 TRACK key 18 Track recording 39 Bus recording 41 Creating a new song 39 Direct recording 40 MUTE button 48 NAME button 48 Pairing 49 TRACK field 48 Track name 48...

Page 227: ...NPUT MONITOR RECORDER INPUT 1 16 RECORDER 4BAND EQ Gain Reduction METER EQ ON INSERT Stereo Track In Sound Clip In RECORDER Stereo Track Out Sound Clip Out Stereo in X 4 9 10 15 16 RECORDER REPRO 1 16 CH DIRECT SELECT OUT 1 8 INPUT MONITOR INPUT MONITOR CH DIRECT SELECT OUT 1 8 RECORDER INPUT 1 16 CH DIRECT OUT1 8 BUS L R 2 8 16 SELECT CH DIRECT SELECT OUT 1 8 8 SELECT EFFECT EFFECT 1 2 L to INSER...

Page 228: ...AW1600 Owner s Manual 228 MEMO ...

Page 229: ...229 AW1600 Owner s Manual MEMO ...

Page 230: ...AW1600 Owner s Manual 230 MEMO ...

Page 231: ...sica Italia S P A Combo Division Viale Italia 88 20020 Lainate Milano Italy Tel 02 935 771 SPAIN PORTUGAL Yamaha Hazen Música S A Ctra de la Coruna km 17 200 28230 Las Rozas Madrid Spain Tel 91 639 8888 SWEDEN Yamaha Scandinavia AB J A Wettergrens Gata 1 Box 30053 S 400 43 Göteborg Sweden Tel 031 89 34 00 DENMARK YS Copenhagen Liaison Office Generatorvej 6A DK 2730 Herlev Denmark Tel 44 92 49 00 N...

Page 232: ...Yamaha Corporation 2005 Yamaha Corporation 511POCP2 3 02B0 WE23260 Printed in Japan This document is printed on chlorine free ECF paper with soy ink Yamaha Web Site English only http www yamahasynth com Yamaha Manual Library http www yamaha co jp manual ...

Reviews: