background image

YDP-C71 Owner’s Manual

Basic Operations

11

E

NGLISH

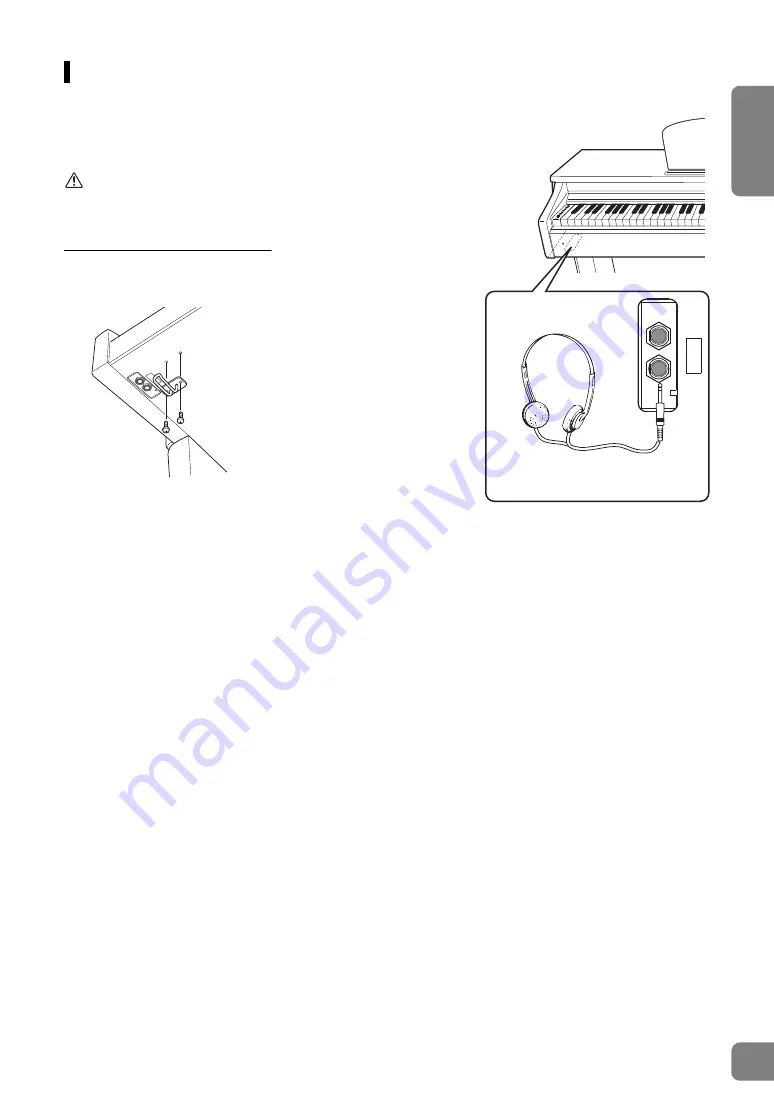
Using Headphones

Since this instrument is equipped with two [PHONES] jacks, you can 
connect two sets of standard stereo headphones. If you are using only one 
set of headphones, insert a plug into either jack, which automatically shuts 
off the speakers.

CAUTION

Do not use headphones at a high volume for an extended period of time; 
doing so may cause hearing loss.

Using the headphone hanger

You can hang the headphones on the instrument. Install the headphone 
hanger using included two screws as shown in the illustration.

NOTICE

Do not hang anything other than the headphones on the hanger. Doing so may damage this instrument or the hanger.

PHONES

Standard stereo phone plug

Bottom surface

PHONES

Summary of Contents for Arius YDP-C71

Page 1: ...ion est réglé sur 240 V au départ d usine Pour modifier ce réglage utilisez un tournevis à lame plate pour tourner le sélecteur afin de mettre l indication correspondant à la tension de votre région vis à vis du repère triangulaire situé sur le panneau Para información sobre el montaje del soporte del teclado consulte las instrucciones al final de este manual IMPORTANTE Verifique la alimentación d...

Page 2: ...ing Variations to the Sound Reverb 17 Transposing the Pitch in Semitones 18 Fine tuning the Pitch 18 Layering Two Voices Dual mode 19 Song Playback and Practice 20 Listening to 50 Preset Songs 20 Practicing a One Hand Part 21 Recording Your Performance 22 Recording Your Performance 22 Changing the Initial Settings of the Recorded Song 23 Deleting Recorded Data 23 Data Maintained When Power is Turn...

Page 3: ...ronmentally friendly We sincerely believe that our products and the production methods used to produce them meet these goals In keeping with both the letter and the spirit of the law we want you to be aware of the following Battery Notice This product MAY contain a small non rechargeable battery which if applicable is soldered in place The average life span of this type of battery is approximately...

Page 4: ...irements Modifi cations not expressly approved by Yamaha may void your authority granted by the FCC to use the product 2 IMPORTANT When connecting this product to acces sories and or another product use only high quality shielded cables Cable s supplied with this product MUST be used Follow all installation instructions Failure to follow instructions could void your FCC authorization to use this p...

Page 5: ... been dropped into the instrument There is a sudden loss of sound during use of the instrument CAUTION Always follow the basic precautions listed below to avoid the possibility of physical injury to you or others or damage to the instrument or other property These precautions include but are not limited to the following Do not connect the instrument to an electrical outlet using a multiple connect...

Page 6: ... car during the day to prevent the possibility of panel disfiguration damage to the internal components or unstable operation Verified operating temperature range 5 40 C or 41 104 F Do not place vinyl plastic or rubber objects on the instrument since this might discolor the panel or keyboard Bumping the surface of the instrument with metal porcelain or other hard objects can cause the finish to cr...

Page 7: ...in English French and German Contains basic explanations about MIDI To obtain these manuals access the Yamaha Manual Library enter YDP C71 or MIDI Basics to the Model Name box then click SEARCH Included Accessories 1 The PRODUCT ID on the sheet is required for filling out the User Registration form 2 Included or optional depending on locale Yamaha Manual Library http www yamaha co jp manual Thank ...

Page 8: ... down PLAY turning on off the Right hand and Left hand Parts individually During Metronome playback for increasing or decreasing the Tempo 6 REC button page 22 For recording your keyboard performance 7 PLAY button page 23 For playing back the recorded performance 8 MASTER VOLUME knob page 12 For adjusting the volume of the entire sound 9 FUNCTION pages 18 26 Simultaneously holding these two button...

Page 9: ...d may be nearly impossible to remove This could cause electric shock short circuit fire or other serious damage to the instrument Music Rest To raise the music rest 1 Pull the music rest up and toward yourself as far as it will go 2 Flip down the two metal supports at the rear left and right of the music rest 3 Lower the music rest so that it rests on the metal supports To lower the music rest 1 P...

Page 10: ... shock hazard Use only the AC power cord supplied with your instrument If the supplied cord is lost or damaged and needs to be replaced contact your Yamaha dealer The use of an inappropriate replacement can pose a fire and shock hazard The type of AC power cord provided with your instrument may be different depending on the country in which it is pur chased Do NOT modify the plug provided with you...

Page 11: ...lly shuts off the speakers CAUTION Do not use headphones at a high volume for an extended period of time doing so may cause hearing loss Using the headphone hanger You can hang the headphones on the instrument Install the headphone hanger using included two screws as shown in the illustration NOTICE Do not hang anything other than the headphones on the hanger Doing so may damage this instrument or...

Page 12: ... chord for example while the other notes are played staccato Soft Pedal Left Pressing this pedal will reduce the volume and slightly change the timbre of the notes The notes played before this pedal is pressed are not affected Using the Damper Resonance When playing an actual grand piano the strings resonate sympathetically whether the damper pedal is pressed or not The Damper Resonance function r...

Page 13: ...ONOME press the D5 key to increase or the A 4 key to decrease To specify a three digit value While holding down METRONOME press the relevant C4 A4 keys one by one in order For example to specify 95 press the C4 0 A4 9 and F4 5 keys in order Resetting the value to the default 120 While holding down the METRONOME press the R and L simultaneously or press the C5 default key Setting range C1 1 G2 20 D...

Page 14: ...s occurs polish the pedal with a compound designed for piano pedals Before using the compound make sure to read the instructions for proper usage Tuning Unlike an acoustic piano this instrument does not need to be tuned by an expert although the pitch can be user adjusted to match other instruments This is because the pitch of digital instruments is always maintained perfectly However if you feel ...

Page 15: ...ano Perfect for classical compositions C 1 Grand Piano 2 Spacious and clear piano with bright reverb Good for popular music D1 E Piano 1 Created by FM synthesis Good for popular music D 1 E Piano 2 Using hammer struck metallic tines Soft tone when played lightly and an aggressive tone when played hard E1 Harpsichord 1 The definitive instrument for baroque music Since the strings of a harpsichord a...

Page 16: ...n the DEMO SONG then press one of the C1 A1 keys 2 Press DEMO SONG or PLAY to stop playback The PLAY lamp turns off Demo Song List The Demo Songs excluding original Songs are short rearranged excerpts from the original compositions The original Demo Songs are Yamaha originals 2011 Yamaha Corporation Key Voice Name Title Composer C1 Grand Piano 1 Salut d amour op 12 E Elgar C 1 Grand Piano 2 Origin...

Page 17: ... maximum depth While holding down PIANO VOICE press one of the C3 G 4 keys The Depth value increases as you press higher keys While holding down PIANO VOICE press the A4 key to set the Reverb Depth to the most suitable value for the current Voice Lowest key C3 depth 0 G 4 depth 20 A4 The depth value increases as you press higher keys C 2 D 2 C2 D2 E2 Selecting a Reverb Type Adjusting Reverb Depth ...

Page 18: ...holding down DEMO SONG and PIANO VOICE press the C3 key Fine tuning the Pitch You can fine tune the pitch of the entire instrument in about 0 2 Hz steps This lets you match the keyboard pitch finely to that of other instruments or CD music Setting range 427 0 453 0 Hz Default Setting 440 0 Hz To tune up in about 0 2 Hz steps Press and hold down the DEMO SONG and PIANO VOICE simultaneously and pres...

Page 19: ...ill be designated as Voice 2 You cannot assign the same Voice to Voice 1 and Voice 2 simultaneously in Dual mode To shift the Octave for each Voice While holding down PIANO VOICE press one of the C5 F5 keys To adjust the Balance between two Voices While holding down PIANO VOICE press one of the F 5 F 6 keys A setting of 0 produces an equal balance between two Voices Settings below 0 increase the v...

Page 20: ...back The PLAY R and L lamps light and playback continues the sequence other Preset Songs then Demo Songs After that the sequence returns to the first Preset Song then repeats NOTE For instructions on changing the playback tempo see page 13 NOTE You can import additional Songs by loading SMF files from a computer Refer to the Computer related Operations manual To play only the Preset Songs consecut...

Page 21: ...playing back and vice versa NOTE Selecting another Song cancels the on off status of the Parts 1 Select a Preset Song page 20 or the User Song page 22 2 While holding down PLAY press R or L to turn the Part on off Pressing the same button repeatedly while holding down PLAY toggles playback on and off 3 Practice the Part which is turned off To change the Tempo If desired you can change the tempo fo...

Page 22: ...record right and left hand Parts separately record the entire performance to either Part Recording the right hand Part R Recording the left hand Part L After a while the REC lamp and the selected Part lamp will flash at the current tempo To exit from Record Ready mode Press only the REC If data has already been recorded to the other Part The data in this Part will be played back while recording Th...

Page 23: ...ge Record Ready mode In this status do not press PLAY again or any key Otherwise the originally recorded performance data will be deleted 3 Press REC again to exit from Record Ready mode Deleting Recorded Data To delete the entire Song 1 Press REC to engage Record Ready mode The REC and R lamps flash 2 While holding down PLAY press REC The REC PLAY R and L lamps flash To exit from this status pres...

Page 24: ...nstrument to recall the settings again Likewise the User Song data can be transferred to a computer and saved as an SMF file and vice versa For instructions on transferring a Backup file to a computer refer to the Computer related Operation manual Initializing the Settings NOTICE Never turn off the power while the Initialize operation is being executed that is while the REC and PLAY lamps are flas...

Page 25: ...onnection You can purchase MIDI cables at musical instrument stores What You Can Do With MIDI Controlling another keyboard and vice versa When making the connections shown below you can play one of the keyboards and control the tone generator of the other instrument NOTE No MIDI data of any of the Songs is transmitted during playback NOTE The panel settings of this instrument are not affected by a...

Page 26: ...Program Change On or Off While holding down DEMO SONG and PIANO VOICE simultaneously press the C 6 key once to change the setting NOTE For information on the Program Change number for each Voice refer to the MIDI Reference Control Change On Off Normally on this instrument pressing a Pedal or setting the Reverb Depth transmits the corresponding Control Change over the specified Transmit Channel Lik...

Page 27: ...ile phone in close proximity to this instrument Turn off the mobile phone or move it further away from this instrument The overall volume is low or no sound is heard The Master Volume is set too low Set it to an appropriate level using the MASTER VOLUME knob page 12 Make sure a pair of headphones is not connected to the headphones jack page 11 Make sure that Local Control page 26 is On Pedals do n...

Page 28: ...e bundled pedal cord Don t discard the vinyl tie You will need it later in step 6 1 2 Align D and E with each end of C 1 3 Attach D and E to C by finger tightening the long screws 1 6 20mm 2 Attach B 2 1 Place the lower side of B on each foot of D and E then attach the upper side to D and E 2 2 Attach the top of B to D and E by finger tightening the thin screws 3 4 12mm 2 3 While pushing the lower...

Page 29: ... 5 2 Secure A by tightening the short screws 2 6 16 mm from the front R L E 2 2 2 5 2 4 2 3 D B 2 3 2 1 Place the bot tom ends of the rear panel on each foot 3 C B R A D E B Be sure to place your hands at least 10 cm from either end of the main unit when positioning it At least 10 cm CAUTION Fingers can become pinched between the main unit and the rear or side panels be extra careful so as not to ...

Page 30: ...ely until the metal part of the cord plug disappears from view Otherwise the pedal may not function properly PEDAL 6 1 6 3 6 2 M I D I Insert the cord all the way until the metal part of the plug disappears from view 240 127 110 220 Voltage Selector Before connecting the AC power cord check the setting of the voltage selector which is provided in some areas To set the selector for 110V 127V 220V o...

Page 31: ...e or give way when you step on the pedals Turn the adjuster so that it is set firmly against the floor Are the pedal and power cords inserted securely into the sockets Check the connection If the main unit creaks or is otherwise unsteady when you play on the keyboard refer to the assembly diagrams and retighten all screws When moving the instrument after assembly always hold the bottom of the main...

Page 32: ...r of Polyphony Max 128 Preset Number of Voices 10 Effects Types Reverb Yes Damper Resonance Yes Part Dual Yes Songs Preset Number of Preset Songs 10 Demo Songs 50 Preset Songs Recording Number of Songs 1 Number of Tracks 2 Recording Capacity 1 Song 100KB approx 11 000 notes Recording Function Yes Compatible Data Format Playback Standard MIDI File SMF Format 0 1 Recording Standard MIDI File SMF For...

Page 33: ...Basics 7 MIDI Reference 7 MIDI terminals 25 MIDI Transmit Receive Channel 26 Music Rest 9 O Octave 19 Online Manuals PDF 7 P Panel Controls and Terminals 8 Pedals 12 Pitch 18 Polyphony 32 Power 10 Power indicator 10 Practice 21 Preset Songs 20 Program Change 26 Q Quick Operation Guide 7 R Recording 22 Recording Capacity 32 Reverb 17 Reverb Depth 17 Reverb Type 17 Reverb Type List 17 Right hand Par...

Page 34: ...rchase to aid identification in the event of theft Model No Serial No Das Typenschild dieses Produkts befindet sich an der Unterseite des Geräts Die Seriennummer dieses Produkts befindet sich auf dem Typenschild oder in der Nähe davon Sie sollten diese Seriennummer an der unten vorgesehenen Stelle eintragen und dieses Handbuch als dauerhaften Beleg für Ihren Kauf aufbewahren um im Fall eines Diebs...

Page 35: ... le Traitement des déchets d équipements électriques et électroniques Le symbole sur les produits l emballage et ou les documents joints signifie que les produits électriques ou électroniques usagés ne doivent pas être mélangés avec les déchets domestiques habituels Pour un traitement une récupération et un recyclage appropriés des déchets d équipements électriques et électroniques veuillez les dé...

Page 36: ...YCL XXX Owner s Manual ...

Page 37: ... 200 28230 Las Rozas Madrid Spain Tel 91 639 8888 GREECE Philippos Nakas S A The Music House 147 Skiathou Street 112 55 Athens Greece Tel 01 228 2160 SWEDEN Yamaha Music Europe GmbH Germany filial Scandinavia J A Wettergrens Gata 1 Box 30053 S 400 43 Göteborg Sweden Tel 031 89 34 00 DENMARK Yamaha Music Europe GmbH Tyskland filial Denmark Generatorvej 6A DK 2730 Herlev Denmark Tel 44 92 49 00 FINL...

Page 38: ...ndonesia 109APZC 01A0 WZ90220 2011 Yamaha Corporation Yamaha Manual Library http music yamaha com homekeyboard Yamaha Home Keyboards Home Page U R G Digital Musical Instruments Division http www yamaha co jp manual ...

Reviews: