background image

20

YA3200-210723

A

C

E

B

D

D

D . 7 

D . 8 

CLICK

CLICK!

Summary of Contents for SOLAR

Page 1: ...EN FR NL DE EN FR NL DE Installation instructions Installationsanweisungen Installatievoorschrift Instructions d installation YA 3200 Yalp Solar D 21 ...

Page 2: ...ent ce manuel d installation avant installation du produit Conservez ce manuel pour utilisation future WARNING Read these installation instructions before you start the installation Retain this manual for future reference WARNUNG Bitte lesen Sie dieses Installationshandbuch durch bevor Sie das Produkt installieren Bewahren Sie dieses Handbuch zum späteren Nachschlagen auf ...

Page 3: ...3 YA3200 210723 A B C D E A B C D E EN FR NL DE EN FR NL DE EN FR XX XX NL IT XX XX DE XX XX XX EN FR XX XX NL IT XX XX DE XX XX XX D 21 YA 3200 Yalp Solar ...

Page 4: ...4 YA3200 210723 A C E B D A A 3500 mm 137 8 1300 mm 51 2 750 mm 29 5 A 1 3500 mm 137 8 1300 mm 51 2 750 mm 29 5 350 kg 772 lbs ...

Page 5: ...5 YA3200 210723 A B C D E A 1364 mm 53 7 1002 mm 39 4 411 mm 16 2 594 mm 23 4 4819 mm 189 7 A 2 ...

Page 6: ...er 3200 800 Anchor plate 100 187 Battery 0 5 m 5 m 10 m 100 189 Solar panel 2x 2x Secloc bit M10 100 191 Anchor M16 100 284 M16 4x 6x 100 277 M16 12x 100 192 Carr M16 10x 100 194 M12 4x 100 195 M12 4x 100 196 M8x12 4x 100 197 M10x40 1x Seclock M10 4x 100 210 M8x20 8x 100 281 M8 16x 100 271 M8 8x 100 198 M4x8 4x Pin Torx T40 100 190 M16 2x ...

Page 7: ... D E A Leveller 24 mm 19 mm 13 mm Shovel 3 mm 5 mm 8 mm 10 m Ø32 mm Measuring tape Stanley knife Wire stripper B C 100 250 kg C20 25 Drill bit Ch Anchor M16 Concrete cutter 1250 kg C20 25 6x Flat insulated 3mm Phillips PH2 ...

Page 8: ...8 YA3200 210723 A C E B D A 1 5 m 5 ft 0 m 0 ft 6 m 20 ft 5 m 16 5 ft 5 m 16 5 ft A 4 A 5 ...

Page 9: ...9 YA3200 210723 A B C D E A N S E W N S E W A 6 A 7 ...

Page 10: ...10 YA3200 210723 A C E B D 15 cm 5 9 A 8 A 9 ...

Page 11: ...11 YA3200 210723 A B C D E B B 1000 mm 39 4 700 mm 27 6 X 75 mm 3 1000 mm 39 4 N S E W B 1 NOTICE A 7 Shovel ...

Page 12: ...12 YA3200 210723 A C E B D B 60 mm 2 4 50 mm 2 500 mm 19 7 500 mm 19 7 B 2 B 3 PE N L 2 cores 1 ground 3x2 5mm2 ...

Page 13: ...00 210723 A B C D E B 40mm 1 6 1 0 0 1 9 2 1 0 0 1 9 2 100 192 1 0 0 1 9 2 1 0 0 1 9 2 100 284 B 4 B 5 600 mm 23 6 100 192 Carr M16 100 191 Anchor M16 10x 1250 kg C20 25 24 mm 100 190 M16 2x 100 277 M16 12x 6x ...

Page 14: ...14 YA3200 210723 A C E B D B 6 D ...

Page 15: ...15 YA3200 210723 A B C D E C C N S E W 100 mm 3 9 75 mm 3 50 mm 2 1000 mm 39 4 C 1 C 2 NOTICE A 7 Concrete cutter PE N L 2 cores 1 ground 3x2 5mm2 ...

Page 16: ...16 YA3200 210723 A C E B D 40 mm 1 6 Drill bit C 3 C 4 C 5 C 6 6x 100 250 kg C20 25 NOTICE Ch Anchor M16 6x ...

Page 17: ...17 YA3200 210723 A B C D E D D D 1 D 2 24 mm ...

Page 18: ...18 YA3200 210723 A C E B D D 3200 708 Flange 1x 100 197 M10x40 1x 8 mm D 3 D 4 ...

Page 19: ...19 YA3200 210723 A B C D E D D 5 D 6 5 mm 100 196 M8x12 4x 19 mm 100 194 M12 4x 100 195 M12 4x ...

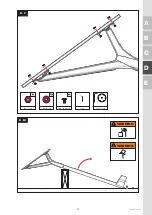
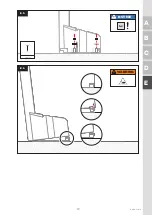
Page 20: ...20 YA3200 210723 A C E B D D D 7 D 8 CLICK CLICK ...

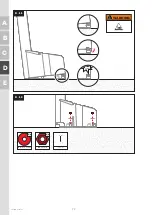
Page 21: ...21 YA3200 210723 A B C D E D D 9 D 10 100 281 M8 16x WARNING WARNING 8x 13 mm 8x Pin Torx T40 100 271 M8 8x 100 210 M8x20 8x ...

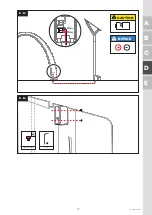
Page 22: ...22 YA3200 210723 A C E B D D CLIC K CLICK WARNING D 11 D 12 24 mm 100 193 M16 4x 100 192 Carr M16 4x ...

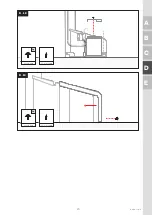
Page 23: ...23 YA3200 210723 A B C D E D CAUTION NOTICE D 13 100 198 M4x8 4x 3 mm D 14 Vin Vin ...

Page 24: ...24 YA3200 210723 A C E B D D D 15 WARNING WARNING A C B CAUTION WARNING BATT PV LOAD BATT PV LOAD BATT PV LOAD NOTICE 2x D 16 D 17 Flat insulated 3mm ...

Page 25: ...25 YA3200 210723 A B C D E D Seclock M10 Seclock M10 D 18 D 19 2x 2x Secloc bit M10 Secloc bit M10 ...

Page 26: ...26 YA3200 210723 A C E B D D 20 ...

Page 27: ...27 YA3200 210723 A B C D E E E WARNING E 1 E 2 Secloc bit M10 Secloc bit M10 ...

Page 28: ...28 YA3200 210723 A C E B D E C B A BATT PV LOAD B BATT PV LOAD A BATT PV LOAD C CAUTION WARNING 3 mm NOTICE D 15 NOTICE D 14 E 3 E 4 ...

Page 29: ...29 YA3200 210723 A B C D E E WARNING 24 mm NOTICE E 5 E 6 4x ...

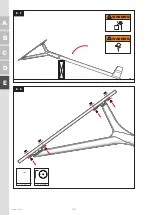
Page 30: ...30 YA3200 210723 A C E B D E 13 mm WARNING E 7 E 8 WARNING Pin Torx T40 ...

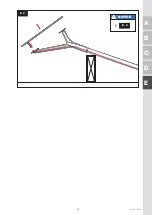
Page 31: ...31 YA3200 210723 A B C D E E NOTICE D 8 E 9 ...

Page 32: ...ising out of or related to the use of these installation instructions or the products described herein Should further information be desired or should particular problems arise which are not covered sufficiently or if you find information in these installation instructions that is incorrect misleading or incomplete we would appreciate your comments and suggestions WARNING Important information Not...

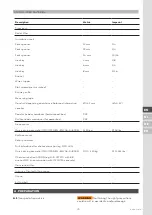
Page 33: ...ion Amount Material Finish 3200 200 Y top 1 SS304 Powder coated 3200 420 Upper panel mount 1 SS304 Powder coated 3200 440 Lower panel mount 1 SS304 Powder coated 3200 600 Battery cover 1 SS304 Powder coated 3200 703 Battery clamp 1 SS304 3200 708 Security flange 1 SS304 3200 800 Anchor plate 1 SS304 100 187 Battery 1 Electronics 100 189 Solar panel 1 Electronics Cable 1 m 2 Electronics Red black C...

Page 34: ...0 1 FE360 Galvanized 100 198 Button head screw M4x8 DIN7380 4 SS304 100 271 Lock nut M8 8 FE360 Galvanized 100 277 Hex nut M16 12 FE360 Galvanized 100 281 Washer M8 16 SS304 100 284 Washer M16 4 FE360 Galvanized Seclock M10 Seclock M10x20 4 SS304 Bit M10 Seclock bit M10 1 A2 Pintorx T40 Pintorx hand tool 1 FE360 ...

Page 35: ...Pozidriv head screwdriver for transport box PZ2 Phillips head screwdriver for power box PH2 Deep mount Quick drying concrete C20 C25 NEN EN206 1 8005 1250 kg 2756 lbs Surface mount Rotary hammer Drill bit advised for chemical anchor e g M20 Hilti Quick drying concrete C20 C25 NEN EN206 1 8005 100 250 kg 220 551 lbs Chemical anchor 4000N e g Hilti HIT 170 with 8 8 anchor M20 in combination with C20...

Page 36: ...the Solar panel is more than 1 5 meters 5ft and no more than 6 meters 20ft A 5 Make sure that there is enough distance between the anchor plate and a potential object e g a wall A 6 Determine the position of the Solar pole When the product is placed in the Northern Hemisphere face the Solar panel south as shown in the image Is the product placed in the Southern Hemisphere face the Solar panel nort...

Page 37: ...tions on electrical safety e g NEN 1010 CAUTION For assembling and installing the product it is recommended to work with two persons CAUTION The people installing the product should wear the required protection and clothing D 1 Fasten the anchor plate at the two middle anchors only D 2 Place the Solar pole on the hinge of the anchor plate D 3 Secure the Solar pole on the hinge by fastening the loc...

Page 38: ...t the positive and negative poles correctly If done right a green LED light in the power box of the interactive product is visible If not the LED light turns red D 18 Place the battery inside the Solar pole Mount the battery clamp WARNING Lifting hazard Single person lift could cause injury Work with two people when lifting the battery D 19 Place and secure the battery cover D 20 Enjoy the sun E E...

Page 39: ...ARNING Follow the instructions in this section closely when servicing the product Failure to follow these instructions may cause serious injury or damage WARNING Always be sure that the product is powered off before attempting to perform inspection or maintenance WARNING When servicing the product use identical replacement parts only Use of unauthorized parts may cause serious injury or damage Use...

Page 40: ...ING Please make sure when discarding the product the materials are recycled sensibly and correctly To recycle this product you can contact us and send back the product We will then dispose of your used product in a way that lives up to our sustainability directives WARRANTY TERMS CONDITIONS For the Warranty Terms Conditions on this product My Yalp Content and Software visit store yalp com download...

Page 41: ...nd met het gebruik van deze installatiehandleiding of de hierin beschreven producten Als meer informatie gewenst is of als er zich problemen voordoen die niet voldoende worden behandeld of als u informatie in deze installatiehandleiding vindt die onjuist misleidend of onvolledig is dan stellen wij uw opmerkingen en suggesties zeer op prijs WARNING Belangrijke informatie Het niet doorlezen van dit ...

Page 42: ...ELENLIJST Nummer Omschrijving Hoeveelheid Materiaal Afwerking 3200 200 Y frame 1 SS304 Poedercoating 3200 420 Bovenste paneelbevestiging 1 SS304 Poedercoating 3200 440 Onderste paneelbevestiging 1 SS304 Poedercoating 3200 600 Accu dekplaat 1 SS304 Poedercoating 3200 703 Accu klemplaat 1 SS304 3200 708 Veiligheidsflens 1 SS304 3200 800 Grondplaat 1 SS304 100 187 Accu 1 Elektronica 100 189 Zonnepane...

Page 43: ...zinkt 100 196 Inbusbout DIN 7380 M8x12 4 SS304 100 197 Inbusbout CK D912 M10x40 1 FE360 Verzinkt 100 198 Inbusbout D912 CK A2 M4x8 4 FE360 100 271 Borgmoer DIN 985 M8 8 100 277 Zeskantmoer DIN 934 M16 12 FE360 Verzinkt 100 281 Sluitring DIN 125 M8 16 SS304 100 284 Sluitring DIN 125 M16 4 FE360 Verzinkt Seclock M10 Seclock M10x20 4 SS304 Bit M10 Seclock bit M10 1 A2 ...

Page 44: ...t Kabelgoot Ø0 32 mm Ø 0 13 Waterpas Kruiskop schroevendraaier PH2 Grondmontage Sneldrogend beton C20 C25 NEN EN206 1 8005 1250 kg 2756 lbs Opbouwmontage Klopboor Chemisch anker bijv M20 Hilti Sneldrogend beton C20 C25 NEN EN206 1 8005 100 250 kg 220 551 lbs Chemisch anker 4000N bijv Hilti HIT 170 met 8 8 anker M20 in combinatie met C20 C25 beton Betonzaag Beperkte kantelruimte Kraan Hijsband A VO...

Page 45: ...cycle het verpakkingsmateriaal op de juiste manier A 4 Zorg ervoor dat de afstand tussen de interactive en de Solarpaal minimaal 1 5 meter 5ft en maximaal 6 meter 20ft is A 5 Bepaal de richting van de Solarpaal Wanneer het product op het noordelijk halfrond geplaatst wordt richt dan het zonnepaneel op het zuiden zoals weergegeven in de afbeelding Staat het product op het zuidelijk halfrond richt d...

Page 46: ... 5 Boor 6 gaten met een klopboor volgens de instructies van het gebruikte chemische anker C 6 Plaats de chemische ankers volgens de instructies van het desbetreffende chemische anker D INSTALLATIE WARNING De elektrische installatie dient gedaan te worden door een gecertificeerd installateur volgens de regionale richtlijnen met betrekking tot het veilig installeren van elektrische apparaten bijv NE...

Page 47: ...l A aan load Accukabel B aan batt Zonnepaneelkabel C aan PV WARNING Schokgevaar Vanaf het moment dat het zonnepaneel licht ontvangt wekt deze energie op en kan het aanraken van het uiteinde van de kabels een schok veroorzaken Raak alleen het gecoate deel van de kabels aan CAUTION Storingsgevaar Het verbinden van de kabels in de onjuiste volgorde kan leiden tot een onomkeerbare storing in het produ...

Page 48: ...l de kabels van het zonnepaneel NOTICE Je kan nu het nieuwe zonnepaneel aansluiten door de stappen vanaf D 8 te volgen SERVICE ONDERSTEUNING Voor vragen opmerkingen of hulp kun je altijd contact opnemen met het hoofdkantoor van Yalp Yalp Nieuwenkampsmaten 12 7472 DE Goor Nederland 31 0 547 289 410 support yalp com Ga voor contactgegevens van Yalp distributeurs of kantoren naar Yalp com of bekijk h...

Page 49: ...en om te zien of ze opnieuw gebruikt kunnen worden Benodigde reserveonderdelen kunnen bijbesteld worden Neem voor hulp contact met ons op AFVOEREN Als je hulp nodig hebt bij het afvoeren van het product neem dan contact met ons op en informeer naar onze diensten en mogelijke kosten RECYCLEN Zorg er bij het weggooien voor dat alle onderdelen van het product verstandig en correct worden gerecycled O...

Page 50: ...shandbuchs oder der darin beschriebenen Produkte ergeben oder damit in Zusammenhang stehen Wenn Sie weitere Informationen benötigen oder wenn Probleme auftreten die nicht angemessen behandelt werden oder wenn Sie in diesem Installationshandbuch falsche irreführende oder unvollständige Informationen finden würden wir uns über Ihre Kommentare und Vorschläge sehr freuen WARNING Wichtige Informationen...

Page 51: ...d Staub IP Schutz Solarpfosten IP 54 IP Schutz Solarpaneel IP 67 IP 68 NORMEN Normen International IEC 62368 1 2018 Europäisch CE TEILELISTE Nummer Beschreibung Menge Material Fertigstellung 3200 200 Y frame 1 SS304 Pulverbeschichtung 3200 420 Montage der oberen Platte 1 SS304 Pulverbeschichtung 3200 440 Montage der unteren Platte 1 SS304 Pulverbeschichtung 3200 600 Batterie Abdeckplatte 1 SS304 P...

Page 52: ...legscheibe M12 4 FE360 Feuerverzinkt 100 195 Sicherungsmutter M12 DIN 985 4 FE360 Feuerverzinkt 100 196 Innensechskantschraube M8x12 DIN 7380 4 SS304 100 197 Rundkopfschraube M10x40 DIN7380 1 FE360 Feuerverzinkt 100 198 Rundkopfschraube M4x8 DIN7380 4 SS304 100 271 Sicherungsmutter M8 8 100 281 Unterlegscheibe M8 16 SS304 100 284 Unterlegscheibe M16 12 FE360 Feuerverzinkt Seclock M10 Seclock M10x2...

Page 53: ...aßband Kabelkanal Ø0 32 mm Ø 0 13 Wasserwaage Kreuzschraubenzieher Bodenmontage Schnell trocknender Beton C20 C25 NEN EN206 1 8005 1250 kg 2756 lbs Oberflächenmontage Schlagbohrmaschine Bohrer für chemische Verankerung z B M20 Hilti Schnell trocknender Beton C20 C25 NEN EN206 1 8005 100 250 kg 220 551 lbs Chemischer Anker 4000N z B Hilti HIT 170 mit 8 8 Anker M20 in Kombination mit Beton C20 C25 B...

Page 54: ...rrekt wiederverwenden und recyceln A 4 Stellen Sie sicher dass der Abstand zwischen dem interaktiven und dem Sonnenmast mindestens 1 5 Meter und höchstens 6 Meter beträgt A 5 Bestimmen Sie die Richtung des Sonnenpfosten Wenn das Produkt auf der Nordhalbkugel platziert wird richten Sie das Solarpanel nach Süden aus wie in der Abbildung gezeigt Wenn das Produkt auf der Südhalbkugel platziert wird ri...

Page 55: ...eiden C 3 Gießen Sie den Beton auf die richtige Höhe und warten Sie bis der Beton ausgehärtet ist C 4 Richten Sie die Grundplatte wie in der Abbildung gezeigt aus C 5 Bohren Sie 6 Löcher mit einem Gewindebohrer gemäß den Anweisungen des verwendeten chemischen Dübels C 6 Setzen Sie die chemischen Dübel entsprechend den Anweisungen des jeweiligen chemischen Dübels D INSTALLATION WARNING Die Installa...

Page 56: ...n Sie mit mindestens zwei Personen während Sie die Batterie anheben WARNING Schockgefahr Wenn zwei Pole verbunden sind fließt Strom durch die Kabel Achten Sie darauf dass Sie immer nur eine Stange auf einmal berühren NOTICE Stellen Sie sicher dass die Plus und Minuspole korrekt angeschlossen sind D 17 Schließen Sie die Kabel in dieser Reihenfolge an Erdungskabel A zur Last Batteriekabel B zum Batt...

Page 57: ...ast wie in der Abbildung gezeigt Senken Sie den Solarmast mit zwei Personen vorsichtig ab WARNING Gefahr Das Anheben durch nur eine Person kann zu Verletzungen führen Arbeiten Sie mit mindestens zwei Personen während Sie den Solarmast absenken E 8 Trennen Sie das Solarmodul von den beiden Plattenbefestigungen E 9 Trennen Sie die Kabel vom Solarpanel NOTICE Sie können nun das neue Solarpanel anschl...

Page 58: ...ports mit geeigneten Materialien NOTICE Wenn das Produkt an einem anderen Ort wieder installiert werden muss prüfen Sie alle demontierten Teile daraufhin ob sie wiederverwendet werden können Benötigte Ersatzteile können bestellt werden Bitte kontaktieren Sie uns für Hilfe ENTSORGUNG Wenn Sie Unterstützung bei der Entsorgung des Produkts benötigen wenden Sie sich bitte an uns und erkundigen Sie sic...

Page 59: ...duits décrits ici Si plus d informations sont nécessaires ou si des problèmes surviennent qui ne sont pas résolus de manière adéquate ou si vous trouvez des informations dans ce manuel d installation qui sont incorrectes trompeusus ou incomplètes nous apprécions grandement vos sugestions WARNING Informations importantes Le fait de ne pas lire ce document peut entraîner des blessures graves et ou d...

Page 60: ...tionale IEC 62368 1 2018 Européen CE LISTE DES PIÈCES Numéro Description Quantité Matériel Finition 3200 200 Structure Y 1 SS304 Poedré laqué 3200 420 Fixation panneau supérieur 1 SS304 Poedré laqué 3200 440 Fixation panneau inférieur 1 SS304 Poedré laqué 3200 600 Couvercle batterie 1 SS304 Poedré laqué 3200 703 Plaque de serrage batterie 1 SS304 3200 708 Bride de sécurité 1 SS304 3200 800 Plaque ...

Page 61: ...é 100 196 Vis allen M8x12 DIN 7380 4 SS304 100 197 Vis à tête ronde M10x40 DIN7380 1 FE360 Galvanisé 100 198 Vis à tête ronde M4x8 DIN7380 4 SS304 100 271 Contre écrou M8 8 FE360 Galvanisé 100 277 Écrou hexagonal M16 12 FE360 Galvanisé 100 281 Rondelle M8 16 FE360 Galvanisé 100 284 Rondelle M16 4 FE360 Galvanisé Seclock M10 Seclock M10x20 4 SS304 Bit M10 Seclock bit M10 1 A2 Pintorx T40 Pintorx ou...

Page 62: ...0 13 Niveau à bulle Tournevis cruciforme Montage au sol Béton rapide C20 C25 NEN EN206 1 8005 1250 kg 2756 lbs Montage en surface Marteau perforateur Foret pour ancrage chimique par exemple M20 Hilti Béton rapide C20 C25 NEN EN206 1 8005 100 250 kg 220 551 lbs Ancrage chimique 4000 par exemple Hilti HIT 170 avec ancrage 8 8 M20 combiné béton C20 C25 Scie à béton Espace d inclinaison limité Grue Sa...

Page 63: ... le matériau d emballage A 4 S assurer que la distance entre l interactive et le pôle solaire est au moins 1 50m est au plus 6 00m A 5 Déterminez la direction du pôle solaire Lorsque vous placez le produit dans l hémisphère nord orientez le panneau solaire vers le sud comme indiqué sur l image Si le produit se trouve dans l hémisphère sud pointez le panneau solaire vers le nord NOTICE La figure mo...

Page 64: ... le béton prenne C 4 Alignez la plaque de base comme indiqué sur l image C 5 Percer 6 trous avec un marteau perforateur selon les instructions de l ancrage chimique utilisé C 6 Installer les ancrages chimiques conformément aux instructions de l ancrage chimique approprié D INSTALLATION WARNING L installation doit être effectuée par un installateur agréé conformément aux directives régionales pour ...

Page 65: ...e de choc À partir du moment où le panneau solaire reçoit de la lumière il génère de l énergie et toucher l extrémité des câbles peut provoquer un choc Ne touchez que la partie revêtue des câbles CAUTION Risque de panne Le branchement des câbles dans le mauvais ordre peut entraîner une défaillance irréversible du produit Connectez les câbles dans le bon ordre NOTICE Assurez vous que les pôles plus...

Page 66: ...TIEN Pour toute question commentaire ou aide vous pouvez toujours contacter le siège social de Yalp Yalp Sport speeltoestellen Nieuwenkampsmaten 12 7472 DE Goor Pays Bas 31 0 547 289 410 support yalp com Pour obtenir les coordonnées des distributeurs ou bureaux Yalp visitez Yalp com ou consultez la liste des distributeurs dans l application MyYalp MAINTENANCE WARNING Suivez attentivement les instr...

Page 67: ...Les pièces de rechange nécessaires peuvent être commandées séparément Veuillez nous contacter pour assistance SUPPRIMER Si vous avez besoin d aide pour l élimination du produit veuillez nous contacter et vous renseigner sur nos services et les coûts éventuels RECYCLER Lors de l élimination assurez vous que toutes les pièces du produit sont recyclées judicieusement et correctement Pour recycler ce ...

Page 68: ...YA3200 210723 Made in the Netherlands ...

Reviews: