K720W
Fitting Kit
EN
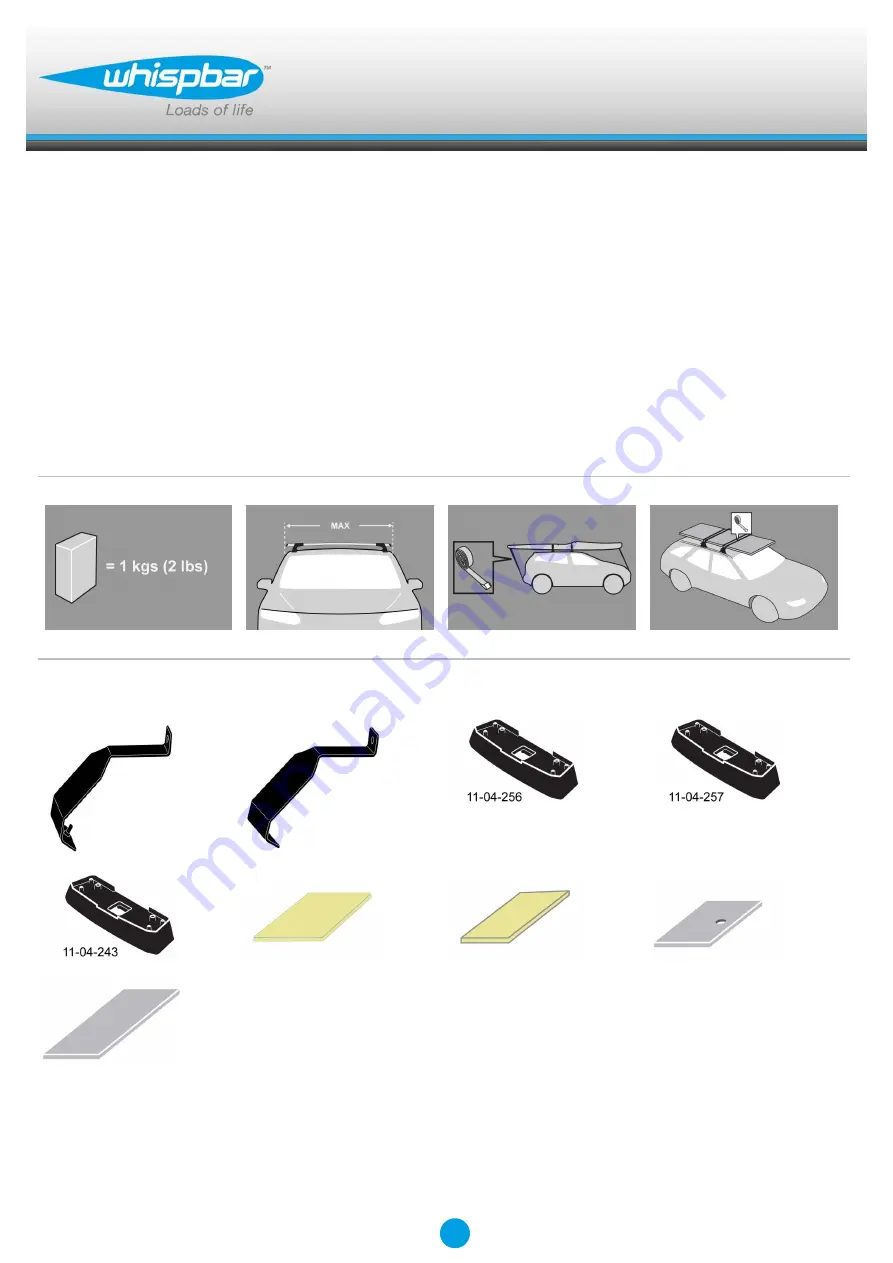
Fitting Instructions for Basic Carrier
x 2
x 1
x 4
Revision No: 1A
1
Page 1: ...K720W Fitting Kit EN Fitting Instructions for Basic Carrier x 2 x 2 x 1 x 1 x 2 x 4 x 4 x 2 x 2 Revision No 1A 1...
Page 2: ...h 12 EU 50 kgs 110 lbs 50 kgs 110 lbs Citigo 5dr Hatch 12 14 NZ 50 kgs 110 lbs 50 kgs 110 lbs Seat Mii 5dr Hatch 12 EU 50 kgs 110 lbs 50 kgs 110 lbs Volkswagen UP 5dr Hatch 12 AU 50 kgs 110 lbs 50 kgs...
Page 3: ...kage and check Contact your dealer if any parts are missing or damaged This kit fits type A B C and D These instructions show type A crossbar fitted They also apply to type B C and D NOTE Clamp images...
Page 4: ...ove covers Use hex screwdriver to reverse adjusting screw 10 turns Press adjusting screw and pull crossbar legs out Refer to the crossbar instructions for crossbar adjustment method Ensure each end of...
Page 5: ...ing screw Apply protective strip as shown Trim if required A Clear B Grey It is important to put the clamps in the correct position on the vehicle Letters refer to the part numbers stamped on clamps C...
Page 6: ...clamps may have labels showing their positions on the vehicle For example Front Right Refit locking screw so that it goes through the hole in the clamp Do not begin to tighten the locking screw Refer...
Page 7: ...position on the vehicle Letters refer to the pad part numbers and position Pad Part Number A 243 B 256 C 257 Place rubber pads supplied with fitting kit on the vehicle roof Pad may vary in shape to th...
Page 8: ...mmended spacing between the bars is 700mm 27 1 2 unless otherwise stated Adjust the legs on the crossbar so that they are positioned equally from the ends of the crossbar and the clamps engage firmly...
Page 9: ...Fitting Kit EN K720W Locate vehicle fixed point for the rear bar as indicated on rear window Install front clamp as shown Install rear clamp as shown 9...
Page 10: ...Fitting Kit EN K720W Tighten adjusting screw to 5 Nm 3 7 ft lb hand tight Tighten locking screw on both legs evenly Check crossbar is securely attached to the vehicle 10...
Page 11: ...Fitting Kit EN K720W Use keys to fit and lock covers CAUTION Recheck all fasteners immediately after a load is applied to the crossbars Regularly check screws are tight 11...
Page 12: ...cle manufacturers roof load rating if it is lower than the maximum load capacity specified in the fitting instructions Loads should not overhang the sides of the product and be evenly distributed with...
Page 13: ...itted Lubricate locks and adjusting screws at regular intervals Remove the products from the vehicle when not in use Make sure all loose parts are stored safely Yakima Australia Pty Ltd 17 Hinkler Cou...
Page 14: ...12 14 NZ 200mm 500mm 852mm 849mm 7 7 8ths 19 11 16ths 33 9 16ths 33 7 16ths Mii 5dr Hatch 12 EU 200mm 500mm 852mm 849mm 7 7 8ths 19 11 16ths 33 9 16ths 33 7 16ths UP 5dr Hatch 12 AU 200mm 500mm 852mm...
Page 15: ...anty cover defects loss or damage resulting from accidents unlawful use of the vehicle or defects inconsistencies in the vehicle on which the product or component is fitted Liability for direct indire...
Page 16: ...those instructions and of returning the product to Yakima or the Whispbar dealer will be borne by you Following receipt of the product and purchase invoice or receipt Yakima or the Whispbar dealer mus...