background image

7


Internet Connection

•  ADSL 8 Mbps or faster (No fixed or dynamic global IP address is required.)

When the Internet line speed is low or unstable, the sound may be interrupted or the connection of the WIRES-X 

connection may become unstable.

Preparation

 User registration (acquire an ID number)

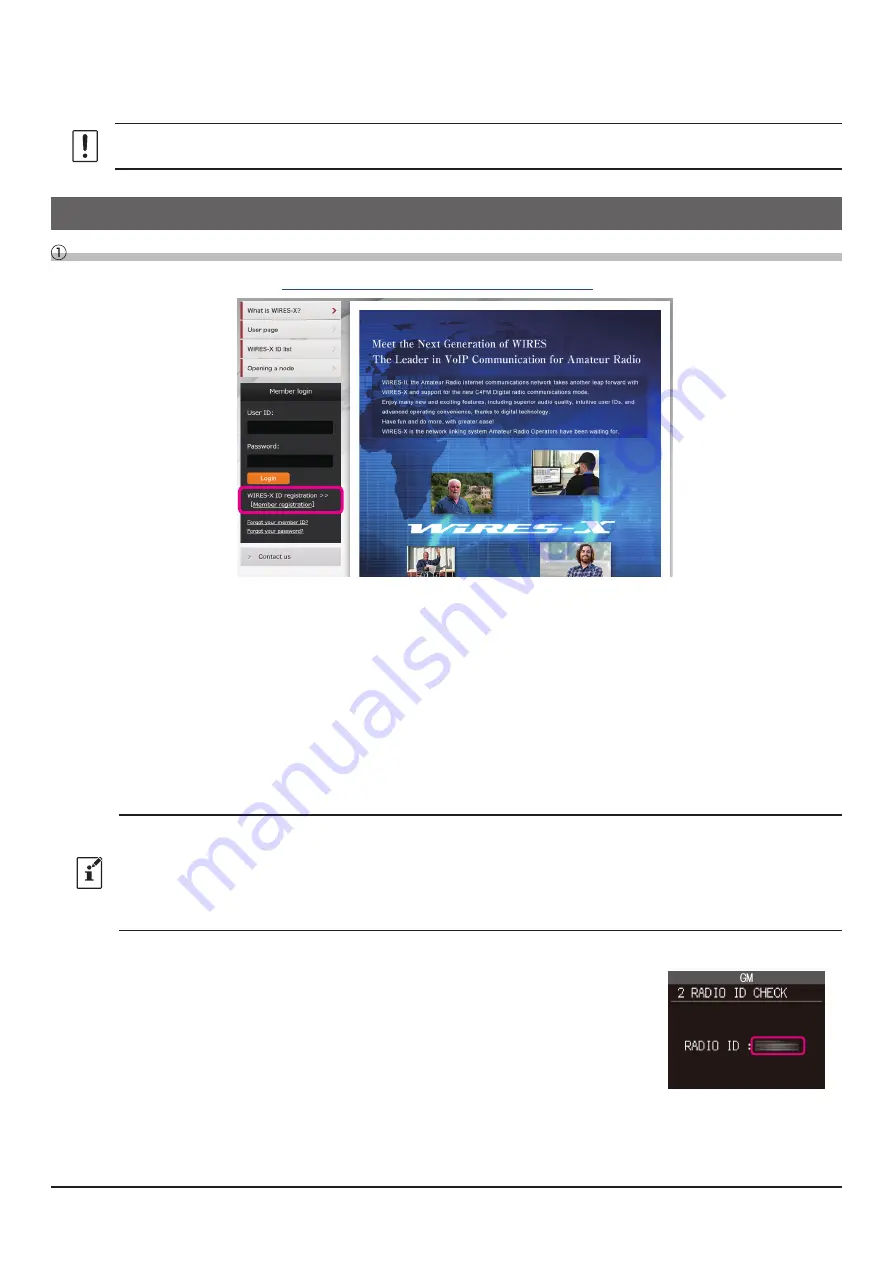
1.  Access the WIRES-X website (

https://www.yaesu.com/jp/en/wires-x/index.php

).

2.  Click [

Member Registration

] on the left side of the screen.


The “

Member registration

” page opens.

3.  On the “

Member registration

” page, enter the e-mail address to be used for registration and click the [

Send

] button.


You will promptly receive an e-mail with an URL address to the website for registration.

4.  Click the URL address of an e-mail to open the website.
5.  When “

WIRES-X Server End-User License Agreement

” is displayed, check “

I agree to the WIRES-X server 

license agreement

”, then click [

Agree and proceed

].

6.  Fill in all the fields on the “

Member registration

” page and send it.


In the “

HRI-200 Serial Number / RADIO ID

” field, enter the “

RADIO ID

” of the transceiver used for the node station 

(RADIO ID: 5-digit alphanumeric ID unique to the transceiver).

The transceiver's RADIO ID is a combination of five letters and numbers. Since the RADIO ID is distinguished 

between uppercase and lowercase letters of the alphabet, please input the RADIO ID displayed on the screen exactly 

as it is.
If it is difficult to determine the Radio ID, please enter the 

RADIO ID

 and also enter the 

Transceiver's Serial Number


in the “

comment

” field at the bottom of the WIRES-X registration form screen so that registration can be completed 

without delay.


The “

RADIO ID

” of the transceiver may be displayed using the following procedure:


FT5DR/DE or FT3DE/DE

(1)  Press and hold the [

MENU

] key (FT5D) or the [

DISP

] key (FT3D) to open the 

setup menu.

(2)  Touch [

GM

].

(3)  Touch [

2 RADIO ID CHECK

].


The RADIO ID is displayed.

Summary of Contents for FT3DE

Page 1: ...sceivers that support the Portable Digital Node Function are FT5D FT3D FT2D FTM 500D FTM 400XD D FTM 300D FTM 200D and FTM 100D As of Apr 2023 Other C4FM digital transceivers do not require WIRES X us...

Page 2: ...de mode SCU 56 or SCU 20 PC Connection Cable Supplied with the transceiver When communicating with a digital node station or an analog node station in the portable HRI mode via the Internet SCU 58 or...

Page 3: ...ration of Portable Node 30 Connecting to a node or a room on the Internet 42 Communicating with other station 56 Disconnecting from the node or room 57 Closing the WIRES X software 57 Using the Portab...

Page 4: ...100D Two forms of WIRES X Access are supported Access Point and Direct Operation In Access Point the Portable Node station FT5D FT3D FT2D FTM 500D FTM 400XD D FTM 300D FTM 200D or FTM 100D can be use...

Page 5: ...SB Connection Cable audio cables and a PC with WIRES X Software and Internet connection The HRI 200 interface is not used In the Portable HRI Mode configuration either the Access Point operation or th...

Page 6: ...ls are heard only from the PC speaker In this Direct Operation the Portable Digital Node Station transceiver does not transmit or receive over the air Direct Operation Portable HRI Mode Illustration W...

Page 7: ...in a portable digital mode SCU 56 or SCU 20 PC Connection Cable Supplied with the transceiver When communicating with a digital node station or an analog node station in the portable HRI mode via the...

Page 8: ...ver license agreement then click Agree and proceed 6 Fill in all the fields on the Member registration page and send it In the HRI 200 Serial Number RADIO ID field enter the RADIO ID of the transceive...

Page 9: ...L knob 3 Rotate the DIAL knob to select 3 RADIO ID CHECK The RADIO ID is displayed at the top of the screen 1 2 3 DP ID LIST RADIO ID CHECK GM FTM 200DR DE 1 Press and hold the F MENU key to open the...

Page 10: ...550 or higher 2 Execute the Install exe file in the unzipped folder The WIRES X Installer window will appear 3 Click WIRES X Software Setup The Welcome to the WIRES X Setup Wizard window will appear 4...

Page 11: ...ear on the Windows desktop 9 Click Close in the WIRES X installer windows Installation of the WIRES X software is complete Install the USB driver for the PC connection cable 1 Download the SCU 58 SCU...

Page 12: ...SETUP MENU 2 Touch RESET CLONE The firmware version of MAIN will be displayed on the top of the screen 3 Touch BACK 4 Touch TX RX 5 Touch DIGITAL 6 Rotate the DIAL knob to select 5 DSP VERSION The DSP...

Page 13: ...d connect the transceiver and the PC Communicating only with C4FM digital mode Portable Digital Node Mode FT5DR DE FT3DR DE or FT2DR DE 1 Refer to the below figure and connect the PC connection cable...

Page 14: ...on is complete After completing Initial Setting setting is required only once at the beginning page 15 the volume level of the microphone and PC speaker must be set by referring to Adjusting Audio Lev...

Page 15: ...re and connect the SCU 56 or SCU 20 PC connection cable that is supplied with the separately sold SCU 58 or SCU 40 WIRES X connection cable kit and the audio cable Speaker MIC DATA Jack USB SCU 56 or...

Page 16: ...he LCD screen Portable HRI Mode Supports Internet communication in digital mode and analog mode FT5DR DE 1 Press and hold the GM X key F MENU key and the POWER switch to turn the transceiver ON WIRES...

Page 17: ...ommunication port with the transceiver connected to the PC 1 Connect the transceiver to the PC using the SCU 55 SCU 56 SCU 19 or SCU 20 PC connection cable For details on the connection procedure refe...

Page 18: ...the e mail received when the user registration is completed The Radio ID is automatically entered when the transceiver is started in Porta ble digital node mode or Portable HRI mode is connected to t...

Page 19: ...eration Default Unchecked DG ID Select the DG ID Digital Group ID number 00 to 99 default setting 00 When the DG ID number is set to 00 the node becomes an open node The subcode on the right can be se...

Page 20: ...ist It takes about 10 minutes for the setting to be reflected in the node list Default Checked This is the only item that may be set when using Access Point in the Portable Digital Node Mode 3 Click t...

Page 21: ...N is displayed on the LCD screen 2 Press the A B key to select Access Point or Direct Operation Depending on the operation mode chosen the frequency display will show as follows Access Point Frequency...

Page 22: ...and the POWER switch to turn the transceiver ON PDN is displayed on the LCD screen 2 Press the A B DW key to select Access Point or Direct Operation Depending on the operation mode chosen the sub freq...

Page 23: ...and hold the GM X key Sets the operation frequency Rotate the DIAL knob or press the Numeric keypad input screen Displays the Function Menu Screen Press the F menu key Switches between the VFO mode an...

Page 24: ...g screen you can set and operate the following with the transceivers key and DIAL knob settings Function Key or Dial Switches between the Access Point and the Direct Operation Press the key Starts ope...

Page 25: ...g screen you can set and operate the following with the transceivers key and DIAL knob settings Function Key or Dial Switches between the Access Point and the Direct Operation Press the A B key Starts...

Page 26: ...ey on the microphone by default setting Adjusts the squelch level Press the SQL VOICE key then rotate the DIAL knob Switches Busy detection between Noise squelch and DG ID number match Press and hold...

Page 27: ...e Fmenu key then rotate the DIAL knob to select DG ID RX DG ID TX 50 DG ID RX 00 4 Press the Fmenu key then rotate the DIAL knob to set the receive DG ID DG ID RX DG ID TX 50 DG ID RX 50 5 Press the B...

Page 28: ...AL knob to select DG ID RX 4 Press the GM key then rotate the DIAL knob to set the receive DG ID DG ID RX 5 Press and hold the DISP key to save the setting and return to normal opera tion The setting...

Page 29: ...G ID TX DG ID RX DG ID SETUP 5 Press and hold the GM key to save the setting and return to normal operation The setting of the FTM 500D transceiver is complete FTM 400XD D 1 Press and hold the GM key...

Page 30: ...ob then rotate the DIAL knob to set the DG ID RX DG ID SETUP DG ID TX DG ID RX 4 Press the DIAL knob then rotate the DIAL knob to set the receive DG ID DG ID RX DG ID SETUP DG ID TX DG ID RX 5 Press a...

Page 31: ...ination display will be blank SEARCH DIRECT JQ1YBG ND1 Shinagawa When connection history is stored The ID of the previous connected the Node or Room will blink Press the PTT switch or touch blinking c...

Page 32: ...elch level Press the SQL key then rotate the VOL knob Some items in the Set mode and Function menu are automatically set for the Portable Digital Node function so the settings cannot be used Setting t...

Page 33: ...rnet When connection history is not stored The lower connection destination display will be blank When connection history is stored The ID of the previous connected the Node or Room will blink Press t...

Page 34: ...OL knob FT2D Press the SQL key then rotate the DIAL knob Some items in the Set mode and Function menu are automatically set for the Portable Digital Node function so the settings cannot be used Settin...

Page 35: ...tion destination display will be blank JQ1YBG ND Shinagawa SEARCH DIRECT When connection history is stored The ID of the previously connected ID will blink Press the PTT switch to connect to the previ...

Page 36: ...r Mute Press the MUTE key on the microphone Turning the back light ON and OFF Press and hold the DISP key Disconnects a node or a room on the Internet Press and hold the key on the microphone Setting...

Page 37: ...nection history is stored The ID of the previous connected Node or Room will display in gray Press the PTT switch or touch connection ID to connect Upon being connected the text will light up in white...

Page 38: ...on the microphone By default setting Selects Speaker Mute Press the MUTE on the LCD screen Disconnects a node or a room on the Internet Press the key on the microphone Press and hold Some items in th...

Page 39: ...e connection destination display will be blank JQ1YBG ND Shinagawa SEARCH DIRECT When connection history is stored The ID of the previously connected ID will blink Press the PTT switch to connect to t...

Page 40: ...ess the P4 key on the microphone by default setting Selects Speaker Mute Press the MUTE key on the microphone Turning the back light ON and OFF Press and hold the DISP key Disconnects a node or a room...

Page 41: ...ode or a room on the Internet When connected to the same node or room as the ID of the previous connection history The current connection ID is displayed in the LCD To communicate with this connection...

Page 42: ...A B DW key each time toggles the mute mode as follows MUTE OFF MUTE ALL MUTE TX MUTE RX MUTE OFF MUTE OFF Disable mute MUTE ALL Mute both the received voice from the C4FM digital station and the voice...

Page 43: ...ily connect to the desired room or node station 1 Click the Digital Node or Digital Room to connect Icon of a digital room or a digital node Digital Open room Only the Digital Nodes may be connected D...

Page 44: ...agawa 2 Touch ALL Displays the list of accessible nodes and rooms Connection destinations are displayed from the room list and then node list On the connection destination room columns the number of a...

Page 45: ...essful an error message appears and the screen re turns to the list of nodes and rooms JA1YOE TKY ROOM 21 JA1YOE ROOM A 4 JA1YOE ROOM B 3 JA1YOE ROOM C 0 JQ1YBG ND JA1Y 24 Connecting to registered nod...

Page 46: ...ars and the name flashes again SEARCH DIRECT JQ1YBG ND1 Shinagawa JA1YOE ROOM12345 Entering the DTMF ID number 5 digits of the node or the room 1 Touch SEARCH DIRECT Displays the category list SEARCH...

Page 47: ...d from the room list and then node list On the connection destination room columns the number of activities the number of nodes connected to each room appears on the right side ALL SEARCH DIRECT C1 C2...

Page 48: ...D Shinagawa SEARCH DIRECT 2 Rotate the FUNC knob to select the category C1 to C5 and then press the FUNC knob Displays the node and room lists For details on registering nodes and rooms see Registerin...

Page 49: ...5 digit DTMF ID 3 Press the key on the microphone to start a connection Once connection is successfully established Connected will appear on the LCD If connection is unsuccessful an error message appe...

Page 50: ...76 5 12 8 53 5 7 6 5 7 4 5 0 9 7 3 6 6 4 2 Touch ALL twice Displays the list of accessible nodes and rooms Connection destinations are displayed from the room list and then node list On the connection...

Page 51: ...l an error message appears and the screen re turns to the list of nodes and rooms 116 116 116 7 116 20 116 0 4 6 5 4 612 Connecting to registered nodes or rooms to the category list 1 Touch Displays t...

Page 52: ...an error message appears and the name flash es again 76 5 12 8 53 5 7 6 5 7 4 5 0 9 7 3 6 5 7 6 7 4 6 4 Entering the DTMF ID number 5 digits of the node or the room 1 Press and hold the key on the mi...

Page 53: ...played from the room list and then node list On the connection destination room columns the number of activities the number of nodes connected to each room appears on the right side ALL SEARCH DIRECT...

Page 54: ...2 Rotate the DIAL knob to select the category C1 to C5 and then press the DIAL knob Displays the node and room lists For details on registering nodes and rooms see Registering the connected node or ro...

Page 55: ...5 digit DTMF ID 3 Press the key on the microphone to start a connection Once connection is successfully established Connected will appear on the LCD If connection is unsuccessful an error message appe...

Page 56: ...g Once connection is successfully established Connected will appear on the LCD If connection is unsuccessful an error message appears and the screen re turns to the list of nodes and rooms Searching b...

Page 57: ...tted from the C4FM digital radio at the same time In the Direct Operation the signal will only be relayed to the other station on the Internet The TX BUSY LED lights red but the transceiver does not t...

Page 58: ...tion of the other station in real time on the transceiver screen FT5D Press the F menu key then touch DISP to display the compass screen Press the F menu key again to return to the normal screen FT3D...

Page 59: ...ry and then press the FUNC knob The name of the node or room currently connected is added to the list of the registered nodes and rooms If the selected category is already registered with the same nod...

Page 60: ...DIAL knob to select the desired category and then press the DIAL knob The name of the node or room currently connected is added to the list of the registered nodes and rooms If the selected category i...

Page 61: ...ON 2 Press the A B key to select Access Point or Direct Operation The set operation mode is indicated on the frequency display as follows Access Point Frequency Display Direct Operation DIRECT To comm...

Page 62: ...s Point or Direct Operation The set operation mode is indicated on the sub frequency display as follows Access Point NODE Direct Operation DIRECT Connecting a node or a room by operating the WIRES X s...

Page 63: ...munication from the other station on the Internet but the S meter does not fluctuate In Direct Operation of Portable HRI Mode with an FT5D FT3D FT2D transceiver the audio from the other station is hea...

Page 64: ...From the File menu select Exit If Enable WIRES X Auto Start has been selected when installing the WIRES X software the software will restart immediately after closing the software If you do not want t...

Page 65: ...oint and Direct Operation Press the A B key BACKTRACK screen compass screen Press the DISP key Direct Operation only Transmission sound monitor function on or off Press the V M key Direct Operation on...

Page 66: ...reen compass screen Press the DISP key Direct Operation only SQL level setting Press the SQL key and rotate the A Band DIAL knob FTM 300D or the DIAL knob FTM 200D Turning the backlight ON and OFF Pre...

Page 67: ...ach menu refer to Main Menu page 74 of the WIRES X Connection Kit HRI 200 Instruction Manual Group window Displays active nodes and rooms arranging the list based on the setting Active node window Act...

Page 68: ...con to toggle between transmit prohibit and release alternately Not transmitting Transmitting Prohibit transmission Receiving status The signal receiving status of the node and the repeating status of...

Page 69: ...r of nodes connecting to the room Transmission node information display area Displays information of a node or digital node which is currently transmitting Node ID display area Lists the IDs of nodes...

Page 70: ...or room Receive audio level adjustment PC microphone input level Adjust the volume level so that the VOL bar graph is 50 by turning the VOL knob of FT5D FT3D FT2D and then make the following adjustmen...

Page 71: ...frequency and DG ID number as the Portable Digital Node station move the Slider to adjust so that the peak is not over the dotted line If the microphone input is muted click the icon on the right side...

Page 72: ...he sound may be distorted 5 Click TX to stop transmitting 6 Click the button at the top right of the Volume Mixer window to close The audio level adjustment of Access Point is completed Adjusting Audi...

Page 73: ...ect area Waveform monitor is enabled 3 Click Sound Property The WINDOWS Sound window opens 4 Click the Recording tab in the WINDOWS Sound window 5 Click Microphone then click the Properties button The...

Page 74: ...itor does not exceed the dotted line or the peak of the waveform does not col lapse 8 This setting is necessary only when using the FT5D FT3D or FT2D transceiver Click the Listen tab and check Listen...

Page 75: ...k the Start button again to stop the test sound If the speaker output is muted click the icon at the bottom of the slider to release the mute If the volume level of Speaker Headphone is too low adjust...

Page 76: ...ches between ON and OFF OFF Does not output sound to the analog station Default setting Turn it OFF to do Internet communication only in digital mode ON Audio output to the analog station Is displayed...

Page 77: ...ed they are displayed in the group window so you can easily access them Bookmarking Nodes or Rooms 1 Click on the node station or room you want to bookmark in Active node window or Active room window...

Page 78: ...eproduced without the permission of YAESU MUSEN CO LTD YAESU MUSEN CO LTD Omori Bellport Building D 3F 6 26 3 Minami Oi Shinagawa ku Tokyo 140 0013 Japan YAESU USA 6125 Phyllis Drive Cypress CA 90630...

Reviews: