


Installation Notes
To reset the terminal server manually, follow these steps:
1. Make a simple "tool" from an ordinary paper clip by bending one end outward. You
need this tool to press the RESET switch located behind the terminal server's front
panel.
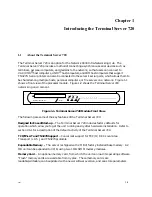
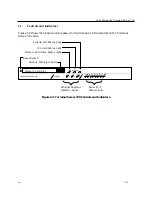
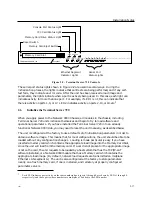
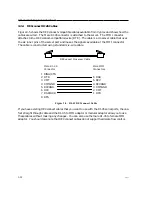
2. Look for the small hole to the left of the Memory Card Slot (see Figure 2-2).
3. Use the paper clip tool to press the RESET switch once. This halts all terminal server
operations -- the server will no longer send or receive network data or data from its
connected devices. The terminal server enters a halt state; all front panel lights
illuminate.
☞
All ongoing sessions and data are lost when you reset the unit.
4. Press the RESET switch again. The terminal server performs a self test of its
circuitry, which takes about 20 seconds. Check the lights on the front panel (see Figure
2-2) while the test is under way.
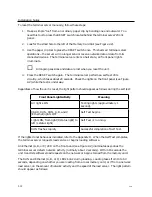
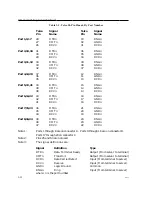
Regardless of how the unit is reset, the light pattern should appear as follows during the self test:
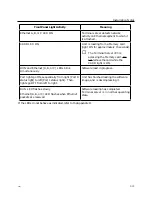
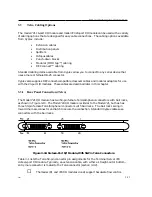
Front Panel Light Activity
Meaning
All lights ON
Testing lights (approximately 1
second).
CARD, RUN, CON, A, B, and C
(Ethernet) lights OFF
Self Test begins.
Lights ON, from right (8 status light) to
left (1 status light)
Self Test is running.
RUN flashes rapidly
Successful completion of Self Test.
If the lights do not behave as indicated, refer to the Appendix D. When the Self Test completes,
the terminal server requests load service or begins loading software.
An Ethernet (A, B, or C) LED on the front panel (see Figure 2-2) illuminates as soon as the
terminal server detects network activity (normally about 2 seconds). Within 15 seconds the
unit transmits software load requests on the network or begins to load from the memory card.
The RUN and Ethernet (A, B, or C) LEDs blink during loading. Loading takes from 10 to 60
seconds, depending on whether you are loading from a local memory card, or if from a network
load server, on the amount of network activity and the speed of the load server. The light pattern
should appear as follows:
2-18
0021


