background image

58

For specific steps, please contact:

[email protected]

Q5: HOW TO MAKE AN APPOINTMENT FOR REMOTE SUPPORT

Please contact your dealer, or send an email to our technical support centre. (Email address:

[email protected]

).

Our technical support team will confirm the time of remote support with you.

Q6: HOW TO GENERATE AND UPLOAD DIAGNOSTIC LOG FILES

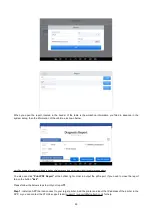
The tablet will automatically generate and store diagnostic logs. When the device is connected to the Internet, it will

automatically upload all the stored diagnostic logs to the backend system.

Q7: HOW TO SWITCH LANGUAGE

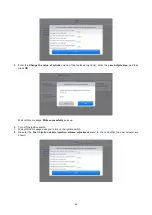
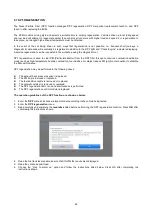
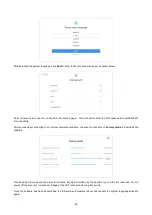
1. Contact your dealer and leave a message about the language you need and the S/N of your device. The technician will

modify the language configuration for you in the backend system.

2.

Settings

->

Language

->Choose language

3. Back to

Updates

to update all the software again

Q8: FAILED TO DIAGNOSE VEHICLE

1. Contact your dealer to confirm whether the vehicle model is supported by the scan tool.

2. Check whether the vehicle is properly connected (e.g. whether the ignition is ON, and the Diagnostic of some vehicles

need to turn on the engine), If your tablet is equipped with a VCI (Vehicle Communication Interface) box, please

check the status of the VCI box indicator.

3. Confirm whether you have entered the correct Diagnostic menu.

4. Confirm whether the

AUTO-SCAN

function can assist you to enter the correct Diagnostic menu.

5. Check whether the software is the latest version. If not, please update to the latest version and retest.

Q9: FAILED TO ACTIVATE OR REGISTER

For ‘Activation Failed’

This error is generally caused by network instability. Please switch to a more stable network and try to activate it again.

For ‘Registration Failed’

Generally, this error is caused by a connection timeout. Please check whether you have blocked the outgoing network

traffic to non-US regions like China. We recommend that you unblock and try to register again.

Q10: FAILED TO TURN ON WHEN CHARGING

In the charging state, you need to first press the power button to light up the screen (showing the charging status). Then

press and hold the power button for 4-5 seconds until the boot animation is shown on the screen.

Q11: FAILED TO OPEN THE DIAGNOSTIC APP

The tablet has to connect to the network every 30 days, otherwise, the Diagnostic app will be locked and disabled until the

device is connected to the network. After connecting to the network, the APP will be available again. If the device is still

unavailable, please contact XTOOL technical support team for help.

Summary of Contents for IP819TP

Page 1: ...Shenzhen Xtooltech Intelligent Co LTD User Manual IP819TP TPMS Diagnosis System Version 1 0 Revise date 2022 11...

Page 2: ...the engine starts Make sure the DLC Diagnostic Link Connector is functioning properly before starting the test to avoid damage to the Diagnostic Computer Do not switch off the power or unplug the con...

Page 3: ...Activation 5 2 DIAGNOSTIC 26 Vehicle Connection Beginning Diagnostic Testing 26 Vehicle Selection 26 Diagnosis functions 28 3 SPECIAL FUNCTIONS 34 5 1 ABS BLEEDING 34 5 2 OIL RESET 37 5 3 EPB 39 5 3...

Page 4: ...orted 57 Q5 How to make an appointment for remote support 58 Q6 How to generate and upload diagnostic log files 58 Q7 How to switch language 58 Q8 Failed to diagnose vehicle 58 Q9 Failed to activate o...

Page 5: ...iii Function Buttons 61 Navigation Buttons 62 Notification Bar 62 Compliance Information 64 FCC Compliance 64 CE 64 UKCA 64...

Page 6: ...tem diagnosis allows you to get sensor data quick and easy Some of the diagnostic functions include Full system Diagnostics function Full OBD II functions TPMS system diagnosis sensor activation XTool...

Page 7: ...DC charger and also into the scan tool s USB charging port Note a fully discharged battery will take approximately 6 hours to fully charge The scan tool can be used while charging ACTIVATION After fi...

Page 8: ...the figure below You can also click the Trial button in the upper right corner to try it out before activation However activation is highly recommended to take advance of any new online software updat...

Page 9: ...ing via Bluetooth 1 Turn on the tablet and make sure the Bluetooth is on 2 Take the VCI box and plug it in the OBD2 port of the vehicle 3 Switch on the ignition and tap on the Diagnostic application t...

Page 10: ...ere it is impossible to test or a large amount of test data is abnormal you can search for the ECU of the vehicle and select the menu for the model on the ECU nameplate 4 If the vehicle type or electr...

Page 11: ...lowing menu allows you to select the system via those methods Vehicle Select the manufacturer and the model of the car and get into the menu for that specific vehicle OEM Choose the manufacturer and t...

Page 12: ...Please select by vehicle if necessary Auto detect VIN Automatically choose the manufacturer by scanning the VIN code of the vehicle Please connect the VCI box to do so Manually Input VIN Automatically...

Page 13: ...ort here see Report section for details SELECT BY VEHICLE To select the vehicle that you are going to do TPMS diagnosis please select the region first Normally the region should match the area where y...

Page 14: ...ated to find the manufacturer you need Click the brand find the model and select the model year to continue Sometimes there are multiple menus with the same model year The menu will also show the freq...

Page 15: ...continue Find the manufacturer for the sensor first then search the correct part number for that specific sensor The part number of the OEM sensor will be printed on the shell of the sensor TPMS CHECK...

Page 16: ...Here is the screen when you select the menu by sensor P N Here are all the functions available on the TPMS diagnosis system SENSOR ACTIVATION TPMS SYSTEM DIAGNOSIS XTOOL SENSOR PROGRAMMING SENSOR RELE...

Page 17: ...For indirect TPMS systems without sensors activation program and relearn will be inaccessible as there are no sensors equipped on the car when it is out from factory SENSOR ACTIVATION When activating...

Page 18: ...ensor is successfully triggered If not a failed sign will show up like the picture below 4 After activated one of the sensors go clockwise and check other tires and go through the entire vehicle Somet...

Page 19: ...ecorded in the system and so on Before doing this make sure that you have the VCI box connected to the OBD port of the vehicle XTOOL SENSOR PROGRAMMING IP819 TP can write specific IDs into XTOOL Tire...

Page 20: ...ant to program Put the sensor close to the top right corner of the device Click Copy by Activation and the device will automatically scan the sensor close to the device When programming please put all...

Page 21: ...or will show up When the process is done the new ID will show up at the form on the right Make sure it is the same as the original ID and you are free to install it on your new tires COPY ID BY OBD Be...

Page 22: ...r of the device and click Copy by OBD After finding the sensor the device will write the original ID into the sensor and the S N of the sensor will show up When the process is done the new ID will sho...

Page 23: ...sensor ID could be decimal or hexadecimal Make sure the number system is right before you write the data into it or the ID that written inside will be incorrect Click OK and the device will find the...

Page 24: ...and write to the sensors To do that put the sensor s close to the right top corner of the device and click Auto Create button The device will find the sensor s and write random IDs into them After the...

Page 25: ...ut we suggest you program the sensors one by one to maximize the success rate TPMS RELEARN Sometimes when new sensors are installed into the vehicle the TPMS light will light up as the vehicle won t r...

Page 26: ...n doing that plug the VCI box into the OBD port of the vehicle and click OBD relearn on the screen The device will write the ID into the system STATIONARY RELEARN Some vehicles can get into sensor rel...

Page 27: ...eave other sensors away The device will show the info for that sensor When finished TPMS diagnosis procedure please exit the menu We don t suggest to turn off the screen when you are still inside the...

Page 28: ...n choose to enter the vehicle diagnosis through either AUTO SCAN or MANUAL INPUT AUTO SCAN It supports the automatic reading of vehicle VIN code You also can tap on the button AUTO SCAN on the diagnos...

Page 29: ...owertrain Control Module PCM DEMO a demonstration program Click this button to experience and learn the operation processes of the diagnostic function Some models provide multiple entry methods in the...

Page 30: ...de Read Live Data Freeze Frame Actuation Test Bi Directional Control Special functions READ ECU INFORMATION This function is to read ECU version information and is the equivalent of System Identificat...

Page 31: ...ry specific test conditions are met such as engine coolant temperature within a range speed within a range for a duration of time throttle percentage within a range etc If the trouble codes are erased...

Page 32: ...ng the Clear DTC s function of the Scantool Permanent Permanent DTC s are trouble codes that are stored in the ECU when continuous and non continuous monitors fail Permanent DTC s are set in conjuncti...

Page 33: ...to display all PIDs Combine The scan tool includes support to select multiple PIDs and click Combine to combine different graphs into one chart Data recording The scan tool supports recording the cur...

Page 34: ...frames displayed when diagnosing vehicles of different brands may also be different Some vehicles may not have the option of a freeze frame which means that the model does not support this function Ta...

Page 35: ...fault ACTUATION TEST BI DIRECTIONAL CONTROL Actuation test also known as bidirectional control is a generic term used to describe sending and receiving information between one device and another This...

Page 36: ...ons supported 5 SPECIAL FUNCTIONS The Scan Tool supports a lot of commonly used special reset functions allowing you to quickly access your vehicle system for various scheduled services maintenance an...

Page 37: ...35 4 When ready click OK to enter the bleed procedure and pumping the brake pedal continuously with steady applies every 2 seconds during the entire procedure...

Page 38: ...next bleed procedure for left front wheel 6 Repeat the operation 3 times to complete the bleed procedure for the left front wheel right front wheel and right rear wheel in turn 7 Stop pumping the brak...

Page 39: ...calculate when the next oil change is required This function can be performed in the following cases If the service lamp is on you must provide service for the car After service you need to reset the...

Page 40: ...d enter a reasonable value of remaining oil life and press OK 5 Confirm the New Value you just entered and then click OK at the bottom right to complete the procedure 6 Message of Write successfully d...

Page 41: ...send a signal to the onboard tablet asking for replacing the brake pad After replacing the brake pad you must reset the brake pad to clear the trouble code Otherwise the car continues to falsely noti...

Page 42: ...automatically cleared To reset the steering angle you need to first find the relative zero point position for the car to drive in a straight line Taking this position as a reference the ECU can calcu...

Page 43: ...ompleted 5 5 BMS RESET The Battery Management System BMS allows the scan tool to evaluate the battery charge state monitor the close circuit current register the battery replacement and activate the r...

Page 44: ...ing is performed to re match the control module and motoring sensor to detect battery power usage more accurately which can avoid an error message displayed on the instrument cluster The operation gui...

Page 45: ...fter cleaning The identification of the fuel injector includes its working accuracy value and type value When replacing an injector you need to find the corresponding model for replacement At present...

Page 46: ...5 digit value and then press OK Wait until the message Write successfully pops up 6 Turn off the ignition switch 7 Wait until the message asks you to turn on the ignition switch 8 Re enter the Fuel in...

Page 47: ...ous combustion oxidation mode such as high temperature heating combustion fuel additive or catalyst reduce PM ignition combustion to stabilize the filter performance DPF regeneration may be performed...

Page 48: ...uctions shown on the screen Press OK after completing the instructions shown 8 Follow the instructions displayed and press OK after completing the instructions shown IMPORTANT Please pay attention to...

Page 49: ...pops up this process may take up to 40 minutes 11 Wait for 2 minutes to let the particulate filter cool down 12 Press drop out to exit the DPF function 6 SETTINGS Click the Settings button to adjust t...

Page 50: ...This will only change the language of the APP If you want to change the system language please go to Android Settings How to change the language of your software Step1 Contact your dealer or XTOOL Su...

Page 51: ...As shown in the figure below you need to fill in the valid information in the corresponding column and click SUBMIT Then it will show your workshop information in the report when you generate a diagno...

Page 52: ...er the diagnostic software and the firmware will be automatically updated to the latest version ABOUT Tap on ABOUT you can check the serial number and APP version on here 7 REPORT HISTORY TPMS REPORTS...

Page 53: ...nd hold each item to delete the selected reports If you want to resume the diagnostic progress click the button on the right to go back to diagnostic menu with all recorded data saved inside activated...

Page 54: ...ecord of which cars have been previously tested It includes 3 parts Diagnosis Report Data Playback File Manager REPORT This feature provides a history of diagnostic reports where you can view and dele...

Page 55: ...on on the right side of the picture shown above You also can click Print PDF Report at the bottom right corner to output the pdf report If you need to close the report tap on the button Exit Please fo...

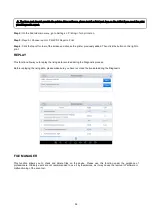
Page 56: ...nter previously added Then click the button on the right to print REPLAY This function allows you to replay the living data recorded during the Diagnostic process Before replaying the living data plea...

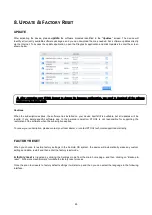
Page 57: ...is available but all updates will be invalid If you delete specific software due to the personal operation XTOOL is not responsible for supporting the restoration of the software when the subscriptio...

Page 58: ...essfully connecting to an Internet network connection the scan tool will jump to Factory mode to download the software This download process can take several minutes largely determined by the speed of...

Page 59: ...Diagnosis Clear Cache Q2 HOW TO PRINT A DIAGNOSTIC REPORT The XTOOL device is compatible with third party print drivers You can download the printer driver you need in the browser that comes with the...

Page 60: ...Communication Interface box please check the status of the VCI box indicator 3 Confirm whether you have entered the correct Diagnostic menu 4 Confirm whether the AUTO SCAN function can assist you to e...

Page 61: ...aged from external causes such as fire dirt sand battery leakage blown fuse theft or improper usage of any electrical source 11 REMOTE ASSISTANCE Tap on Remote to start the TeamViewer quick support pr...

Page 62: ...60 5 A pop up window will be displayed asking you to permit the remote control program to control your device 6 Click Allow to accept or click Reject to reject...

Page 63: ...ic mechanical photocopying recording or otherwise without the prior written permission of XTOOL This manual is designed for the usage of the IP819 Smart Diagnostic System and provides operating instru...

Page 64: ...s Users can view more extended functions and can use this function to bring up a web browser to aid the user when researching various trouble codes NAVIGATION BUTTONS The navigation bar buttons are lo...

Page 65: ...63...

Page 66: ...ent s requirements for exposure to radio waves The guidelines are based on standards that were developed by independent scientific organizations through periodic and thorough evaluations of scientific...

Page 67: ...TIVITY CITY LIUXIAN AVENUE NANSHAN DISTRICT SHENZHEN CHINA FACTORY ADDRESS 2 F BUILDING 12 TANGTOU THIRD INDUSTRIAL ZONE SHIYAN STREET BAOAN DISTRICT SHENZHEN CHINA SERVICE HOTLINE 0086 755 21670995 8...

Reviews: