
D
e
u
ts
c
h
Xoro PAD 9W4 Quick Start Guide
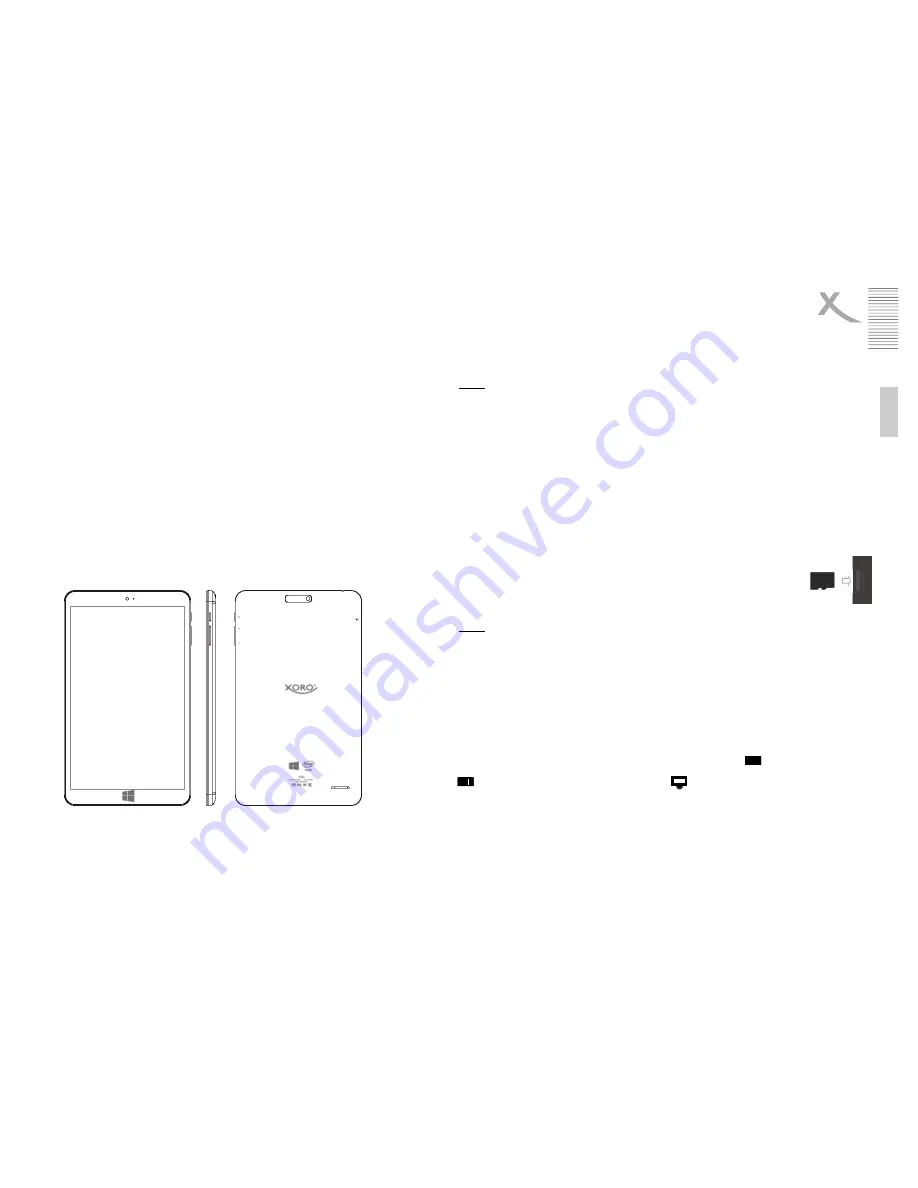
1.
Volume -
2.
3.
Power Button
4.
Headphone jack
5.
Micro USB 2.0 port
6. LED
7. MicroSD memory card slot
8. front camera
9. back camera
10. speaker
Battery & Charging
The device can also get the required current for charging the battery from a USB 2.0 port of a connected
computer. Alternatively use the supplied power adapter to charge your Xoro Tablets. The unit is ready to
operate even during charging. For a long battery life however we recommend not to use the device while
charging.
Notes:
•
We
recommend
to
charge
your
tablet
to
use
only
the
supplied
charger.
Charge the battery fully before initial use.
•
For best performance lithium-ion batteries need to be used frequently. For low usage charge the
battery at least once after a month.
•
If the device's battery is completely drained, turn the unit 5-10 minutes to connect to a power
source. It can then be immediately put back into operation. In individual cases, the device can not
be switched on even after prolonged charging. Please list, in this case by a reset.
•
Close unneeded apps to extend the battery life of the device.
USB ports & memory cards
The device has a microUSB 2.0 port (5). This connector USB devices such as mass storage devices
(USB sticks, hard drives) or USB input devices (mouse, keyboard etc.) to be connected. Also, the device
has a MicroSD memory card slot (7). The device supports memory cards with capacity of up to 32GB
FAT & NTFS.
To insert the microSD card, make sure that the memory card is properly around, as
shown on the device, is introduced.
Press the Micro SD card into the card reader until it clicks. To remove the Micro SD
card, press it again until something.
Notes:
•
It supports only the file systems FAT / FAT32 / NTFS. If a medium is formatted with a different file
system, then this may not be recognized by the device.
•
The USB ports on this device are not suitable for charging other devices with an integrated
battery (eg mobile phones, tablet computer, MP3 player, etc.). Notice. Regarding the information
on the nameplate. Maximum power output of the USB ports
•
Unfortunately, there are a variety of different SD cards and USB 2.0 storage devices on the
market, so a basic compatibility of all storage media can not be guaranteed.
•
A direct USB connection to another PC is not possible.
Virtual keyboard
Tap to use the onscreen keyboard on a screen area, you can enter in the text. The on-screen keyboard
appears. If you are on the desktop, tap the desktop taskbar, click the icon for the screen keyboard to
open the onscreen keyboard. Tap to close the onscreen keyboard outside the text box, or tap the icon
for the on-screen keyboard and then click the icon to close the keyboard.
Headphone
The device is equipped on the top of a headphone connector (4). For the use of a commercially available
headphones with 3.5 mm jack plug is required. The built-in speaker on the back is automatically turned off
when using headphones.
Introduction
This is a quick guide for your new Xoro PAD 9W4. Please also see the notes and warnings in the manual.
In the manual, detailed instructions, support and compliance information.
To use, you must create a user account with Microsoft to use the device without restrictions. If you have
forgotten your password, you can reset it by www.live.com.
Switching on and off
To turn on the device, you hold the power button until the Home screen appears. The system startup may
take several minutes, please wait the end of the operation from. If necessary, follow the installation wizard
for easy setup of the device.
To turn off, press and hold the power button until the Abschaltbild is displayed. Drag the image then
appears as down to shut down the tablet.
Standby and Hibernate
The device goes depending on the configuration in the idle state when it is not used for some time in
order to save battery power. With the power button to turn it on again. Slide the lock screen to unlock to
top.
Press shortly to switch to standby mode, the power button to turn the unit. Briefly press the power button
to turn the power on again.
Product Overview
8
9
6
3
3
1
2
1
2
10
5
5
4
4
7
7


