

1
2
4
5
3
6 7
A.
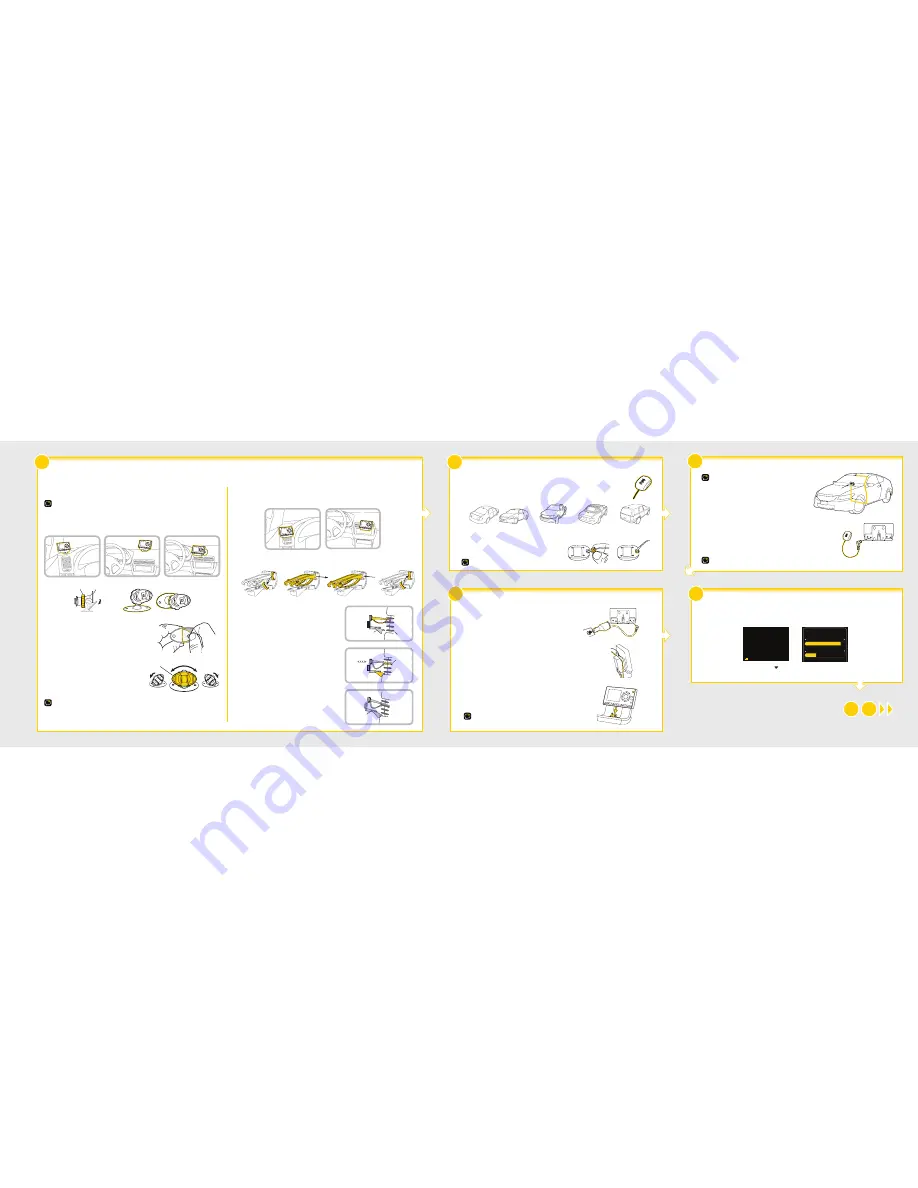
Be sure the vehicle is outside and the antenna has a clear view of the sky.
B.
Verify that you are receiving the XM signal. The radio should be tuned to channel 1, the XM Preview channel. There
should at least be one bar on the lower left corner of the screen that denotes antenna signal strength.
C.
You can also press menu and then press
to scroll to and highlight Signal Indicator. Press the Select button. The
Satellite and Terrestrial bars show the strength of the signal being received. If the signal reception is good, press
and hold menu to return to channel 1, the XM Preview channel.
Verify Signal Reception
Signal Indicator
SATELLITE
TERRESTRIAL
800-643-2112
siriusxm.com
1
XM Preview
Find a Location for OnyX and Mount it
Dash Mount Method:
IMPORTANT:
The air temperature needs to be at least 60û F to install the Dash Mount. If needed, turn on the heater
in your vehicle.
A.
Select a flat surface for the Dash Mount with ample room for OnyX. Avoid mounting on leather
surfaces.
B.
Orient the adhesive foot so that OnyX is easily accessible. Loosen the knob and adjust the adhesive
foot to position
1
or
2
, and then tighten it.
C.
Clean the surface with the alcohol preparation pad.
D.
Once the surface is dry, remove the adhesive liner. Press
and hold the Dash Mount in place for 30 seconds. Allow the
adhesive cure for 2-4 hours.
E.
You can tilt the dock mounting plate in your preferred
direction.
TIP:
Choose a location that doesn’t interfere with the driver’s vision or access to driving controls, won’t interfere with
the deployment of airbags or other safety equipment, and makes OnyX easily accessible for operation.
jump
FM
menu
2
3
4
5
6
7
8
9
0
direct
1
1
2
3
4
5
6
7
8
9
0
direct
jump
FM
menu
1
2
2
3
4
5
6
7
8
9
0
direct
jump
FM
menu
1
1
Dock Mounting Plate
1
2
Knob
Adhesive Foot
Vent Mount Method:
A.
Select a vent with ample room for OnyX.
B.
Some vents have recessed louvers. If yours are recessed, remove the regular vent clamps and install the
extended vent clamps.
C.
Install the Vent Mount onto the vehicle vent:
i.
Insert the vent mount into the vent opening.
ii.
Push until hooked on the rear of the vent louver. Rest
the foot against the bottom of the vent.
iii.
If necessary, adjust the tilt of the Vent Mount by
repositioning the foot to a different tilt adjustment hole.
PUSH
Dash
Vent
Louver
Foot
Vent
Vent
Dash
Dash
HOOKED
TILT
ADJUSTMENT
HOLES
2
3
4
5
6
7
8
9
0
direct
jump
FM
menu
1
jump
FM
menu
2
3
4
5
6
7
8
9
0
direct
1
Select either the Dash Mount method or the Vent Mount method for your OnyX. Do not attach the
Power
Connect Vehicle Dock to the mount. Wait until after you have connected all the cables to the dock.
A.
Mount the Magnetic Mount Antenna outside your vehicle, on a clean and dry horizontal surface that
will always face the sky.
B.
Choose the location for the antenna according to your type of vehicle. Center it between the left and
right sides, and away from other antennas.
C.
Install the Cable Routing Adapter to direct the antenna
cable downward, if mounting on an edge.
TIP:
Use the Alcohol Prep Pad to clean the surface.
Sedans and Coupes
(above front windshield or rear window)
Pickups
(above front windshield)
SUVs
(rear of roof)
Convertibles
(leading edge of trunk)
Route the Antenna Cable
NOTE:
These instructions are for a sedan or coupe where the antenna
is mounted above the front windshield. The User Guide has detailed
antenna cable routing instructions for all types of vehicles, beginning
on page 26.
A.
Tuck the antenna cable under the windshield rubber molding
and run it to the nearest corner.
B.
Route the cable out of the molding and into the rubber weather
stripping around the door opening.
C.
Lift the weather stripping. Tuck and run the cable inside it to
the bottom of the door opening. Replace the weather stripping.
D.
Pull the cable out and route it to OnyX .
E.
Plug the Magnetic Mount Antenna connector into the silver ANT connector at the
rear the
Power
Connect Vehicle Dock.
TIP:
Include enough slack in your routing to accommodate open doors or the hood lid. Coil
any excess cable in a hidden location and keep it away from any vehicle pedals or controls.
OnyX
Location
AUDIO
ANT
PWR
FM
A.
Insert the
Power
Connect Power Adapter into your vehicle’s
cigarette lighter or power adapter socket. Plug the other end into
the red PWR connector on the rear of the
Power
Connect Vehicle
Dock.
B.
Use the wire guide on the top of the dock to organize the wires
connected to the dock.
C.
Place OnyX into the dock and press the Power button.
IMPORTANT!
Don’t attach the dock to the mount just yet.
Wire Guide
2
3
4
5
6
7
8
9
0
direct
jump
FM
menu
1
AUDIO
ANT
PWR
FM
Mount the Magnetic Mount Antenna
Connect the
Power
Connect Power Adapter
Star
t Her
e