background image

16

Step 6 — Connecting wireless clients

Step 6 — Connecting wireless clients 

1.

Make sure that you have all the desired settings on the Array (

Alternative Settings

). In 

particular, consider the following settings: 

Do you want wireless clients to use the default, secure 

ConnectHereSecure

network, or your own SSID? 

The Array uses the DNS servers at 

opendns.com

 by default (208.67.222.222 and 

208.67.220.220). Do you want clients to use different DNS servers? 

To use the Public Safety Channels, you must enable them. A license is required to 
use these channels.

2.

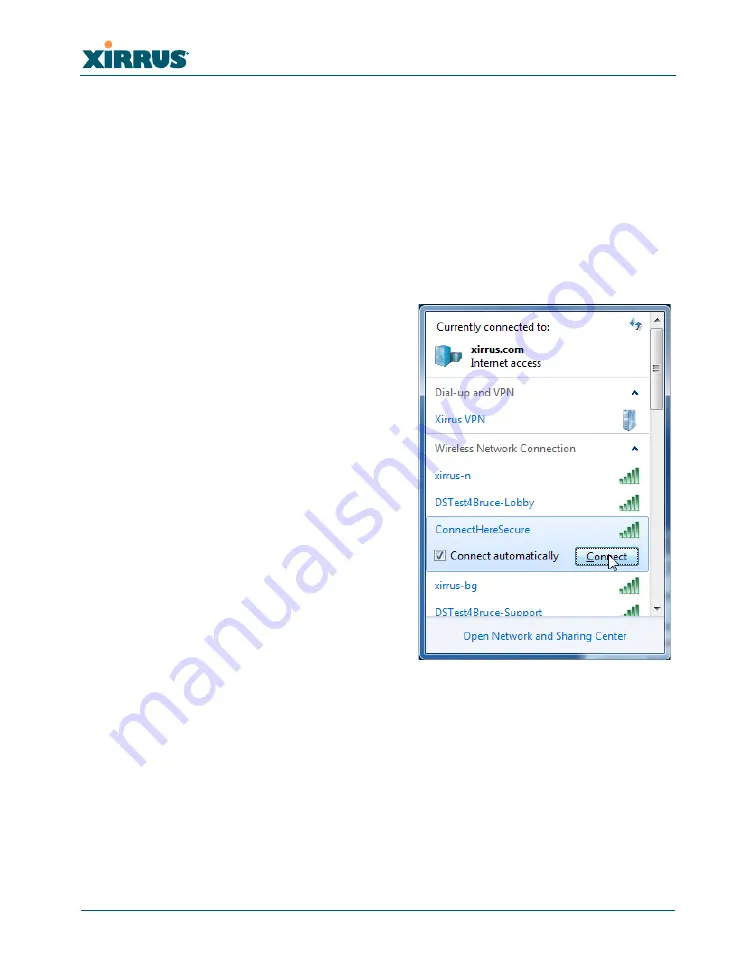
Clients may connect to the Array’s 
Wi-Fi network in the usual way. For 
Windows Vista or XP, a user may click 
the Windows 

Start

 button and then 

select 

Connect to

. This displays a 

network connection window similar to 

Figure 12

 (the Windows Vista dialog 

box is shown). 

3.

By default, the Array provides the 
secure, encrypted 

ConnectHereSecure

network to clients. If one of the Array’s 
predefined secure networks is enabled 
(see 

“Set up an open or secure Wi-Fi 

network, with or without DHCP” on 
page 18

), clients may connect to it by 

entering its passkey, which is set to 

wifi-

now

 by default. 

Figure 12. Connecting a Wi-Fi client to the 

Array Wi-Fi network

4Gon   www.4Gon.co.uk   [email protected]   Tel: +44 (0)1245 808295   Fax: +44 (0)1245 808299

Summary of Contents for XK-RDW-100-N

Page 1: ......

Page 2: ...tements and Warranty and License Agreements in the Wi Fi Array User s Guide Part Number 800 0006 001 All rights reserved This document may not be reproduced or disclosed in whole or in part by any means without the written consent of Xirrus Inc Part Number 812 0072 001 Rev E June 1 2011 4Gon www 4Gon co uk info 4gon co uk Tel 44 0 1245 808295 Fax 44 0 1245 808299 ...

Page 3: ...configuration optional 13 Step 6 Connecting wireless clients 16 Alternative Settings 17 Change the Array IP address if needed 17 Set up an open or secure Wi Fi network with or without DHCP 18 Change DNS servers if needed 20 Change the Array host name 21 Set the Time Zone 22 Use Public Safety Channels 22 Setting Up Your Laptop to Provide an Internet Connection 23 Setting the IP Subnet of Your Lapto...

Page 4: ...2 4Gon www 4Gon co uk info 4gon co uk Tel 44 0 1245 808295 Fax 44 0 1245 808299 ...

Page 5: ...thout the complexity of deploying multiple APs antennas controllers etc Advanced models support 802 11n for ultra high coverage bandwidth and throughput The RDK delivers out of the box capability for deploying a fully functional wireless network Applications Use the RDK in situations that require a powerful wireless connectivity solution to be deployed quickly and easily in a mobile and or tempora...

Page 6: ... description of the Array s features and configuration options see the Wi Fi Array User s Guide Part Number 800 0006 001 Tripod Mounting Stand Supplied in its own rugged case the tripod stand opens easily to securely support the Array on any relatively flat surface with no tools required Kit Array included Arrays supported XK RDW 100 N XN4 Four 802 11abg n radios XN4 XK RDW 200 N XN8 Eight 802 11a...

Page 7: ...n Array A power injector and power cord are not included with the XK RDW CASE S and XK RDW CASE L For more detailed information about the injector including the significance of its LEDs see the Power over Gigabit Ethernet Installation Guide Snap on Array Cover A cover is included to protect the Array Data and Power Cables The RDK supplies all data and power cables that are necessary to get the Arr...

Page 8: ... refrigerators and cordless phones The Array should be sufficiently close to power and network connections To use the supplied cables the Array must be within about 100 feet of the network connection If you supply your own Ethernet cables the total length of cables from the network connection to the PoGE module and then to the Array must not exceed 328 ft 100m Power Use the supplied power injector...

Page 9: ...on Mobile broadband connection In some situations your best source for an Internet connection may be a mobile broadband connection to your laptop For example you may have a 3G wireless broadband card that plugs into your laptop from a provider such as AT T Verizon or Sprint You can then use an Ethernet port on your laptop as your Internet connection Figure 3 Using a mobile broadband connection Sat...

Page 10: ...y on the tripod furnished attached to the Array see Figure 7 1 Snap on cover XE 2500 for XN4 XE 2520 for all others 1 Array traveling case with custom padding 1 Read Me First document 1 Quick Start Guide this document 1 100 Cat 5e orange Ethernet cable with carrier 1 black accessories bag containing these items 1 14 Cat 5e black Ethernet cable 1 short Cat 5e Ethernet cable to connect the Array s D...

Page 11: ...nnection The Array requires a 10 100 or 1000 Mbps Ethernet connection using auto negotiation The use of a DHCP server to assign local IP addresses on the network is optional If the network uses DHCP we strongly recommend that you have the network administrator configure the DHCP server to assign a reserved IP address to the Array You will need the MAC address of the Array s Gigabit1 port This is f...

Page 12: ...ector may be placed closer to the Internet connection within 14 feet or closer to the Array whichever is more convenient 2 Plug the supplied power cord into the back of the injector unit and into a dedicated AC power outlet 100 240 VAC The injector s ON LED should light green 3 Using either the 14 black Cat 5e cable or the long orange cable connect the injector s IN port to the Ethernet port provi...

Page 13: ...he top two knobs and leave the tripod s poles at their lowest levels for now This is a convenient height for working with the Array 4 Secure the Array to the tripod using the black tripod mounting bracket that comes attached to the Array Figure 7 Ignore the small hole drilled into the top pole of the tripod this is not used for the RDK Tighten the knob on the mount to secure the Array to the tripo...

Page 14: ...e 8 XN4 Power Data Connections To connect the XN8 Connect Data OUT to GIGABIT1 port with short cable Connect Cat 5e from PoGE Injector to IN port NOTE Do not connect the data cable from the injector to a Gigabit port on the XN8 Array It must be connected to the IN port on the right in Figure 9 1 Connect the Cat 5e data cable from the injector s OUT port to the Array s Data and Power IN port as sho...

Page 15: ...urnished with the RDK are preconfigured to be immediately useful in many network environments but in some cases you may wish to make changes For example to have your clients connect to a secure SSID network that does not use DHCP use the WMI to edit the example SSID named ExampleSecureNoDHCP See Alternative Settings on page 17 Starting the WMI 1 You will need a computer to access the WMI 2 You mus...

Page 16: ...described below In either of these two cases after you log in to the WMI in Step 4 be sure to change the Gigabit1 port s IP address to one that is part of your network as described in Change the Array IP address if needed on page 17 For an Array with 8 12 or 16 radios connect to the Ethernet0 port following the directions in Step c above using its default IP address of 10 0 1 1 to access the WMI 4...

Page 17: ... Figure 10 Login Prompt You are now logged in to the Wi Fi Array The WMI is displayed in the browser showing the Array Summary page Note that the Array s IP address for the Gigabit ports is displayed Figure 11 WMI Array Summary To go to a different page click its name in the frame on the left In most cases this will display additional choices The Status entries in the left frame display informatio...

Page 18: ...these channels 2 Clients may connect to the Array s Wi Fi network in the usual way For Windows Vista or XP a user may click the Windows Start button and then select Connect to This displays a network connection window similar to Figure 12 the Windows Vista dialog box is shown 3 By default the Array provides the secure encrypted ConnectHereSecure network to clients If one of the Array s predefined ...

Page 19: ... without DHCP on page 18 3 Make any other desired changes after the steps above are complete Change the Array IP address if needed If the IP address of the Array was not set by DHCP then the default address of the Gigabit1 port is 10 0 2 1 Typically you will want to replace this with an address that is part of your subnetwork Note that the assigned address must be unique If you duplicate an IP add...

Page 20: ...eSecure SSID is shipped in the enabled state All the other SSIDs are shipped in the disabled state Thus when the Array is first powered up your clients will only be able to connect to the ConnectHereSecure network ConnectHereSecure provides a secure encrypted wireless connection Wireless users must provide the passkey wifi now to connect to the Array Users are assigned an IP address by DHCP in the...

Page 21: ...of SSIDs as shown in Figure 14 enter a meaningful name for your wireless network Click Create Figure 14 Creating an SSID 3 Your new SSID appears in the list above the Create button The easiest way to configure the new SSID is to mimic the settings from one of the Predefined SSIDs Copy the settings for each field from the desired model SSID 4 For a secure network make sure to set the Encryption fie...

Page 22: ...to use DHCP to assign IP addresses to wireless clients At the same time DHCP will tell clients which DNS servers to use By default servers at OpenDNS com are used To specify your preferred DNS servers instead 1 On the left of the WMI click Services then click DHCP Server Figure 15 2 Select a DHCP entry In the DNS Servers column enter the IP addresses of up to three servers The first server is norm...

Page 23: ...ly they do not affect the operation of the Array 3 Click the Save button Click OK if the following message appears Figure 17 Host Name change message 4 Now you must reboot the Array On the left of the WMI click Tools and then click System Tools In the System section at the top click the Save Reboot button Wait about 2 minutes for the Array to reboot 5 If you wish to continue using the WMI enter th...

Page 24: ...ave button Use Public Safety Channels There are two wireless channels reserved for public safety usage channels 191 and 195 in the 4 9GHz spectrum range Operating these channels requires a license using them without a license violates FCC rules Warning notices are displayed when you select these channels 1 On the left of the WMI click IAPs then click Advanced RF Settings Figure 19 Figure 19 Enabli...

Page 25: ...as Gateway for Array IP 192 168 0 1 DHCP server on laptop assigns address to Array IP 192 168 0 xxx Wireless clients IP address of laptop s mobile broadband port assigned by mobile provider PoGE Injector Client addresses assigned by laptop Internet AT T Sprint Verizon If you are using a mobile broadband connection on your laptop to provide the Internet access for your Array you must change some ne...

Page 26: ...s The Properties window appears Figure 21 Windows XP Properties window for the mobile connection Click the Advanced tab In the Internet Connection Sharing section enable the check box labeled Allow other network users to connect through this computer s Internet connection In the field displaying Select a private network connection select the LAN Ethernet port that you will connect to the Array via...

Page 27: ...at you will connect to the Array via the PoGE injector Leave the checkbox titled Allow other network users to control or disable the shared Internet connection disabled Click OK For a more detailed discussion you may see Internet Connection Sharing on the Microsoft Vista Help and How to web site 3 Your host laptop now serves as a simple router to provide Internet access The selected LAN port on yo...

Page 28: ...ollowing IP address Set the IP address to 10 0 1 2 and set the Subnet mask to 255 255 255 0 Click OK then Close For Windows XP From the Windows Start button open the Control Panel and double click Network Connections In the Network Connections window find your Computer Port Double click it and select Properties Select Internet Protocol TCP IP and click the Properties button In the TCP IP propertie...

Reviews: