background image

OWNER’S/OPERATOR’S


MANUAL


6. V.I.N., ENGINE SERIAL NUMBER AND KEY


6-  1 


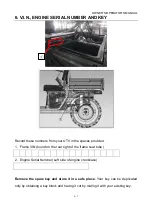
Record these numbers from your UTV in the spaces provided. 
1.  Frame VIN (found on the rear right of the frame seat tube ) 


2.  Engine Serial Number (Left side of engine crankcase) 


Remove the spare key and store it in a safe place.

 Your key can be duplicated 

only by obtaining a key blank and having it cut by mating it with your existing key. 


Summary of Contents for XY200U-B

Page 1: ...G Read this Manual and any Supplements Carefully Before Operating Vehicle Assembly Operation Maintenance THIS VEHICLE IS NOT DESIGNED FOR USE ON RENTAL TRACKS OR RACING BEFORE OPERATING THIS VEHICLE T...

Page 2: ...5 1 6 V I N NUMBER 6 1 7 CONTROL AND FUNCTIONS 7 1 8 STARTING THE ENGINE 8 1 9 BREAK IN 9 1 10 RIDING GEAR 10 1 11 CARRYING LOADS 11 1 12 DRIVING 12 1 13 CVT SYSTEM 13 1 14 BATTERY 14 1 15 EXHAUST SYS...

Page 3: ...iliar with the operating characteristic and the many features offered on the UTV The manual also covers information on the care and maintenance of your UTV Please read this manual carefully The inform...

Page 4: ...intended to increase the speed or power of your UTV Failure to follow these warnings increases the possibility of accidents leading to DEATH or SERIOUS INJURY Additionally failure to follow these req...

Page 5: ...kets and long pants As with any off road capable vehicle there is a risk of tip over or rollover under certain conditions Uneven terrain or slopes which pitch the vehicle sideways turning too fast or...

Page 6: ...ng larger hills Always follow proper procedures for climbing hills as described in this manual Check the terrain carefully before you start up any hill Never climb hills with excessively slippery or l...

Page 7: ...imes to let friction dry out the pads Always be sure there are no obstacles or people behind you when you operate in reverse When it is safe to proceed in reverse go slowly Avoid turning at sharp angl...

Page 8: ...YOUR VEHICLE BEFORE YOU BEGING RIDING Read this manual thoroughly referring to the various areas which are being discussed on your machine Operating this vehicle carries with it responsibilities for y...

Page 9: ...t this manual to convey the following messages This is the safety alert symbol When you see this symbol on your machine or in this manual be alert to the potential for personal injury Your safety is i...

Page 10: ...ARNING 3 1 NOTE Warning decals have been placed on the vehicle for your protection Read and follow the instructions on each decal carefully In the event any decal becomes illegible or comes off contac...

Page 11: ...OWNER S OPERATOR S MANUAL 3 SAFETY WARNING 3 2 1 2 3 4...

Page 12: ...OWNER S OPERATOR S MANUAL 3 SAFETY WARNING 3 3 5 6 7...

Page 13: ...OWNER S OPERATOR S MANUAL 3 SAFETY WARNING 3 4 8 9...

Page 14: ...ld be a firm feeling when the brakes are applied If not have the vehicle inspected by your dealer Brake fluid leakage Check to see if any brake fluid is leaking out of the pipe joints or the brake flu...

Page 15: ...gh feeling Have an authorized dealer repair as necessary for proper operation 9 Loose parts visually inspect vehicle for any damaged components or loose nuts bolts or fasteners Always check the tightn...

Page 16: ...hts of water heaters and clothes dryers WARNING POTENTIAL HAZARD Check the fuel system while smoking or near an open flame WHAT CAN HAPPEN Fuel can ignite or explode causing severe injury or property...

Page 17: ...not work smoothly check for the cause Correct the problem before operating the vehicle Consult an authorized dealer if you can t find or solve the problem yourself WARNING POTENTIAL HAZARD Take a loo...

Page 18: ...tip over If you are in a situation where the vehicle is tipping over do not put your arm or and leg outside the vehicle do not try to stop tipping with your arm or leg You could be severely injured Yo...

Page 19: ...designed to carry cargo only WARNING POTENTIAL HAZARD Improper shock absorber adjustment WHAT CAN HAPPEN Uneven adjustment can cause poor handling and loss of stability which could lead to an accident...

Page 20: ...losed securely WARNING POTENTIAL HAZARD Operate vehicle without being familiar with all controls WHAT CAN HAPPEN Loss of control which could cause an accident or injury HOW TO AVOID THE HAZARD Read th...

Page 21: ...en performing maintenance unless otherwise specified Have an authorized dealer perform service if you are not familiar with vehicle service WARNING POTENTIAL HAZARD Operate this vehicle with improper...

Page 22: ...the spark arrester Always let the exhaust system cool prior to touching exhaust components Do not start the engine when cleaning the exhaust system WARNING POTENTIAL HAZARD Operate with improperly ser...

Page 23: ...uld be poisoned You could be severely burned by the sulfuric acid in battery electrolyte Batteries produce explosive gases HOW TO AVOID THE HAZARD Avoid contact with skin eyes or clothing Always shiel...

Page 24: ...lb to cool before touching or removing it WARNING POTENTIAL HAZARD Operate with wet brakes after washing WHAT CAN HAPPEN Wet brakes may have reduced stopping ability increasing the chance of an accide...

Page 25: ...ould affect your balance and perception Could result in an accident HOW TO AVOID THE HAZARD Never consume alcohol or drugs before or while driving this UTV WARNING POTENTIAL HAZARD Operate this UTV at...

Page 26: ...from footrests during operation WHAT CAN HAPPEN Removing even one hand or foot can reduce your ability to control the UTV or could cause you to lose your balance and fall off the UTV HOW TO AVOID THE...

Page 27: ...arp drop or another vehicle or person could be on the other side of the hill WARNING POTENTIAL HAZARD Turn improperly WHAT CAN HAPPEN UTV could go out of control causing a collision or overturn HOW TO...

Page 28: ...he vehicle to lean sharply to one side Go straight down the hill where possible WARNING POTENTIAL HAZARD Improperly cross hills or turning on hills WHAT CAN HAPPEN Could cause loss of control or cause...

Page 29: ...e or to either side if pointed straight uphill WARNING POTENTIAL HAZARD Improperly operate over obstacles WHAT CAN HAPPEN Could cause loss of control or a collision Could cause the UTV to overturn HOW...

Page 30: ...annot avoid water go slowly balance your weight carefully avoiding sudden movement maintain a slow and steady forward motion do not make sudden turns or stops and do not make sudden throttle changes R...

Page 31: ...flation could cause the tire to burst WARNING POTENTIAL HAZARD Ride on frozen lakes and rivers WHAT CAN HAPPEN Severe injury or death can result if the UTV and or the operator break through the ice HO...

Page 32: ...TV in the spaces provided 1 Frame VIN found on the rear right of the frame seat tube 2 Engine Serial Number Left side of engine crankcase Remove the spare key and store it in a safe place Your key can...

Page 33: ...he vehicle frame and engine serial numbers are important for model identification when registering your vehicle obtaining insurance or whenever replacement parts are required In the event your vehicle...

Page 34: ...ART The electric starter is engaged by turning and holding the key in this position Release the key when the engine starts CAUTION Do not operate the electric starter continuously for more than 5 seco...

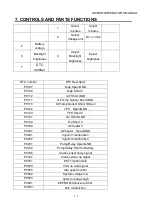
Page 35: ...cator 14 Speed 5 N A 15 Odometer 6 Neutral indicator 16 N A 7 Reverse indicator 17 N A 8 N A 18 N A 9 High beam headlight indicator 19 Transmission position indicator 10 EFI fault indicator 20 Functio...

Page 36: ...p Sensor Short GND P0118 Oil Temp Sensor Short V Open P0122 TPS Open GND P0123 TPS Short V P0131 O2 Short GND P0132 O2 Short V P0038 O2 heater V P0037 O2 heater Open GND P0201 Injector1 malfunction P0...

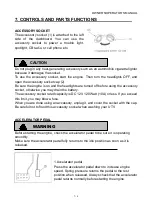
Page 37: ...cessory socket otherwise you may drain the battery The accessory socket rated capacity is DC 12V 120 Watt 10A or less If you exceed this limit you may blow a fuse When you are done using an accessory...

Page 38: ...solve the problem yourself BRAKE PEDAL 1 Brake pedal Press the brake pedal to slow or stop the vehicle WARNING Never operate the UTV with a spongy feeling brake pedal Operating the UTV with a spongy...

Page 39: ...ansmission selector lever has four positions H drive L drive Neutral Reverse CAUTION To change gears stop the vehicle and with the engine idling move the lever to the desired gear Shifting gears with...

Page 40: ...e the fuel tank cap by turning it counterclockwise SEATS Driver seat Passenger seat To remove the seat lift the front of the seat and then slide the seat up and forward To install the seat insert the...

Page 41: ...ng operation HOW TO AVOID THE HAZARD Make sure the seat is securely latched SEAT BELTS This vehicle is equipped with three point seat belts for both the operator and passenger Always wear the seat bel...

Page 42: ...e belt is snug across your hips 4 Position the shoulder belt over your shoulder and across your chest The shoulder belt should fit against your chest If it is loose pull the belt out all the way and t...

Page 43: ...they must be stored wrap them in an appropriate cushioned material CARGO BED Cargo bed Tailgate Lifting And Lowering The Cargo Bed Cargo bed release lever To lift Push down the cargo bed release lever...

Page 44: ...ENTIAL HAZARD Overload the cargo bed WHAT CAN HAPPEN Could cause changes in vehicle handling which could lead to an accident HOW TO AVOID THE HAZARD Never exceed the stated maximum load limit for this...

Page 45: ...the tank Do not fill the tank neck If you get gasoline on your skin or clothing immediately wash it off with soap and water and change clothing Never start the engine or let it run in an enclosed area...

Page 46: ...il 1 Set machine on a level surface 2 Start the engine and let it idle for 20 30 seconds 3 Stop the engine remove the dipstick and wipe it dry with a clean cloth 4 Put the dipstick into the oil filler...

Page 47: ...g CAUTION You must allow your vehicle adequate warm up time before operating or engine damage could result 1 Apply the brake 2 Shift the drive select lever into the neutral position NOTE When the driv...

Page 48: ...2 Open the hood 3 Using a charged 12 V battery connect the positive lead of the jumper cable to the positive terminal of the battery in the vehicle and the other end of the positive lead to the posit...

Page 49: ...ive lead of the jumper cable from the charged battery and the battery in the vehicle 8 Close the hood WARNING If the hood latches are hooked improperly or the latches and their attachments cannot work...

Page 50: ...break in period Excessive heat can build up and cause damage to close fitted engine parts 1 Fill fuel tank 2 Check oil reservoir level indicated on dipstick Add oil if necessary 3 Drive slowly at firs...

Page 51: ...tive gear for safe riding A helmet can prevent a severe head injury Select an approved off road motorcycle type helmets that fit properly 2 Eye Protection A pair of goggles or helmet face should offer...

Page 52: ...rcycle helmet increases your chances of a severe head injury or death in the event of an accident Operating without eye protection can result in an accident and increases your chances of a severe inju...

Page 53: ...bed as close to the center of the vehicle as possible and tie it down using the cargo hooks equipped on the cargo bed Tie down cargo securely in the trailer Make sure cargo in the trailer cannot move...

Page 54: ...er exceed the stated load capacity for this vehicle Cargo should be properly distributed and securely attached Reduce speed when carrying cargo or pulling a trailer Allow greater distance for braking...

Page 55: ...increased risk of being killed or seriously injured in an accident HOW TO AVOID THE HAZARD Always wear your seat belt when riding in the vehicle Be sure the seat belt is close fitting across your hips...

Page 56: ...miliar with the operation of your vehicle 4 When slowing down or stopping take your foot off the accelerator pedal and smoothly press the brake pedal Improper use of the brakes can cause the tires to...

Page 57: ...o climb Choose carefully which hills you attempt to climb Avoid hills with slippery surfaces or ones where you will not be able to see far enough ahead of you WARNING POTENTIAL HAZARD Operate on exces...

Page 58: ...nation of conditions increase the risk of tipping over If you are in a situation where the vehicle is tipping over do not put your arm or and leg outside the vehicle do not try to stop tipping with yo...

Page 59: ...mage to the vehicle could occur WARNING POTENTIAL HAZARD Fail to use extra care when operating this vehicle on unfamiliar terrain WHAT CAN HAPPEN You can come upon hidden rocks bumps or holes without...

Page 60: ...ath WARNING POTENTIAL HAZARD Improperly operating over obstacles WHAT CAN HAPPEN Could cause loss of control or a collision Could cause the vehicle to overturn HOW TO AVOID THE HAZARD Before operating...

Page 61: ...e at a low speed for an extended period of time it is best to use the Low range in the transmission In Low range the vehicle will be limited to 7 10 mph You should not try to exceed this speed in Low...

Page 62: ...be out of balance The CVT housing must be securely in place during operation Failure to comply with this warning can result in severe injury or death CVT SYSTEM On UTV the approximate gear ratio diffe...

Page 63: ...Batteries produce explosive gases Keep sparks flame cigarettes etc away Ventilate when charging or using in an enclosed space Always shield eyes when working near batteries KEEP OUT OF REACH OF CHILD...

Page 64: ...ld down straps 5 Verify that cables are properly routed NOTE When your UTV is placed in storage for one month or more the battery should be removed charged to proper level and stored in a cool dry pla...

Page 65: ...exhaust pipe must be periodically purged of accumulated carbon as follows 1 Remove the arrestor screw located on the bottom of the muffler pull out the arrestor the mesh 2 Clean the arrestor or replac...

Page 66: ...in the exhaust and ignited by the catalyst in the muffler MAY RESULT IN THE MUFFLERS OVERHEATING AND FIRE RISK Always reduce throttle when the engine reach top rpm avoid the engine popping WARNING Th...

Page 67: ...000 6000 9000 12000 15000 Everyday check before riding Re seating Valve I I I I I Spark Plug I R I R I Fuel System I I I I I Engine Oil R R R R R R I Valve Gap A A A A A Idle Speed A A A A A Engine Bo...

Page 68: ...UE SPECIFICATIONS Bolt Size Specification M12X1 25 50Ft Lbs 69N m NOTE All nuts that have a cotter pin installed must be serviced by an authorized Dealer Rear Tapered nuts install with tapered side ag...

Page 69: ...VICE 1 Lift the cargo bed See 7 CONTROL AND PARTS FUNCTIONS in this manual for bed lifting and lowering 2 Remove the screws and remove Cover 3 Loosen clamp and remove Filter 4 Remove fabric type pre f...

Page 70: ...ve your dealer repair them before riding your vehicle The steering assembly should be also checked periodically for free operation steering should move freely through entire range of travel without bi...

Page 71: ...e these adjustment The recommended toe alignment is 1 8 to 1 4 3to6mm toe out 1 Set the steering wheel in a straight ahead position and hold them in this position 2 Measure A and B A minus B should be...

Page 72: ...see 7 Control and part functions Normal functioning of the diaphragm is to extend into the reservoir as fluid lever drops If the fluid lever is low and the diaphragm is not extended a leak is indicat...

Page 73: ...level Use only the recommended quality brake fluid Otherwise the rubber seals may deteriorate causing leakage and poor braking performance Recommended brake fluid DOT 3 Refill with the same type of b...

Page 74: ...c turn the adjuster bolt CCW counterclockwise by 1 4 to one turn for 10 to 20mm free play at the end of the parking lever 4 Tighten the nuts securely against the adjusters 5 Make sure the rear wheels...

Page 75: ...come on properly then lock the lock nut all purpose grease ENGINE IDLE RPM ADJUSTMENT Throttle Free Play Inspection 1 Apply the parking brake 2 Put gear in Neutral position 3 Start the engine and war...

Page 76: ...of specification Adjust gap Spark Plug Removal and Replacement WARNING Never attempt to remove a spark plug while the engine is warm The exhaust system or engine could burn you causing severe injury...

Page 77: ...nuous duty in dusty or wet conditions and cold weather riding NOTE Severe use cold weather riding is all riding below 10 F 12 and riding between 10 F 12 and 30 F 0 when most trips are slow speed and l...

Page 78: ...ase with 1 4L engine oil refer to Recommended Engine Oil 9 Check the oil level refer to Engine Oil Level Inspection 10 Reinstall the Oil filler plug Transmission Lubrication CAUTION Be sure no foreign...

Page 79: ...If wheels are improperly installed it could affect vehicle handling and tire wear Tire Pressure front rear 48kPa 7SI 48kPa 7PSI Wheel Removal Procedure 1 Stop the engine place the transmission in gea...

Page 80: ...s a residue causing a hot spot which will shorten the life of the lamp High Beam Headlight Adjustment The headlight beam can be adjusted up and down 1 Place the vehicle on a level surface with the hea...

Page 81: ...V is with a garden hose and a pail of mild soap water Use a professional type washing mitten cleaning the upper body first and lower parts last Rinse with water frequently and dry with a cloth to prev...

Page 82: ...y Maintenance Remove the battery and add electrolyte as required to the proper level Do not use tap water which may contain minerals that reduce battery life Apply Dielectric Grease to the terminal bo...

Page 83: ...the engine turn off the main switch key off at once WARNING This UTV is equipped with an electric start system If the battery is under charging the UTV will not run NOTE The following troubleshooting...

Page 84: ...ment Nozzle clogging or failure Improper air cleaner setting Throttle position sensor failure EFI relay does not work COMPRESSION SYSTEM Cylinder and cylinder head Valve system Loose spark plug Improp...

Page 85: ...tion coil Loose battery terminal Broken or shorted primary Loose coupler connection secondary coil Improperly grounded Faulty high tension cord Broken wire harness Broken ignition coil body POOR IDLE...

Page 86: ...Ignition system Compression system Dirty spark plug Worn cylinder Improper heat range Worn or seized piston ring Faulty ignition unit Cylinder head gasket broken Faulty pick up coil Cylinder gasket b...

Page 87: ...oling system Improperly spark plug gap Faulty thermostat Improper spark plug heat rang Faulty thermo switch Faulty ignition unit Fuel system Improper EFI setting Improper fuel level adjustment Clogged...

Page 88: ...Incorrect engine mount Clutch shoe see 13 CVT system Worn damaged Primary sliding sheave Seized POOR STARTING FAULTY BRAKE POOR BRAKING PERFORMANCE EFFECT V belt Worn front hub bearing Slipping oily...

Page 89: ...OWNER S OPERATOR S MANUAL 18 TOOL 18 1 Tool Bag Spark Plug Wrench Wrench 8 10mm Wrench 12 14mm Screw Driver Hexagon Bar Wrench...

Page 90: ...11 lbs Cargo Bed Maximum load limit 100 kg 220 lbs Load Capacity Combined Rider Payload 250kg 551 6 lbs Tow Capacity 200 kg 450 lbs Drive System Drive System CVT Front Tire 24X8 12 Rear Tire 24X8 12 T...

Page 91: ...ctrical Equipment Battery 12V 9AH Head light LED Brake Taillight LED High Beam Indicator Light LED Reverse Indicator Light LED Turn Light Europe Only LED Turn Indicator Light Europe Only LED Front Pos...

Page 92: ...ter temperature sensor G Accessory Accessory Sock Sock parking parking switch switch Bl R Bl OFF OFF LEFT RIGHT Front Front turn turn left left light light Rear Rear turn turn left left light light Re...

Reviews: