background image

X5105 Firmware Update 

Instruction 

Things to prepare for updating the firmware: 

1.

USB-to-Serial cable

2.

X5105

3.

A computer running windows(XP/Vista/7/8/10) operating system

4.

A 12~15VDC(current ability not less than 1A) power supply

1. Install USB-to-Serial cable:

Firmware  update  is  done  through  the  serial  port  (which  can  be  located  at  the  right  side

panel named COM) of X5105. As modern computers generally no longer provide a serial port, so 

we need to use the USB-to-Serial cable to create a virtual serial port on the computer. 

The very first thing is to make sure that the USB-to-Serial cable is working properly on the 

computer. After the cable is plugged into the USB port of the computer, the operating system will 

prompt  to  find  the  new  hardware,  and  then  the  operating  system  will  automatically  install  the 

driver  of  the  new  hardware.  If  all  goes  well,  we  can  see  the  virtual  serial  port  in  the  device 

manager of the computer. If the driver can’t be automatically installed by the operation system 

then we need to install it manually (driver files can be found in the update pack). 

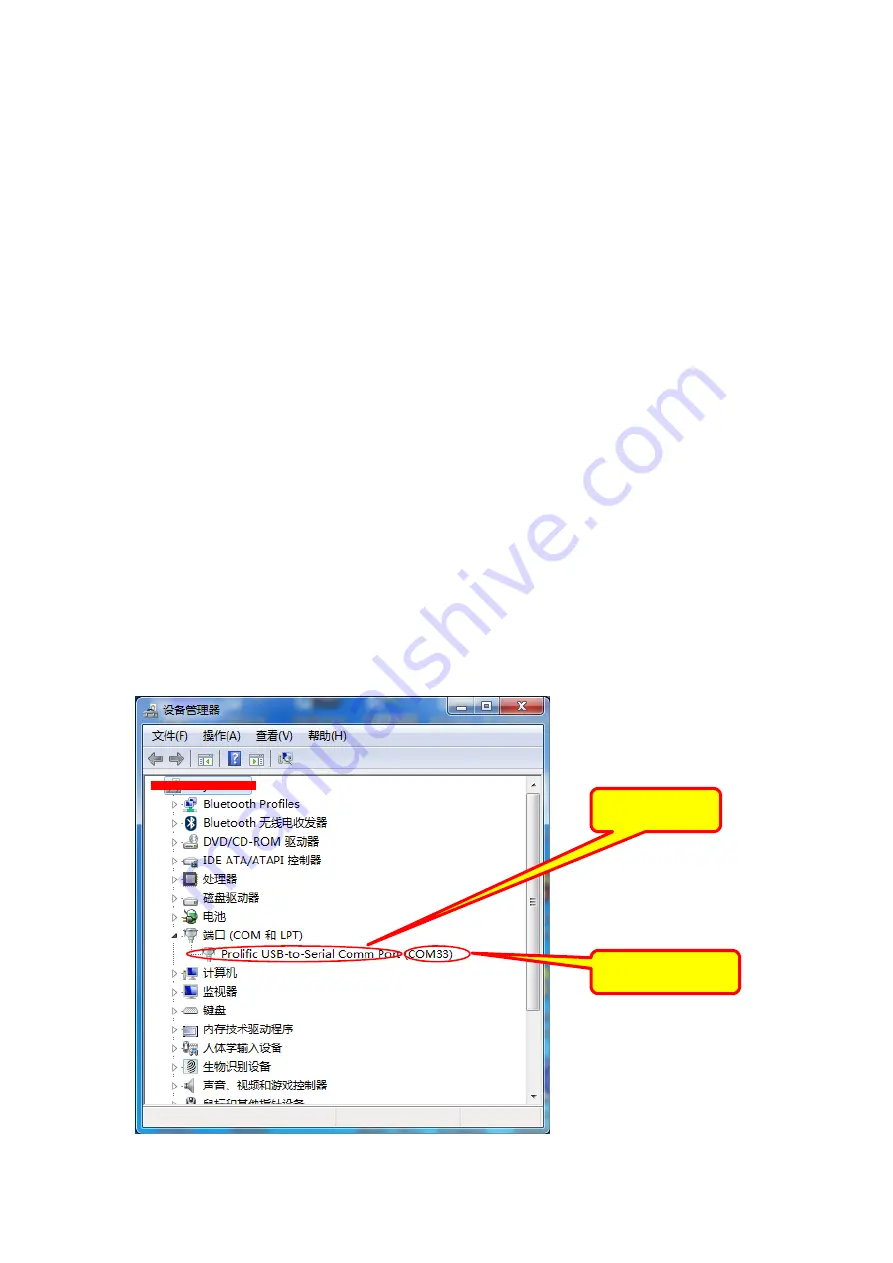
After that, we can see the virtual serial port and its port number (which in my computer is 

COM33) in the device manager. 

Port name 

Port number 

Summary of Contents for X5105

Page 1: ...on the computer The very first thing is to make sure that the USB to Serial cable is working properly on the computer After the cable is plugged into the USB port of the computer the operating system...

Page 2: ...of X5105 a Keep X5105 power OFF and disconnect the power cable b Disconnect the 3 5mm stereo plug c Press and hold both of the VOLUM button d Plug the power cable into the power jack e The LCD will s...

Page 3: ...shed Note Don t unplug the power cable during the erasing process i If such a screen does not appear try again from Section 2 step a 3 Use the Hyper terminal software In order to transfer the firmware...

Page 4: ...b Select the baud rate Click Setup Click Serial port Click the drop list to select the right serial port Select this first...

Page 5: ...Click Baud rate droplist and select 115200 Click OK c The main workspace...

Page 6: ...d Insert the 3 5mm stereo plug into the COM jack After doing so the firmware file transfer is ready to go 4 Wiring diagram...

Page 7: ...meaningless character s appears in the main workspace area due to the interference of stereo plug inserting but it s OK just ignore them If the C does not show up do as following Unplug the 3 5mm ste...

Page 8: ...the firmware file Click File Transfer XMODEM Send Check 1K checkbox Browse and select the firmware file and click the Open button Select the firmware file This button should be an Open Make sure to ch...

Page 9: ...internal EEPROM of X5105 so after the updating configurations need to be done a Power ON the X5105 b If the keypad of X5105 is not respond Press the LOCK KEY for several times and make sure the LOCK I...

Page 10: ...d Check other configurations Select 0x59A03360 Select Enable End of instruction...

Reviews: